Part 3: Integrating Native Mobile Apps with ForgeRock Identity Cloud
Author: |
George Bafaloukas |
Created at: |
Aug 2021 |
Updated at: |
Jul 2022 |
This article was written by George Bafaloukas and Adam Crockett.
Overview
Who is this article for?
Step-by-step instructions follow for anyone who wishes to use hosted pages in their mobile or web app, with the help of the ForgeRock SDKs. The goal is to give you practical advice about themes and provide some best practices along the way.
Prior knowledge configuring ForgeRock Identity Cloud is helpful but not assumed.
This article is the third of four in a series:
-
Integrating a Single-Page App (SPA) with ForgeRock Identity Cloud (Part 2)
-
Integrating Native Mobile Apps with ForgeRock Identity Cloud (Part 3)
-
Navigating to a Specific Journey Using Centralized Login (Part 4)
What is a native mobile application?
Native apps install and run on a specific mobile device operating system (OS), such as Apple iOS or Android OS.
Users download the app via app stores such as the Apple App Store, the Google Play store, etc.
Users use the version of an app that is specific to Apple iOS or Android OS. For an app to be available for multiple mobile OSs, you must create a version of that app for each OS.
Forgerock native SDKs for iOS and Android
The ForgeRock SDKs let you quickly integrate ForgeRock Identity Platform authentication into your mobile apps. ForgeRock currently offers native SDKs for iOS and Android, written in Swift and Java respectively.
To learn more about the Forgerock SDKs, visit the SDK documentation pages.
Integration with XCode
Use the following methods to integrate the Forgerock SDK for iOS with your XCode projects:
-
Cocoapods (Recommended)
-
Embed source code
-
Swift Package manager
To learn more about how to use the iOS SDK in your app, visit
https://sdks.forgerock.com/getting-started/using-sdks
Integration with Android Studio
The ForgeRock SDK for Android requires Java 8 (v1.8). You must configure the compiler options in your project to use this version of Java.
You use Gradle to integrate the Android SDK in your project.
To learn more about how to use the Android SDK in your app, visit https://sdks.forgerock.com/ios/index
A custom UI vs a centralized UI
As discussed in previous articles in this series, the use of a custom UI or a centralized UI mostly depends on your project requirements. The ForgeRock SDKs for iOS and Android support both options for integrating apps with ForgeRock Identity Cloud.
When building a custom UI for authentication, you need to build the login and register pages for each platform separately. This guarantees the best user experience for each platform and adheres to platform-specific UI/UX patterns. However, this means the development team must duplicate efforts to authenticate app users.
The example in this part of the series uses a centralized UI for both iOS and Android to leverage ForgeRock Identity Cloud hosted login pages. You created the pages in an earlier article in the series.
To learn more about centralized UIs, visit How to Enable Centralized UI.
Configuring Access Management
Configuring the OAuth 2.0 Provider
In Part 2 of this series, you set the OAuth 2.0 provider in Access Management (AM) to support authentication with the Javascript SDK. The OAuth2 provider does not require any additional configuration to support the iOS and Android SDKs.
Configuring OAuth 2.0 Clients
In this example, we will create an iOS client and an Android client.
Create the iOS client:
-
In the AM Native console, navigate to Applications > OAuth 2.0 > Clients.
-
Create a new OAuth 2.0 client called “iOSClient”.
-
Enter the following details:
-
Client ID = iOSClient
-
Client secret = (leave blank)
-
Redirection URIs = frauth://com.forgerock.ios.frexample
-
Scope(s) = openid, profile, email, address_
_
-
-
Click Create.
-
On the Core tab:
-
Set the Client type property to Public.
-
Disable the Allow wildcard ports in redirect URIs property.
-
-
Click Save.
-
On the Advanced tab:
-
Ensure the Grant Types field contains the Authorization Code value.
-
Set the Token Endpoint Authentication Method field to None.
-
Enable the Implied consent property.
-
-
Click Save.
Create the Android OAuth2 client:
-
In the AM Native console, navigate to Applications > OAuth 2.0 > Clients.
-
Create a new OAuth 2.0 client called “AndroidClient”.
-
Enter the following details:
-
Client ID = AndroidClient
-
Client secret = (leave blank)
-
Redirection URIs = org.forgerock.demo:/oauth2redirect
-
Scope(s) = openid, profile, email, address
-
-
Click Create.
-
On the Core tab:
-
Set the Client type property to Public.
-
Disable the Allow wildcard ports in redirect URIs property.
-
-
Click Save.
-
On the Advanced tab:
-
Ensure the Grant Types field contains the Authorization Code value.
-
Set the Token Endpoint Authentication Method field to None.
-
Enable the Implied consent property.
-
-
Click Save.
Configure your app to use a centralized UI
In this example, we use a centralized UI to authenticate our app. We
point the app to use the ForgeRock Identity Cloud authentication hosted
page from
Part 1 in
this series.
Configure the Xcode project:
-
Create a new Xcode project and add the Forgerock iOS SDK using Cocoapods.
In the Podfile, add the following:
pod 'FRAuth' pod 'FRUI' pod 'FRProximity' -
In a terminal window, navigate to the root of your XCode project and run the following command:
pod install -
When the Pod installation is complete, open the project’s xcworkspace file.
-
In the Main.storyboard file:
-
Add a Login button in the ViewController view.
-
Connect the Login button with the ViewController class creating an IBAction.
-
In Viewcontroller.swift, add the following code:
+func performCentralizedLogin() { FRUser.browser()? .set(presentingViewController: self) .set(browserType: .authSession) .build().login { (user, error) in self.displayLog("User: \(String(describing: user)) || Error: \(String(describing: error))") } return } -
Call the ‘performCentralizedLogin’ function from the Login button IBAction.
-
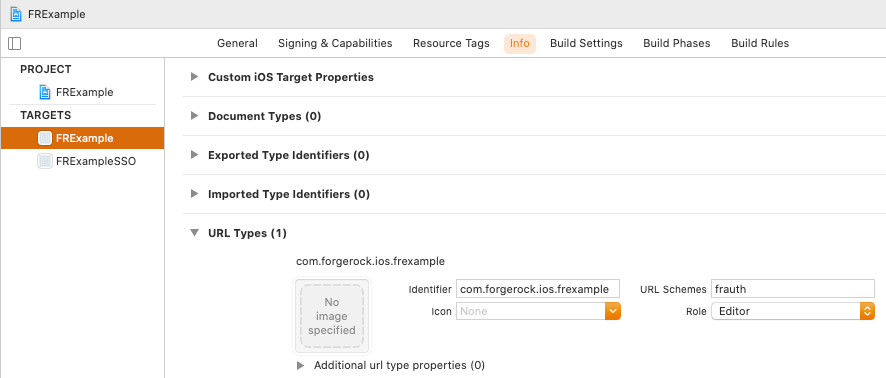
Configure the Custom URL scheme in XCode
We will now configure the custom URL Scheme of your ForgeRock SDK for iOS app to use centralized UI.
If your app targets iOS 10 or earlier, configure a custom URL scheme as follows:
-
In Xcode, in the Project Navigator, double click your app to open the Project pane.
-
On the Info tab, in the URL Types panel, configure your custom URL scheme.
-
In your AppDelegate.swift file, call the validateBrowserLogin() function:
@UIApplicationMain

class AppDelegate: UIResponder, UIApplicationDelegate {


  // Method invoked when the app is opened with Custom URL Scheme.

  // For example, a redirect from SFSafariViewController with an authorization code

  func application(_ app: UIApplication, open url: URL, options: [UIApplication.OpenURLOptionsKey : Any] = [:]) -> Bool {

     // Parse and validate URL, extract authorization code, and continue the flow:

    Browser.validateBrowserLogin(url)

  }
+
Test the configuration
At this point, you are ready to test the app using a simulator or an iOS Device.
When you click the Login button, you should see something like this:
For more information, see the Sample App demo in the Sample Apps folder in the iOS SDK.
Configure the Android Studio project
Set the Android compile options:
-
In the Project tree view of your Android Studio project, navigate to the app folder.
-
Open the build.gradle file.
-
In the android section, add the following code:
+compileOptions { sourceCompatibility JavaVersion.VERSION_1_8 targetCompatibility JavaVersion.VERSION_1_8 }+ . In the dependencies section, add the following code: + +
implementation 'org.forgerock:forgerock-auth:2.2.0' implementation 'org.forgerock:forgerock-auth-ui:2.2.0' implementation 'net.openid:appauth:0.7.1' -
Navigate to app > src > main > res > values.
-
Open the strings.xml file.
-
In the <resources> section, add the following code:
+<!-- OAuth 2.0 Client Details --> <string name="AndroidClient" translatable="false">ForgeRockSDKClient</string> <string name="forgerock_oauth_redirect_uri" translatable="false">org.forgerock.demo:/oauth2redirect</string> <string name="forgerock_oauth_scope" translatable="false">openid profile email address phone</string> <integer name="forgerock_oauth_threshold" translatable="false">30</integer> <!-- AM Instance Details --> <string name="forgerock_url" translatable="false">[FIDC AM URL]</string> <string name="forgerock_cookie_name" translatable="false">iPlanetDirectoryPro</string> <string name="forgerock_realm" translatable="false">alpha</string> <integer name="forgerock_timeout" translatable="false">30</integer> <!-- AM Tree Details --> <string name="forgerock_auth_service" translatable="false">Login</string> -
To allow AppAuth to capture authorization redirects, add a custom scheme to your build.gradle file:
android.defaultConfig.manifestPlaceholders = [

    'appAuthRedirectScheme': 'com.example.sdkapp'

]
+ . For more information, see https://github.com/openid/AppAuth-Android#capturing-the-authorization-redirect[Capturing the authorization redirect]. . Configure your app to use Browser mode. . In your MainActivity, add a button with a listener that runs the following code: + +
FRUser.browser().login(this, new FRListener<FRUser>() {

            @Override

            public void onSuccess(FRUser result) {

                runOnUiThread(() -> {

                    final AccessToken accessToken;

                    try {

                        accessToken = FRUser.getCurrentUser().getAccessToken();

                        WritableMap map = Arguments.createMap();

                        map.putString("userToken", accessToken.getIdToken());

                        reactNativeCallback.invoke(map);

                    } catch (AuthenticationRequiredException e) {

                        e.printStackTrace();

                    }

                });

            }

            @Override

            public void onException(Exception e) {

                System.out.println(e);

            }

        });
+
Test the configuration
At this point, you are ready to test the app using an emulator or an Android Device.
When you click the Login button, you should see something like this:
 +
For more information, see the Sample App demo in the Sample Apps folder
in the https://github.com/ForgeRock/forgerock-android-sdk[Android SDK.]
What’s next
Summary
In this article, you learned how to integrate your native iOS and Android apps with ForgeRock Identity Cloud’s hosted pages, using centralized UI.
In the next article, you learn how to use your iOS, Android, or SPA JS apps with Forgerock Identity cloud and centralized UI for a specific authentication journey.
Continue to
Part
4.
Other Articles by This Author
This article was written by George Bafaloukas and Adam Crockett. Overview: Who is this article for? Step-by-step instructions follow for anyone who wishes to use hosted pages (more on that later in the article) in their mobile or web app, with the help of the ForgeRock SDKs. The goal is to give you practical advice on theming, show how the SDKs help the integration, and provide some best practices along the way. Prior knowledge configuring ForgeRock Identity Cloud is helpful, but not assum…
![]() Part
2: Integrating a Single-Page app (SPA) with ForgeRock Identity Cloud
[.badge-category__name#Integrations#]
Part
2: Integrating a Single-Page app (SPA) with ForgeRock Identity Cloud
[.badge-category__name#Integrations#]
This article was written by George Bafaloukas and Adam Crockett. Overview Who is this article for? Step-by-step instructions follow for anyone who wishes to use hosted pages in their mobile or web app, with the help of the ForgeRock SDKs. The goal is to give you practical advice about themes and provide some best practices along the way. Prior knowledge configuring ForgeRock Identity Cloud is helpful but not assumed. This article is the second of four in a series: Creating Themes in Fo…
![]() Part
4: Navigating to a Specific Journey Using Centralized Login with
ForgeRock Identity Cloud
[.badge-category__name#Setup#]
Part
4: Navigating to a Specific Journey Using Centralized Login with
ForgeRock Identity Cloud
[.badge-category__name#Setup#]
This article was written by George Bafaloukas and Adam Crockett. Overview Who is this article for? Step-by-step instructions follow for anyone who wishes to use hosted pages in their mobile or web app, with the help of the ForgeRock SDKs. The goal is to give you practical advice about themes and provide some best practices along the way. Prior knowledge configuring ForgeRock Identity Cloud is helpful but not assumed. This article is the last of four in a series: Themes in ForgeRock Iden…