Introduction
Note
Since the time of this writing, the Service Broker for Cloud Foundry (CF) reached EOL with the introduction of Identity Platform 7. ForgeRock Identity Gateway (IG) 7.x supports this functionality natively without the necessity of a service broker. Please see the following KB article How do I use IG 7.x as a route service for Cloud Foundry? for set up instructions.
Pivotal Cloud Foundry (PCF) deployments are maturing across the corporate landscape. PCF’s out-of-the-box identity and access management (IAM) tool, UAA (User Accounts and Authentication), provides basic user management functions and OAuth 2.0/OIDC 1.0 support. UAA has come a long way since its inception and provides a solid foundation of IAM services for an isolated application ecosystem running on the Pivotal platform. As organizations experience ever more demanding requirements pushed on their applications, they start realizing the need for a full IAM platform that provides identity services beyond what UAA can offer. Integrating applications running on Pivotal with applications running outside the platform, providing strong and adaptive authentication journeys, managing identities across applications, enforcing security policies and more requires a full-service IAM platform like ForgeRock’s Identity Platform.
ForgeRock provides a Pivotal service broker implementation, the ForgeRock Service Broker. It runs as a small service inside Pivotal and brokers two services into the PCF platform: An OAuth 2.0 AM Service and an IG Route Service. While the OAuth 2.0 AM Service provides similar capabilities to UAA on the OAuth/OIDC side, the IG Route Service is based on IG (Identity Gateway) and can broker the full spectrum of services of the ForgeRock Identity Platform. PCF applications bound to the IG Route Service can seamlessly consume any of the countless services the ForgeRock Identity Platform provides: Intelligent authentication, authorization, federation, user-managed access, identity synchronization, user self-service, workflow, social identity, directory services, API gateway services and more.
This article provides an easy-to-follow path to:
- Set up a PCF development environment (PCF Dev)
- Install and configure IG in that environment
- Install and configure the ForgeRock Service Broker in that environment
- Deploy, integrate and protect a number of PCF sample applications using the IG Route Service and IG
Additionally, the guide provides steps how to run IG on PCF. If you have access to a full PCF instance, you can skip the PCF Dev part and dive right into the Service Broker deployment and configuration. You also need access to a ForgeRock Access Management instance 5.0 or newer.
1. Preparing a PCF Dev environment
As mentioned, if you have access to a full PCF instance, you can skip this part and go straight to the Service Broker deployment and configuration.
1.1. Installing CF CLI
Before you install the server side of the PCF Dev environment, you must first install the Cloud Foundry Command Line Interface (CF CLI) utility, which is the main way you will interact with PCF throughout this process.
Follow the Pivotal documentation to install the flavor of the CLI you need for your workstation OS:
https://docs.run.pivotal.io/cf-cli/install-go-cli.html
1.2. Installing PCF Dev
Now that you are ready to roll with the CF CLI, it is time to download and install the PCF Dev components. This article is based on PCF Dev v0.30.0 for PCF 1.11.0. This version is based on a VirtualBox and has a number of default services installed, some of which you will need later on.
PCF Dev – PAS 2.0.18.0 is an alpha release of the NextGen PCF Dev using the native OS hypervisor, doubling the minimum memory requirements from 4G to 8G, having only a few PCF services installed by default, and taking up to 1h to start. It does however include a full BOSH Director, which is the graphical UI to manage “Tiles” in PCF vs having to use the CLI. As soon as this version is a bit more stable and bundles more services like the old one did, it might be worth upgrading. But for now, make sure you select and download v0.30.0: https://network.pivotal.io/products/pcfdev

In order to use your own IP address and DNS name (-i and -d parameters of the cf dev start command) you need to set up a wildcard DNS record. In my case I setup *.pcfdev.mytestrun.com pointing to my workstation’s IP address where I am running PCF Dev.
Follow the command log below to install and start PCF Dev:
$ unzip pcfdev-v0.30.0_PCF1.11.0-osx.zip
./pcfdev-v0.30.0+PCF1.11.0-osx
cf dev start -i 192.168.37.73 -d pcfdev.mytestrun.com -m 6144
Warning: the chosen PCF Dev VM IP address may be in use by another VM or device.
Using existing image.
Allocating 6144 MB out of 16384 MB total system memory (6591 MB free).
Importing VM...
Starting VM...
Provisioning VM...
Waiting for services to start...
7 out of 58 running
7 out of 58 running
7 out of 58 running
7 out of 58 running
40 out of 58 running
56 out of 58 running
58 out of 58 running
 _______  _______  _______    ______   _______  __   __
|       ||       ||       |  |      | |       ||  | |  |
|    _  ||       ||    ___|  |  _    ||    ___||  |_|  |
|   |_| ||       ||   |___   | | |   ||   |___ |       |
|    ___||      _||    ___|  | |_|   ||    ___||       |
|   |    |     |_ |   |      |       ||   |___  |     |
|___|    |_______||___|      |______| |_______|  |___|
is now running.
To begin using PCF Dev, please run:
   cf login -a https://api.pcfdev.mytestrun.com --skip-ssl-validation
Apps Manager URL: https://apps.pcfdev.mytestrun.com
Admin user => Email: admin / Password: admin
Regular user => Email: user / Password: pass
1.3 Logging in to PCF Dev
Login to your fresh PCF Dev instance and select the org you want to work with. Use the pcfdev-org:
cf login -a https://api.pcfdev.mytestrun.com/ --skip-ssl-validation
API endpoint: https://api.pcfdev.mytestrun.com/
Email> admin
Password>
Authenticating...
OK
Select an org (or press enter to skip):
1. pcfdev-org
2. system
Org> 1
Targeted org pcfdev-org
Targeted space pcfdev-space

API endpoint:  https://api.pcfdev.mytestrun.com (API version: 2.82.0)
User:          admin
Org:            pcfdev-org
Space:          pcfdev-space
Authenticate using admin/admin if using PCF Dev or a Pivotal admin user if using a real PCF instance.
2. Install Sample Applications
To test the Service Broker and inter-application SSO, install 2 sample applications:
2.1. Spring Music
git clone https://github.com/cloudfoundry-samples/spring-music cd spring-music
Modify manifest to reduce memory and avoid random route names:
vi manifest.yml
Enter or copy & paste the following content:
---
applications:
- name: music
  memory: 768M
  random-route: false
  path: build/libs/spring-music-1.0.jar
Push the app:
 cf push
…
Waiting for app to start...
name:           music
requested state:   started
instances:      1/1
usage:          768M x 1 instances
routes:            music.pcfdev.mytestrun.com
last uploaded:  Tue 22 May 15:28:24 CDT 2018
stack:          cflinuxfs2
buildpack:      container-certificate-trust-store=2.0.0_RELEASE java-buildpack=v3.13-offline-https://github.com/cloudfoundry/java-buildpack.git#03b493f
                java-main open-jdk-like-jre=1.8.0_121 open-jdk-like-memory-calculator=2.0.2_RELEASE spring-auto-reconfiguration=1.10...
start command:  CALCULATED_MEMORY=$($PWD/.java-buildpack/open_jdk_jre/bin/java-buildpack-memory-calculator-2.0.2_RELEASE
                -memorySizes=metaspace:64m..,stack:228k.. -memoryWeights=heap:65,metaspace:10,native:15,stack:10 -memoryInitials=heap:100%,metaspace:100%
                -stackThreads=300 -totMemory=$MEMORY_LIMIT) && JAVA_OPTS="-Djava.io.tmpdir=$TMPDIR
                -XX:OnOutOfMemoryError=$PWD/.java-buildpack/open_jdk_jre/bin/killjava.sh $CALCULATED_MEMORY
                -Djavax.net.ssl.trustStore=$PWD/.java-buildpack/container_certificate_trust_store/truststore.jks
                -Djavax.net.ssl.trustStorePassword=java-buildpack-trust-store-password" && SERVER_PORT=$PORT eval exec
                $PWD/.java-buildpack/open_jdk_jre/bin/java $JAVA_OPTS -cp $PWD/. org.springframework.boot.loader.JarLauncher

     state    since                  cpu      memory          disk          details
#0   running   2018-05-22T20:29:00Z   226.8% 530.4M of 768M   168M of 512M
Note the routes: music.pcfdev.mytestrun.com
That’s the URL at which your application can be reached. You should be able to resolve the dynamically generated DNS name. You should also be able to hit the URL in a web browser.
Retrieve application logs:
cf logs music --recent
Live-tail application logs:
cf logs music
###2.2. Cloud Foundry Sample NodeJS App
$ git clone https://github.com/cloudfoundry-samples/cf-sample-app-nodejs.git
cd cf-sample-app-nodejs
Modify manifest to reduce memory and avoid random route names:
$ vi manifest.yml

---
applications:
- name: node
  memory: 512M
  instances: 1
  random-route: false
Push the app:
$ cf push
…
Waiting for app to start...
name:           node
requested state:   started
instances:      1/1
usage:          512M x 1 instances
routes:            node.pcfdev.mytestrun.com
last uploaded:  Tue 22 May 15:46:02 CDT 2018
stack:          cflinuxfs2
buildpack:      node.js 1.5.32
start command:  npm start

     state    since                  cpu    memory      disk        details
#0   running   2018-05-22T20:46:35Z   0.0% 0 of 512M 0 of 512M
Note the routes: node.pcfdev.mytestrun.com
That’s the URL at which your application can be reached. You should be able to resolve the dynamically generated DNS name. You should also be able to hit the URL in a web browser.
Retrieve application logs:
cf logs node —recent
Live-tail application logs:
cf logs node
2.3. Create Your Own JSP Headers App
Create your very own useful sample application to display headers. This will come in handy for future experiments with the IG Route Service.
$ mkdir headers
$ cd headers
$ mkdir WEB-INF
$ vi index.jsp
<%@ page import="java.util.*" %>
<html>
<head>
<title><%= application.getServerInfo() %></title>
</head>
<body>
<h1>HTTP Request Headers Received</h1>
<table border="1" cellpadding="3" cellspacing="3">
<%
Enumeration eNames = request.getHeaderNames();
while (eNames.hasMoreElements()) {
String name = (String) eNames.nextElement();
String value = normalize(request.getHeader(name));
%>
<tr><td><%= name %></td><td><%= value %></td></tr>
<%
}
%>
</table>
</body>
</html>
<%!
private String normalize(String value)
{
StringBuffer sb = new StringBuffer();
for (int i = 0; i < value.length(); i++) {
char c = value.charAt(i);
sb.append(c);
if (c == ';')
sb.append("<br>");
}
return sb.toString();
}
%>
cf push headers
Waiting for app to start...
name:           headers
requested state:   started
instances:      1/1
usage:          256M x 1 instances
routes:            headers.pcfdev.mytestrun.com
last uploaded:  Tue 22 May 16:24:26 CDT 2018
stack:          cflinuxfs2
buildpack:      container-certificate-trust-store=2.0.0_RELEASE java-buildpack=v3.13-offline-https://github.com/cloudfoundry/java-buildpack.git#03b493f
                open-jdk-like-jre=1.8.0_121 open-jdk-like-memory-calculator=2.0.2_RELEASE tomcat-access-logging-support=2.5.0_RELEAS...
start command:  CALCULATED_MEMORY=$($PWD/.java-buildpack/open_jdk_jre/bin/java-buildpack-memory-calculator-2.0.2_RELEASE
                -memorySizes=metaspace:64m..,stack:228k.. -memoryWeights=heap:65,metaspace:10,native:15,stack:10 -memoryInitials=heap:100%,metaspace:100%
                -stackThreads=300 -totMemory=$MEMORY_LIMIT) &&  JAVA_HOME=$PWD/.java-buildpack/open_jdk_jre JAVA_OPTS="-Djava.io.tmpdir=$TMPDIR
                -XX:OnOutOfMemoryError=$PWD/.java-buildpack/open_jdk_jre/bin/killjava.sh $CALCULATED_MEMORY
                -Djavax.net.ssl.trustStore=$PWD/.java-buildpack/container_certificate_trust_store/truststore.jks
                -Djavax.net.ssl.trustStorePassword=java-buildpack-trust-store-password -Djava.endorsed.dirs=$PWD/.java-buildpack/tomcat/endorsed
                -Daccess.logging.enabled=false -Dhttp.port=$PORT" exec $PWD/.java-buildpack/tomcat/bin/catalina.sh run

     state    since                  cpu    memory        disk            details
#0   running   2018-05-22T21:24:48Z   0.0% 600K of 256M 84.6M of 512M
2.4. More Sample Apps
$ git clone https://github.com/cloudfoundry-samples/cf-ex-php-info
$ git clone https://github.com/cloudfoundry-samples/cf-sample-app-rails.git
3. Running IG in Pivotal Cloud Foundry
You can run IG absolutely anywhere you want, but since you are going to use it inside PCF, running it in PCF may be a logic choice.
3.1. Install, Deploy, and Configure IG in PCF
The steps below describe an opinionated deployment model for IG in PCF. Your specific environment may require you to make different choices to achieve an ideal configuration and behavior.
3.1.1. Download IG
Download IG 6 from https://backstage.forgerock.com/downloads/browse/ig/latest to a preferred working location. Login using your backstage credentials.
unzip IG-6.1.0.war
cf push ig --no-start
3.1.2. Enable Development Mode
cf set-env ig IG_RUN_MODE development
3.1.3. Create And Use Persistent Volume For Configuration Data
IG is configured using JSON files. This section is an easy way to create a share storage volume that can persist your IG configuration between restarts. If you run IG using its default configuration, it will lose all its configuration every time it restarts because the app is reset. Externalizing the config allows the configuration to reside outside the app and persist between restarts. In a real PCF environment (vs a PCF DEV environment) you would probably use a different shared storage like an NSF service or the like. But for development purposes, a local-volume will work great.
(GitHub - cloudfoundry-attic/local-volume-release)
cf create-service local-volume free-local-disk local-volume-instance
cf bind-service ig local-volume-instance -c ‘{“mount”:“/var/openig”}’
cf set-env ig IG_INSTANCE_DIR ‘/var/openig’
3.1.4. Start IG applying all the configuration changes we have made
cf start ig
3.1.5. Logs
cf logs ig --recent
3.1.6. Apply Required Configuration
3.1.6.1. SSH into your IG instance
cf ssh ig
cd /var/openig
mkdir config
vi config/config.json
3.1.6.2. Apply configuration
Create /var/openig/config/config.json and populate with the default configuration as documented here:
3.1.6.2. Apply configuration
Create /var/openig/config/config.json and populate with default configuration as documented here:
{
  "heap": [
     {
       "name": "ClientHandler",
       "type": "ClientHandler",
       "config": {
         "hostnameVerifier": "ALLOW_ALL",
         "trustManager": {
           "type": "TrustAllManager"
         }
       }
    },
    {
      "name": "_router",
      "type": "Router",
      "config": {
        "defaultHandler": {
          "type": "StaticResponseHandler",
          "config": {
            "status": 404,
            "reason": "Not Found",
            "headers": {
              "Content-Type": [
                "application/json"
              ]
            },
            "entity": "{ \"error\": \"Something went wrong, contact the sys admin\"}"
          }
        }
      }
    },
    {
      "type": "Chain",
      "name": "CloudFoundryProxy",
      "config": {
        "filters": [
          {
            "type": "ScriptableFilter",
            "name": "CloudFoundryRequestRebaser",
            "comment": "Rebase the request based on the CloudFoundry provided headers",
            "config": {
              "type": "application/x-groovy",
              "source": [
                "Request newRequest = new Request(request);",
                "org.forgerock.util.Utils.closeSilently(request);",
                "newRequest.uri = URI.create(request.headers['X-CF-Forwarded-Url'].firstValue);",
                "newRequest.headers['Host'] = newRequest.uri.host;",
                "logger.info('Receive request : ' + request.uri + ' forwarding to ' + newRequest.uri);",
                "Context newRoutingContext = org.forgerock.http.routing.UriRouterContext.uriRouterContext(context).originalUri(newRequest.uri.asURI()).build();",
                "return next.handle(newRoutingContext, newRequest);"
              ]
            }
          }
        ],
        "handler": "_router"
      },
      "capture": [
        "request",
        "response"
      ]
    }
  ],
  "handler": {
    "type": "DispatchHandler",
    "name": "Dispatcher",
    "config": {
      "bindings": [
        {
          "condition": "${not empty request.headers['X-CF-Forwarded-Url']}",
          "handler": "CloudFoundryProxy"
        },
        {
          "handler": {
            "type": "StaticResponseHandler",
            "config": {
              "status": 400,
              "entity": "Bad request : expecting a header X-CF-Forwarded-Url"
            }
          }
        }
      ]
    }
  }
}
Then:
exit cf
restart ig
3.1.7. Access IG Studio
4. Install ForgeRock Service Broker
Download and install the service broker following the instructions in the doc:
4.1. Deploy and Configure the Service Broker App
cf push forgerockbroker-app -p service-broker-servlet-2.0.1.war
cf set-env forgerockbroker-app SECURITY_USER_NAME f8Q7hyHKgz
cf set-env forgerockbroker-app SECURITY_USER_PASSWORD n3BpjwKW4m
cf set-env forgerockbroker-app OPENAM_BASE_URI https://idp.mytestrun.com/openam/
cf set-env forgerockbroker-app OPENAM_USERNAME CloudFoundryAgentAdmin
cf set-env forgerockbroker-app OPENAM_PASSWORD KZDJhN7Vr4
cf set-env forgerockbroker-app OAUTH2_SCOPES profile
cf set-env forgerockbroker-app OPENIG_BASE_URI https://ig.pcfdev.mytestrun.com
cf restage forgerockbroker-app
Note that OPENIG_BASE_URI is specified as https, not http! If specified as http, the following error occurred when binding the ig route service to an application:
cf bind-route-service pcfdev.mytestrun.com igrs --hostname spring-music-chatty-quokka Binding route spring-music-chatty-quokka.pcfdev.mytestrun.com to service instance igrs in org pcfdev-org / space pcfdev-space as admin … FAILED Server error, status code: 502, error code: 10001, message: The service broker returned an invalid response for the request to http://forgerockbroker-app.pcfdev.mytestrun.com/v2/service_instances/4aa37a88-afc0-4e75-9474-d5e2ed3e7876/service_bindings/c8da2445-6689-4824-afd1-125795e2a848. Status Code: 201 Created, Body: {“route_service_url”:“http://ig.pcfdev.mytestrun.com/4aa37a88-afc0-4e75-9474-d5e2ed3e7876/c8da2445-6689-4824-afd1-125795e2a848”}
To see the service broker app’s environment:
cf env forgerockbroker-app
To see the service broker app’s details:
cf app forgerockbroker-app
Create service broker:
cf create-service-broker forgerockbroker f8Q7hyHKgz n3BpjwKW4m http://forgerockbroker-app.pcfdev.mytestrun.com
Enable the service you plan on using. The ForgeRock Service Broker supports OAuth and IG. You can enable either or both.
cf enable-service-access forgerock-ig-route-service
cf enable-service-access forgerock-am-oauth2
Create the service instance(s) you will be using for your apps. You should only need one instance per service to handle any number of applications:
cf create-service forgerock-ig-route-service shared igrs
cf create-service forgerock-am-oauth2 shared amrs
4.2. Bind IG Route Service to the Sample Apps
Note how no apps are bound to the IG Route Service (igrs):
cf routes
Getting routes for org pcfdev-org / space pcfdev-space as admin ...
space          host                  domain                port  path  type  apps                  service
pcfdev-space  music                 pcfdev.mytestrun.com                     music
pcfdev-space  node                  pcfdev.mytestrun.com                     node
pcfdev-space  rails                 pcfdev.mytestrun.com                     rails
pcfdev-space  headers               pcfdev.mytestrun.com                     headrs
pcfdev-space  ig                    pcfdev.mytestrun.com                     ig
pcfdev-space  forgerockbroker-app   pcfdev.mytestrun.com                     forgerockbroker-app
Bind the Route Service to the apps:
cf bind-route-service pcfdev.mytestrun.com igrs --hostname music
cf bind-route-service pcfdev.mytestrun.com igrs --hostname node
cf bind-route-service pcfdev.mytestrun.com igrs --hostname rails
cf bind-route-service pcfdev.mytestrun.com igrs --hostname headers
Now the two sample apps are bound to our IG Route Service:
cf routes
Getting routes for org pcfdev-org / space pcfdev-space as admin ...
space          host                              domain                port  path  type  apps                  service
pcfdev-space  music                 pcfdev.mytestrun.com                     music              igrs
pcfdev-space  node                  pcfdev.mytestrun.com                     node               igrs
pcfdev-space  rails                 pcfdev.mytestrun.com                     rails              igrs
pcfdev-space  headers               pcfdev.mytestrun.com                     headers            igrs
pcfdev-space  ig                    pcfdev.mytestrun.com                     ig
pcfdev-space  forgerockbroker-app   pcfdev.mytestrun.com                     forgerockbroker-app
5. Define IG Routes for the Sample Apps
By default, no routes are defined in IG for our sample apps and the default behavior in IG (defined in config.json you created earlier) is to deny access to everything. So the next and very important step is now to define routes that re-enable access to our sample applications. Once the basic routes are defined, we can add authentication and authorization per application as we see fit:
- Point your browser to the IG Studio: http://ig.pcfdev.mytestrun.com/openig/studio/
- Select “Protect an Application” from the Studio home screen, then select “Structured.”
- Select “Advanced options” and enter the app URL from the step where you pushed the app to PCF.
- Since PCF does hostname-based routing (vs path-based) you have to change the Condition that selects your route accordingly. Into the Condition field, select “Expression” and enter:
${matches(request.uri.host, ‘^app-url’)}
E.g.:
${matches(request.uri.host, ‘^music.pcfdev.mytestrun.com’)} - Pick a descriptive name and a unique ID for the application
- Select “Create route”
- Since PCF does hostname-based routing (vs path-based) you have to change the Condition that selects your route accordingly. Into the Condition field, select “Expression” and enter:

- Deploy your route.
- You have now created a route with default configuration, which simply proxies requests through IG to the app. That means your app is available again like it was before you implemented IG and the Service Broker. The next step is to add value to your route like authentication or authorization.
5.1. Prepare for Authentication and Authorization
As a preparatory step to authentication and authorization, create an AM Service for your route, which is a piece of configuration pointing to your ForgeRock Access Management instance. Select “AM service” from the left side menu and provide the details of your AM instance:

You won’t need the agent section populated for the use cases here.
5.2. Broker Authentication to an Application
-
To add authentication to your route, select “Authentication” from the left side menu and move the slider “Enable authentication” to the right, then select “Single Sign-On” as your authentication option.
-
In the configuration dialog popping up, select your AM service:
Then select “Save”.
-
Deploy your route.
-
In a browser, point your browser to your app URL, e.g. https://music.pcfdev.mytestrun.com/
-
Notice how you will be redirected to your Access Management login page for authentication. Provide valid login credentials and your sample app should load.
-
Repeat with the other apps. Note how you can now SSO between all the apps!
-
Now let’s add authorization to one of the routes and only allow members of a certain group access to that application. For that, we need some additional prep work in AM:
- Create a J2EE agent IG can use to evaluate AM policies:
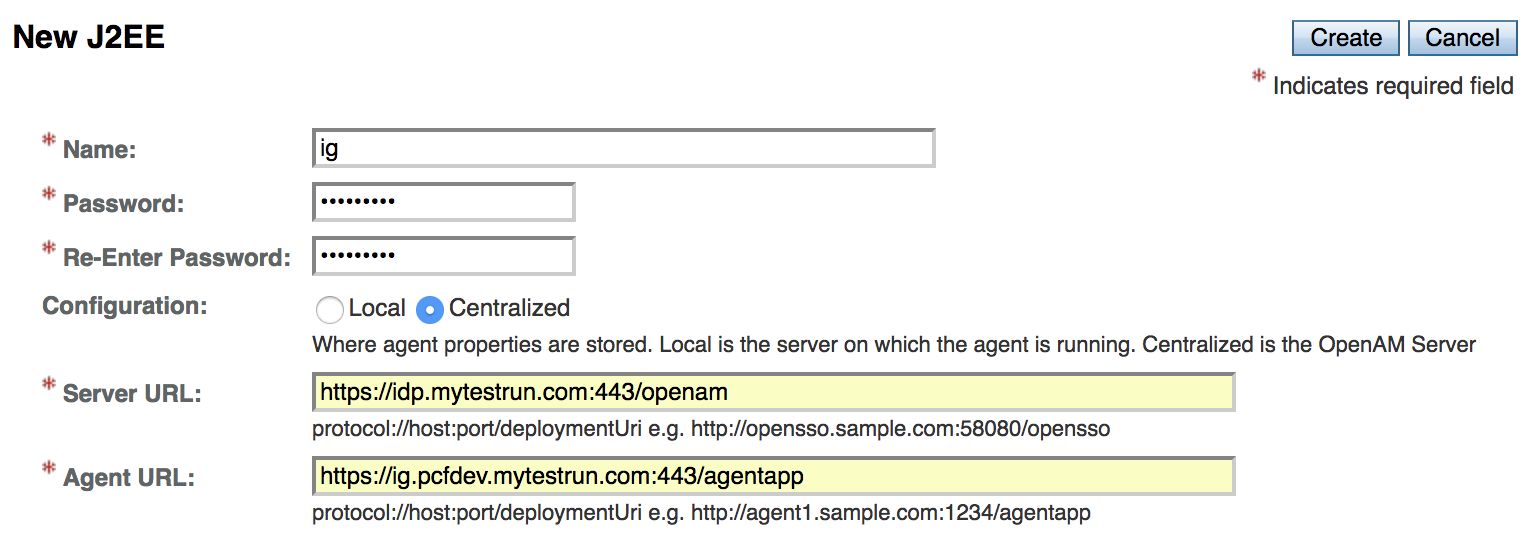
- Create a J2EE agent IG can use to evaluate AM policies:
-
- Create a new policy set with the name “PCF” or a name and ID of your liking:


Add URL as the resource type.
-
- Create a policy and name it after your application you are protecting. Specify your app URL as the resource, allow GET as an action, and specify the subject condition to require a group membership. In this example, we want membership in the “Engineering” group to be required for access to the “headers” application:

Your policy summary page should look something like this:

- Now come back to IG Studio and select the route of the app you created your policy for, in our case the “headers” app and select “Authorization” from the left side bar and move the slider “Enable authorization” to the right, then select “AM Policy Enforcement” as your way to authorize users.
- Select your AM service, specify your realm and provide the name of the J2EE agent you created in an earlier step and the password. In the policy endpoint section specify the name of your policy set and the expression to retrieve your SSO token; the default should work: ${contexts.ssoToken.value}

- Save and deploy your route.
- Point your browser to the protected app and login using a user who is a member of the group you configured to control access. Notice how the app loads after logging in.
- Now remove the user from the group and refresh the app. Notice how the page goes blank because the user is no longer authorized.
Conclusion
With this setup, applications can now be integrated, protected, SSO-enabled, and identity-infused within minutes. Provide profile self-service, password reset, strong and step-up authentication, continuous authentication, authorization, and risk evaluation to any application in the Pivotal Cloud Foundry ecosystem.
Quick Links
Identity Gateway Docs
Knowledge Base
Cloud Foundry Docs