Configuration Management in ForgeRock Identity Cloud Part 2: Basic
Author: |
Kevin Schneider |
Created at: |
Nov 2023 |
Updated at: |
Nov 2023 |
By Kevin Schneider
Originally posted on
https://medium.com/@kevsuisse
The first part of this series on Configuration Management in ForgeRock Identity Cloud was looking at the repository structure that enables a CI/CD pipeline to be built. In this part, we are looking at how to implement such a pipeline and how to work with it.
I will also introduce an open-source tool that is purpose-built for this type of configuration management: https://github.com/ForgeRock/fr-config-manager.
Types of Configuration Management
How to implement configuration management depends on what the goal of the implementation is and what resources are available, especially the availability of a sandbox environment. At a high level, there are 3 ways, a pull-only pipeline, a development environment driven pipeline and a sandbox driven pipeline, to manage configuration in ForgeRock Identity Cloud.
Pull-only pipeline
In this type of pipeline, static and dynamic configuration is developed in the development environment and a GIT repository is used as a backup and review tool.
Even though this is the simplest approach to implement, it still leads to greater visibility. It can also serve as a baseline for future automation and expansion.
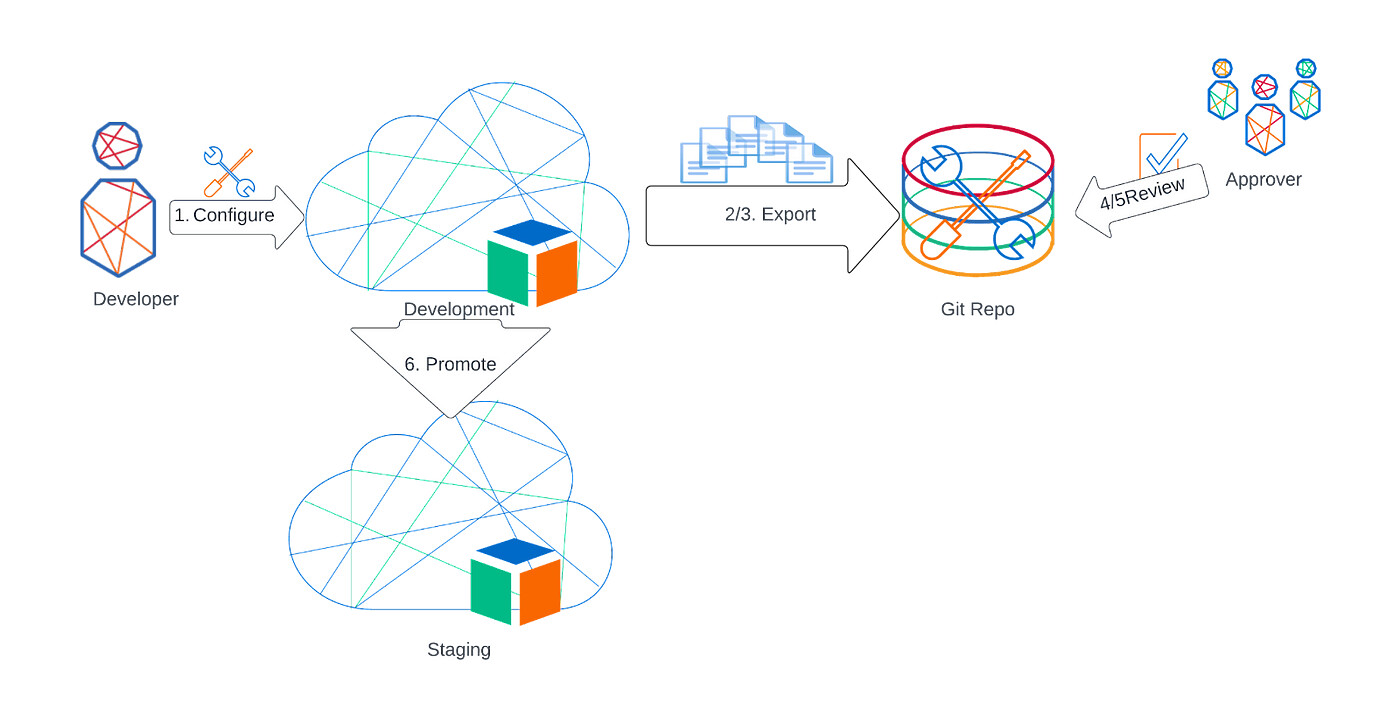
Pull-only pipeline
-
Changes are made in the development environment directly by the tenant admins / super administrators.
-
When development reaches a stage where it can be promoted to the staging environment, the configuration in the repo is updated in a branch by doing a config pull.
-
The developer commits the changes in the repo and creates a pull request to merge into the main branch.
-
The pull request is reviewed. The diff view of the commit makes it easy to see what changes have been made.
-
If the review finds issues and the pull request is rejected, changes steps 1 to 3 are repeated until the pull request is approved.
-
The promotion team now goes ahead with the promotion
Benefits
-
Get visibility of what exactly has changed in the environment.
-
Maintain a history of changes.
-
Enable a simple copy of an environment. You can quickly set up a new sandbox with the exact configuration of the development environment.
-
Enable a signoff gate for promotions
Drawbacks
-
The approval flow can only happen late in the pipeline.
-
Requires manual process that cannot be enforced. The changes could still be promoted without approval
-
As promotions are all or nothing, it may be necessary to temporarily roll back some changes that are not yet ready for promotion. For example, journeys may have to be exported, deleted and then re-imported after promotion.
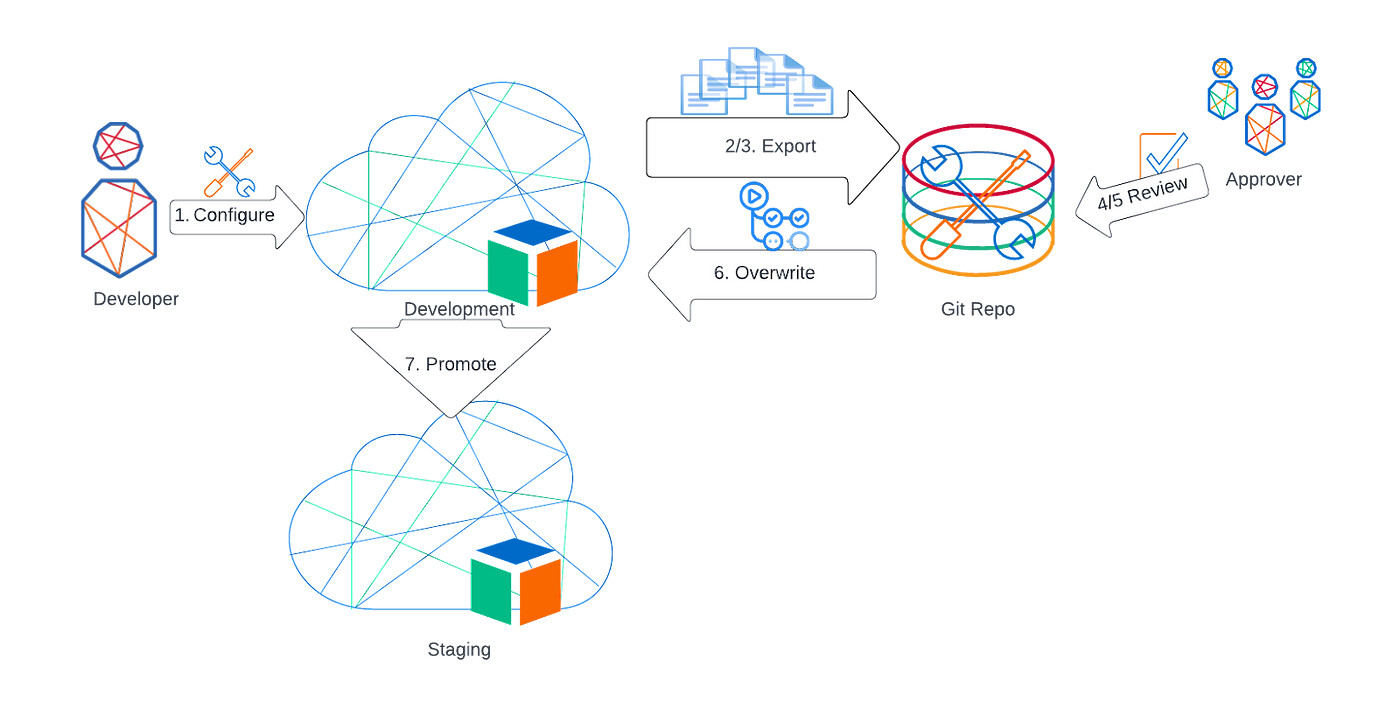
Development environment driven config management
In this type of pipeline, everything is still configured in the development environment. The changes are then pulled to a repo, reviewed and pushed back into the development environment before promotion to staging.
Pushing the configuration back into the development environment ensures that the promotion only contains approved changes.
Development environment driven pipeline
-
Changes are made in the development environment directly by the tenant admins / super administrators.
-
When development reaches a stage where it can be promoted to the staging environment, the configuration in the repo is updated in a branch by doing a config pull.
-
The developer commits the changes in the repo and creates a pull request to merge into the main branch.
-
The pull request is reviewed. The diff view makes it easy to see what changes have been made.
-
If the review finds issues and the pull request is rejected, changes steps 1 to 3 are repeated until the pull request is approved.
-
The approved pull request is merged into the main branch. This triggers a GitHub Action that pushes the configuration from the repo back into the development environment, guaranteeing that the environment is in an approved state.
-
The promotion team now goes ahead with the promotion
Drawbacks
-
Some configurations in ForgeRock Identity Cloud, mainly Journeys and scripts are individual objects. That means that the same journey will be overwritten with a new version. But if a journey is removed from the repo, it won’t automatically be removed from the development environment. See the section ‘Removing configuration’ below for a discussion on how this can be mitigated.
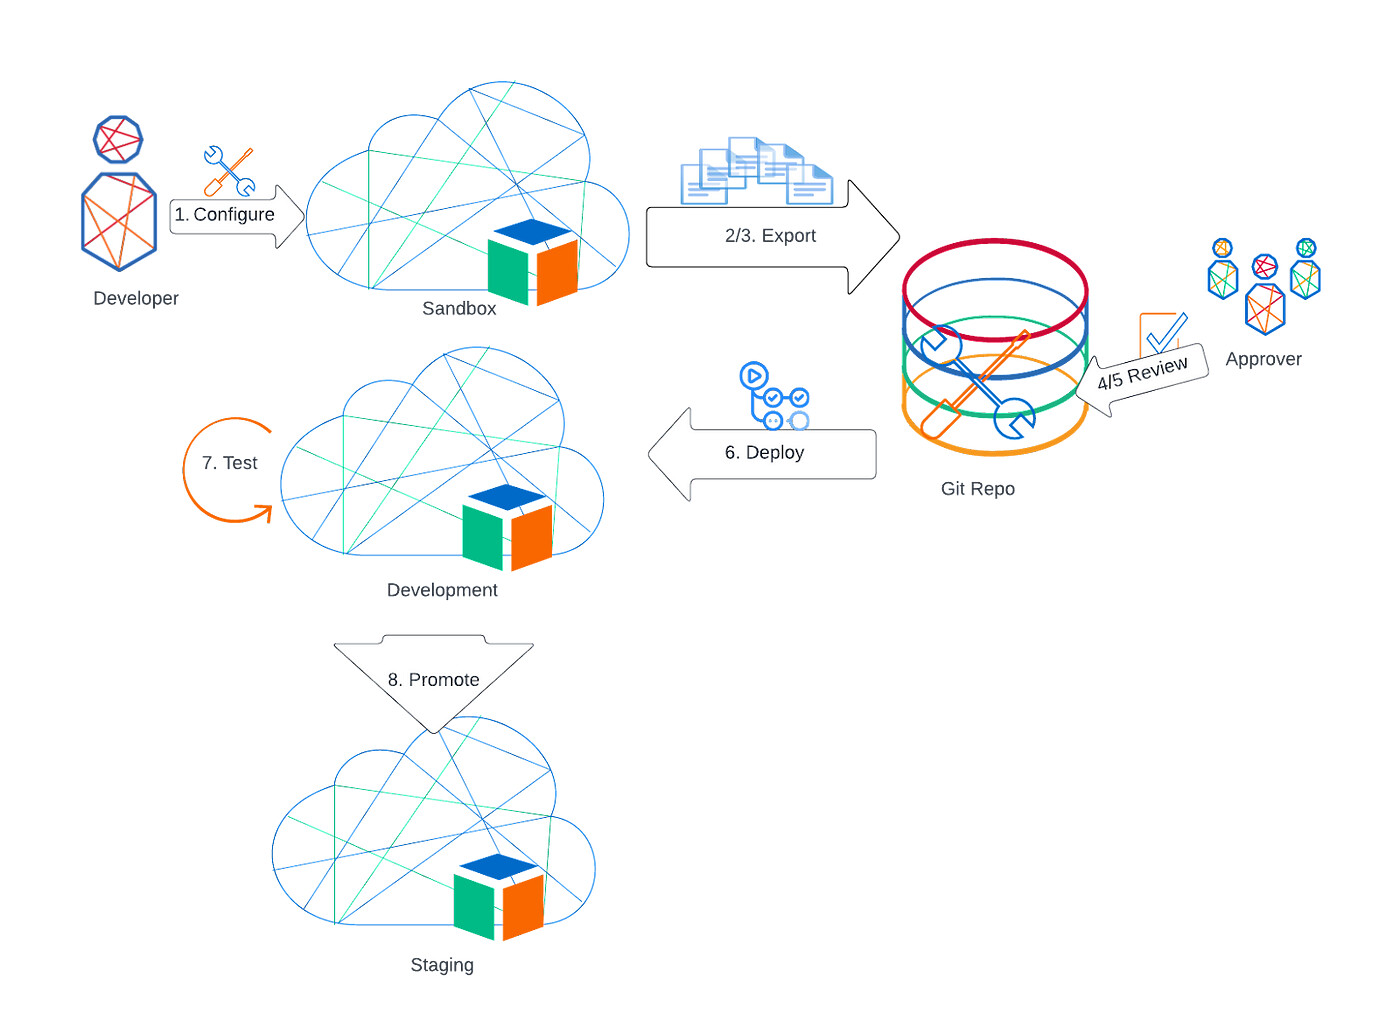
Sandbox-driven config management
In this type of pipeline, configuration is done in a sandbox environment, after a change is made it is pulled into the repo and reviewed, then pushed into the development environment.
Adding a sandbox environment enables much greater flexibility in the pipeline design. It is also the only way to truly guarantee that only approved changes reach the higher environments.
Sandbox driven pipeline
-
Changes are made in the sandbox environment by the tenant admins / super administrators.
-
When development reaches a stage where it can be moved to the development environment, the configuration in the repo is updated in a branch by doing a config pull from the sandbox environment.
-
The developer commits the changes in the repo and creates a pull request to merge into the main branch.
-
The pull request is reviewed. The diff view makes it easy to see what changes have been made.
-
If the review finds issues and the pull request is rejected, changes steps 1 to 4 are repeated until the pull request is approved.
-
The approved pull request is merged into the main branch. This triggers a GitHub Action that pushes the configuration from the repo into the development environment.
-
Functional tests are run against the development environment to ensure it is working as expected
-
The promotion team now goes ahead with the promotion to the staging environment where further integration and performance tests are run before promoting to production.
Benefits
-
Making no manual changes in the development environment guarantees that only reviewed and approved changes are pushed.
-
The development environment can be secured by allowing access only to the pipeline. Developers don’t normally need tenant admin access to the development, staging or prod environments.
Drawbacks
-
Additional cost for sandbox environment.
-
A stricter process can make it harder for quick fixes to be deployed.
-
Some configurations in ForgeRock Identity Cloud, mainly Journeys and scripts are individual objects. That means that the same journey will be overwritten with a new version. But if a journey is removed from the repo, it won’t automatically be removed from the development environment. See the section ‘Removing configuration’ below for a discussion on how this can be mitigated.
After looking at the possible high-level pipelines, let’s see in practice how this can be implemented. In this guide, we will look at the sandbox driven pipeline as this provides the most benefits and can easily be adapted to the other pipelines.
Initializing the repository
Before the CI/CD pipeline can be put into action, a repository must be set up to maintain the configuration artefacts. This ideally happens at the very start of the project to guarantee that the configuration has always gone through the pipeline and was reviewed at every step. Initializing the configuration from the development environment rather than from a static config repo also guarantees that the latest improvements in ForgeRock Identity Cloud are automatically part of the project going forward. It also allows for the adoption of a CI/CD process for customers that already made changes to the development environment or even for customers already in production.
Regardless of whether a customer has just been given access to a new tenant or if they already have a setup that is in production, the tenant will already contain some configuration. To set up the repository, it must be initialised with that configuration from the development environment. The step consists of pulling all configuration objects from the environment and putting them into the directory structure discussed in part one. ForgeRock Identity Cloud offers a REST API for all configurations and with that an easy way to download it. The only issue is that there are many configuration endpoints that need to be queried. This is where fr-config-manager’s fr-config-pull command comes into play. It queries all the required endpoints to download the configuration and then puts them into the correct repo directory. It does so in a deterministic way, so any subsequent pulls will only change the config that has changed in your cloud instance.
The first step is to install the fr-config-manager and run the fr-config-pull command to create a local copy of the repo.
Setting up fr-config-manager locally
Clone the config manager repo
The fr-config-manager is available as an open-source tool written in Node JS and available on GitHub. The config manager consists of two basic commands. fr-config-pull fetches the configuration from a ForgeRock Identity Cloud tenant and puts it into the correct directory structure. fr-config-push reads that configuration and pushes it back into the tenant.
Create a repository to store the config. The following example is using GitHub and GitHub actions.
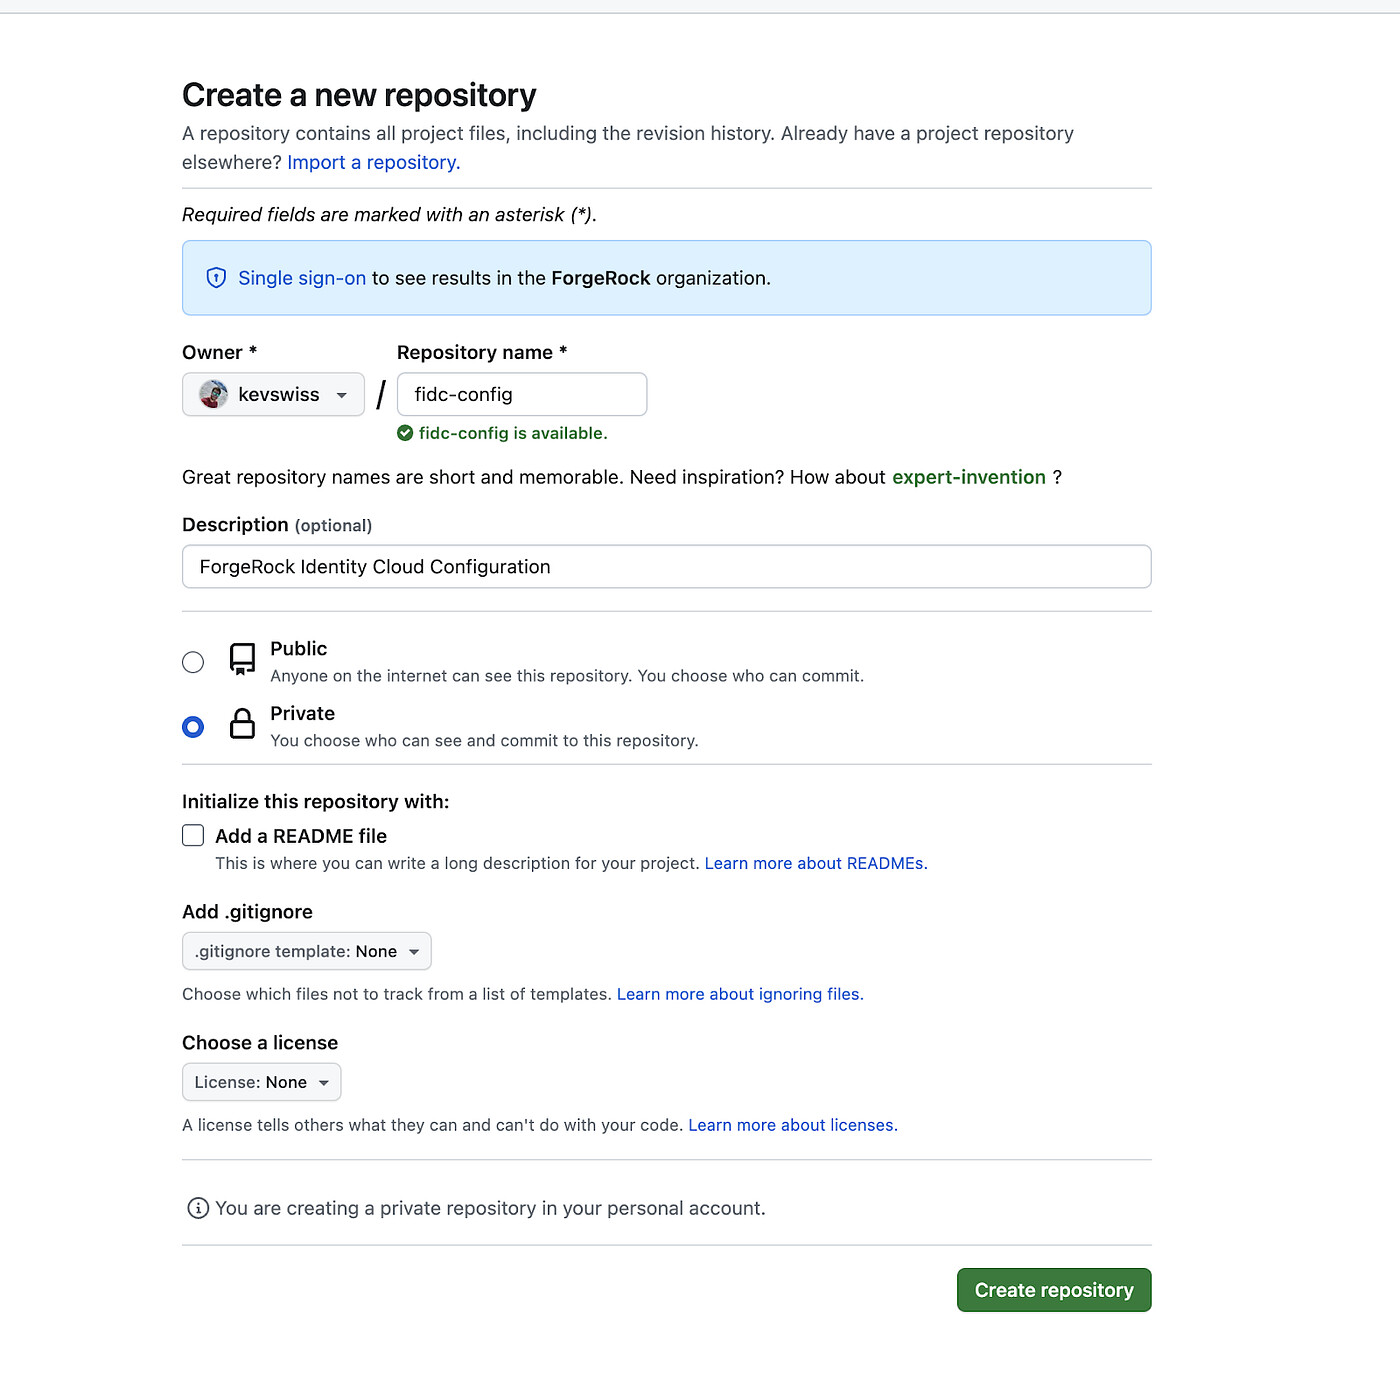
Creating a new repository in GitHub
Service account
Fr-config-manager uses service accounts to authenticate to ForgeRock Identity Cloud and getting access to the configuration. The Service account can be created by a tenant administrator by going to Tenant Settings > Global Settings > Service Accounts. Make sure the service account has enabled the fr:idm:* , fr:am:* and fr:idc:esv:* scopes. A service account will have to be created for each environment — sandbox, dev, staging and production.
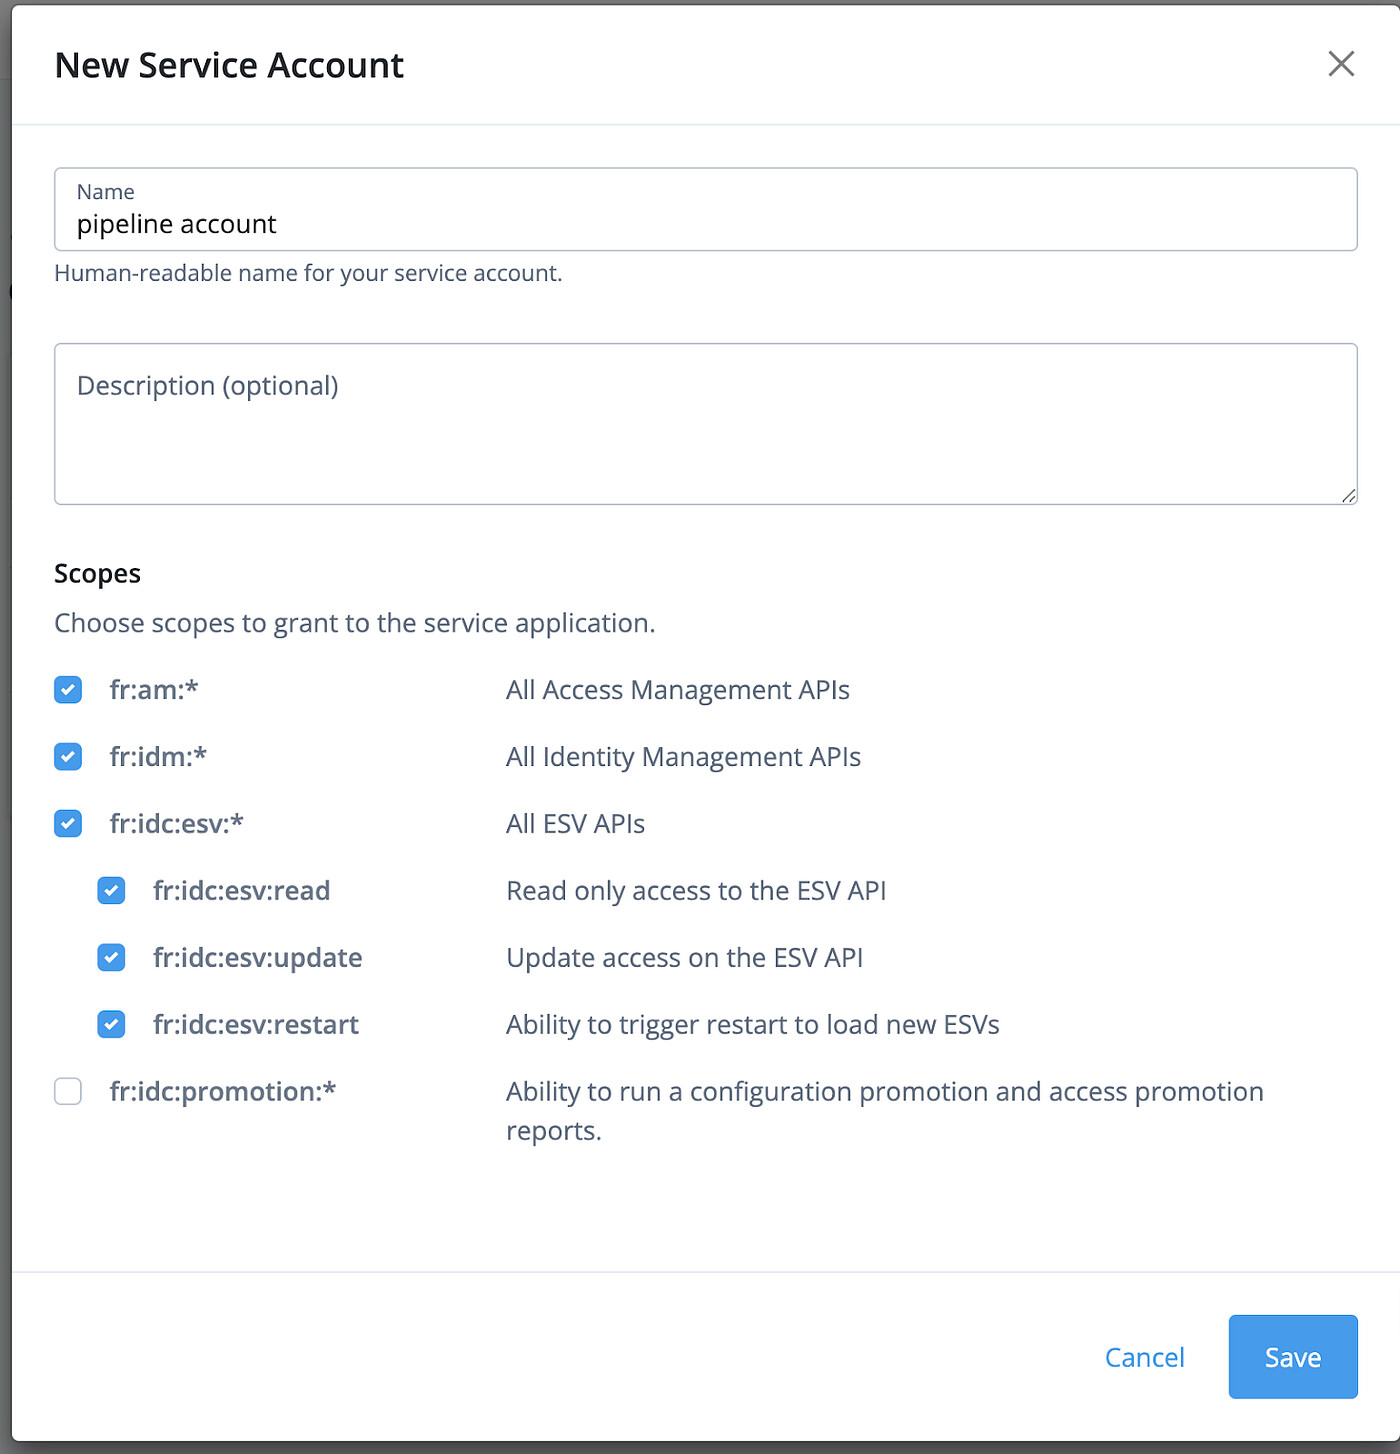
Creating a new service account
 +
Download the key file and open it in a text editor. +
Install the pull command
Run the following commands:
mkdir ~/identity-cloud
cd ~/identity-cloud
git clone https://github.com/ForgeRock/fr-config-manager.git
cd fr-config-manager
npm install --ws
cd packages/fr-config-pull
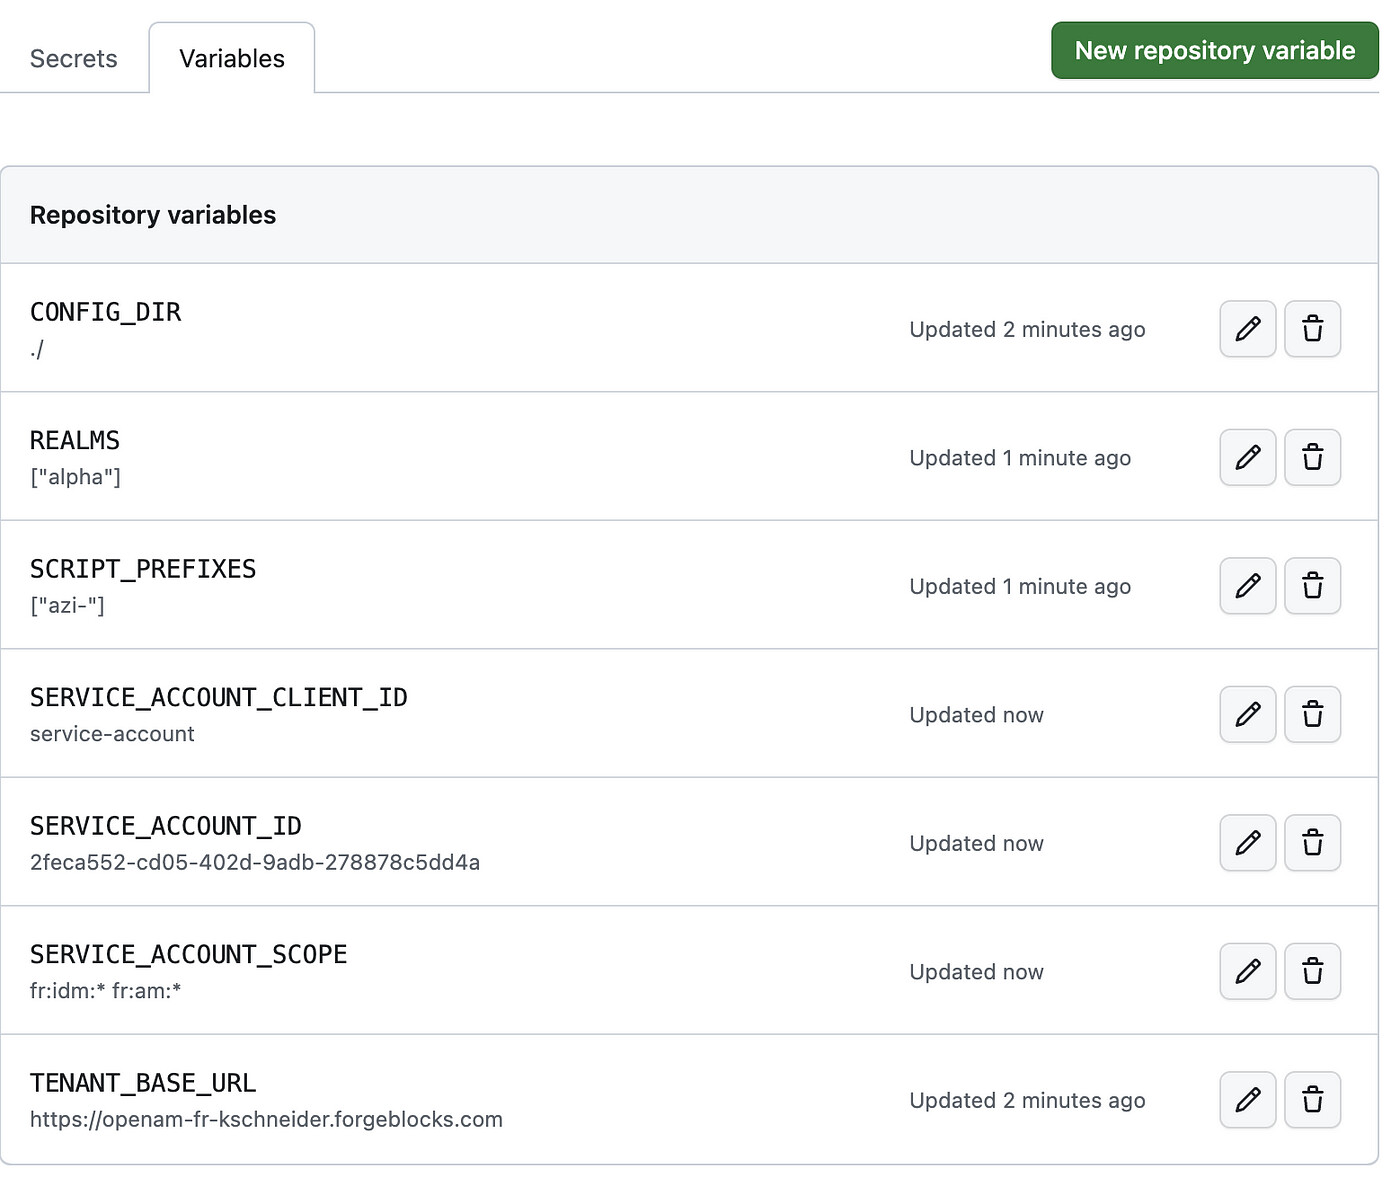
npm linkCreate a .env file for the initialization. Refer to the README.md for details about the .env file. Use the details for the sandbox environment.
# Sample environment for ForgeRock Identity Cloud config pull
TENANT_BASE_URL=https://openam-xyz-sandbox.forgeblocks.com
# Directory to write configuration data to
CONFIG_DIR=./fidc-config
# AM realms to pull config from
REALMS=["alpha"]

# AM script prefix - only pull scripts with matching names
SCRIPT_PREFIXES=["ks-"]

# Service account ID
SERVICE_ACCOUNT_ID=2feca552-cd05-402d-9adb-278878c5dd4a

# Service account PEM encoded private key
SERVICE_ACCOUNT_KEY="DOWNLOADED KEY"

# System wide OAuth2 client ID for service account
SERVICE_ACCOUNT_CLIENT_ID=service-account

# Scope to request for service account access
SERVICE_ACCOUNT_SCOPE=fr:idm:* fr:am:* fr:idc:esv:*
Warning : The .env file contains credentials to a service account which is a very highly privileged account and as such must never be committed to the git repository. Add the .env to the .gitignore file if it is within the repository directory.
Pull the initial configuration
You can now pull the configuration from your ForgeRock Identity Cloud environment. The fr-config-pull all command calls all the ForgeRock Identity Cloud endpoints, downloads the configuration and splits it up into their respective components.
Pull the configuration to initialize the repo. Cd to the directory containing the .env file and run:
fr-config-pull allCommit and push the initial config
cd fidc-config
git init
git add — all
git commit -m ‘Initial configuration of the forgerock identity cloud sandbox tenant’
git branch -M main
git remote add origin https://github.com/xyz/fidc-config.git
git push -u origin main
Setting up the GitHub action
Now that the repo is initialised, we can create a pipeline that will push changes automatically into the development environment.
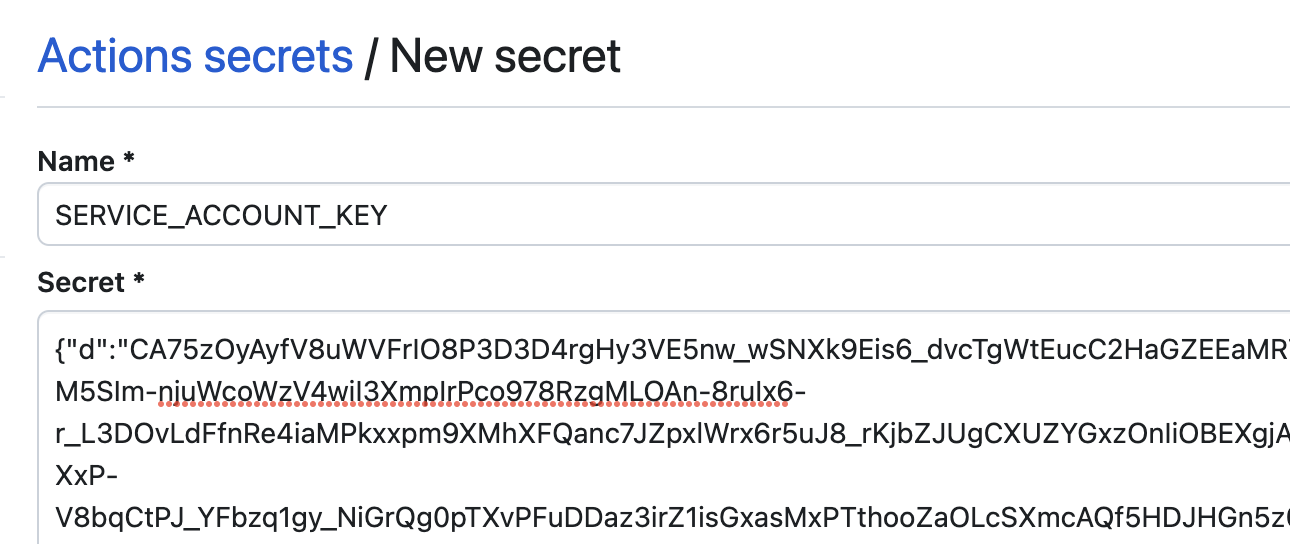
Service account secret
Create a new secret for the service account belonging to the development environment.
In GitHub repo settings > Secrets and variables > Actions
Add a new repository secret.
Name: SERVICE_ACCOUNT_KEY
Value: the JWK key of the service account
Create a GitHub action workflow file
The following example workflow provides a very simple and basic pipeline, that pushes any repo changes that are merged into the main branch into the development tenant. Note that there is no need for an .env file, as all the configuration is injected by the repository secrets and variables in the env: block of the workflow file.
name: ForgeRock Identity Cloud Static Config

env:
  SERVICE_ACCOUNT_ID: ${{ vars.SERVICE_ACCOUNT_ID }}
  SERVICE_ACCOUNT_KEY: ${{ secrets.SERVICE_ACCOUNT_KEY }}
  TENANT_BASE_URL: ${{ vars.TENANT_BASE_URL }}
  REALMS: ${{ vars.REALMS }}
  SCRIPT_PREFIXES: ${{ vars.SCRIPT_PREFIXES }}
  SERVICE_ACCOUNT_CLIENT_ID: ${{ vars.SERVICE_ACCOUNT_CLIENT_ID }}
  SERVICE_ACCOUNT_SCOPE: ${{ vars.SERVICE_ACCOUNT_SCOPE }}
  CONFIG_DIR: ${{ github.workspace }}

on:
  push:
    branches: [ "main" ]
  pull_request:
    branches: [ "main" ]

jobs:
  build:
    runs-on: ubuntu-latest
    strategy:
      matrix:
        node-version: [ 19.x]
        # See supported Node.js release schedule at https://nodejs.org/en/about/releases/

    steps:
    - uses: actions/checkout@v3
    - name: Use Node.js ${{ matrix.node-version }}
      uses: actions/setup-node@v3
      with:
        node-version: ${{ matrix.node-version }}
    - name: install external repo
      run: git clone https://github.com/ForgeRock/fr-config-manager.git
    - name: Install config push
      run: |
          cd fr-config-manager
          npm install --ws
          cd packages/fr-config-push
          npm link
    - name: Update static config
      run: fr-config-push all-static
Save the workflow file.
Once the repository is initialised, changes to the development environment should only happen through the pipeline.
How to use the pipeline
Development
Development can either happen directly in a sandbox environment from which the changes are then pulled back into the repo or by editing files on a branch of the repo using an IDE. Direct configuration of a sandbox is recommended or even required where the UI is the major driver. This is particularly the case for authentication journey development. The changes should then be pulled again and added to the repo to ensure the config is up to date and reviews are carried out.
Other configurations, such as scripts are much easier to develop in a fully-fledged IDE. This is greatly facilitated by the rhttps://medium.com/@kevsuisse/configuration-management-for-forgerock-identity-cloud-part-1-a703fe6b22c7[epo structure discussed in part 1], where native file types are kept separate from their metadata wrapper.
The development process for ForgeRock Identity Cloud should align with the Secure Development Lifecycle process for other developments. A well-designed and known process can be taken as the baseline and adapted to the specifics of ForgeRock Identity Cloud.
Branching and version control
As is generally the case for continuous integration, trunk based branching is the recommended strategy. Developers split features into small, self-contained batches of work and merge them frequently back into the trunk. In combination with reviews and testing this practice prevents big, interruptive merges and minimises the need for conflict resolutions.
Developers should keep in mind that the promotion process always promotes all configurations to the higher environment and cherry picking changes is not possible.
To enable the emergency rollout of bug fixes, it may be necessary to roll back development changes to the version currently in production and apply bug fixes on top of that. How this is best implemented depends on factors such as what GIT repository software is being used.
An approach could be to create a git tag with a version number and add that version number as a metadata file into the ForgeRock Identity Cloud config. This way the current production version can be quickly identified and the corresponding tag checked out and pushed into the sandbox environment to fix the bug.
The impact of a rollback is minimized if changes are rolled out to production frequently to avoid a large diverge between the development and production environment.
Example use case
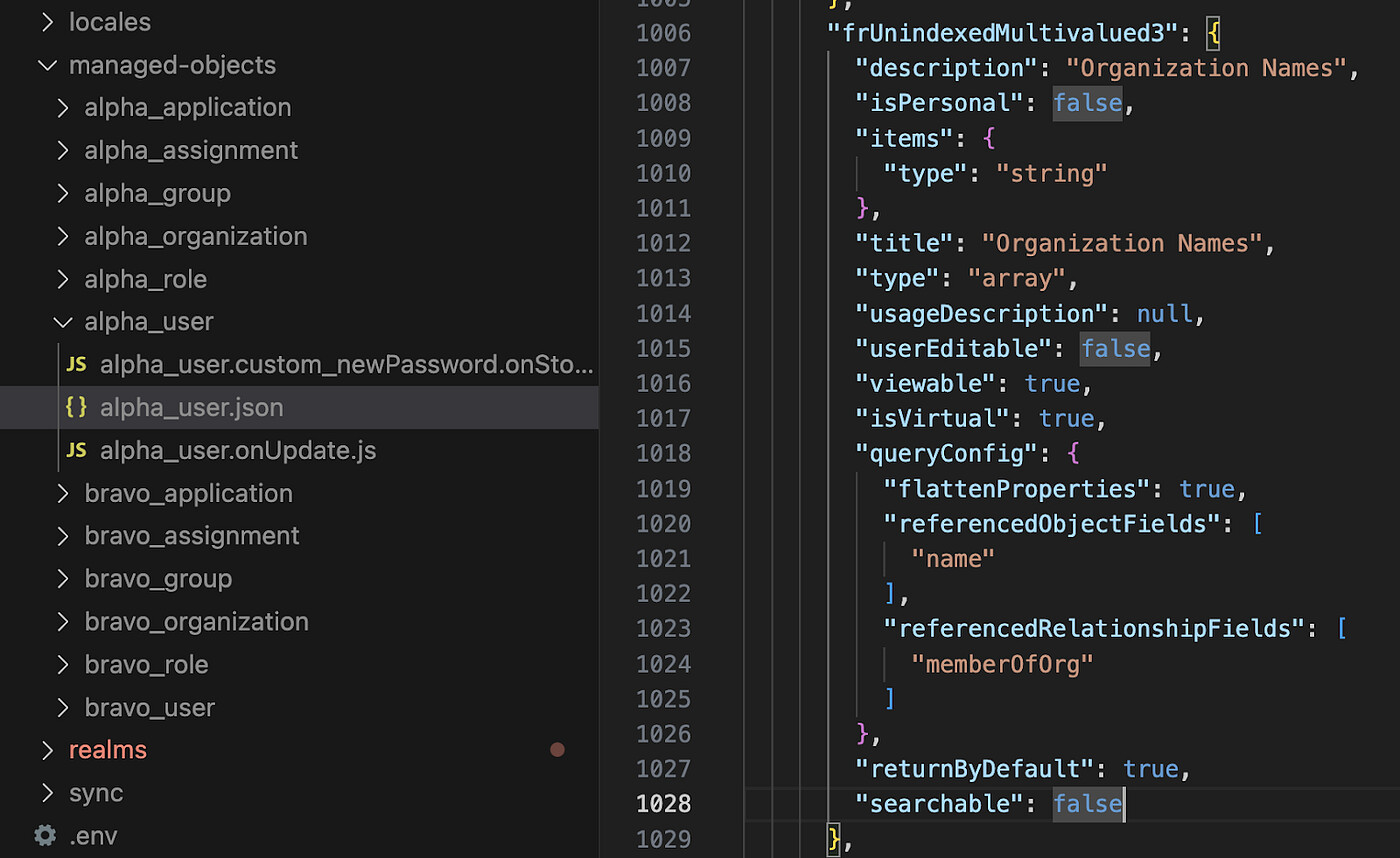
Let’s say our task is working on a story to change an existing journey to make use of a relationship-derived virtual property (RDVP) on frUnindexdMultivalued3 that is not yet defined. We split the story into individual tasks, one to update the journey and one to update the alpha_user managed object to introduce the RDVP. As the RDVP is a dependency of the journey, that task is completed first.
The developer creates a branch of the main repository.
git checkout main
git pull
git checkout -b feature/loginOrgCheck
RDVPs are defined in the openidm/config/managed endpoint. We want to set the flattenProperties attribute of the RDVP, which cannot be set via the UI. So it is easiest to just edit the file directly. As we’ve just checked out the configuration, we can just open the managed-objects/alpha_user/alpha_user.json file where the attributes are defined in an IDE and update it to define the RDVP on frUnindexedMultivalued3.
We then update the managed objects in the sandbox environment specifically with the alpha_user configuration, to ensure we only push our own changes and don’t overwrite other developers work.
fr-config-push managed-objects -–name alpha_userWe can now test if our change is behaving as expected.
We can check the attribute in the UI to ensure the changes have been made.
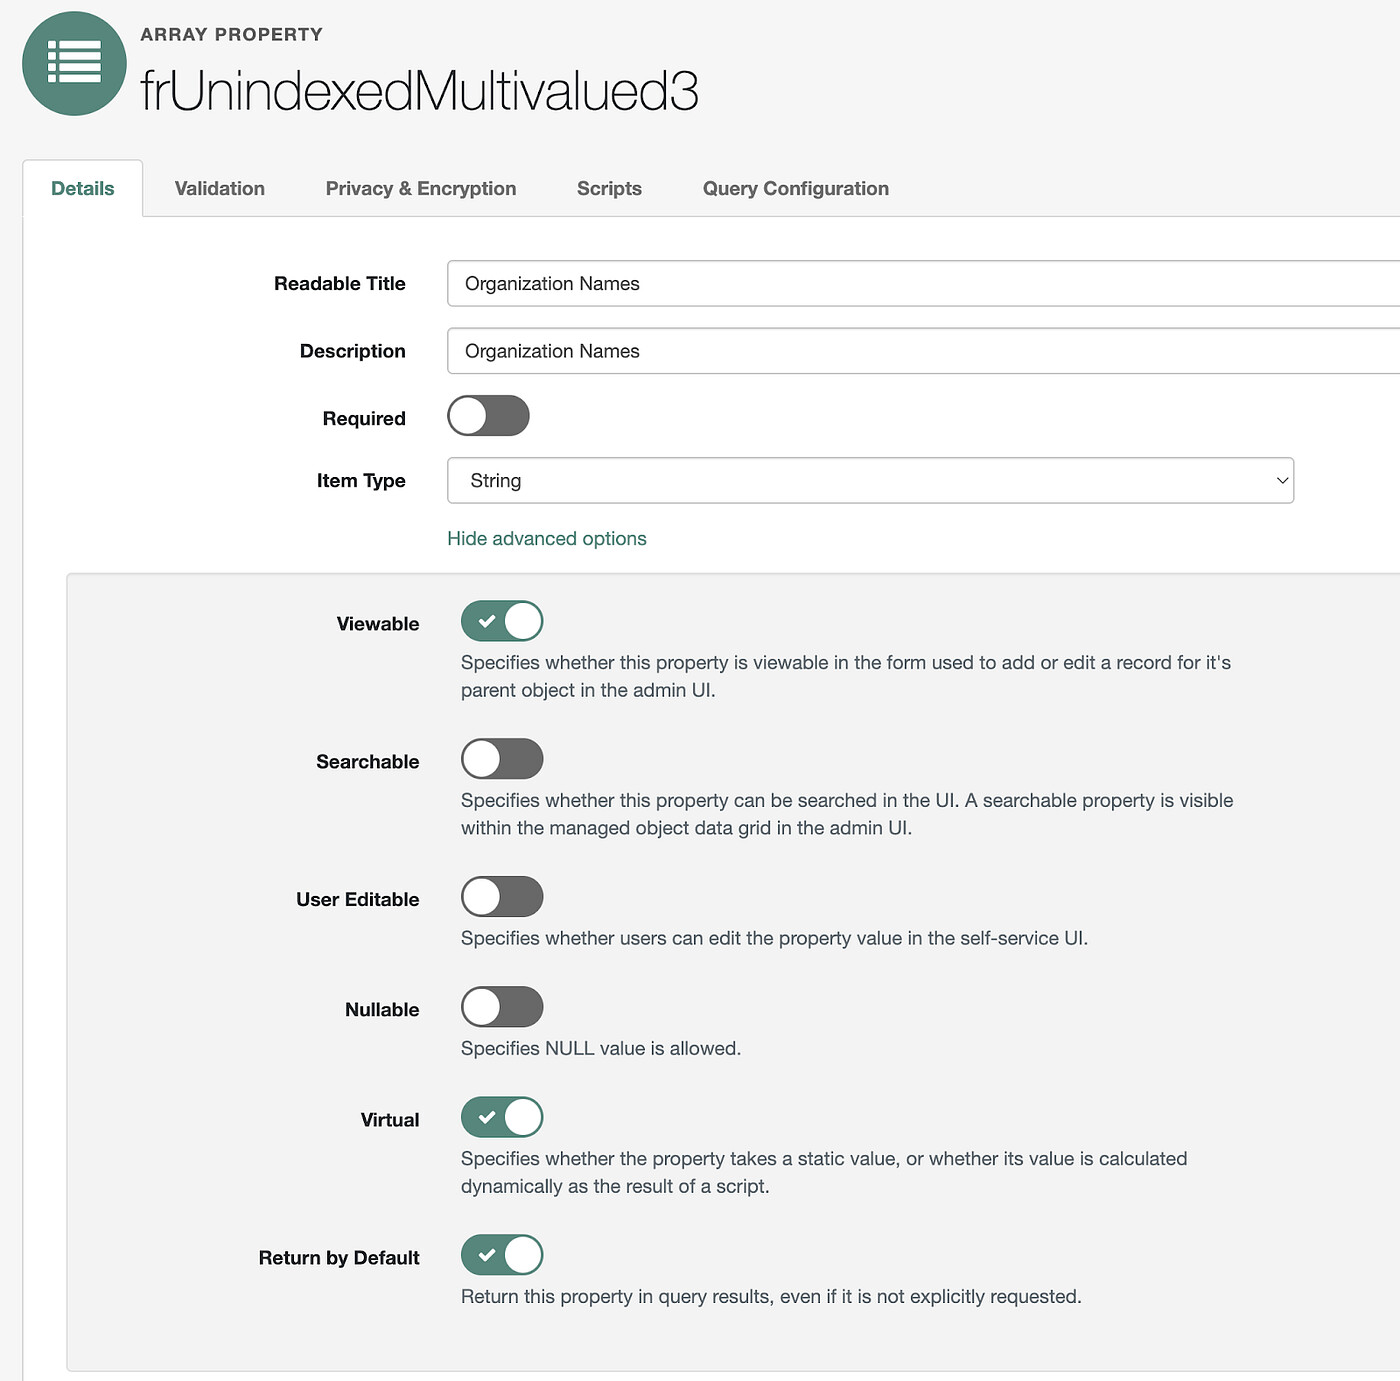
frUnindexedMultivalued3 after the change
After making a user member of an organization, the organization name is reflected in frUnindexedMultivalued3 as expected.

The attribute viewed in the Admin UI shows the name of the organization we have added.
After that check, we commit and push the branch to the repo before starting on the second task of the story.
git commit -am ‘setting frUnindexedString3 as a RDVP with alpha_org names’
git push
Working on journeys
Journeys are an example of a configuration that cannot realistically be worked on in an IDE, it is much more efficient to work directly in a ForgeRock Identity Cloud environment.
To do that, let’s first make sure the journey we are working on is the same as in the production branch. For that, we refresh the main branch of the repo and push it and its dependencies to our sandbox environment.
git checkout main
git pull
fr-config-push journeys –name Login -r alpha -d
Once this has been completed, we can do the updates on our journey using the journey editor in the sandbox environment.
In this example, we add a new scripted decision node with a script that ensures that the user is part of an organization with the name ‘MyOrg’.
We add the scripted decision node, click on the plus sign in the script selector to create a new script
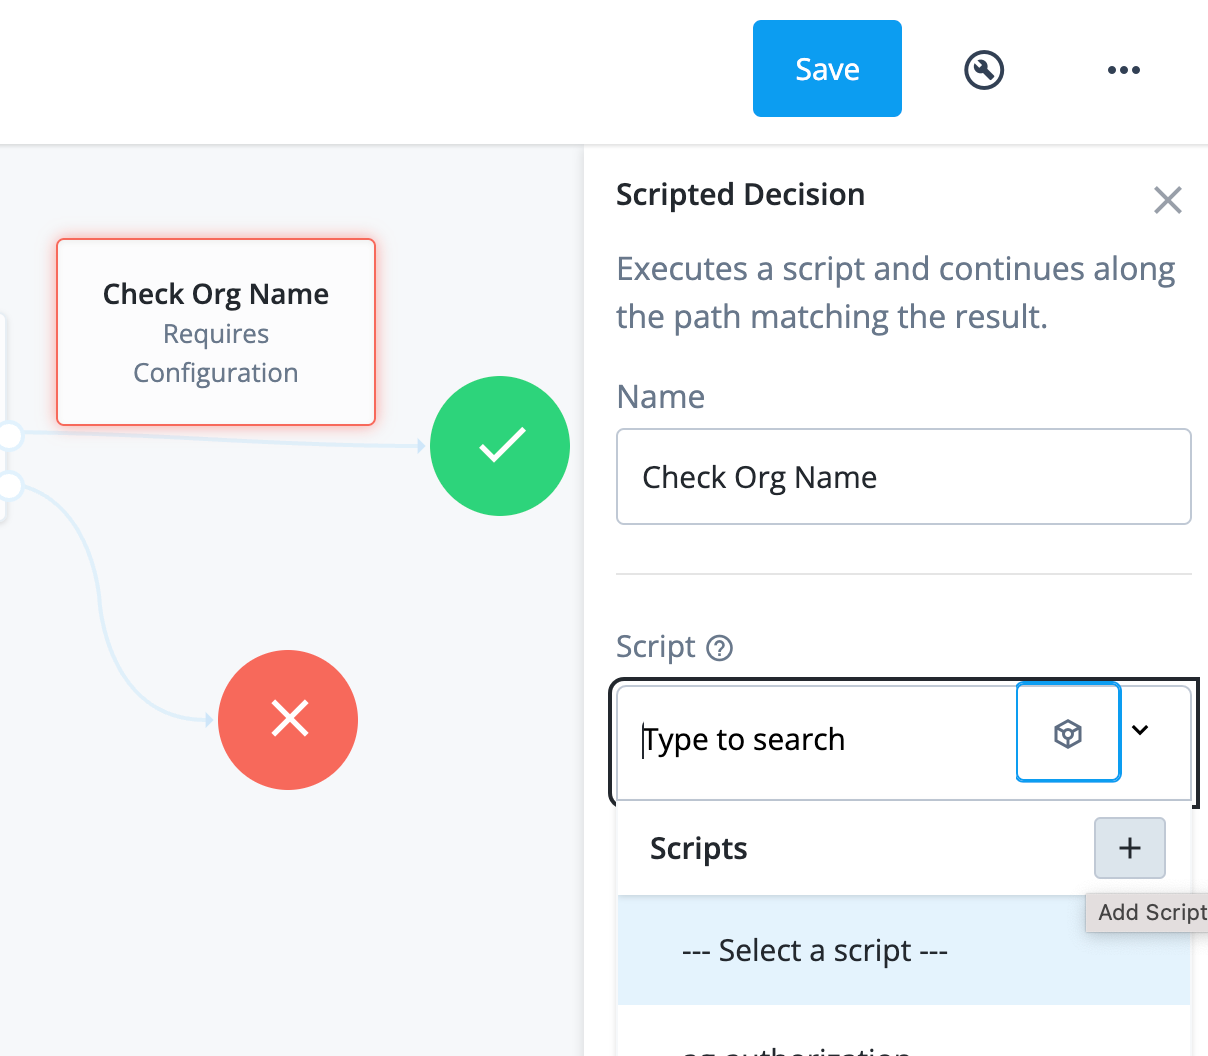
Adding a scripted decision node to the Login journey
+
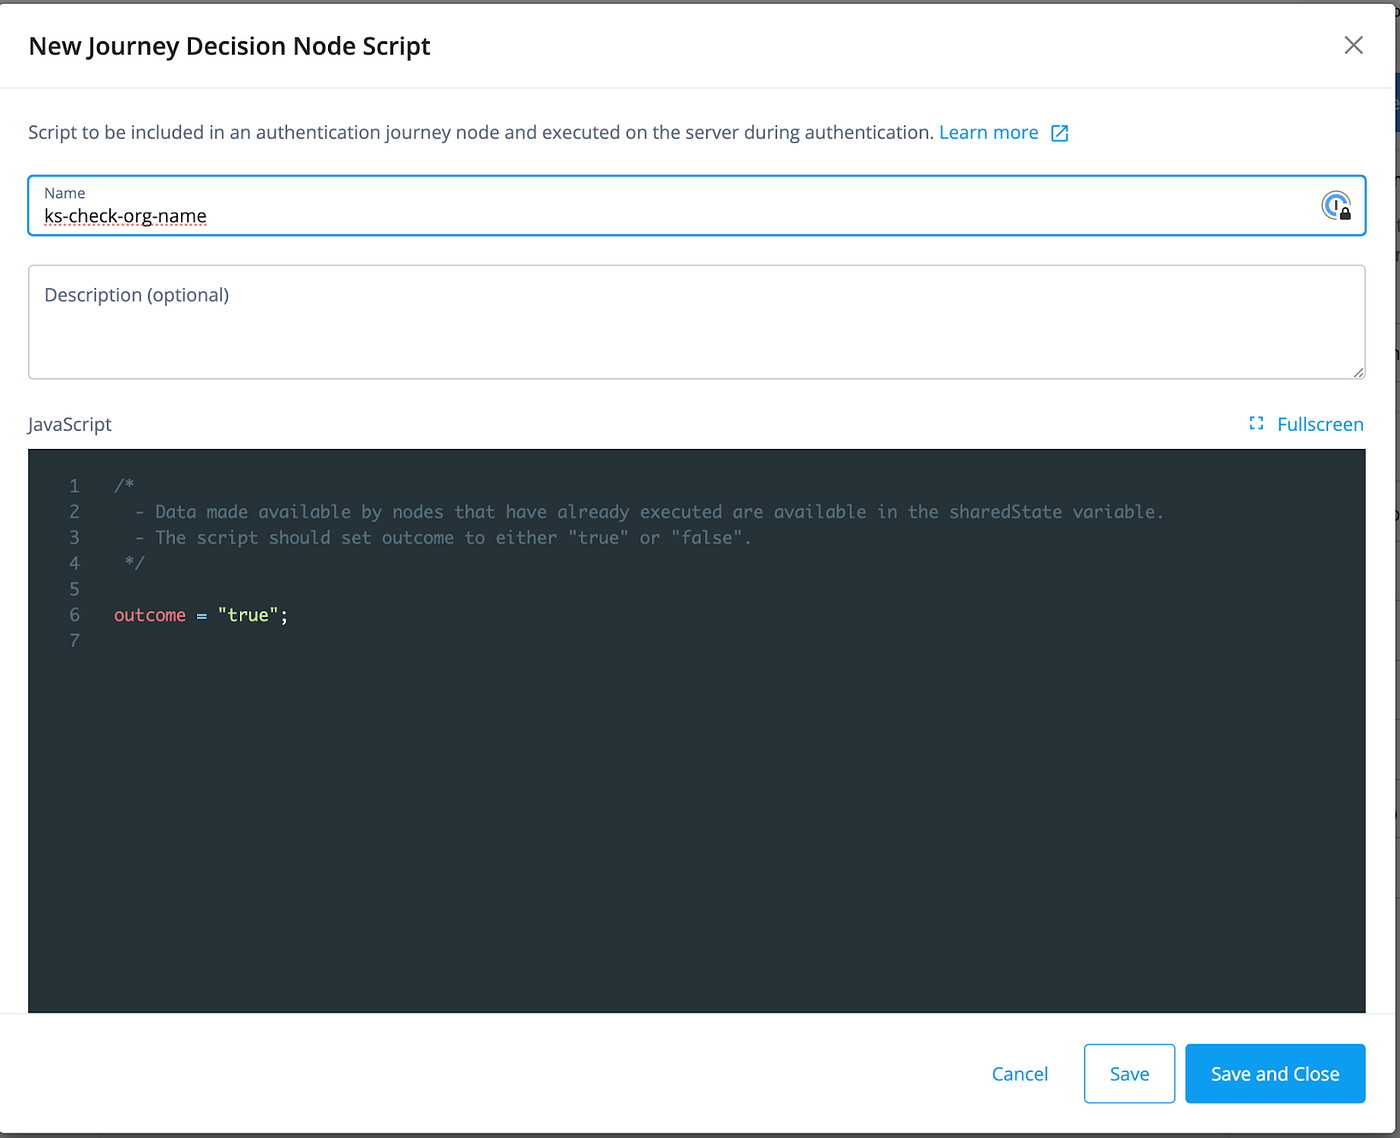
In the editor that opens, we give the script a name and click Save and Close.
We also configure the outcomes as ‘true ’ and ‘false ’ and connect the outcomes to the ‘success ’ (green checkmark) and ‘failure ’ (red cross) end nodes, respectively.
We could develop the script in the journey editor, but it is much more convenient to do so in an IDE. So we save the journey in the editor and go back to the IDE.
We can now change back to the feature branch and pull the journey with its dependencies.
git checkout feature/loginOrgCheck
fr-config-pull journeys –-name Login — -realm alpha -d
The new script is now available in the IDE and we can develop it’s content in there.
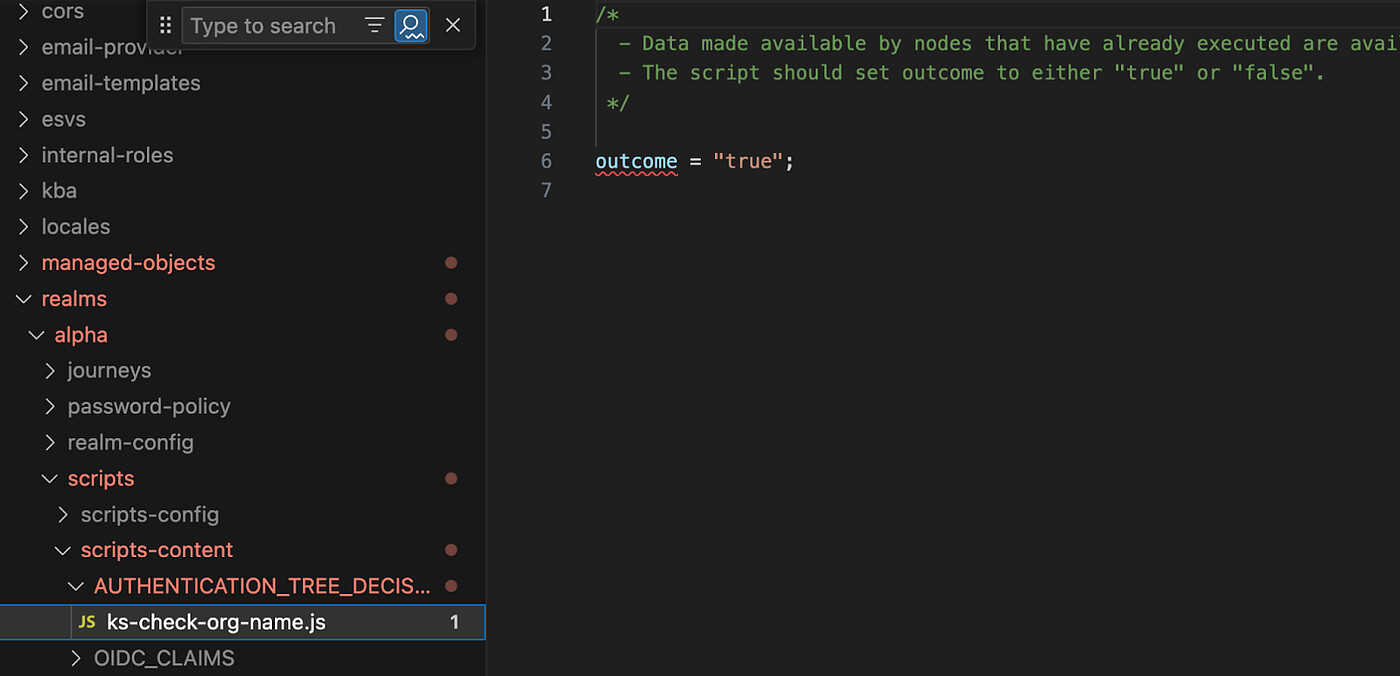
The new script in the IDE Once
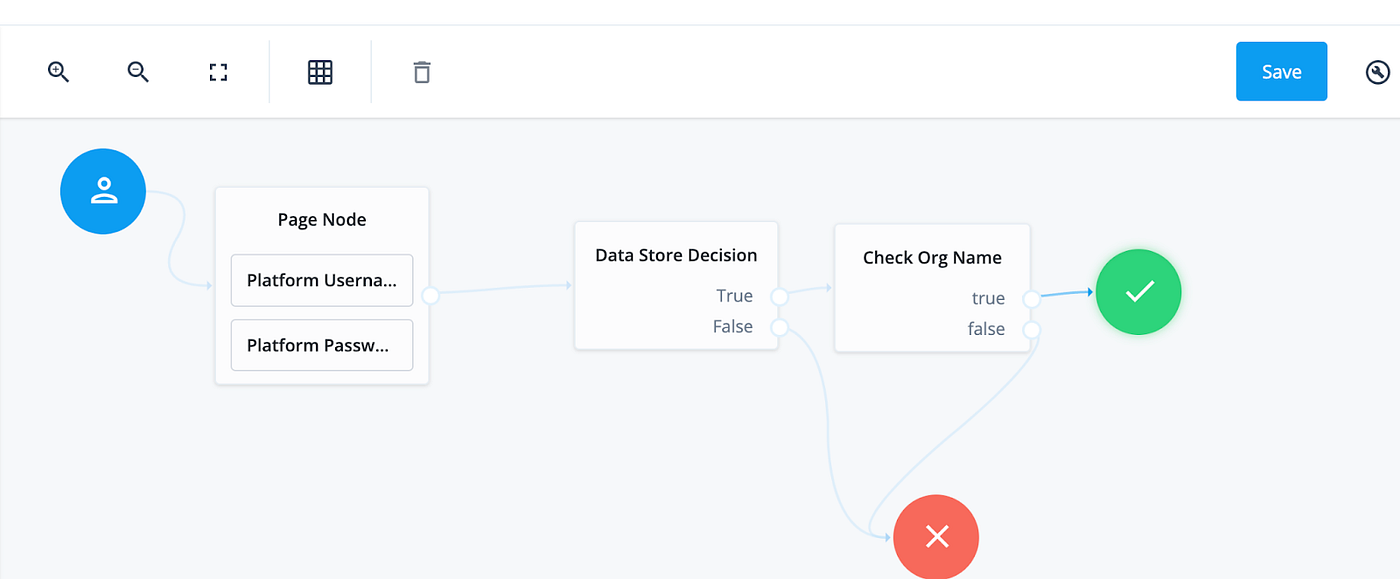
Once the development is complete, we push the journey back to the sandbox environment.
fr-config-push journey — -name Login — -realm alpha -dWe can now test if everything is working as expected. If not, fix the issues and push the journey again until we are happy with the solution.
We can check that we had only modified the journey and the scripts by issuing a git status command:

We can then commit the changes and push the branch to the repo
git commit -am ‘update Login journey with an org check’
git push
Finally, we create a pull request to merge the changes back into the main branch.
Whilst we are working on this story, other developers are doing their work in the same way. They coordinate on what particular configurations they work on at any given time. That practice and the small incremental changes ensure that it is seldom necessary to do complicated merge conflict resolutions.
Review
Being able to quickly and efficiently review changes as they are made is essential to ensure quality and prevent most mistakes before they can reach even the development environment. The repository can be set up in a way that requires pull requests into the main branch and requires one or more reviewers to accept a change before it can be merged.
The repo structure discussed in part 1 allows for changes to be made easily visible and understandable to a reviewer. Importantly it also helps identify changes slipped in by mistake
Example
Our pull request with the change on managed.json in the above example triggers a notification to all the other developers in the team. One of these developers opens the change and starts the review.
A reviewer can easily see what files have been affected. In this example, just by looking at the file name, we can see that the alpha_user managed object is affected in the first commit.
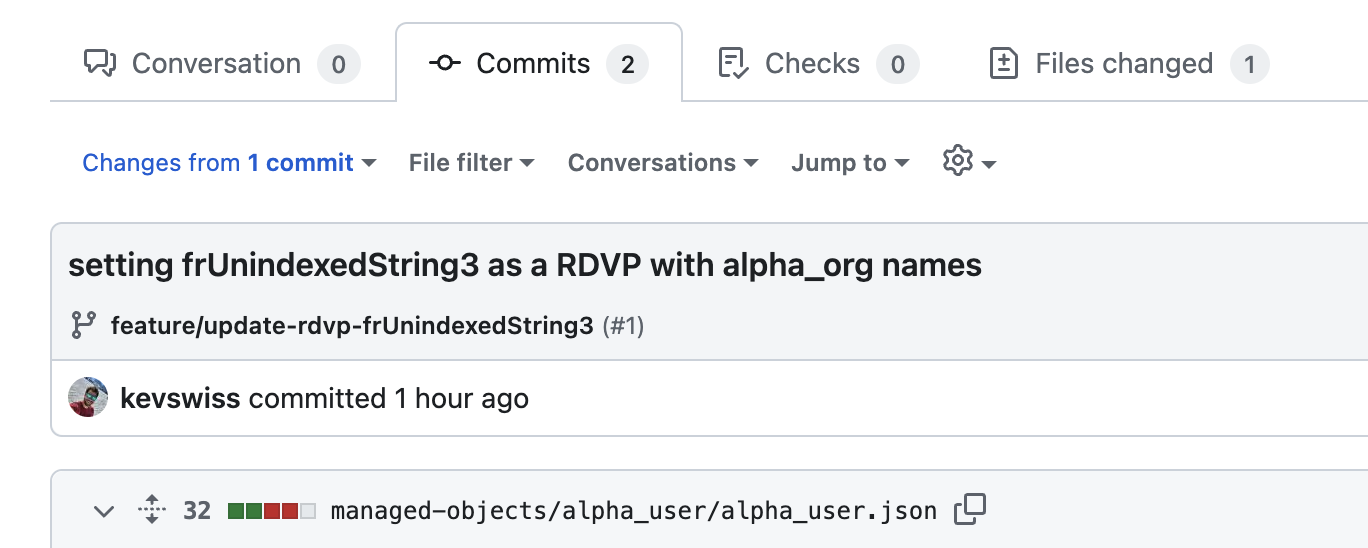
Commit view of the pull request
 +
The reviewer can also easily see what the exact changes are. +
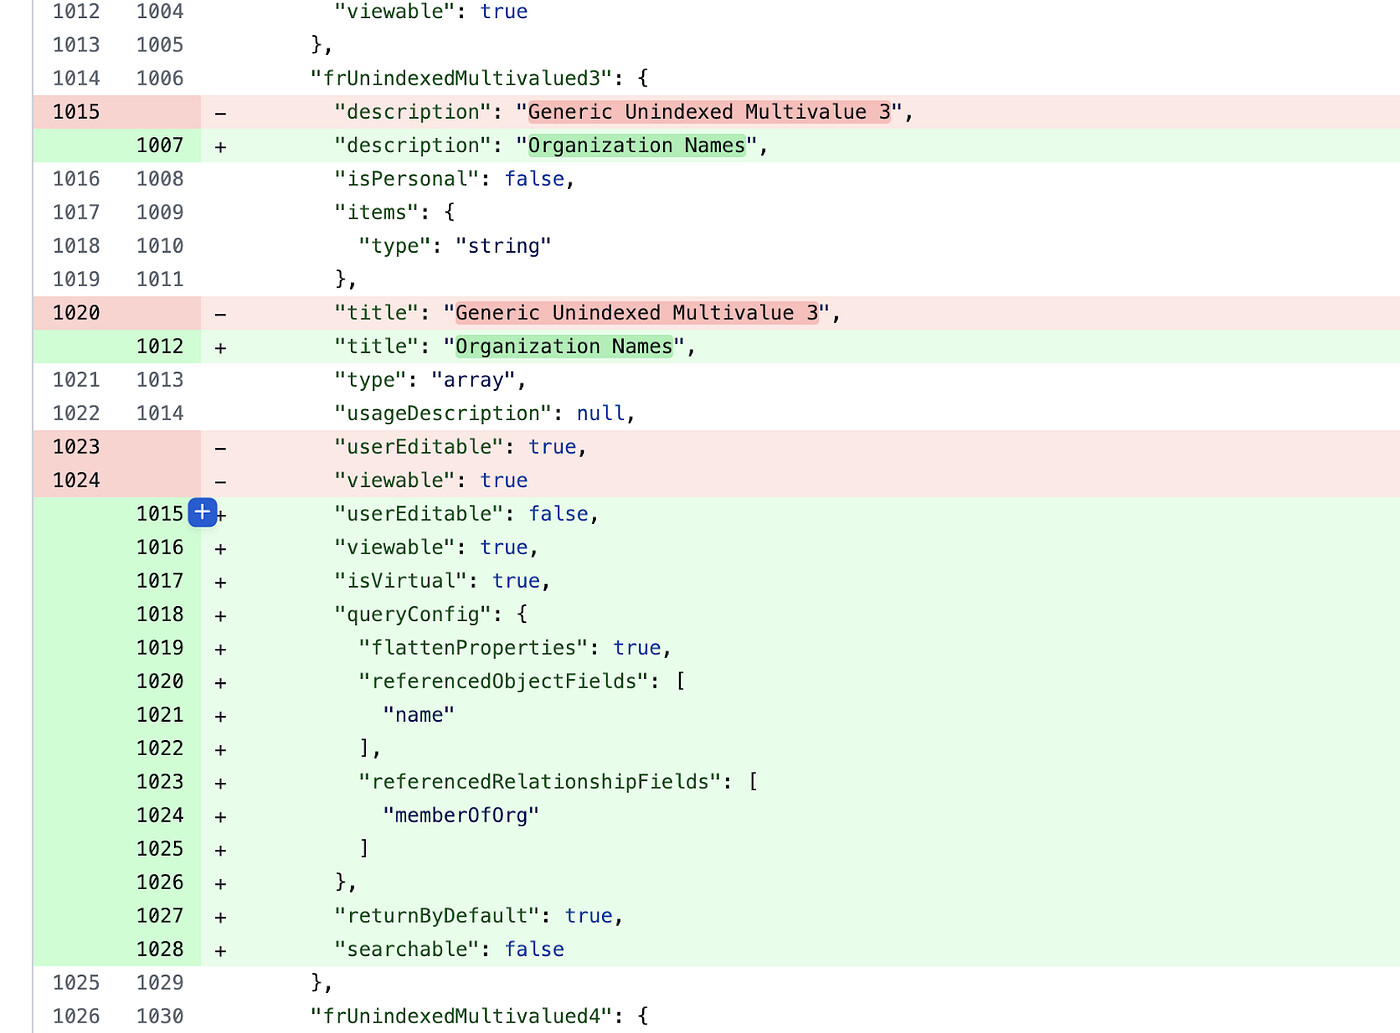
Changes are highlighted when reviewing the pull request
From here a reviewer can review the change as required by the SDLC and ultimately approve or reject the change.
Merge into the development environment
Once changes are reviewed, they can be merged into the main branch. Once merged, this would trigger the GitHub action described above to deploy the change into the development environment.
The simple action ends with the deployment, so any further testing and promotion to the higher environments would need to be executed manually. In reality, these actions would ideally also be automated.
Order of updates
The simple GitHub action uses the fr-config-push all-static command to push the static configuration. Alternatively, the action could individually call push commands to update the configuration.
The following order has been found to be working
-
Scripts
-
Nodes
-
Authentication Journeys
-
Service definitions
-
Realm configuration
-
Managed objects
-
Remote servers
-
Connector Definitions
-
Connector Mappings
-
Custom Endpoints
-
CORS configuration
-
Email templates
-
Themes
-
KBAs
-
Password Policies
-
Terms and Conditions
-
Access Configuration
-
Schedules
Removing configuration
Removing configuration is more complex than adding new or updated configuration objects. Some configuration is always in the form of updates, for example, managed objects are defined in one self-contained file — managed.json. That means that even a big change like removing a whole custom managed object is simply an update to that file and pushing that file guarantees the ForgeRock Identity Cloud tenant is aligned exactly with the repository.
Other configurations, such as journeys are individual configuration objects. As such they have to be actively removed with a DELETE operation.
A simple strategy could be to detect objects to delete by having the pipeline pull the configuration after an update and compare that new configuration with the main branch. Any extra object in the pulled configuration would be a candidate to delete.
Ensuring configuration can only be pushed via the pipeline
As pushing the configuration from the repo does not guarantee in itself that there haven’t been any manual changes, it is important to restrict tenant admin access to the development environment. Tenant admins should only access the environment in case of an emergency or for initial setup and developers shouldn’t regularly be given tenant admin accounts.
Instead, only the pipeline should have that access by using a service account to connect to the development environment.
Testing
Journeys, scripts and other configuration elements require a runtime context to be executable. It is therefore necessary to push the configuration in a ForgeRock Identity Cloud environment and tests run against that environment. This means that testing is always a form of integration testing.
Initial testing should be done by the developer before creating a pull request. This testing is best done in a sandbox environment.
After the push to the development environment, a full suite of tests should be run to ensure that everything is working as expected and no regressions have been introduced. Depending on the setup integration testing with the wider connected systems can be done in development or staging environments.
These tests can also form a quality gate for further promotion to higher environments.
Automated testing should also be combined with regular explorative testing.
Promotion to higher environments
Once testing in the development environment has been completed, changes can be promoted to the staging environment. This promotion can be automated by the use of service accounts and self-service promotions.
In general, it is best practice to promote all the way to production as often as possible. This ensures that there isn’t a big feature gap between production and development environments and bug fixing is always possible without the need for complex rollback operations.
In some cases, like in scripts and journeys, it is possible to use feature flags to prevent new features from being accessible in production but still keep the pipeline going. Such a flag could be implemented in a script as a condition that checks the value of an ESV or that it is being executed in a certain domain and only executes the feature if the condition is met.
Conclusion
Implementing and using a CI/CD pipeline for ForgeRock Identity Cloud makes the development process much more efficient and secure. This article gives an overview of how that pipeline could look like, but customers need to take the time to consider how this best fits in with their project goals and surrounding practices.