ForgeOps DS Customization Guide 7.4/7.5
Author: |
Lee Baines-Dark |
Created at: |
Mar 2024 |
Updated at: |
Nov 2024 |
Overview
This document provides sets of instructions explaining how to customize and manage your PingDS deployment when deployed into a Kubernetes environment using ForgeOps. The use cases below are some of the more common use cases required by a majority of users and should help bridge the gap between tasks that users often know how to execute in an on-prem PingDS deployment but don’t know how to achieve the same outcome with a ForgeOps deployment.
IMPORTANT: The latest release of forgeops is available on the forgeops main branch. We no longer use release branches for new product releases. In this branch, the
docker/ds/ds-newdirectory has been removed and the PingDS artifacts are available underdocker/ds.
NOTE: Any references to the forgeops repository or documentation is based on 7.4. The functionality for all use cases are the same for 7.5 and will be changed once 7.5 is released.
HELM: The following examples are based on Kustomize deployments using bin/forgeops. Helm deployments are available as a technology preview in 7.4. See the forgeops documentation for more details.
VIEWING THE LDAP DIRECTORY USING APACHE DIRECTORY STUDIO
-
Download and open Apache Directory Studio
-
Retrieve your PingDS admin password from the ds-passwords Kubernetes secret:
kubectl get secret ds-passwords -o yaml |grep dirmanager.pw | cut -d' ' -f4 |base64 -d -
Port forward to your PingDS server on your terminal
kubectl port-forward ds-idrepo-0 1389 -
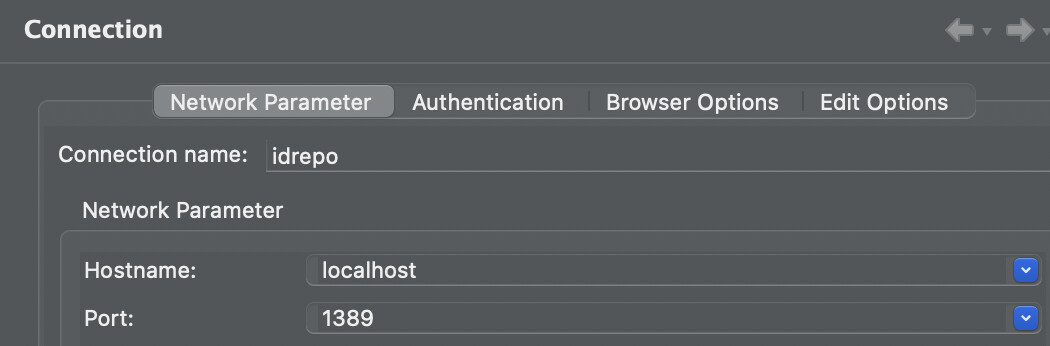
Configure Apache Directory Studio to connect to your DS server:
-
Create a new LDAP connection
-
Complete the Network Parameter tab as follows:
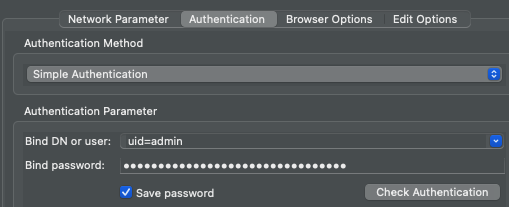
c. Update the Authentication tab with the Bind DN and the password your retrieved in step 2 and click on Check Authentication to verify that the connection is successful:
-
-
Click on your new LDAP connection to bring up the LDAP browser or right click to view option to open schema browser.
ADDING CUSTOM LDAP CONFIGURATION
Custom LDAP configuration can be included in your PingDS image by adding
your custom ldif files to the docker/ds/ds-new/ldif-ext directory.
This directory has been separated into subdirectories for each backend
so just drop your ldif files into the relevant directory and rebuild the
PingDS image:
-
Build your DS image e.g.
forgeops build ds --tag <tag name> -
Deploy DS.
forgeops install
or you can test DS only by running
forgeops install base ds -
Validate your changes by attaching an ldap directory viewer to view the LDAP changes.
IMPORTANT These changes can only be made to a fresh deployment of PingDS.
If you want update the image on an already running deployment, ensure you delete the PVC prior to redeploying PingDS.
If you want to update PingDS without downtime, then follow the steps in the “Online LDAP updates” section below
Online LDAP updates
To update the LDAP confguration entries online without restarting
PingDS, use the
ldapmodify
command but also make sure that your maintain the same custom LDAP
configuration changes in your forgeops repo for future deployments.
ADDING CUSTOM LDAP SCHEMA
LDAP schema is configured in the upstream PingDS image and not in forgeops. But you can include custom schema changes by following the below steps:
-
Navigate to
docker/ds/ds-new/config/schema. All custom schema files should be added here. There is a sample file in this location to use as a starting point. -
Create your custom schema file here.
-
Build your PingDS image
forgeops build ds --tag <tag name> -
Deploy PingDS.
forgeops install
or you can test PingDS only by running
forgeops install base ds -
Validate your changes by attaching an ldap directory viewer to view the schema.
IMPORTANT These changes can only be made to a fresh deployment of PingDS.
If you want update the image on an already running deployment, ensure you delete the PVCs prior to redeploying PingDS.
If you want to update PingDS without downtime, then see the “Online schema changes” section below.
Online schema changes
To update the schema on a running server, follow the commands in the
DS
documentation but also make sure that your maintain the same custom
schema changes in your forgeops repo for future deployments.
USING RUNTIME(LIFECYCLE) SCRIPTS TO CUSTOMIZE IDREPO AND CTS SEPARATELY
By default, forgeops offers a single PingDS docker image that is
consumed by both idrepo and cts pods. Therefore making changes to the
PingDS docker image changes both the behaviour of idrepo and cts. In
most cases this is sufficient as PingAM and PingIDM use only the
backends that it needs. But sometimes users want to configure the
behaviour differently for idrepo or cts. This can be done by configuring
custom lifecycle scripts(these are the runtime scripts in
docker/ds/ds-new/default-scripts and adding them to a configmap. See
the readme for more details:
forgeops/docker/ds/ds-new/README.md
at release/7.4-20240126 · ForgeRock/forgeops · GitHub
NOTE The use of configmaps is only relevant in the 7.4 and 7.5 release branches. If you checkout the latest release in the new forgeops main branch, you no longer require the use of configmaps. The default-scripts dir is renamed to runtime-scripts and contains subdirectories for idrepo and cts. These subdirectories contain separate sets of runtime(lifecycle) scripts which allow you to configure idrepo and cts separately if required.
Helm Steps
-
Add your custom lifecycle scripts to a dedicated directory. If you are adding custom lifecycle scripts for both idrepo and cts, then you would need separate directories for each. There are already sample directories under forgeops/charts/identity-platform/files/lifecycle-scripts/ds which you can use or duplicate. These sample locations are set as default in the values.yaml.
-
Enable lifecycle scripts in your values file for:
idrepo:
  idrepo.lifecycleScripts.enabled: true
  idrepo.lifecycleScripts.path: </path/to/dir/containing/custom-scripts>
cts:
  cts.lifecycleScripts.enabled: true
  cts.lifecycleScripts.path: </path/to/dir/containing/custom-scripts>
Kustomize Steps
-
Create a configmap for each ds server you want use custom scripts for:
-
idrepo:
kubectl create configmap ds-idrepo-lifecycle-scripts --from-file=/path/to/lifecycle-scripts/idrepo/setup -
cts:
kubectl create configmap ds-cts-lifecycle-scripts --from-file=/path/to/lifecycle-scripts/idrepo/setup
-
-
Configure your overlay to patch the relevant volumes and volume mounts to DS
e.g. ds-idrepo patch in <path/to/custom-overlay>/ds-idrepo.yaml
apiVersion: apps/v1
kind: StatefulSet
metadata:
 name: ds-idrepo
spec:
 replicas: 1
 template:
   spec:
     containers:
     - name: ds
       volumeMounts:
       - mountPath: /opt/opendj/scripts
         name: lifecycle-scripts
     initContainers:
     - name: init
       volumeMounts:
       - mountPath: /opt/opendj/scripts
         name: lifecycle-scripts
     volumes:
       - name: lifecycle-scripts
         configMap:
           name: ds-idrepo-lifecycle-scripts
           defaultMode: 0755