How to configure SAML flows using an External Login UI in PingOne
Author: |
Mark Nienaber |
Created at: |
Oct 2024 |
Updated at: |
Oct 2024 |
By Mark Nienaber
Originally posted on
marknienaber.medium.com
How to configure SAML flows using an External Login UI in PingOne Advanced Identity Cloud
Note: This is an updated version of a previous article which focused on older versions of the products and simpler use cases, you can find that article here.
Introduction
Use of an External Login UI has become common place in PingOne Advanced Identity Cloud (AIC) solutions. This article guides you to configure AIC as the SAML IDP protecting an app with PingGateway as the SAML SP. The Login UI will be external and backed by the Ping SDK.
The aim is to address a number of commonly requested use cases:
Use case 1: Use PingOne Advanced Identity Cloud as a SAML 2.0 IDP
PingOne Advanced Identity Cloud can act as an SP or IDP. This use case focuses on configuration of PingOne Advanced Identity Cloud to act as the Identity Provider.
Use case 2: Use PingGateway as a SAML 2.0 SP
PingGateway can operate under various personas, offering protection for APIs, microservices, and both modern and legacy applications. PingGateway has even been referred to as a Swiss Army Knife due to its highly configurable nature to meet even the most complex use cases. PingGateway will be protecting an application and act as the SAML SP.
Use case 3: Use an External Login UI backed by the SDK
In cases where customers manage their own login page the SDK can be used to traverse the login journeys, get SSO tokens and Access Tokens. We will configure authentication via an external page for this SAML interaction.
While this article combines all of these use cases , they can be met individually and you can plug in both your own SP or IDP should that be required, and use either hosted pages or your own login page.
Glossary
The following terms are used in SAML and federation:
-
Identity Provider (IDP): The service that manages the user identity.
-
Service Provider (SP): The service that a user wants to access. PingGateway acts as a SAML 2.0 SP for SSO, providing users with an interface to applications that don’t support SAML 2.0.
-
Circle of trust (CoT): An IDP and SP that participate in the federation.
The Following products are used in this integration:
-
PingGateway (AIC)
-
PingOne Advanced Identity Cloud (AIC)
-
PingAM (AM), formally ForgeRock Access Management
Design your solution
In this simple example, a Sample Application as well as PingGateway are running on a single Virtual Machine. Requests for the service are local and AIC (a SaaS product) is acting as the IDP sitting in Google Cloud Platform (GCP). The Login page with SDK is deployed locally as well. The following diagram illustrates the solution at a high level.
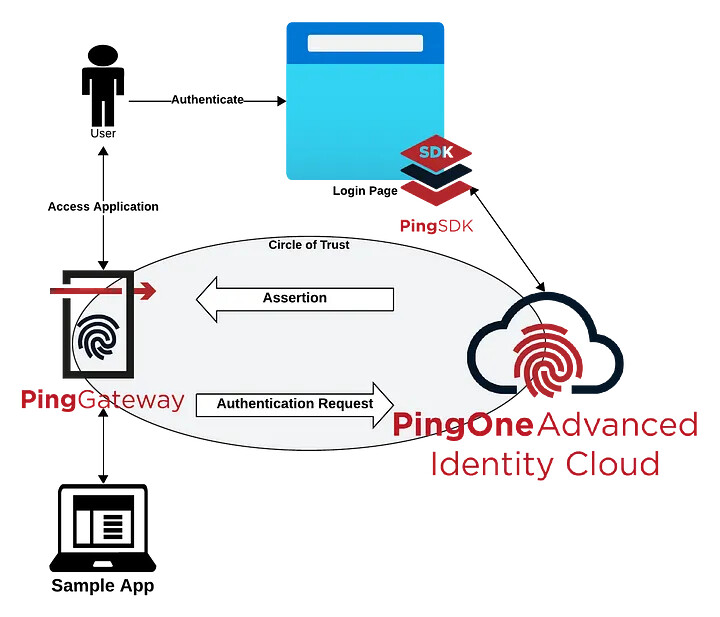
Simplified Solution
+
SP initiated SSO flow
-
End user accesses Sample App protected by PingGateway (SP)
-
PingGateway configured as a reverse proxy protecting the sample application at the following URL https://ig.example.com:9443/home, the SAML Filter will direct the enduser to the configured IDP — AIC
-
User is redirected to IDP — AIC with an SAML Authentication Request
-
IDP is configured with an external Login URL so directs the user to the login page
-
User Authenticates to the login page using SDK to interact with AIC
-
On successful authentication, the login page redirects the user back to the IDP
-
The IDP redirects the user back to the SP with with a SAML Assertion
-
User is granted access to protected application through PingGateway
The following URLs are configured:
PingGateway / SP: https://sp.example.com:9443/home
Sample Application (direct): http://sample.example.com:8081/home
Login Application: https://login.example.com:8443/
Setup the network
You’ll need to configure the /etc/hosts file on your PC/mac to reach
PingGateway and sample application:
` 127.0.0.1 sp.example.com sample.example.com login.example.com`
Nothing is needed for AIC as it’s a publicly accessible service, however if you are using a local AM installation you’ll need to configure that too.
Configure the Fedlet
PingAM provides a fedlet which you can read more about here. The fedlet is a small Java app that adds federation capability to your application. The fedlet libraries are already included in PingGateway but in order to utilise these built in federation capabilities you need to get the configuration files from the fedlet.
A copy of configured fedlet files can be found here.
-
Download the PingAM zip file from backstage — Downloads - BackStage
-
Inside the package find and unzip the
Fedlet-7.x.x.zipfile
$ unzip openam/Fedlet-7.5.0.zip
Archive: openam/Fedlet-7.5.0.zip
creating: conf/
inflating: README
inflating: conf/FederationConfig.properties
inflating: conf/fedlet.cot-template
inflating: conf/idp-extended.xml-template
inflating: conf/sp-extended.xml-template
inflating: conf/sp.xml-template
inflating: fedlet.war-
In the
conffolder make the following replacements:-
IDP_ENTITY_IDreplace withopenam -
FEDLET_ENTITY_IDreplace withsp -
FEDLET_PROTOCOL://FEDLET_HOST:FEDLET_PORT/FEDLET_DEPLOY_URIreplace withhttps://sp.example.com:9443/saml -
fedletcotandFEDLET_COTreplace withCircle of Trust -
https://sp.example.com:9443/saml/fedletapplicationreplace withhttps://sp.example.com:9443/saml/fedletapplication/metaAlias/sp
The full steps of configuring Identity Gateway as a SAML 2.0 IDP can be found here.
-
-
Remove all the
*-templateextensions from the files which means you are now left with:
$ tree -l conf
conf
├── FederationConfig.properties
├── fedlet.cot
├── idp-extended.xml
├── sp-extended.xml
└── sp.xml
A copy of the files with this article’s configuration can be found here.
Configure AIC
Create a test user
Log in to your AIC Console and browse to Identities → Manage → Alpha realm — Users then click +New Alpha realm — User.
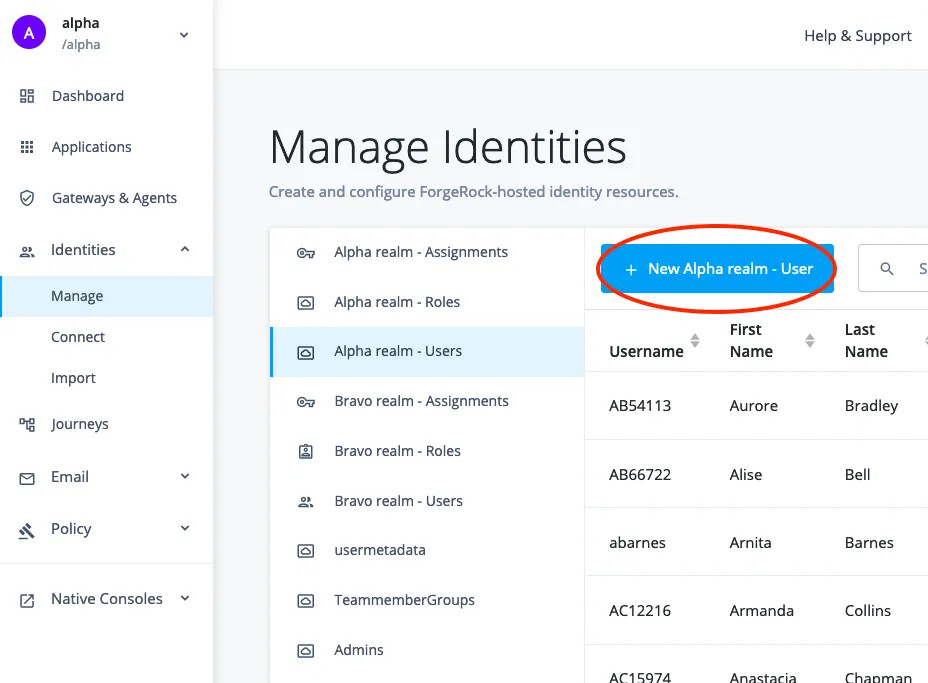
Creating a new user
Create a new user:
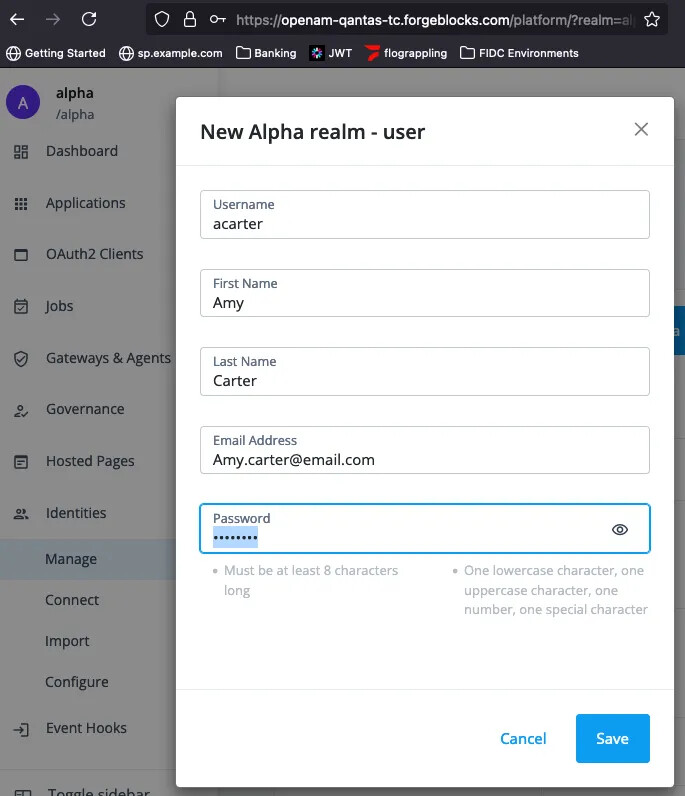
New user example
+
Now the user is configured, let’s check you can log in by authenticating to the Alpha realm.

Login with new user
Because the Enduser UI is enabled and is the default landing page the
welcome message is displayed.
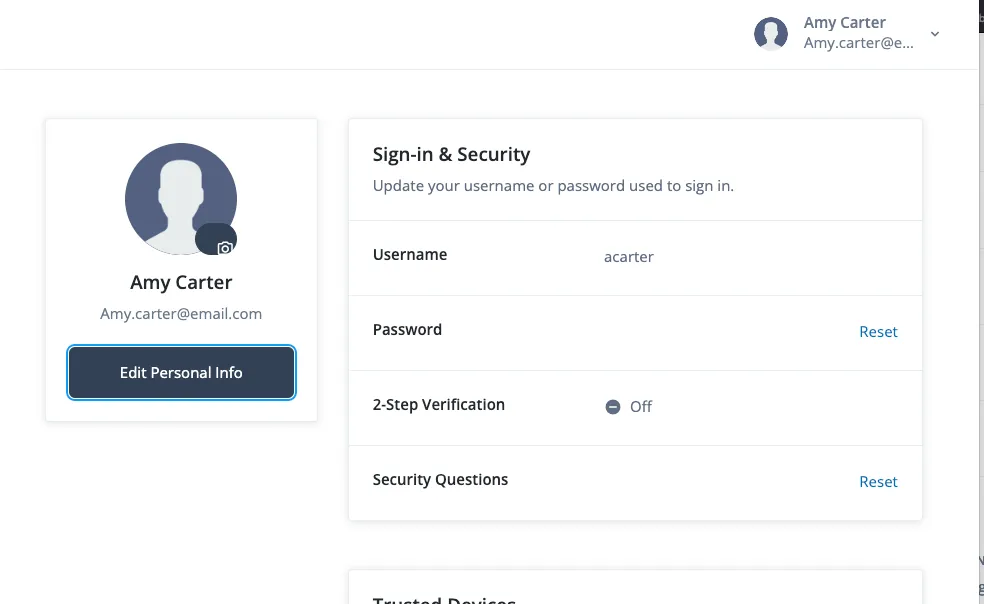
Enduser UI Logged in
Configure Federation
Login to AIC as a tenant administrator and browse to Native Consoles → Access Management.
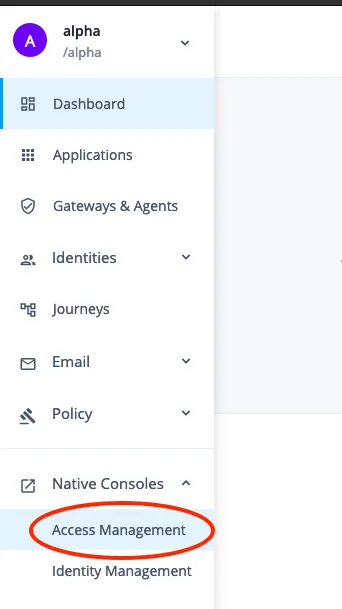
AM Native Console
In the Access Management console, browse to Applications →
Federation → Circles of Trust .
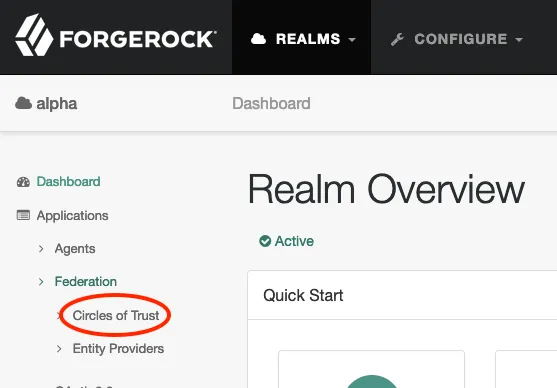
Circles of Trust
+
Choose a name that suits, this example uses Circle of Trust which has been configured in the above fedlet configuration files. Enter the name and press Create . Leave all other fields as their default.
+

New Circle of Trust
+
Setup the Service Provider
The service provider details have already been configured in the above sp.xml. This is imported in subsequent steps into AIC as a Remote Service Provider.
Browse to Applications → Federation → Entity providers → Add
Entity Provider and select Remote.
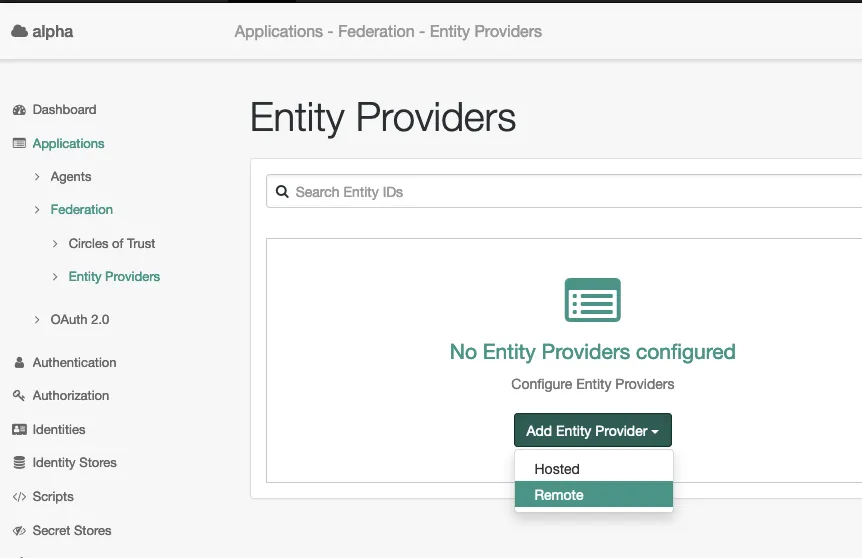
Entity Providers
In the New Remote Entity Provider page, drag and drop your sp.xml
then select your Circle of Trust and press Create.

New SP Entity
+
Your SP entity named sp will appear on your list of Entity
Providers.
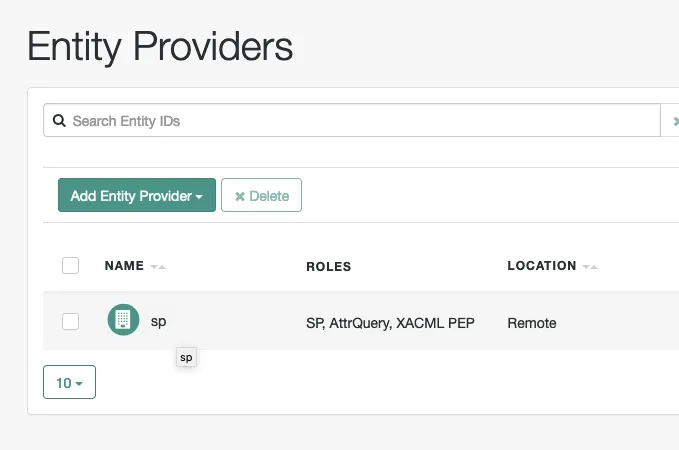
Newly created SP
Your SP is now configured, the next task is to configure the IDP.
Configure your Identity Provider.
The following steps configures AIC as the Hosted Identity Provider.
Browse to Applications → Federation → Entity Providers → Add
Entity Provider → Hosted.

Create hosted IDP
Enter openam as the Entity ID and idp as the Identity Provider
Meta Alias , and select the correct Circles of Trust , then press
Create.

New Hosted Entity Provider
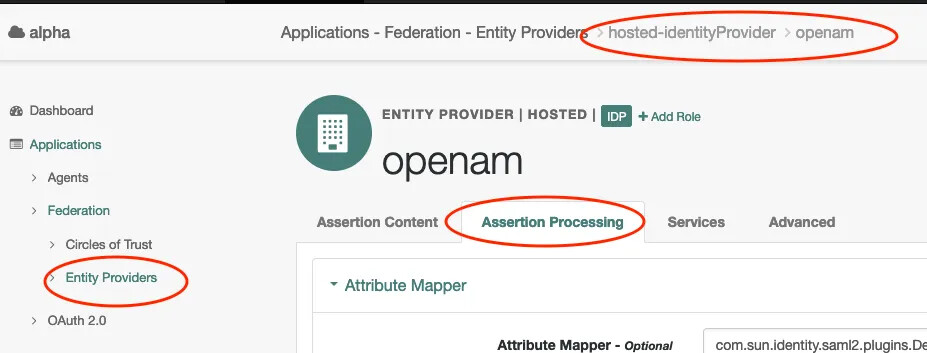
Do the following to add the attributes to your assertion. Firstly configure cn by browsing to your IDP, then to Assertion Processing → Attribute Mapper → Attribute Map . Enter the following and then click Add :
SAML Attribute = cn, Local Attribute = cn

Attribute Mapper
Do the same thing with sn and mail i.e.
SAML Attribute = sn, Local Attribute = sn
After this is completed your Attribute Map will look like this:

Completed Attribute Mapper
Now click Save Changes.
Don’t forget to Save!
Export your IDP settings.
You will need to export the IDP settings and provide them to the Service Provider.
Execute the following curl command to export the IDP settings:
curl -v --output idp.xml “https://openam-mytenant.forgerock.io/am/saml2/jsp/exportmetadata.jsp?entityid=openam&realm=/alpha"
The idp.xml file will be saved locally, copy this to the fedlet conf
directory so the list of files contained look like below:
$ tree -l conf/
conf/
├── FederationConfig.properties
├── fedlet.cot
├── idp-extended.xml
├── idp.xml
├── sp-extended.xml
└── sp.xml
Configure PingGateway
You can use an existing PingGateway Deployment or install (Unzip) a new
instance.
[fradmin@centosbase G]$ unzip ../PingGateway-2024.6.0.zip
Archive: ../PingGateway-2024.6.0.zip
creating: identity-gateway-2024.6.0/
creating: identity-gateway-2024.6.0/legal-notices/
creating: identity-gateway-2024.6.0/legal-notices/third-party-licenses/
creating: identity-gateway-2024.6.0/bin/
creating: identity-gateway-2024.6.0/classes/
creating: identity-gateway-2024.6.0/docker/
creating: identity-gateway-2024.6.0/lib/
Your PingGateway deployment will consist of two important locations:
-
The install directory i.e.
/opt/identity-gateway-2024.6.0 -
The config directory by default is “.openig” in your home directory i.e
/home/fradmin/.openig
Setup SAML folder with fedlet files
In the PingGateway configuration directory i.e. /home/fradmin/.openig,
create a directory named SAML at the same level as the config folder
(Not IN the config folder). Move all the configured fedlet files into
this SAML folder i.e.
/home/fradmin/.openig
[fradmin@centosbase .openig]$ tree -L 2
.
├── config
│ ├── admin 1.json
│ ├── admin.json
│ ├── logback.xml
│ └── routes
├── logs
│ ├── route-saml-filter.log
│ ├── route-saml.log
│ ├── route-static-resources.log
│ └── route-system.log
├── SAML
│ ├── FederationConfig.properties
│ ├── fedlet.cot
│ ├── idp-extended.xml
│ ├── idp.xml
│ ├── sp-extended.xml
│ └── sp.xml
├── scripts
│ └── groovy
└── tmpNOTE: A copy of all pre-configured files for my environment can be found here.
Remove BaseURI
If you have a config.json file setup, remove the baseURI. The
SamlFederationHandler must not be rebased as the URI must match the
endpoint in the SAML metadata.
Allow static resources to pass through
Add a route to pass through css and other resources for your sample
application. To do this create a file named static-resources.json with
the content below and place this into your routes folder i.e.
{
    "name": "saml-filter",
    "baseURI": "http://sample.example.com:8081",
    "condition": "${find(request.uri.path, '^/home')}",
    "handler": {
      "type": "Chain",
      "config": {
        "filters": [
          {
            "name": "SamlFilter",
            "type": "SamlFederationFilter",
            "config": {
              "assertionMapping": {
                "name": "cn",
                "surname": "sn"
              },
              "subjectMapping": "sp-subject-name",
              "redirectURI": "/home/saml-filter"
            }
          },
          {
            "name": "SetSamlHeaders",
            "type": "HeaderFilter",
            "config": {
              "messageType": "REQUEST",
              "add": {
                "x-saml-cn": [ "${toString(session.name)}" ],
                "x-saml-sn": [ "${toString(session.surname)}" ]
              }
            }
          }
        ],
        "handler": "ReverseProxyHandler"
      }
    }
  }
Configure SamlFederationFilter
Add a saml route to configure the SamlFederationFilter by creating a
file named saml-filter.json and placing it in the routes folder i.e.
{
    "name": "saml-filter",
    "baseURI": "http://sample.example.com:8081",
    "condition": "${find(request.uri.path, '^/home')}",
    "handler": {
      "type": "Chain",
      "config": {
        "filters": [
          {
            "name": "SamlFilter",
            "type": "SamlFederationFilter",
            "config": {
              "assertionMapping": {
                "name": "cn",
                "surname": "sn"
              },
              "subjectMapping": "sp-subject-name",
              "redirectURI": "/home/saml-filter"
            }
          },
          {
            "name": "SetSamlHeaders",
            "type": "HeaderFilter",
            "config": {
              "messageType": "REQUEST",
              "add": {
                "x-saml-cn": [ "${toString(session.name)}" ],
                "x-saml-sn": [ "${toString(session.surname)}" ]
              }
            }
          }
        ],
        "handler": "ReverseProxyHandler"
      }
    }
  }
In this route maps the values returned in the assertion to be stored in
PingGateway’s session context, i.e. cn from the assertion is mapped to
session.name.
Notice that when the HeaderFilter adds headers x-saml-cn and
x-saml-sn to the request they are easily reference by the attribute
name in the session context i.e. ${toString(session.name)}.
The filter then allows the ReverseProxyHandler to do it’s job and communicate with the protected application.
Run Sample Application
Follow the steps here to download, configure and run a SDK backed sample application. We will be running the Embedded login sample provided in this repository.
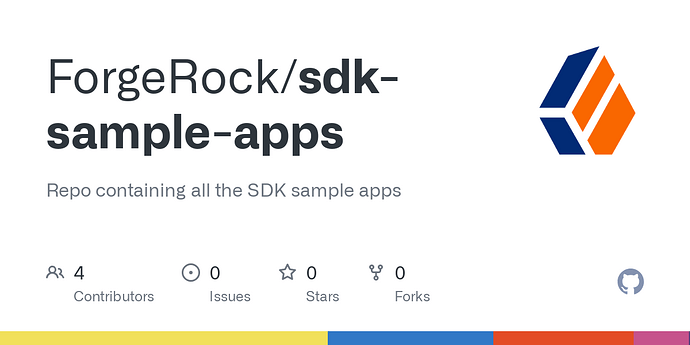
GitHub - ForgeRock/sdk-sample-apps: Repo containing all the SDK sample apps
Repo containing all the SDK sample apps. Contribute to ForgeRock/sdk-sample-apps development by creating an account on GitHub.
Note the following:
Modify the URL of the login app
Locate the sdk-sample-apps/blob/main/embedded-login/webpack.config.js
file and set the host:
devServer: {
    port: 8443,
    host: 'login.example.com',
Run embedded-login sample app
npm run start:embedded-login

> forgerock-sdk-samples@1.0.0 start:embedded-login
> npm start --workspace embedded-login


> embedded-login@1.0.0 start
> webpack serve

(node:74445) [DEP_WEBPACK_DEV_SERVER_HTTPS] DeprecationWarning: 'https' option is deprecated. Please use the 'server' option.
(Use `node --trace-deprecation ...` to show where the warning was created)
<i> [webpack-dev-server] SSL certificate: /Users/mark.nienaber/Documents/ForgeRock/GIT/sdk-sample-apps/embedded-login/node_modules/.cache/webpack-dev-server/server.pem
<i> [webpack-dev-server] Project is running at:
<i> [webpack-dev-server] Server: https://login.example.com:8443/
<i> [webpack-dev-server] Loopback: https://127.0.0.1:8443/
webpack 5.89.0 compiled successfully in 1290 ms
The following login page (or similar) should be displayed:
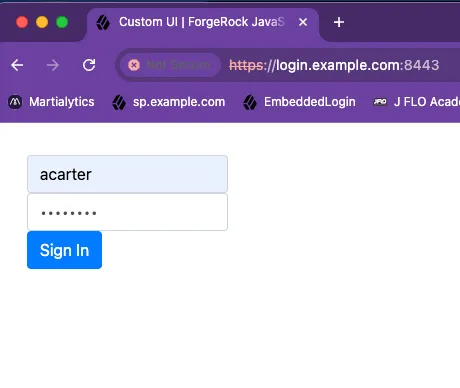
Sample Login Page
+
If working successfully after logging in you should be presented with
the user information.
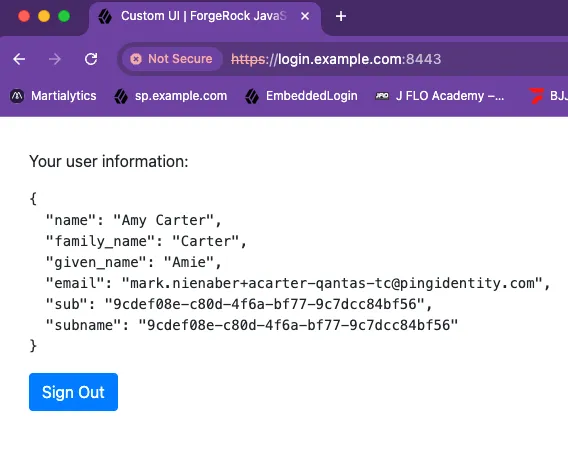
Successful Login
+
Ensure Login App respects the SAML redirect back to the IDP
Modify (if necessary) the login app to respect the goto URL back to the IDP, i.e.
Inside sdk-sample-apps/blob/main/embedded-login/src/main.js make sure
on successful authentication if there is a goto url then proceed
there:
case 'LoginSuccess': {
            // If a goto URL param was captured, then redirect as this is a Custom Login Page flow
            const urlParams = new URLSearchParams(window.location.search);
            const gotoUrl = urlParams.get('goto');

            if (gotoUrl) {
              window.location.href = gotoUrl; // Redirect to the goto URL
              return; // Exit early to avoid running the code below
            }

        // If we have a session token, get user information
        const sessionToken = step.getSessionToken();
        const tokens = await forgerock.TokenManager.getTokens();
        const user = await forgerock.UserManager.getCurrentUser();
        return showUser(user);

    }
Modify the IDP to use the external login app
Browse to the Native Access Management Console, then Applications, Entity Providers then openam. Then browse to the Assertion Processing tab.
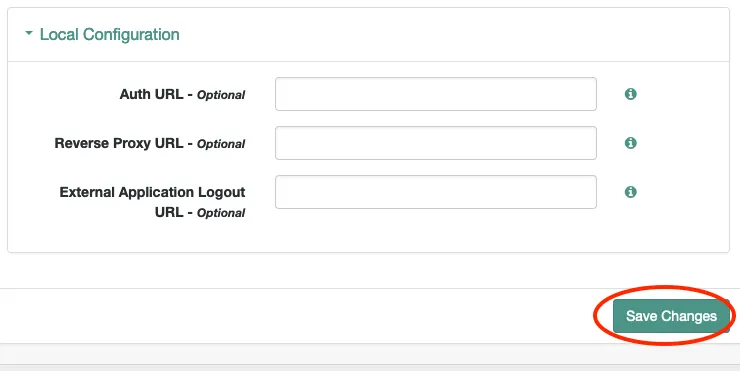
IDP login page setup
At the bottom of the page enter the login page URL under Auth URL, in
my case https://login.example.com:8443/ then press Save Changes.

Save Changes
The setup should now be complete and is now ready to test!
Test the Setup:
Browse to`https://sp.example.com:9443/home `which is detected by our
saml-filter route and handled by the SamlFederationFilter.
This is redirected to the IDP with a SAML Authentication Request:
https://openam-blah.forgeblocks.com/am/SSORedirect/metaAlias/alpha/idp?SAMLRequest=xxxxxxxx
The Authentication request looks similar to:
<samlp:AuthnRequest xmlns:samlp="urn:oasis:names:tc:SAML:2.0:protocol"
                    AssertionConsumerServiceURL="https://sp.example.com:9443/home/saml/fedletapplication/metaAlias/sp"
                    Destination="https://openam-blah.forgeblocks.com/am/SSORedirect/metaAlias/alpha/idp"
...
                    ProtocolBinding="urn:oasis:names:tc:SAML:2.0:bindings:HTTP-POST"
                    Version="2.0"
                    >
    <saml:Issuer xmlns:saml="urn:oasis:names:tc:SAML:2.0:assertion">sp</saml:Issuer>
    <samlp:NameIDPolicy AllowCreate="true"
                        Format="urn:oasis:names:tc:SAML:2.0:nameid-format:transient"
                        SPNameQualifier="sp"
                        />
...
        <saml:AuthnContextClassRef>urn:oasis:names:tc:SAML:2.0:ac:classes:PasswordProtectedTransport</saml:AuthnContextClassRef>
    </samlp:RequestedAuthnContext>
</samlp:AuthnRequest>
You are directed to our IDP, which is configured to redirect you to the
External Login Page. Login with your sample user:

Login to your IDP
Note the login page url is appended by the goto url to continue the SAML flow, back with the IDP.
The Login UI will need to redirect the user back to the IDP to continue
the SAML flow. If configured correctly after authentication we are
directed back to the IDP, and then back to the SP with the appropriate
assertion.
The SAML assertion will contain the relevant information i.e. cn and
sn.
<samlp:Response xmlns:samlp="urn:oasis:names:tc:SAML:2.0:protocol"
                Destination="https://sp.example.com:9443/home/saml/fedletapplication/metaAlias/sp"
...
    <saml:Issuer xmlns:saml="urn:oasis:names:tc:SAML:2.0:assertion">openam</saml:Issuer>
    <samlp:Status>
        <samlp:StatusCode Value="urn:oasis:names:tc:SAML:2.0:status:Success" />
    </samlp:Status>
    <saml:Assertion xmlns:saml="urn:oasis:names:tc:SAML:2.0:assertion"
                    ID="s2aab755b6662440c2e2c264235e3b065ec1e42627"
                    IssueInstant="2024-09-13T04:51:04Z"
                    Version="2.0"
                    >
        <saml:Issuer>openam</saml:Issuer>
        ...
        <saml:Subject>
            <saml:NameID Format="urn:oasis:names:tc:SAML:2.0:nameid-format:transient"
                         NameQualifier="openam"
                         SPNameQualifier="sp"
                         >Ynyc7QPe6BcuhwzEImNclBbVnxv7</saml:NameID>
        ...
        <saml:AttributeStatement>
            <saml:Attribute Name="cn">
                <saml:AttributeValue xmlns:xs="http://www.w3.org/2001/XMLSchema"
                                     xmlns:xsi="http://www.w3.org/2001/XMLSchema-instance"
                                     xsi:type="xs:string"
                                     >Amy Carter</saml:AttributeValue>
            </saml:Attribute>
            <saml:Attribute Name="sn">
                <saml:AttributeValue xmlns:xs="http://www.w3.org/2001/XMLSchema"
                                     xmlns:xsi="http://www.w3.org/2001/XMLSchema-instance"
                                     xsi:type="xs:string"
                                     >Carter</saml:AttributeValue>
            </saml:Attribute>
        </saml:AttributeStatement>
    </saml:Assertion>
</samlp:Response>
PingGateway verifies the assertion, and redirects you to the protected application, inserting the relevant headers.

Protected app with headers
Congratulations you are done :)