Implementing Delegated Administration with the ForgeRock 5.5 Platform
Author: |
Jake Feasel |
Created at: |
Feb 2018 |
Updated at: |
Feb 2018 |
Out of the box in 5.5, IDM (ForgeRock Identity Management) has two types of users – basic end-users and all-powerful administrators. You often need a class of users that fall between these extremes – users which can trigger a password reset action but cannot redefine connector configuration, for example. Another common need is for users to only be allowed to perform actions for a subset of other users – maybe only those within their organization. The typical term for these sorts of users is ‘Delegated Administrators‘ – users who have been granted limited access to perform particular administrative tasks given to them by a more privileged administrator.
There is a way to define new user roles within IDM that have more granular access, but this is fairly limited – you have to write back-end JavaScript code to define what these new roles can do. Also, there is no way to inform the user at runtime about what options they have as a result of these JavaScript-based roles. Instead, you would have to write new UI code which specifically adjusts itself for the each of new roles you define, essentially hard-coding it to match the back-end JavaScript. Depending on the complexity that you need, this can quickly become a big challenge.
The good news is that IDM does not have to do this job by itself – by making use of the other parts of the ForgeRock Identity Platform, you can define very sophisticated authorization logic for each of your users, including the option to delegate administrative tasks to them. The two other products which provide the biggest benefit to IDM for this are AM (ForgeRock Access Management) and IG (ForgeRock Identity Gateway)
AM has a very powerful authorization engine that allows you to declare precise rules which govern the requests made by your users, and it also has the very useful option of being able to return the full set of rules which apply for a given user. Take a look at the product documentation here to learn more about this feature of AM: Introducing Authorization.
IG has full support for working with the AM authorization engine as the enforcement point. It is capable of intercepting each request to IDM and evaluating it by calling out to AM for policy evaluation. It can also do additional local evaluation prior to passing the request down to IDM. You can see the full details about IG’s policy enforcement feature in the IG documentation: Enforcing Policy Decisions.
Demo
Before jumping into the details about how all of this can be put together, a short demo video may make it easier to understand exactly what it is I am hoping to accomplish with this setup:

Example Configuration
I have put together a project in the forgeops git repository which installs the whole ForgeRock Identity Platform exactly as I show it in the demo above and how I describe below. Feel free to use this project to explore the fine details which I might gloss over when I explain how all of this works. You can also use this project as the starting point for your own delegated administration project – after all, it is much easier than starting from scratch! Be aware that the code and configuration provided in this sample are not supported – they are just examples of how you might go about using the supported products they build upon. Also be aware that this project is oriented towards demonstrating functionality – it is not hardened for production. Use your own product expertise as you normally would when considering production deployment practices.
forgeops/sample-platform at release/5.5.0 · ForgeRock/forgeops
ForgeRock platform assets for Kubernetes deployment. Contains the files you need to build your own Docker images and to deploy the ForgeRock Identity Platform on Kubernetes clusters. - ForgeRock/fo…
Architecture
The basic architecture you would need to make the most of each of these products is as follows:

AM
AM is configured as the authentication provider and the authorization policy decision point. For it to perform this role, it will need a “Policy Set” defined for IDM; this is the collection of policy rules which apply specifically to requests for IDM REST APIs. Since each request to the IDM REST APIs is essentially just a basic HTTP call, you can use the default “URL” resource type provided by AM. You will need to define a policy for each call you expect your REST client to make; for example, if your REST client makes calls like: GET /openidm/info/login you will need to declare a policy which allows this request. Such a policy would look like this:
{
 "data" : {
   "_id" : "info",
   "name" : "info",
   "active" : true,
   "description" : "",
   "resources" : [ "*://*:*/openidm/info/login" ],
   "actionValues" : {
     "GET" : true
   },
   "applicationName" : "openidm",
   "subject" : {
     "type" : "AuthenticatedUsers"
   }
 }
}
This simple policy just states that any authenticated user is allowed to perform a GET action on the “/openidm/info/login” resource (irrespective of the protocol/host/port). You could use the AM Admin UI to define this policy; it would look something like this if you did:
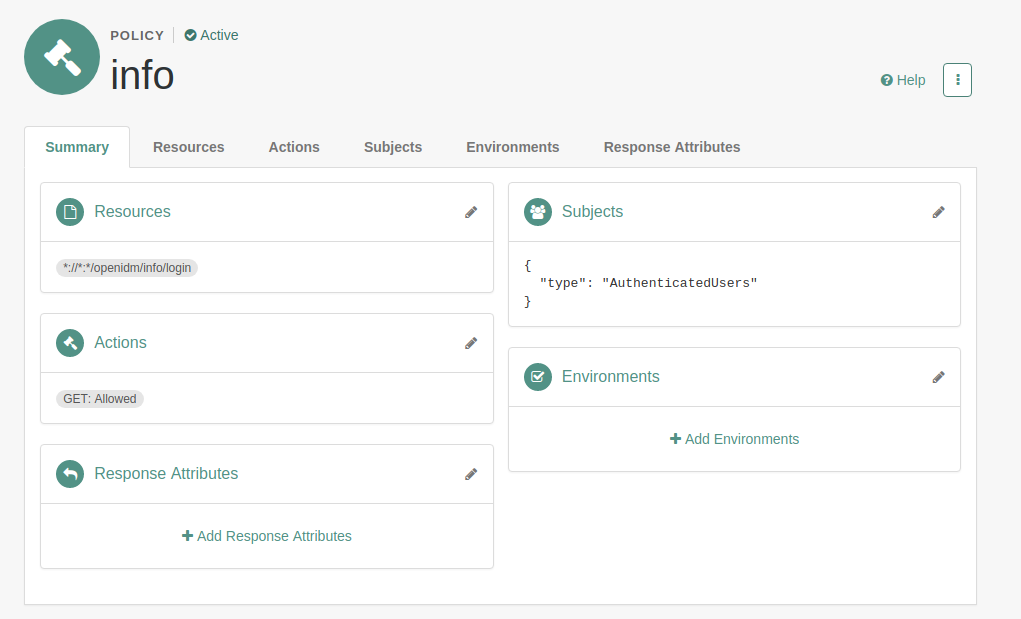
Defining appropriate policies for your IDM needs could vary considerably. Take stock of each IDM REST call you need to make and consider the conditions under which users are allowed to make them. Use this to craft a policy set in AM which aligns with all of those details.
IG
Update: for 6.0, there is a new post describing how you can more easily use IG to protect IDM: Using IG to Protect IDM For Secure and Standards-Based Integration
After you have defined your policies in AM, you can start enforcing them with IG. IG needs to be positioned in your network topology so that all HTTP requests made to IDM can be intercepted by the IG reverse proxy, and also so that IG can request policy decisions about those requests from AM. This is a standard deployment model for IG – very little is different about how you would deploy IG to protect IDM compared with how you would use it to protect any other HTTP application.
The main thing you need to configure within IG is the PolicyEnforcementFilter. This is a supported, out-of-the-box filter and can be configured in many ways, all of which are described in the filter documentation. An example of one such configuration:
{
   "type": "PolicyEnforcementFilter",
   "config": {
     "openamUrl": "${env['OPENAM_INSTANCE']}",
     "cache": {
       "enabled": true,
       "defaultTimeout": "1 hour",
       "maxTimeout": "1 day"
     },
     "pepUsername": "openidm",
     "pepPassword": "openidm",
     "pepRealm": "/",
     "application": "openidm",
     "ssoTokenSubject": "${session.openid.id_token}",
     "environment": {
       "securityContextPath": [
         "${session.idmUserDetails.authorization.component}/${session.idmUserDetails.authorization.id}"
       ],
       "securityContextRoles": "${session.idmUserDetails.authorization.roles}"
     }
   }
 }
This example configuration passes in environment details which are stored in the IG session and relate to the currently-authenticated user, as it is defined in IDM. In particular, it passes in the user’s authorization roles and their IDM-specific REST resource path. Depending on how you decide to define your AM policies, these details may or may not be needed.
Based on the form of delegation that you need for your users, this may be all of the filtering you need to declare in IG. However, if you want to perform more fine-grained access control over subsets of records a user can modify, then you willl need additional filters. Those are described below (under “Scoping Data”).
Assuming the filters allow the request to continue, you will need to be sure that IG provides relevant user details in the request to IDM. The simplest solution is to augment the request by adding a new header value which identifies the user; IDM will read this header from the request and use it as part of its own basic authentication framework.
IDM
Since IG has taken responsibility for validating authentication and authorization, IDM simply needs to be configured to no longer attempt to perform these duties itself. There are two main changes that you need to make to the IDM configuration to make this possible:
conf/authentication.json
This configuration entry describes how IDM performs authentication. Every request to an IDM REST endpoint has to have some form of authentication, even if it is very basic; IDM provides several different options for this. The easist option to use with IG is the TRUSTED_ATTRIBUTE authentication module; see the authentication module documentation and the associated sample documentation for details on how this works. Essentially, the ‘X-Special-Trusted-User’ header contains the name of the user performing the request. It is set by IG, and it is trusted by IDM to be accurate. This trust is why it is so important that IG be the only entry point into IDM – otherwise, an attacker could supply their own header value and pretend to be anyone. Here’s an example module configuration:
{
   "name" : "TRUSTED_ATTRIBUTE",
   "properties" : {
     "queryOnResource" : "managed/user",
     "propertyMapping" : {
       "authenticationId" : "_id",
       "userRoles" : "authzRoles"
     },
     "defaultUserRoles" : [ "openidm-authorized" ],
     "authenticationIdAttribute" : "X-ForgeRock-AuthenticationId",
     "augmentSecurityContext" : {
       "type" : "text/javascript",
       "file" : "augmentSecurityContext.js",
       "globals" : {
         "authzHeaderName" : "X-Authorization-Map"
       }
     }
   },
   "enabled" : true
 }
conf/router.json
This entry defines scripted filters which apply to every IDM API request, whether from HTTP or from internal API calls. By default IDM has its own authorization logic specified as the first filter; it is the one which invokes router-authz.js. Since IG and AM are performing authorization, you can simply remove this filter.
This is actually all that is required for you to change in IDM, at least for the REST API level. At this point the REST API in IDM should be protected by the AM policy engine.
Scoping Data
The request from IG to the AM policy engine only includes certain, high-level details about the request. IG asks AM things like “what actions can this user perform on the resource /openidm/managed/user/01234“. Generally, AM policies are pattern-based; this means that AM can only tell if the user can perform actions on a set of resources, such as “/openidm/managed/user/*“. If you need rules governing the actions a given user can perform on a subset of resources within that pattern, AM probably does not and cannot have enough information about the resources to make a decision on its own. However, there is a way to return information to IG about the user which IG can use to make its own decision about the request.
Response Attributes
An AM policy can return data along with the results of the policy evaluation in the form of “response attributes”. These attributes can be static values defined within the policy or they can be dynamic values read from the user’s profile. It is up to IG to decide what meaning to impart upon the presence of these attributes. For example, IG can use these response attributes to decide whether a request for a particular resource falls within the subset of resources available to the current user.
To continue to build upon the “/openidm/managed/user/01234” question above, an AM policy can be declared which indicates that the current user is allowed to perform some actions on the general case of “/openidm/managed/user/*” and also send back a response attribute – for example, the organization they belong to. IG can then include another filter that runs after the PolicyEnforcementFilter which is configured to look for the presence of this response attribute.
Scripted Filter Based on Policy Response
Before the request is forwarded to IDM, IG can take additional action based on the response attributes recieved from the policy decision. For example, IG can query IDM to verify that /openidm/managed/user/01234 is within the same organization as the user making the request. If the user is not found in the query results, then this filter can simply reject the request before it is sent to IDM.
Here is an example scripted filter which performs this function:
 {
   "name": "ScopeValidation",
   "type": "ScriptableFilter",
   "config": {
     "type": "application/x-groovy",
     "file": "scopeValidation.groovy",
     "args": {
       "scopeResourceQueryFilter": "/organizationName eq \"\\${organizationName}\"",
       "scopingAttribute": "organizationName",
       "failureResponse": "${heap['authzFailureResponse']}"
     }
   }
 }
This “scopeValidation.groovy” example looks for the presence of a “scopingAttribute” as a response attribute from the earlier policy decision and uses it to construct a query filter. This query filter is then used to define the bounds within which a particular user can perform actions on subsets of resources. It is also used when the user is querying resources – whatever filter they supplied will be altered to also include this filter too. For example, if they call GET /openidm/managed/user?_queryFilter=userName eq “jfeasel” then the resulting query that is passed down to IDM would actually be this: GET /openidm/managed/user?_queryFilter=userName eq “jfeasel”) AND (/organizationName eq “example”. The end result is that the user only sees the subset of resources they are allowed to see.
This is just one example of how you could achieve scoping. The power of scripting in IG means that if this example is insufficient for your needs, you can easily alter the groovy code for this filter to account for any variation you might need.
Discovery
Having each REST call validated as it is made is clearly the most essential behavior required. That being said, another very important aspect of delegated administration is being able to show users only those options which are actually available to them. It is a very poor user experience to show all options followed by “Access Denied” type messages when they try something they were not allowed to do.
Fortunately, the AM policy engine has a way for users to discover which features are available to them. See the documentation for “https://backstage.forgerock.com/docs/am/5.5/authorization-guide/#rest-api-authz-policy-decision-subtree[Requesting Policy Decisions For a Tree of Resources]“. Making a request to policies?_action=evaluateTree returns values like so:
[
 {
   "advices": {},
   "ttl": 9223372036854776000,
   "resource": "*://*:*/openidm/info/login",
   "actions": {
     "POST": true,
     "GET": true
   },
   "attributes": {}
 },
 {
   "advices": {},
   "ttl": 9223372036854776000,
   "resource": "*://*:*/openidm/managed/user/*",
   "actions": {
     "PATCH": true,
     "GET": true
   },
   "attributes": {
     "organizationName": [
       "example"
     ]
   }
 }
 .....
]
This is the fundamental building block upon which you can build a dynamic UI for your delegated admins. The next step necessary is a means to return this information to your users. The policy engine endpoints (such as the above call to evaluateTree) are not normally accessible directly by end-users; only privileged accounts can access them. The best method for returning this information to your users is to define a new endpoint in IG which has the same configuration details that the PolicyEnforcementFilter uses. This new endpoint is a ScriptableHandler instance which is basically just a thin wrapper around the call to evaluateTree.
An example implementation of this endpoint is available within the “https://github.com/ForgeRock/forgeops/tree/release/5.5.0/sample-platform[sample-platform]” folder within the forgeops git repository. Here are the two key files:
With this /policyTree/ endpoint available, your UI can make a simple GET request and find every detail about which REST endpoints are available for the current user. You can then write UI code which relies on this information in order to render only those features which the user has access to use. Example code which extends the default IDM Admin UI is also available in the sample-platform folder; take a look at the files under idm/ui/admin/extension for more details.
Request Sequence
Here is a detailed diagram which demonstates how a series of requests by an authenticated user with the delegated administration role are routed through the various systems:
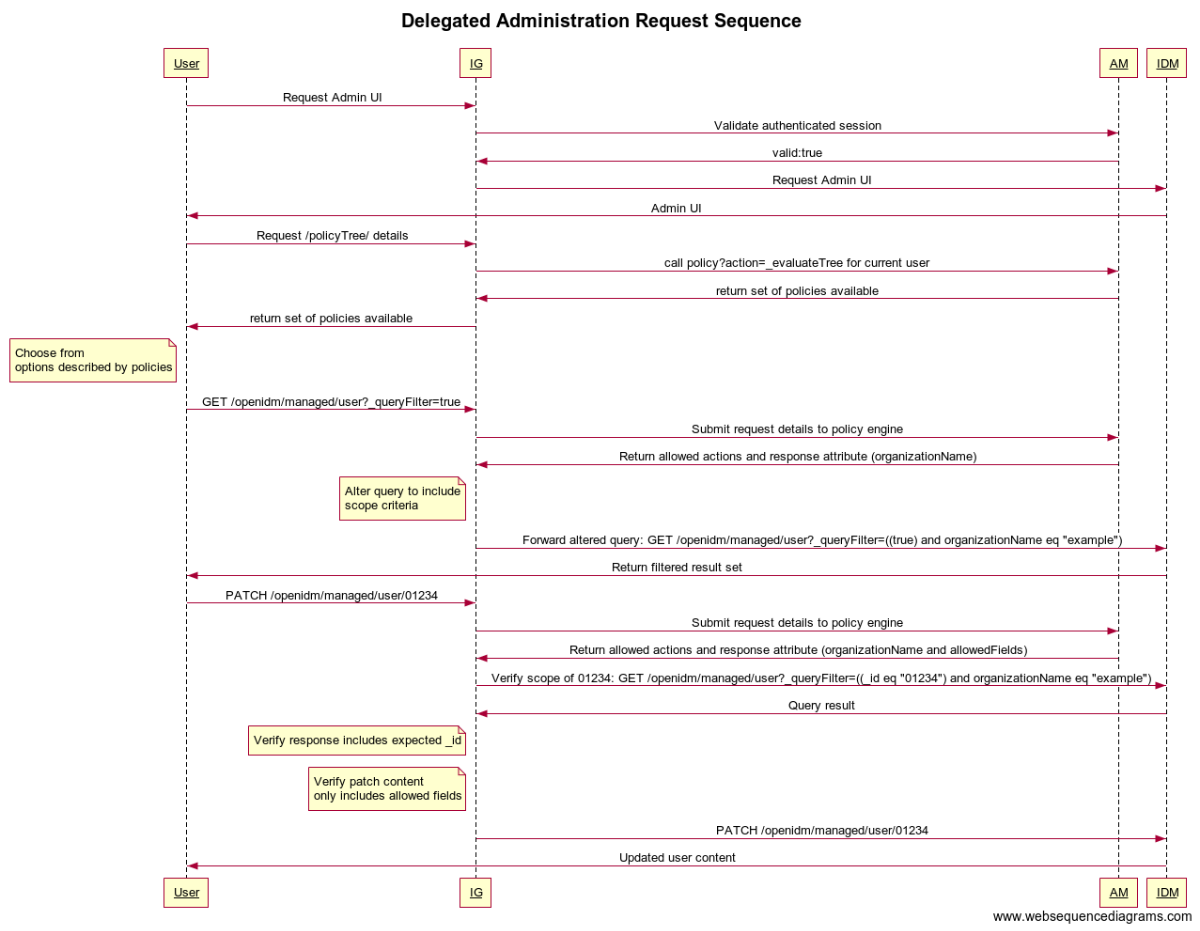
Diagram available via WebSequenceDiagrams
Next steps
Although I only showed a very simple form of delegation with this example, the pattern described should enable many more complex and powerful use-cases. There are many features of the products which, when used together, could make for some very exciting systems.
This is just the beginning – we will be working toward improving product integration and features to make this use case and many others possible. Be sure to let us know about your successes and your struggles in this area, so that we can keep the products growing in the right direction. Thanks!