Introduction
This article describes the steps necessary to integrate Atlassian Cloud (Atlassian) with ForgeRock Identity Cloud (ID Cloud) to achieve the following outcomes:
- Users can access Atlassian applications using their ID Cloud account
- SSO experience when accessing Atlassian and other services integrated with ID Cloud
- Centralised management of user profiles and Atlassian access rights in ID Cloud
![]() Note:
Note:
- Both cloud services are updated on a regular basis and the instructions provided here may differ from the current version
- The integration can also be achieved using a ForgeRock self-managed or on-premises deployment, however the instructions here are based on ID Cloud
What you will need
The following components are required and require administrative access to perform the configuration steps:
- ForgeRock Identity Cloud tenant
- A running instance of ForgeRock Remote Connector Server, connected to the tenant
- Atlassian Cloud account including Atlassian Access | Security & SSO for Jira, Confluence, Etc. Both are available (at the time of writing) as trials, however Access is limited to 30 days
Integration Approach
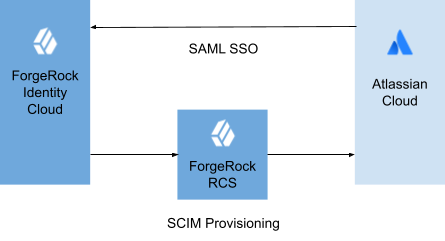
The integration consists of two interfaces:
- SAML v2 : used by Atlassian redirect authentication of users to ID Cloud. Atlassian does not support SLO so SAML is used exclusively to verify user credentials during sign in.
- SCIM : In contrast to other services that offer JIT (Just in time) provisioning of users during sign in, Atlassian relies on the SCIM protocol. This is used to manage both user and group information in Atlassian
Configure SSO
Configure ForgeRock IDP
Skip this section if you already have an existing SAML IDP configured in your tenant.
Create a Circle of Trust:
- Goto the Identity Cloud admin UI page and sign in
- Open the Access Management from the Native Consoles menu
- Select Applications > Federation > Circles of Trust
- Select the Add Circle of Trust button
- Enter a name and select the Create button
Create a Hosted IDP:
- Select Applications > Federation > Entity Providers
- Select Add Entity Provider and choose Hosted
- Enter a unique value in **Entity ID. You can **use the same value of the Entity Provider Base URL which defaults to the AM URL of your tenant
- Enter a value in Identity Provider, for e.g. idp
- Select the name of the CoT you created from the Circles of Trust list box
- Select the Create button
Prepare ForgeRock IDP Metadata
Follow these steps to prepare the information necessary to configure your IDP in Atlassian.
Export the IDP metadata:
- Goto the Identity Cloud admin UI page and sign in
- Open the following URL replacing the text in brackets with your own values
https://[tenant-env-fqdn]/am/saml2/jsp/exportmetadata.jsp?entityid=[entityID]&realm=/[realmname]
Example:
https://openam-example-demo.forgeblocks.com/am/saml2/jsp/exportmetadata.jsp?entityid=https://openam-example-demo.forgeblocks.com/am&realm=/alpha
For the Identity provider Entity ID in Atlassian use the value of the entityID attribute in the following element:
<EntityDescriptor . . . entityID="https://openam-example-demo.forgeblocks.com/am">
The Location attribute in the following element corresponds to the Identity provider SSO URL:
<SingleSignOnService Binding="urn:oasis:names:tc:SAML:2.0:bindings:HTTP-POST" Location="https://openam-example-demo.forgeblocks.com/am/SSOPOST/metaAlias/alpha/idp"/>
Save the value of the ds:X509Certificate element to a file cert.der:
<KeyDescriptor use="signing">
<ds:KeyInfo>
<ds:X509Data>
<ds:X509Certificate>signing_certificate_data<\ds:X509Certificate>
Convert the** **file with certificate data you saved in the previous step into the format required by Atlassian configuration as Public x509 certificate:
#!/bin/bash
# convert certificate from base64 encoded der to pem
base64 -D < cert.der | openssl x509 -inform der -outform pem -out cert.pem
Verify Domain in Atlassian
Verify the domain(s) of the user’s who access Atlassian using ID Cloud:
- Goto the Atlassian Administration URL of your tenant and sign in
- Select Settings from the top level navigation bar
- Select Domains on the left navigation bar
- Choose DNS or HTTPS as the verification method, depending on whether you have access to the DNS records or web server for the domain
- Follow the instructions for the verification method you chose
- Select the Verify domain button
- When the status of the domain listed under Domains is VERIFIED proceed to the next step
Configure Atlassian SSO and User Provisioning
The steps required are based on the instructions for 3rd party IDP integration from the Atlassian online documentation Connecting to a SAML identity provider for single sign-on | Hipchat Data Center and Server Server | Atlassian Documentation.
- Goto the Atlassian Administration URL of your tenant and sign in
- Select Security from the top level navigation bar
- Select Identity providers on the left navigation bar
- Choose Other provider from the list of identity providers
- Enter a descriptive value in Directory name, for e.g. ForgeRock
- Select the Add button
- On the next screen select **Set up SAML single sign-on **to start the configuration wizard
- Select the Next button
- Enter Identity provider Entity ID using the value of the entityID element from the IDP metadata, for e.g. _https://openam-example-demo.forgeblocks.com/am_
- Enter Identity provider SSO URL using the value of the Location attribute from the metadata element
- Enter Public x509 certificate using the contents of the cert.pem file you prepared in the previous section
- Select the Next button
- Make a note of both URLs - they will be required when configuring Atlassian as an service provider in ForgeRock
- Select the Next button
- Choose the domain that you verified from the list
- Select the Next button
- Select the Confirm move button
- Select the Set up provisioning button
- Make a note of SCIM Base URL and API Key for configuration in ForgeRock
- Select the Next button and save the configuration
Configure Atlassian Authentication Policy
- Goto the Atlassian Administration URL of your tenant and sign in
- Select Security from the top level navigation bar
- Select Authentication policies on the left navigation bar
- Select the Edit button next to the directory you set up previously which should display Single sign-on as disabled
- Select the Enforce single sign-on option
- Select Update and confirm changes
Configure Atlassian SP in ForgeRock
Prepare the metadata for importing into ForgeRock by saving the following code block and replacing the values of the following attributes with values from the SAML configuration in Atlassian :
- sp_entity_url with the value of Service provider entity URL
- sp_assertion_consumer_url with the value of Service provider assertion consumer service URL
<?xml version="1.0"?>
<md:EntityDescriptor xmlns:md="urn:oasis:names:tc:SAML:2.0:metadata"
    entityID="service_provider_entity_url">
    <md:SPSSODescriptor AuthnRequestsSigned="false" WantAssertionsSigned="false" protocolSupportEnumeration="urn:oasis:names:tc:SAML:2.0:protocol">
        <md:NameIDFormat>urn:oasis:names:tc:SAML:1.1:nameid-format:emailAddress</md:NameIDFormat>
        <md:AssertionConsumerService Binding="urn:oasis:names:tc:SAML:2.0:bindings:HTTP-POST"
            Location="sp_assertion_consumer_url"
            index="1" />
    </md:SPSSODescriptor>
</md:EntityDescriptor>
Note:
The NameIDFormat element is set to emailAddress as Atlassian expects an email address to be returned and does not specify it in the authentication request.
Testing SSO
Testing SSO without user provisioning requires a valid user account in ForgeRock with an email address containing the domain you registered in Atlassian. Use a private browser window to ensure that you have no existing session in ForgeRock or Atlassian.
Example:
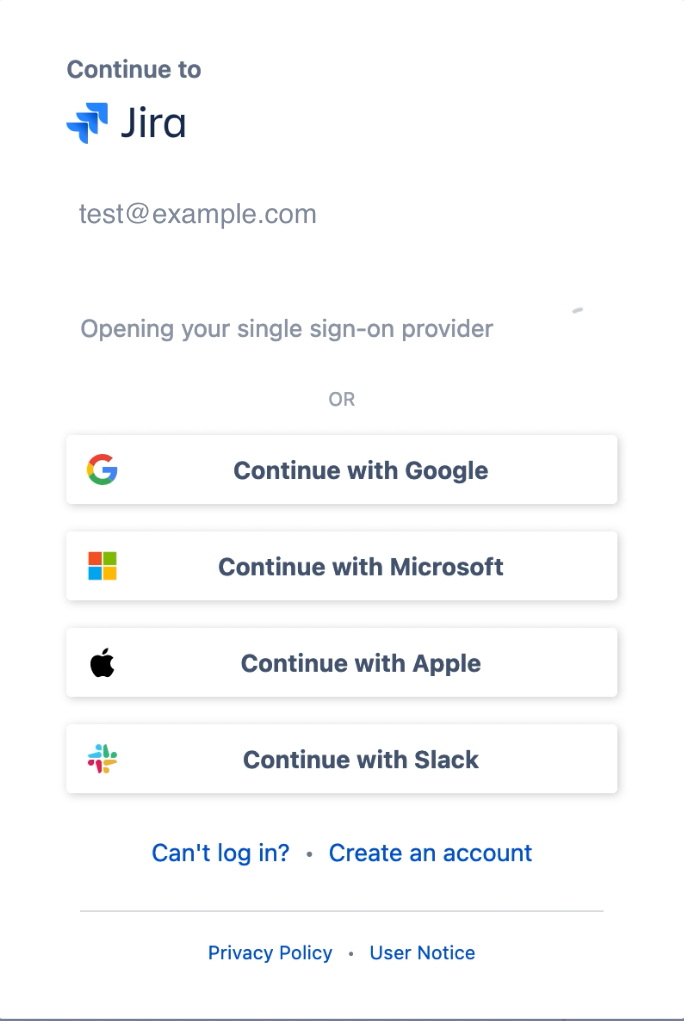
Sign in to your Atlassian tenant and enter an email address with a domain you verified in the Atlassian SSO configuration:

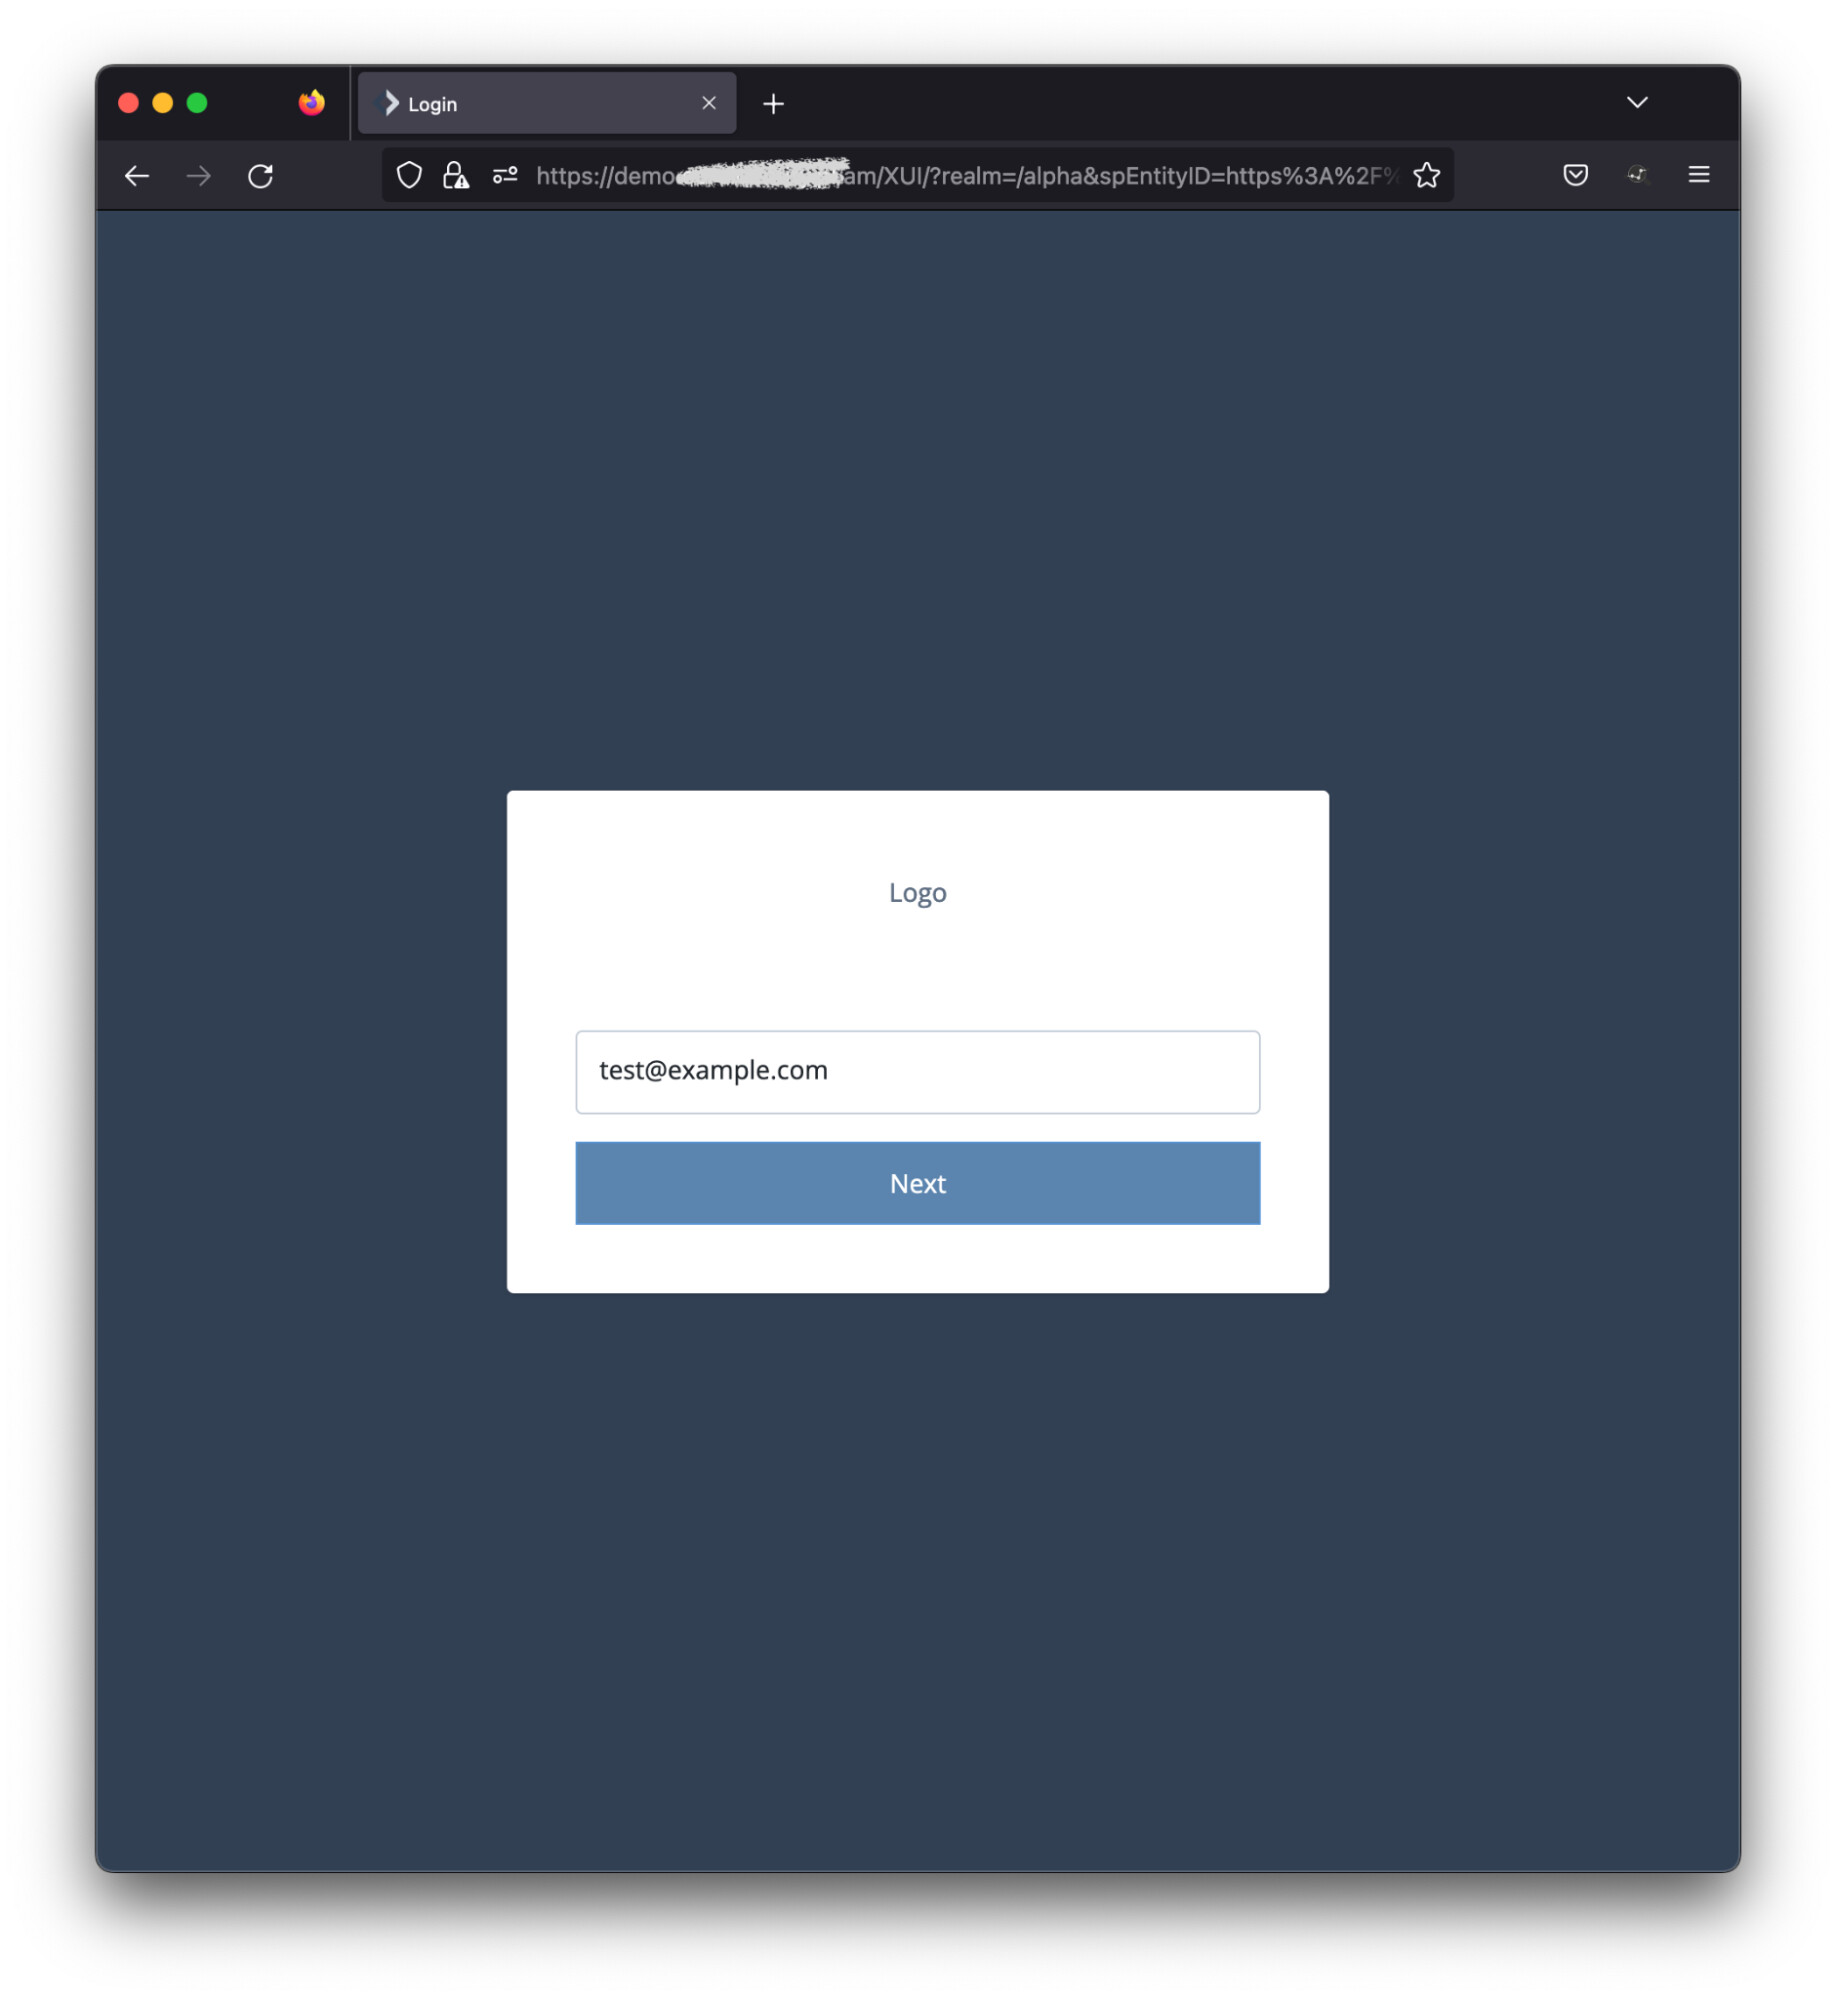
You should then be redirected to ForgeRock and prompted to sign in:
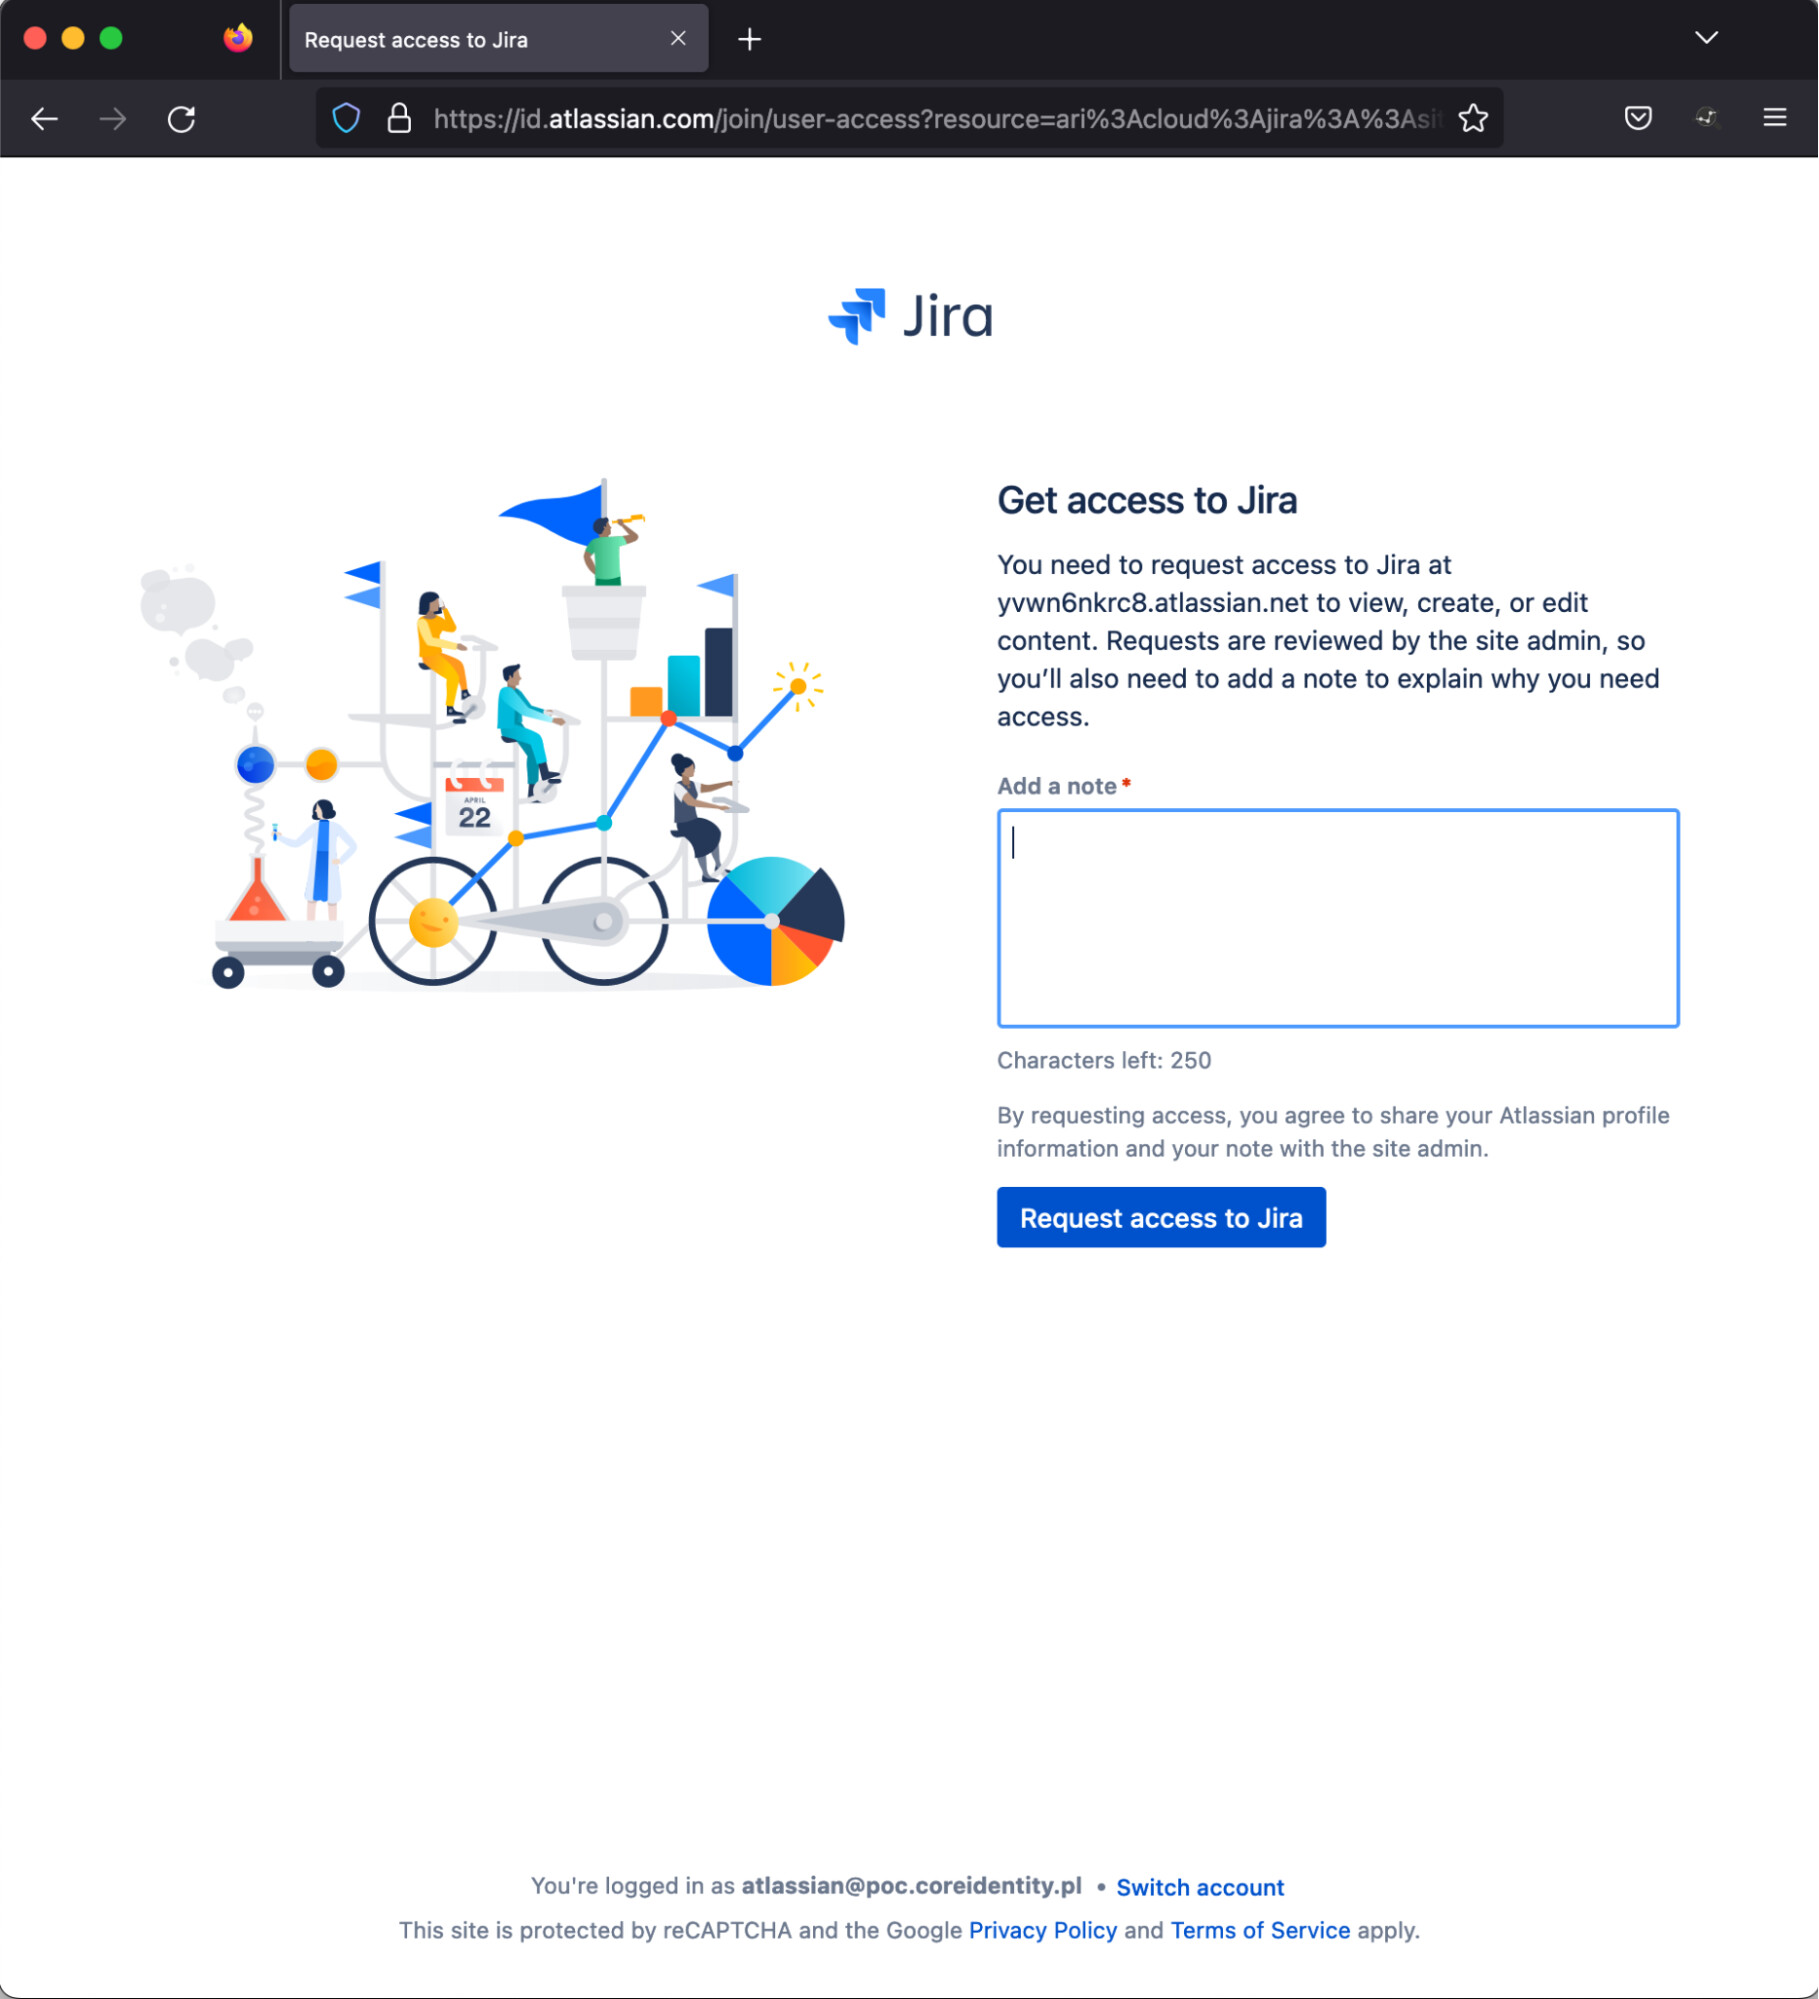
When the login journey is completed successfully you should be redirected back to Atlassian. If no user profile information has been provisioned via SCIM and your user account does not exist yet in Atlassian you will be prompted to request access:
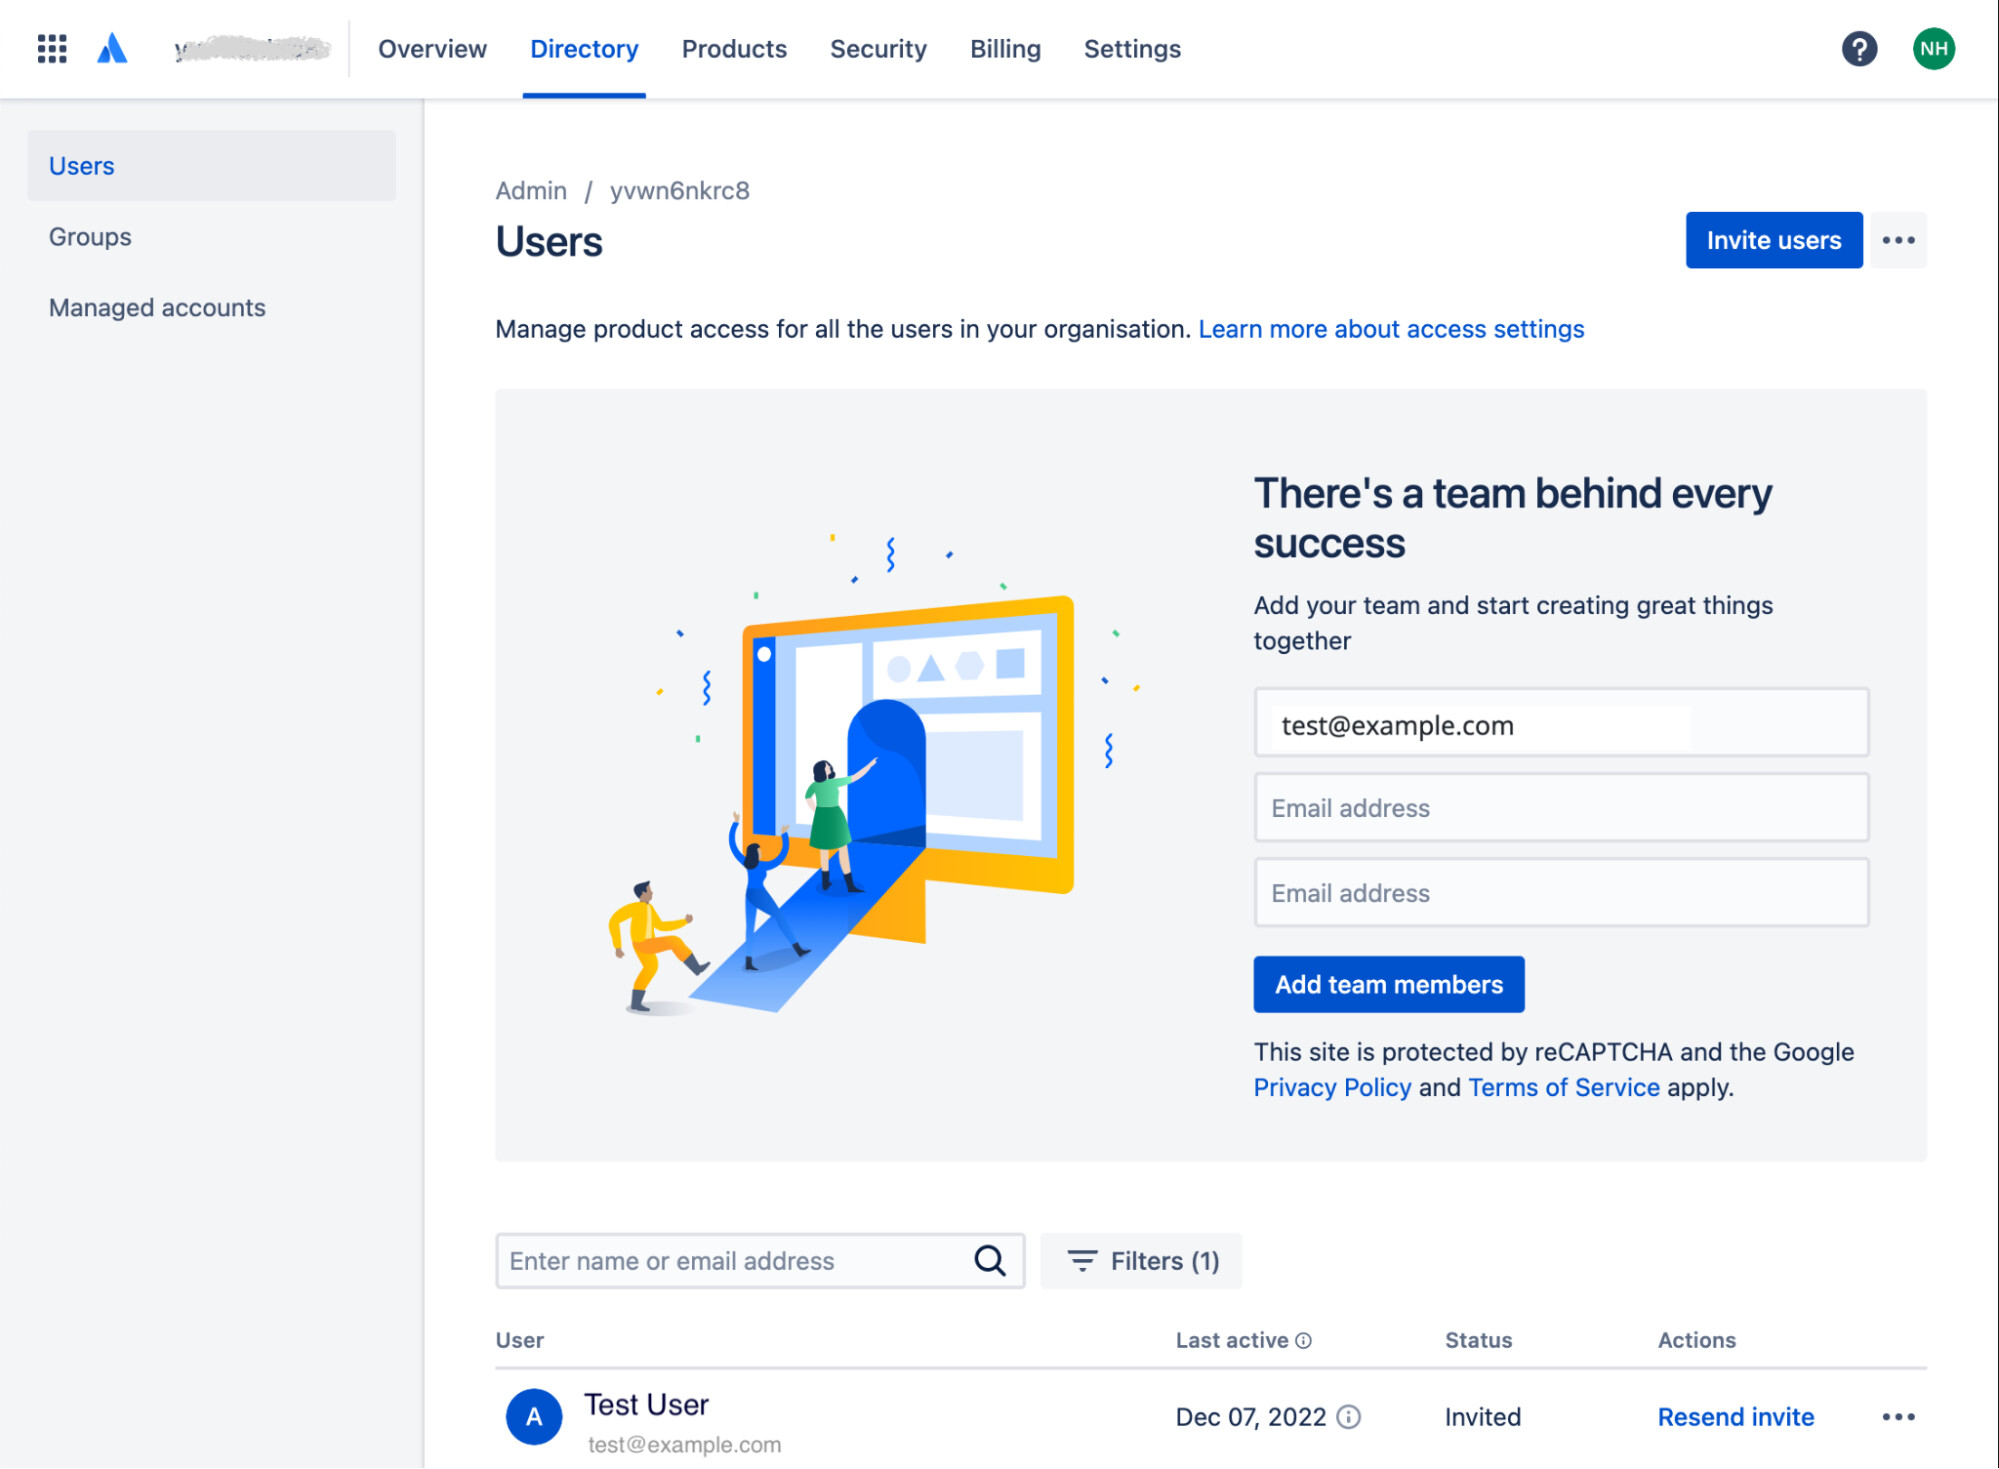
Open another browser window and goto the Atlassian Administration URL of your tenant.
Sign in and Select Directory, Users.
Enter the email address of the user and select Add team members. The user will be added to the list of users displayed at the bottom of the screen and shown as Invited:
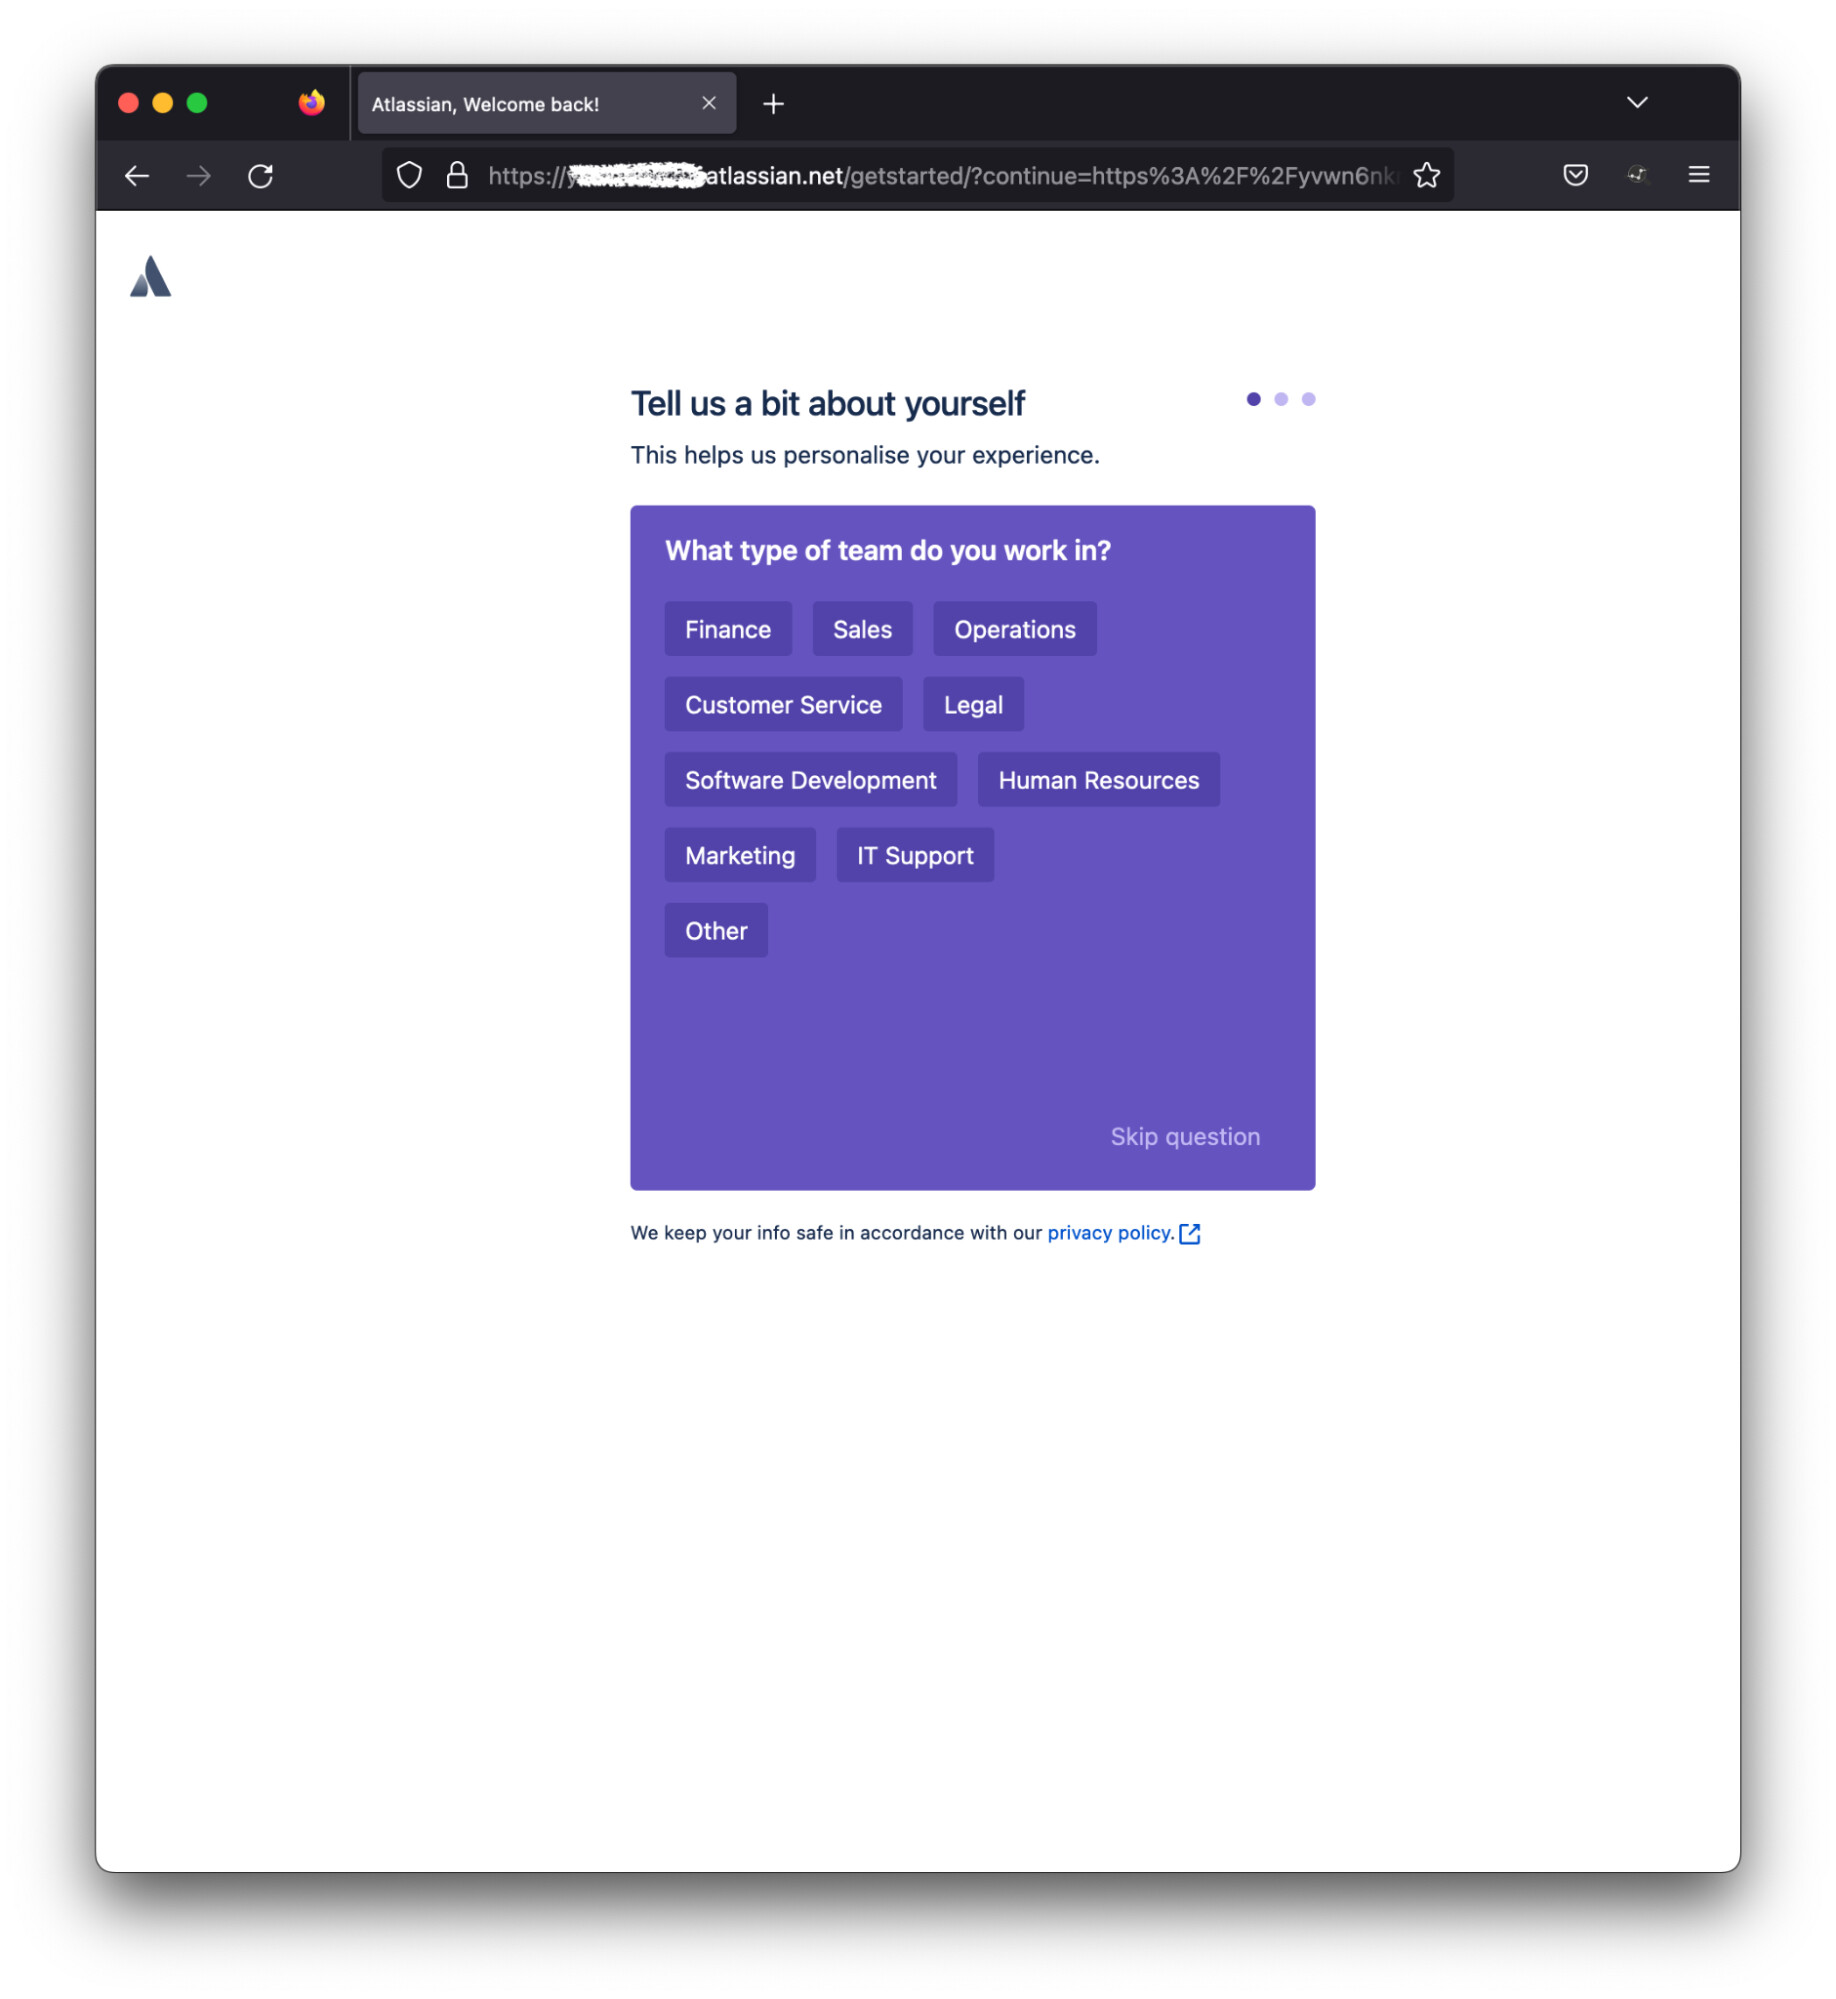
Return to the browser with the user session and refresh. You should be prompted to answer or skip several questions:
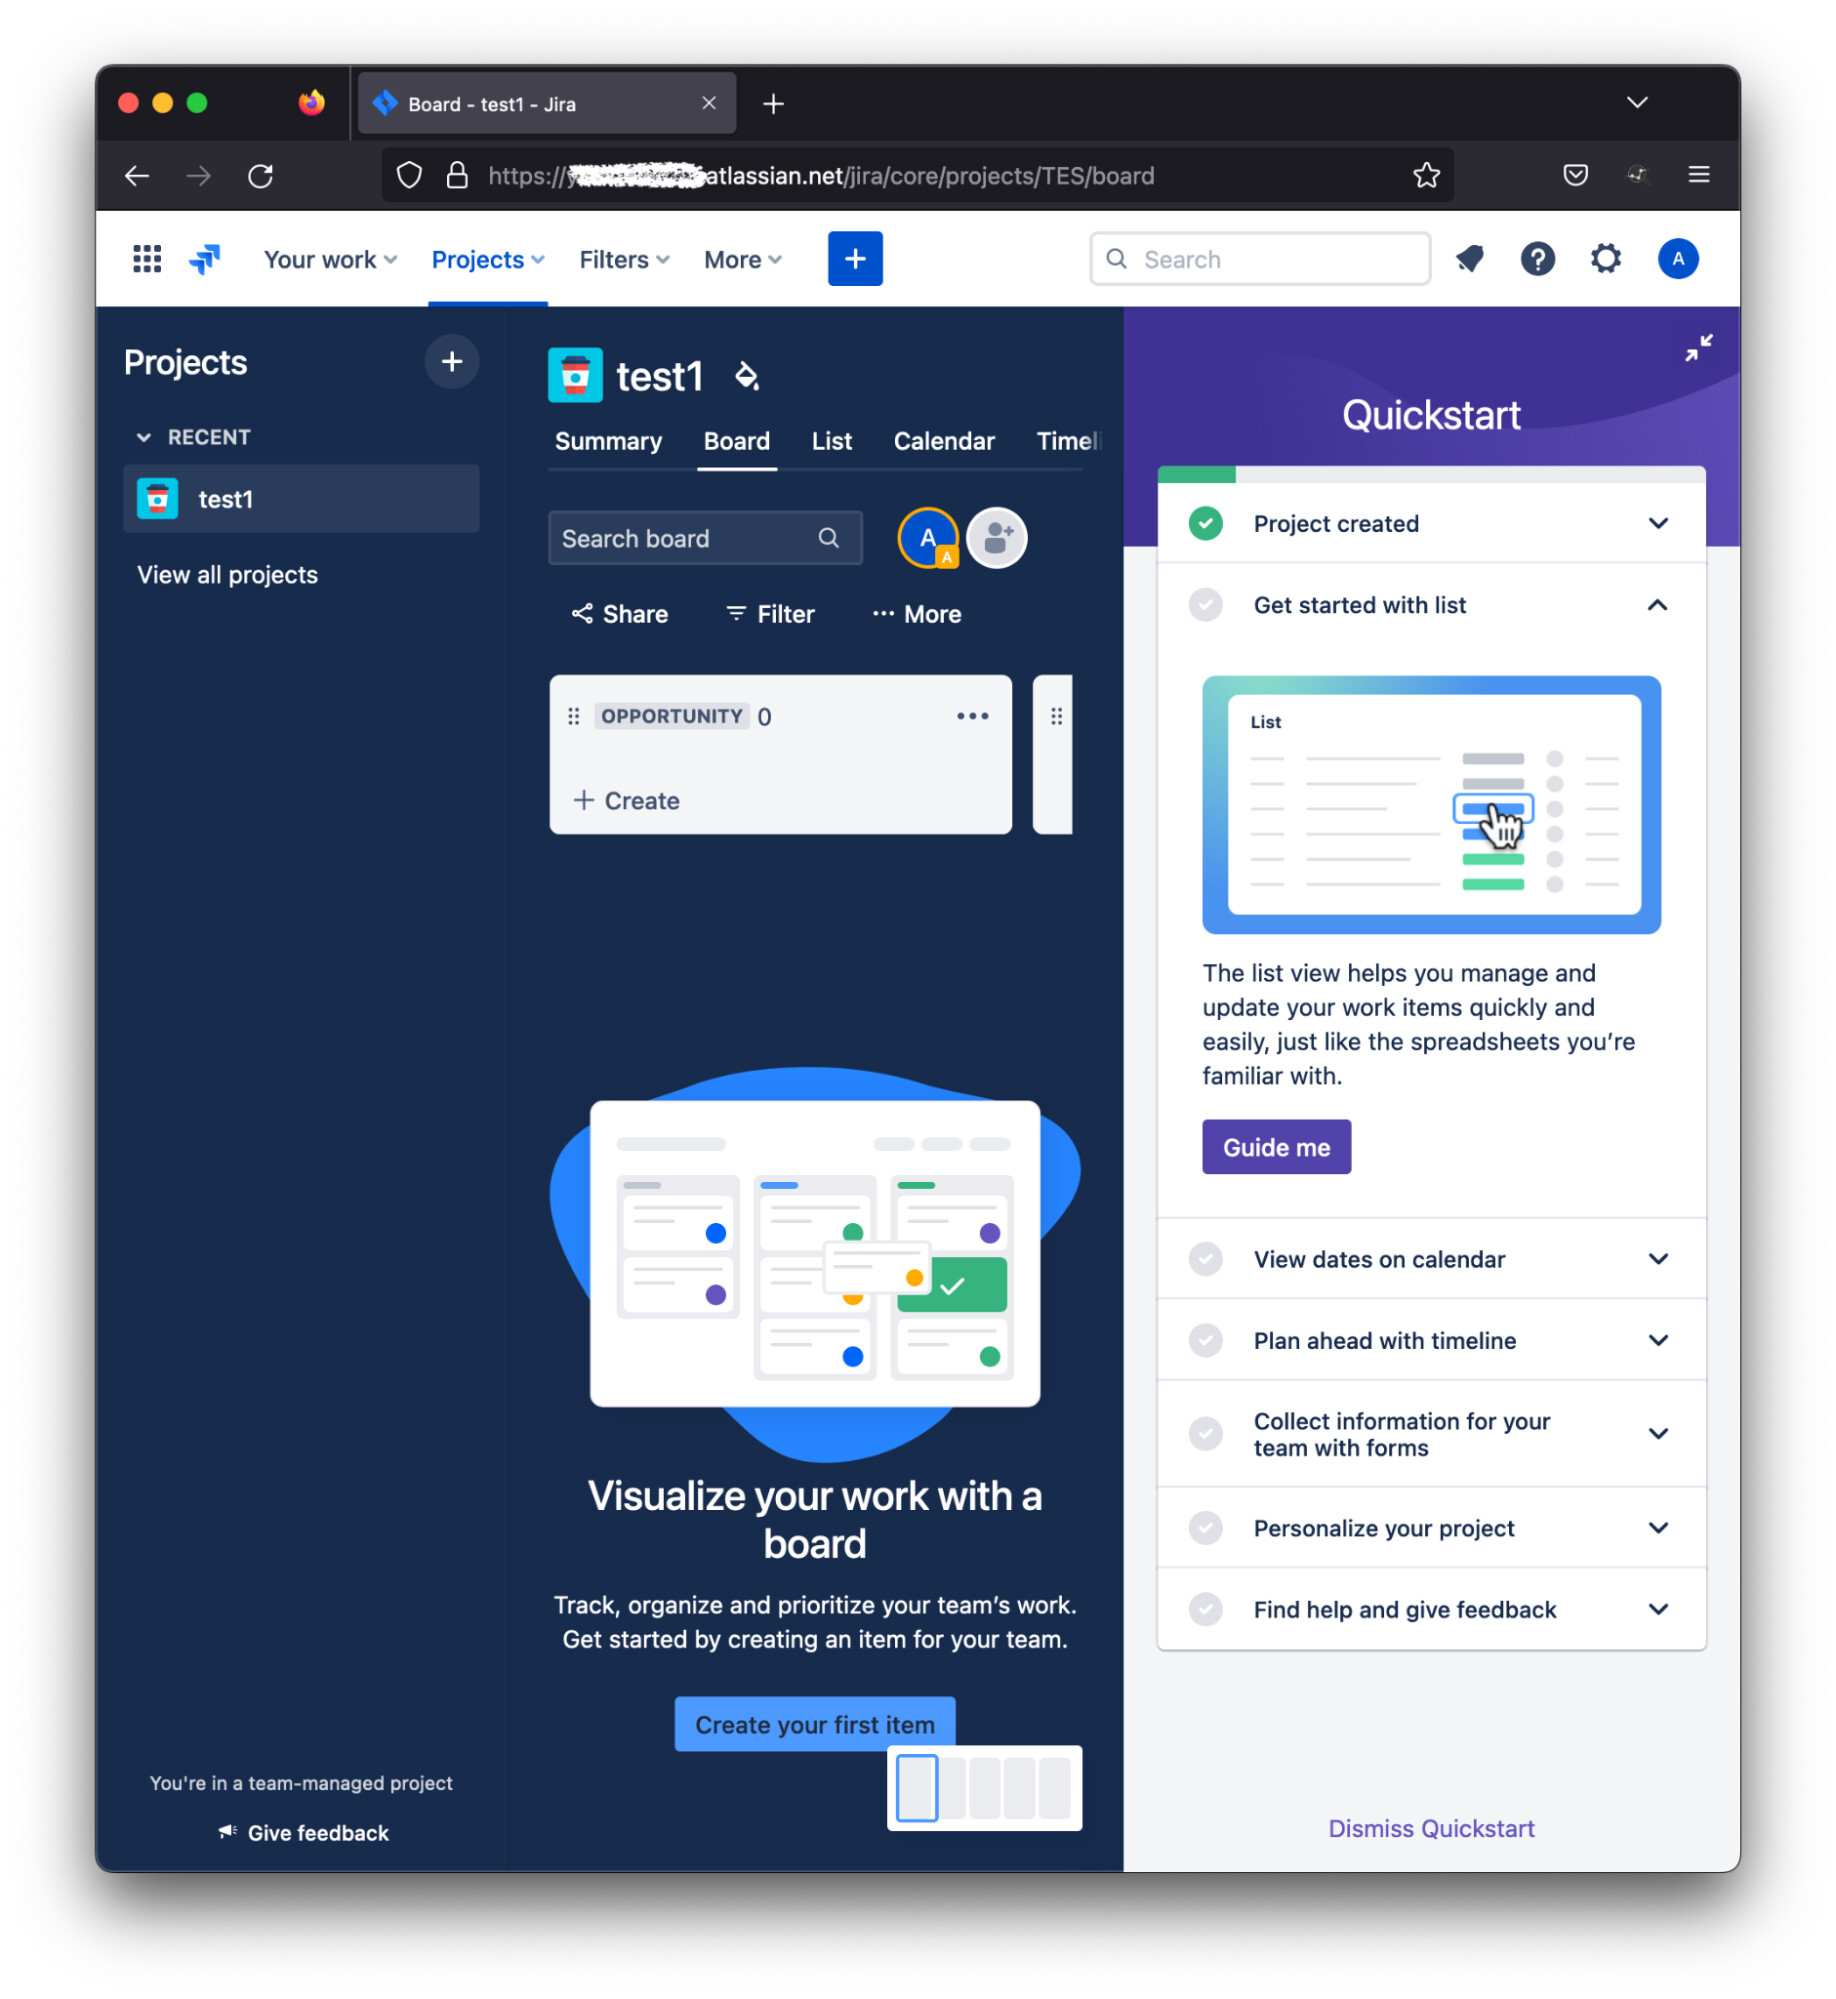
And presented with the Atlassian dashboard:
Configure User Provisioning in ForgeRock
Configure SCIM Connector
Configure a SCIM connector using instructions Create a connector configuration over REST :: ForgeRock Identity Cloud Docs and modify the following properties before sending the configuration to ID Cloud using Postman:
- authenticationMethod with TOKEN
- SCIMEndpoint with the value of SCIM Base URL
- authToken with the value of API Key
//excerpt of SCIM connector configuration
    "configurationProperties" : {
        "authenticationMethod" : "TOKEN",
        "SCIMEndpoint" : "scim_base_url",
        "authToken" : "api_key",
        "acceptSelfSignedCertificates" : false,
        "clientId" : null,
        "clientSecret" : null,
        "disableHostNameVerifier" : false,
        "httpProxyHost" : null,
        "httpProxyPort" : null,
        "maximumConnections" : "10",
        "password" : null,
        "SCIMVersion" : "2",
        "tokenEndpoint" : null,
        "user" : null
    }
Map User Data to SCIM Format
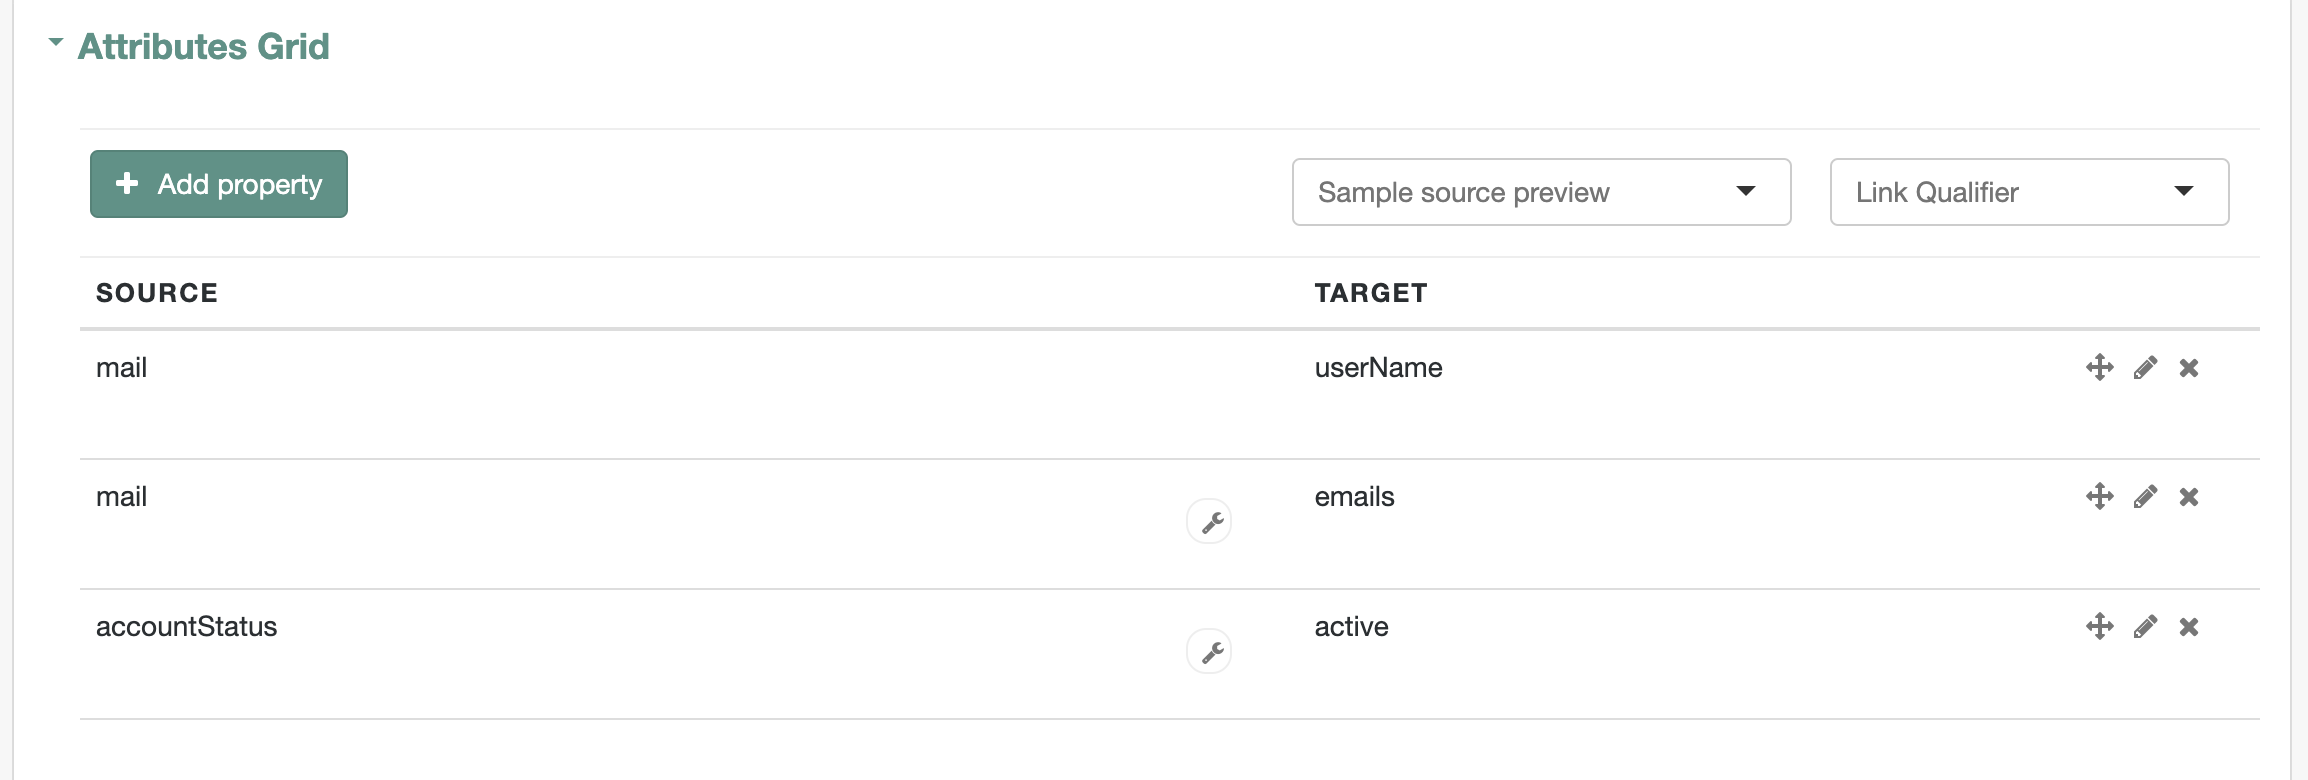
Create a mapping from Managed User to the connector created in the previous step. In minimum the mapping must include the following attributes:
| Source | Target |
| userName | |
| emails |
Add the following transformation to script to the mail attribute which outputs a multi-value attribute as defined by the SCIM schema for the emails attribute. Note that other attributes such as phoneNumbers require similar transformation if used in the mapping.
/*
 * IDM transform script
 *
 * Converts mail attribute to a multi-value attribute
 *  defined by RFC 7643: SCIM Core Schema
 *
 */
function convertMailToScimFormat() {
	var mails = [];
  	var obj = new Object();
  	obj.value = source;
  	obj.type = "work";
  	obj.primary = true;
  	mails.push(obj);
  	return mails;
}

convertMailToScimFormat();
To enable or disable Atlassian accounts based on the status of the user object in ID Cloud map the accountStatus attribute to the active attribute and add the following transformation script:
/*
 * IDM transform script
 *
 * Converts "accountStatus" attribute to a boolean value for the "active" attribute
 *  defined by RFC 7643: SCIM Core Schema
 *
 */
if (source == "active") {
  active = true;
}
else {
  active = false;
}
active;
The attributes mapping should look like this:
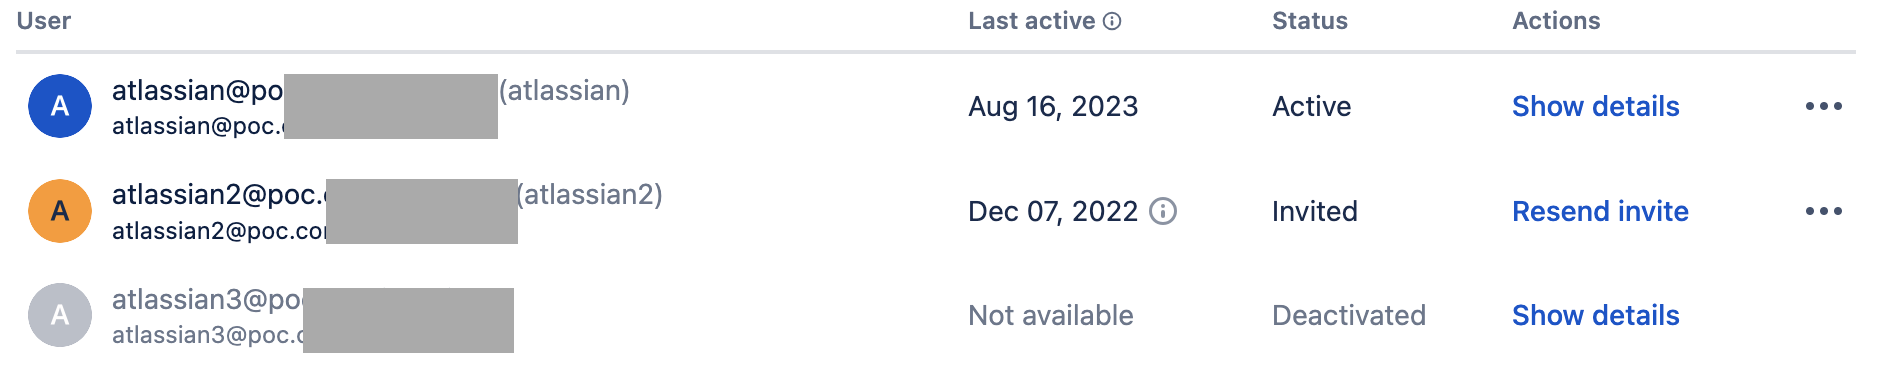
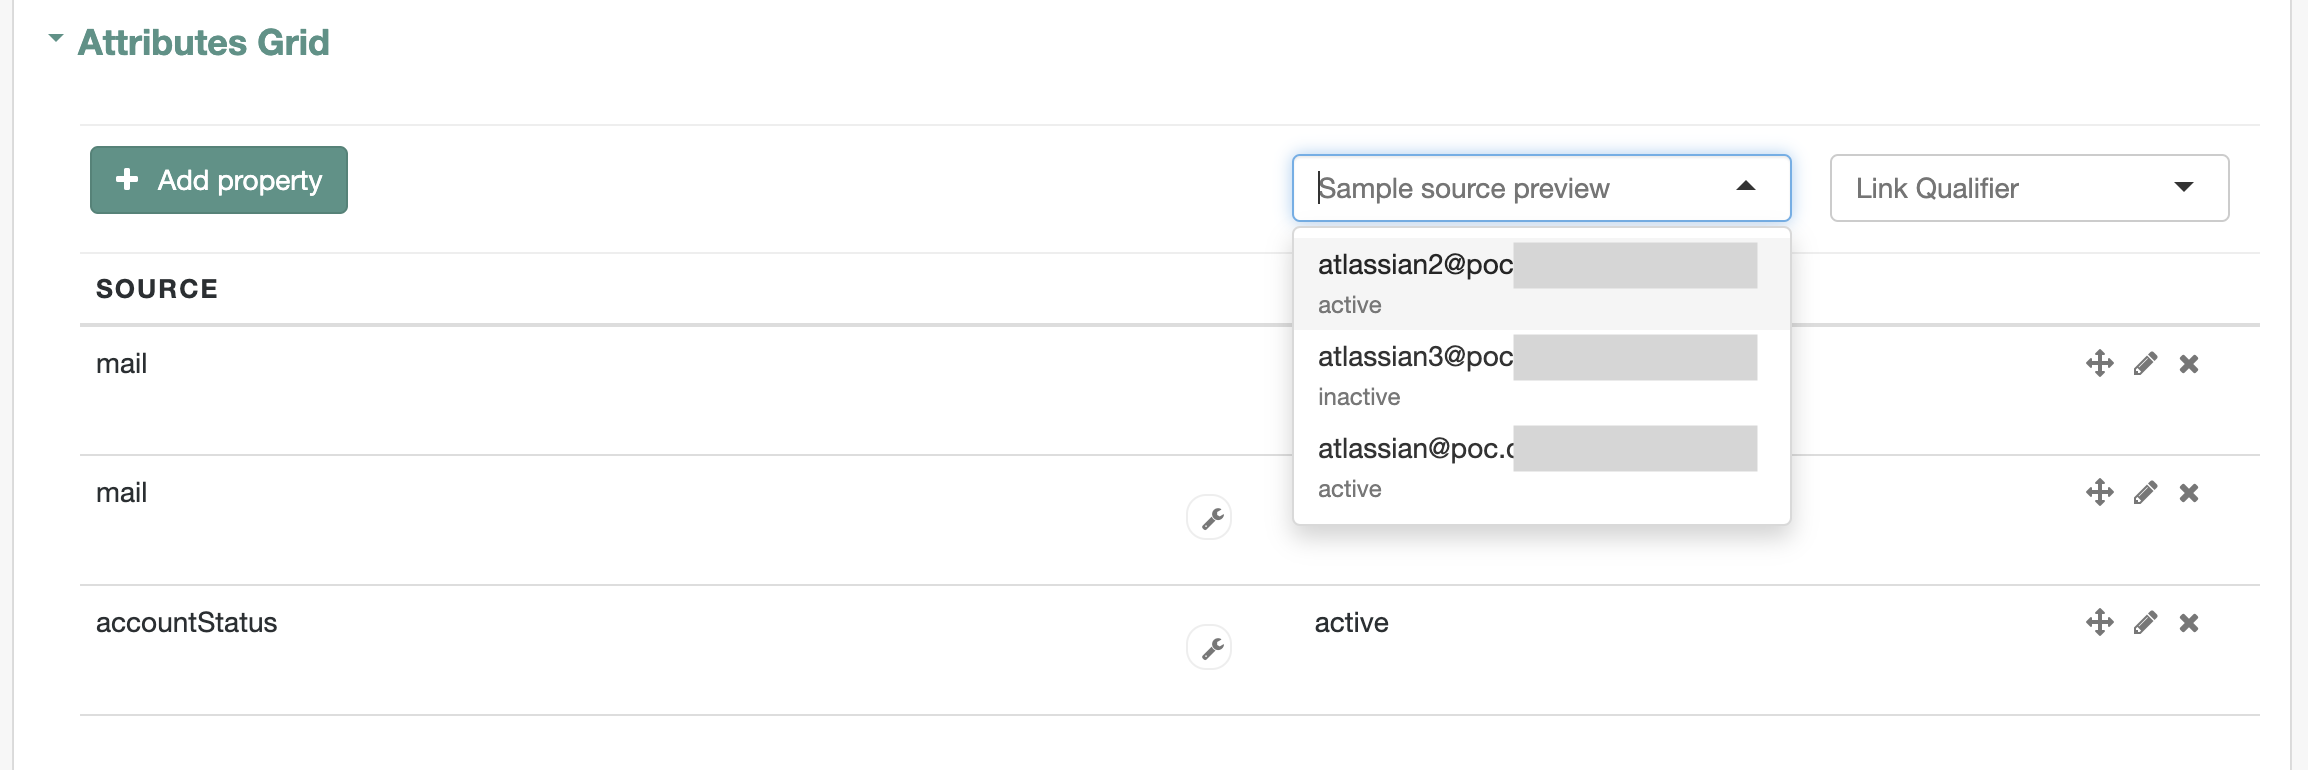
In this example the preview is showing two users where the value of accountStatus is “active” and one user with the value “inactive”:
After selecting Reconcile users with an email that matches the domain that you registered in Atlassian will be synchronized and listed in the Atlassian Administration interface under Directory, Users. Note the Status of the user atlassian3@poc… is set to Deactivated: