Integrating IDM, AM, and DS (version 5.5)
Author: |
Sheila Albertelli |
Created at: |
Oct 2017 |
Updated at: |
Dec 2022 |
Written by Mike Jang
Overview
For version 5.5, we’ve improved integration between our products. It is now easier than ever to integrate ForgeRock Identity Management (IDM), ForgeRock Access Management (AM), and ForgeRock Directory Services (DS). With integration, you can configure aspects of privacy, consent, trusted devices, and more.
Setting up integration can be a challenge, as it requires you to configure (and read documentation from) three different ForgeRock products. This blog will help you set up that integration. For additional features, refer to the following chapters from IDM documentation: Integrating IDM with the ForgeRock Identity Platform and the Configuring User Self-Service.
While you can find most of the steps in the IDM 5.5 Samples Guide, this blog collects the information you need to set up integration in one place.
This blog post will guide you through the process.
If you’re using version 6 of the ForgeRock Identity Platform, see ForgeRock Identity Platform Version 6: Integrating IDM, AM, and DS.
Preparing Your System
For the purpose of this blog, I’ve configured all three systems in a single Ubuntu 16.04 VM (8 GB RAM / 40GB HD / 2 CPU).
Install Java 8 on your system. I’ve installed the Ubuntu 16.04-native openjdk-8 packages. In some cases, you may have to include export JAVA_HOME=/usr in your ~/.bashrc or ~/.bash_profile files.
As AM requires fully qualified domain names (FQDNs), I’ve set up an /etc/hosts file with FQDNs for all three systems, with the following line:
-
192.168.0.1 AM.example.com DS.example.com IDM.example.com
(Substitute your IP address as appropriate. You may set up AM, DS, and IDM on different systems.)
If you set up AM and IDM on the same system, make sure they’re configured to connect on different ports. Both products configure default connections on ports 8080 and 8443.
Download AM, IDM, and DS versions 5.5 from backstage.forgerock.com. For organizational purposes, set them up on their own home directories:
| Product | Download | Home Directory |
|---|---|---|
DS |
DS-5.5.0.zip |
/home/ds |
AM |
AM-5.5.0.war |
/home/am |
IDM |
IDM-5.5.0.zip |
/home/idm |
Unpack the zip files. For convenience, copy the Example.ldif file from /home/idm/openidm/samples/full-stack/data to the /home/ds directory.
Configuring ForgeRock Directory Services (DS)
To install DS, navigate to the directory where you unpacked the binary, in this case, /home/ds/opendj. In that directory, you’ll find a setup script. The following command uses that script to start DS as a directory server, with a root DN of “cn=Directory Manager”, with a host name of ds.example.com, port 1389 for LDAP communication, and 4444 for administrative connections.
$ ./setup \
  directory-server \
  --rootUserDN "cn=Directory Manager" \
  --rootUserPassword password \
  --hostname ds.example.com \
  --ldapPort 1389 \
  --adminConnectorPort 4444 \
  --baseDN dc=com \
  --ldifFile /path/to/Example.ldif \
  --acceptLicense
DS is now ready for integration.
Installing ForgeRock Access Manager (AM)
You’ll use the configured external DS server as a common user store for AM and IDM. For an extended explanation, see the following documentation: Integrating IDM with the ForgeRock Identity Platform. To install AM, use the following steps:
-
Set up Tomcat for AM. For this blog, I used Tomcat 8.0.47, downloaded from http://tomcat.apache.org/.
-
Unzip Tomcat in the /home/am directory
-
Make the files in the apache-tomcat-8.0.47/bin directory executable
-
Unpack the AM binary. Copy the AM-5.5.0.war file from the /home/am directory to apache-tomcat-8.0.47/webapps/openam.war
-
Start the Tomcat web container with the startup.sh script in the apache-tomcat-8.0.47/bin directory
-
Shut down Tomcat, with the shutdown.sh script in the same directory
-
Open the web.xml file in the following directory: apache-tomcat-8.0.47/webapps/openam/WEB-INF/. Include the following code blocks in that file to support cross-origin resource sharing:
<filter>
      <filter-name>CORSFilter</filter-name>
      <filter-class>org.apache.catalina.filters.CorsFilter</filter-class>
      <init-param>
           <param-name>cors.allowed.headers</param-name>
           <param-value>Content-Type,X-OpenIDM-OAuth-Login,X-OpenIDM-DataStoreToken,X-Requested-With,Cache-Control,Accept-Language,accept,Origin,Access-Control-Request-Method,Access-Control-Request-Headers,X-OpenAM-Username,X-OpenAM-Password,iPlanetDirectoryPro</param-value>
      </init-param>
      <init-param>
           <param-name>cors.allowed.methods</param-name>
           <param-value>GET,POST,HEAD,OPTIONS,PUT,DELETE</param-value>
      </init-param>
      <init-param>
           <param-name>cors.allowed.origins</param-name>
           <param-value>http://am.example.com:8080,https://idm.example.com:9080</param-value>
      </init-param>
      <init-param>
           <param-name>cors.exposed.headers</param-name>
           <param-value>Access-Control-Allow-Origin,Access-Control-Allow-Credentials,Set-Cookie</param-value>
      </init-param>
      <init-param>
           <param-name>cors.preflight.maxage</param-name>
           <param-value>10</param-value>
      </init-param>
      <init-param>
           <param-name>cors.support.credentials</param-name>
           <param-value>true</param-value>
      </init-param>
 </filter>

 <filter-mapping>
      <filter-name>CORSFilter</filter-name>
      <url-pattern>/json/*</url-pattern>
 </filter-mapping>
Substitute the actual URL and ports for your AM and IDM deployments, where you see http://am.example.com:8080 and http://idm.example.com:9080
Configuring AM
-
If you’ve configured AM on this system before, delete the /home/am/openam directory.
-
Restart Tomcat with the startup.sh script in the aforementioned apache-tomcat-8.0.47/bin directory
-
Navigate to the URL for your AM deployment. In this case, call it http://am.example.com:8080/openam. You’ll create a “Custom Configuration” for OpenAM, and accept the defaults except when setting up User Data Store settings. The options in the following table are based on the previous installation of DS:
| Option | Setting |
|---|---|
Directory Name |
|
Port |
1389 |
Root Suffix |
dc=example,dc=com |
Login ID |
cn=Directory Manager |
Password |
password |
-
When the installation process is complete, you’ll be prompted with a login screen. Log in as the amadmin administrative user with the password you set up during the configuration process. With the following action, you’ll set up an OpenID Connect/OAuth 2.0 service that you’ll configure shortly for a connection to IDM.
-
Select Top-Level Realm → Configure OAuth Provider → Configure OpenID Connect → Create → OK
-
-
Set up IDM as an OAuth 2.0 Client.
-
Select Applications → OAuth 2.0. Choose Add Client. In the New OAuth 2.0 Client window that appears, set openidm as a Client ID, set changeme as a Client Secret, along with a Redirection URI of http://idm.example.com:9080/oauthReturn/. The scope is openid , which reflects the use of the OpenID Connect standard.
-
Select Create, go to the Advanced Tab, and scroll down. Activate the Implied Consent option.
-
Press Save Changes.
-
-
Go to the OpenID Connect tab, and enter the following information in the Post Logout Redirect URIs text box:
-
Press Save Changes.
-
Select Services → OAuth2 Provider → Advanced OpenID Connect:
-
Scroll down and enter openidm in the “Authorized OIDC SSO Clients” text box.
-
Press Save Changes.
-
-
Navigate to the Consent tab.
-
Enable the Allow Clients to Skip Consent option.
-
Press Save Changes.
-
AM is now ready for integration.
Configuring ForgeRock Identity Management (IDM)
Now you’re ready to configure IDM, using the following steps:
-
For the purpose of this blog, use the following project subdirectory: /home/idm/openidm/samples/full-stack.
-
If you haven’t modified the deployment port for AM, modify the port for IDM. To do so, edit the boot.properties file in the full-stack/conf/boot subdirectory, and change the port property appropriate for your deployment (openidm.port.http or openidm.port.https). For this blog, I’ve changed the openidm.port.http line to:
-
openidm.port.http = 9080
-
-
Start IDM using the full-stack project directory:
-
$ cd openidm
-
$ ./startup.sh -p samples/full-stack
-
-
In a browser, navigate to http://idm.example.com:9080/admin
-
Log in as an IDM administrator:
-
Username: openidm-admin
-
Password: openidm-admin
-
-
Reconcile users from the common DS user store to IDM. Select Configure > Mappings. In the page that appears, find the mapping from System/Ldap/Account to Managed/User, and press Reconcile. That will populate the IDM Managed User store with users from the common DS user store.
-
Select Configure → Authentication. Choose the ForgeRock Identity Provider option. In the window that appears, scroll down to the configuration details. Based on the instance of AM configured earlier, you’d change:
| Property | Entry |
|---|---|
Well-Known Endpoint |
http://am.example.com:8080/openam/oauth2/.well-known/openid-configuration |
Client ID |
Matching entry from Step 5 of Configuring AM (openidm) |
Client Secret |
Matching entry from Step 5 of Configuring AM (changeme) |
-
When you’ve made appropriate changes, press Submit. (You won’t be able to press submit until you’ve entered a valid Well-Known Endpoint.)
-
You’re prompted with the following message:
-
Your current session may be invalid. Click here to logout and re-authenticate.
-
-
-
When you
Click here, you should be taken to http://am.example.com:8080/openam/. Log in with AM administrative credentials:-
Username: amadmin
-
Password:
-
If you see the IDM Admin UI after logging in, congratulations! You now have a working integration between AM, IDM, and DS.
Once you’ve integrated AM, IDM, and DS, you can:
-
Set up read-only User-Managed Access to resources
-
Take advantage of privacy & consent features
Troubleshooting
If you run into errors, review the following table:
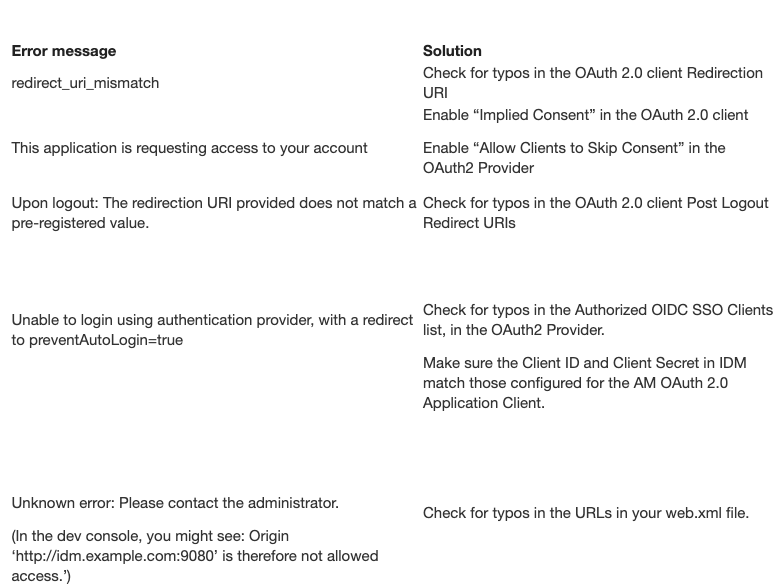
If you see other errors, the problem is likely beyond the scope of this blog.