Password Acquisition in ForgeRock Identity Cloud
Author: |
Dom Reed |
Created at: |
Jul 2022 |
Updated at: |
Mar 2023 |
Problem
Your user passwords are stored in a remote/legacy datastore and you want to be able to use them in Identity Cloud.
Start here
Before getting started, you should understand the fundamentals of authentication, journeys and connecting to external resources in Identity Cloud. These videos are a good place to start:
Options
There are three approaches commonly used to acquire passwords from remote/legacy datastores. These are summarized below, but the rest of this document focuses on the pass-through authentication approach:
Force password reset |
Seamless synchronization |
Pass-through authentication |
This approach is the simplest to implement but the most intrusive for
your users as you don’t try to acquire the legacy passwords at all and
just force a password reset in Identity Cloud. |
This is the preferred approach but not always feasible. If the
password is retrievable as a hash and is in a supported format,
passwords can be automatically synchronized to Identity Cloud and the
user will then be able to log in seamlessly. |
This approach allows for seamless password acquisition when the password cannot be extracted from the remote datastore. A common example is Active Directory, where either the password attribute is not returned or is in an unsupported format. |
⇓ |
⇓ |
⇓ |
Briefly the steps involved are:
|
By utilizing the Remote Connector Service (RCS) and connectors with Identity Cloud, you can connect to a remote datastore to acquire and synchronize user attributes. This can be a one way sync (datastore → Identity Cloud) or a bi-directional sync if the remote datastore is still used by other systems and needs to be kept up-to-date when data changes in Identity Cloud. Review the following resources for more information about using this approach: |
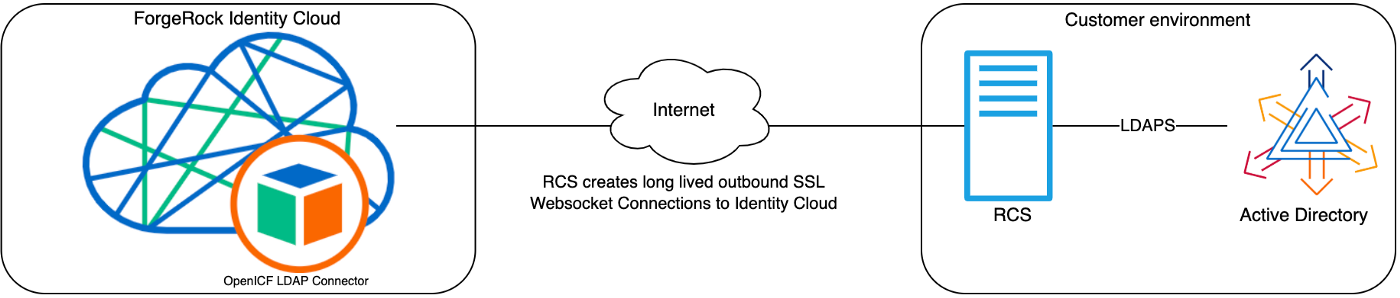
Pass-through authentication again utilizes the RCS and connectors in Identity Cloud, along with authentication journeys, in order to securely verify a user password against a remote datastore during the login process. The process to set up pass-through authentication in Identity Cloud from
Active Directory is covered in the remainder of this document. |
Pass-through authentication
These steps assume you are using Microsoft Active Directory (AD) as the remote datastore, and your deployment looks similar to this:
Before continuing, you should ensure you understand the concepts involved in setting up pass-through authentication; these resources are a good starting place:
-
Documentation:
-
Videos
Configure the RCS
Follow steps 1 to 6 in this KB: How do I implement a Remote Connector Server (RCS) for Identity Cloud? (Implementing the RCS section)
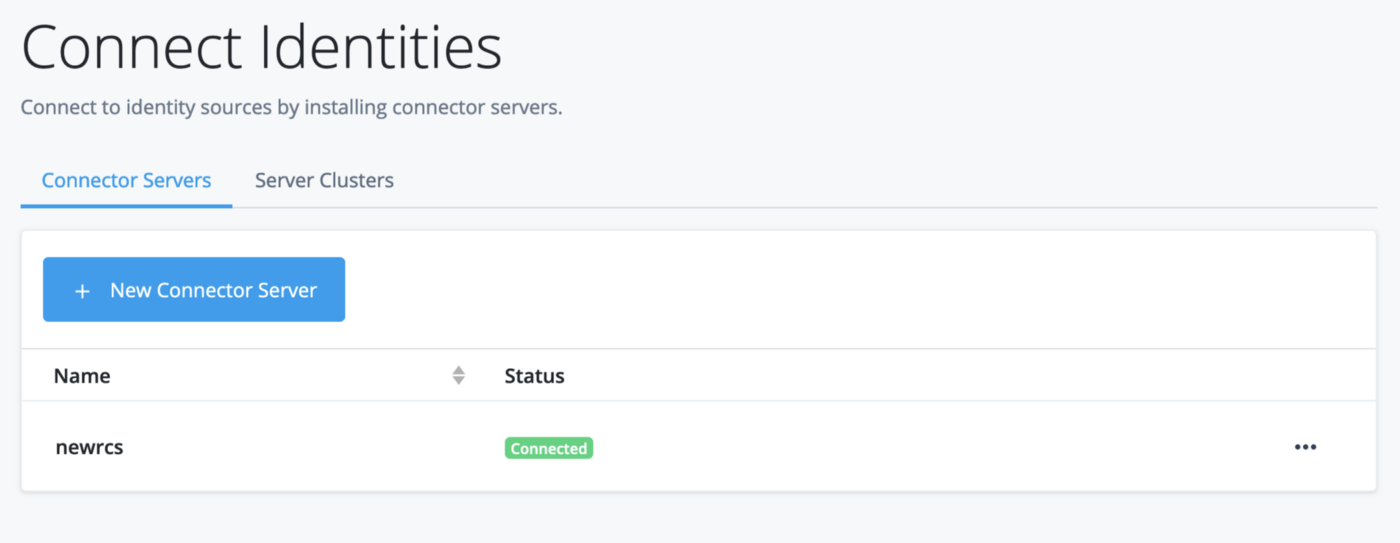
Do not proceed unless the status for your Connector Server shows
Connected. For example, a successful connection is shown below for a
RCS called newrcs:
Configure a connector to AD
You configure a connector for AD as follows:
-
In the Identity Cloud admin UI, go to Native Consoles > Identity Management > Configure > Connectors and click New Connector.
-
Populate the following details:
-
Connector Name: Enter a name to identify this connector, for example,
AD. -
Remote Host: Enter the name of the RCS you created in the previous section, for example,
newrcs. -
Connector Type: Select
LDAP Connector. -
LDAP Type: Select
AD LDAP Configuration. -
Host Name or IP: Enter the hostname for AD - this MUST be resolvable and reachable from the RCS.
-
Port: Enter 636 and select the Use SSL? checkbox.
-
Account Distinguished Name (DN): Enter the bind user for AD, for example:
CN=service_account,CN=Users,DC=ad,DC=example,DC=com. -
Password: Enter the bind password for the above account.
-
Base DN: Enter the Base Distinguished Name where users can be found.
An additional DN can be added if Groups are located in a different location, for example:OU=users,OU=MyOrg,DC=ad,DC=example,DC=com.
-
NOTE
The LDAPS/SSL certificate for AD must be imported into the trusted CA file on the RCS host via keytool. The default Java truststore is cacerts.
-
Click Save.
-
Select the Data tab and check that users are being populated. If they are, your connector is successfully set up and ready to go.
Perform a simple test to verify pass-through authentication works
Once the connector is set up, you should perform a simple test to confirm that pass-through authentication is working before you create the authentication journey. This test will prove that a user can authenticate to Identity Cloud using their password from the remote datastore.
Use the following REST call, replacing the following:
-
<tenant-name>- your Identity Cloud tenant name. -
<connector-name>- the name of the connector you just created, for example, AD. -
<access-token>- the access token you obtained when you authenticated to the Identity Cloud REST API. -
<user>- the username of an AD user. -
<password>- the password for the above user.
$ curl \
--request POST 'https://<tenant-name>.forgeblocks.com/openidm/system/<connector-name>/account?_action=authenticate' \
--header 'authorization: Bearer <access-token>' \
--header 'Accept-API-Version: resource=1.0' \
--header 'Content-Type: application/json' \
--data '{
    "username" : "<user>",
    "password" : "<password>"
}'
If basic pass-through authentication is working, you will see a HTTP 200 response with the remote _id of the user you authenticated with. For example:
{
 "_id": "31966242-e24f-4c4f-b531-3f215a861d6c"
}Import users from AD into Identity Cloud
You import users from AD into Identity Cloud by creating a sync mapping to specify which user attributes are imported. You should not include the password attribute, as this will be retrieved from the remote datastore during login using pass-through authentication.
NOTE
Skip these steps if you do not need to synchronize users.
-
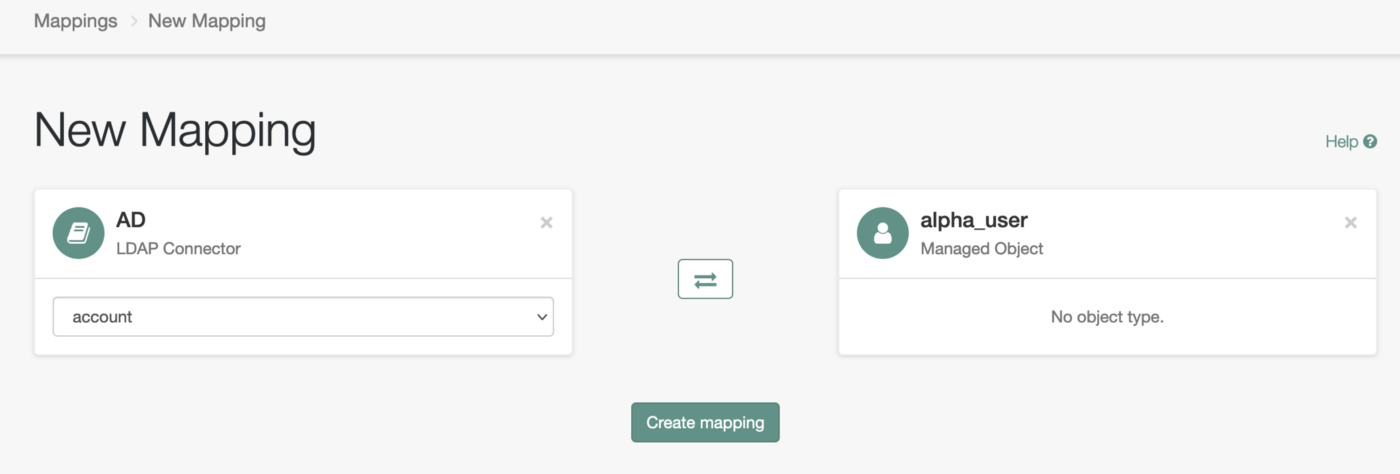
In the Identity Cloud admin UI, go to Native Consoles > Identity Management > Configure > Mappings and click New Mapping.
-
Select the connector you just created (for example, AD) as the source and select the alpha_user as your target.
-
Click Create Mapping, followed by Create.
-
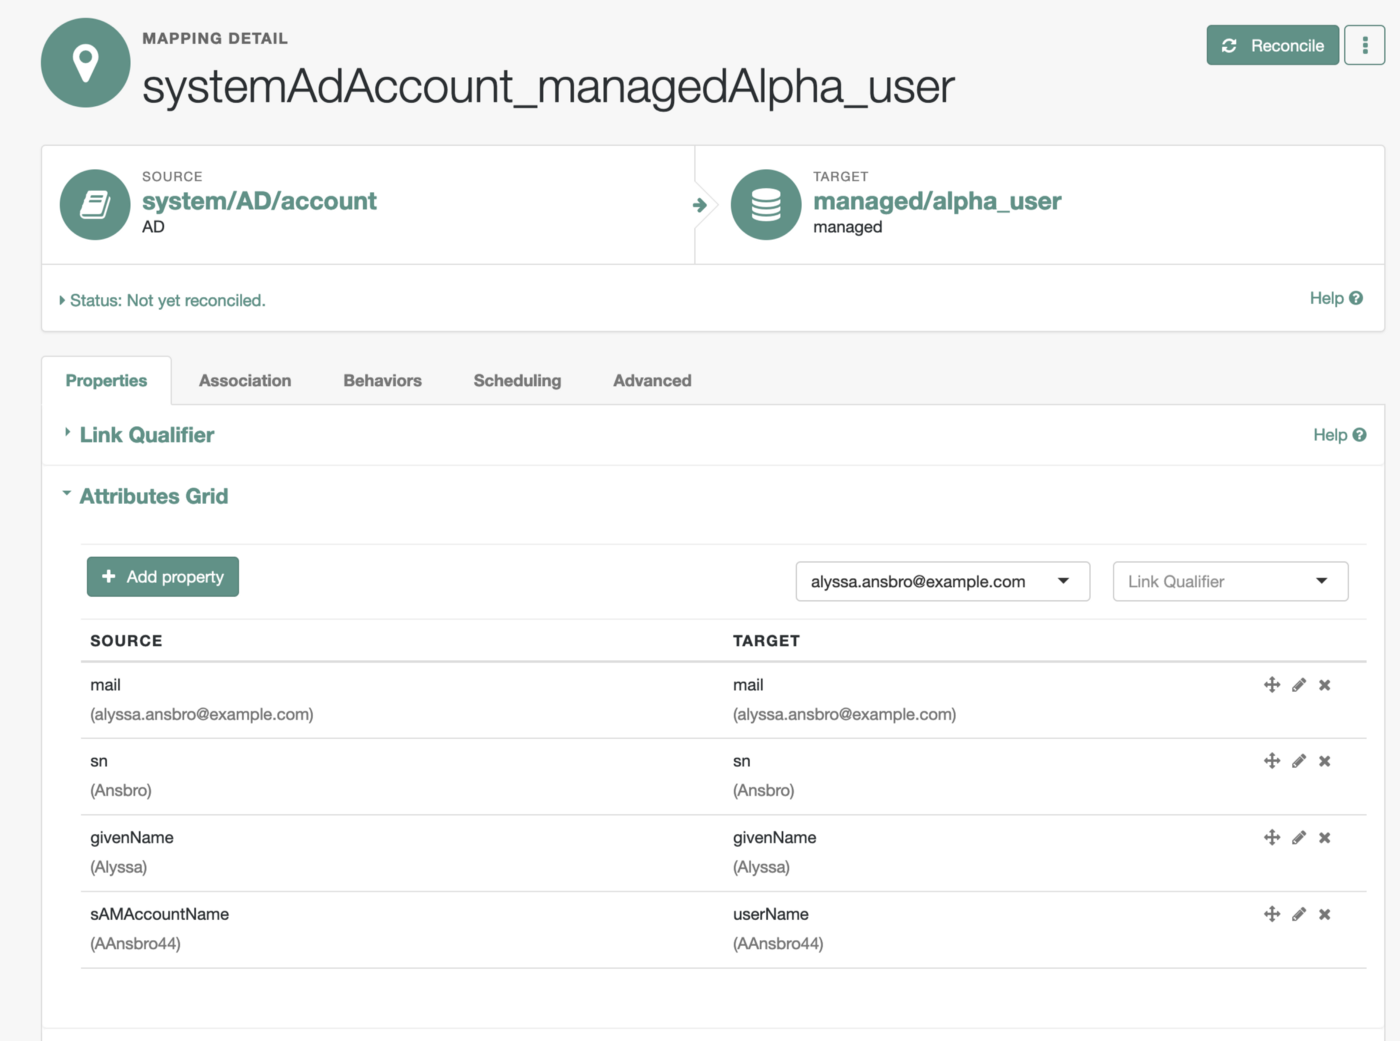
Click Properties > Attributes Grid > Add Missing Required Properties. This adds the minimum required attributes (mail, sn, givenName and userName).
-
Click the Edit icon next to each target property and configure the following corresponding source properties:
-
mail - mail
-
sn - sn
-
givenName - givenName
-
userName - sAMAccountName
-
-
Optional. Add any other attributes you want to import by clicking Add property, select the target property and then select the source property.
-
Test this mapping is working by entering the username of an AD user in the Sample source preview field, and checking the user details are returned. For example, the returned user details look like this for user
AAnsbro44:
-
Click the Behaviors tab and select
Default Actionsfrom the Current Policy drop-down and click Save. -
Click Reconcile to sync the identities.
Once the reconciliation is complete, check that the identities from AD have been synced to Identity Cloud:
-
In the Identity Cloud admin UI, go to Identities > Manage > Alpha realm - Users and check that AD users are now shown.
Configure pass-through authentication using journeys
You configure pass-through authentication by creating a login journey that includes the Pass-Through Authentication node.
At this point, you need to decide what your desired outcome is; this document covers the two most common outcomes.
Outcomes
Remote password verification (Always) |
One-time remote password verification |
In this scenario, the user password is always verified against the remote datastore. For example, this may be required in a situation where SSO has been migrated to Identity Cloud but the self-service functionality has yet to be migrated. |
In this scenario, the user password is verified against the remote datastore the first time the user logs in. If successful, the user is PATCHed to add the password, which is then hashed and stored securely in the Identity Cloud datastore, meaning subsequent authentications are verified against the Identity Cloud datastore. For example, this would be required in a situation where everything (SSO and self-service) has been migrated to Identity Cloud. |
⇓ |
⇓ |
If this is the outcome you want, you can now Create the journey. When a user logs in with this journey, the journey will first check their credentials against the Identity Cloud datastore. If they exist and the credentials are correct, their login will proceed. If not, the journey will next check if their password attribute is populated. If it is, the journey will fail because the password they entered does not match the one in the Identity Cloud datastore. If it is not populated, they will then move on to the Pass-through Authentication node, which connects over SSL and LDAPS to the remote datastore (via the RCS and connector you configured) and validates the user’s credentials; allowing login to proceed if they are correct. The password is NEVER stored in Identity Cloud with this journey. |
If this is the outcome you want, you can now Create the journey. The journey behaves as outlined in the previous outcome. The only difference being that the user in the Identity Cloud datastore
is updated with the password from the remote datastore, to allow future
authentications to be performed against Identity Cloud (removing any
reliance on the remote datastore). |
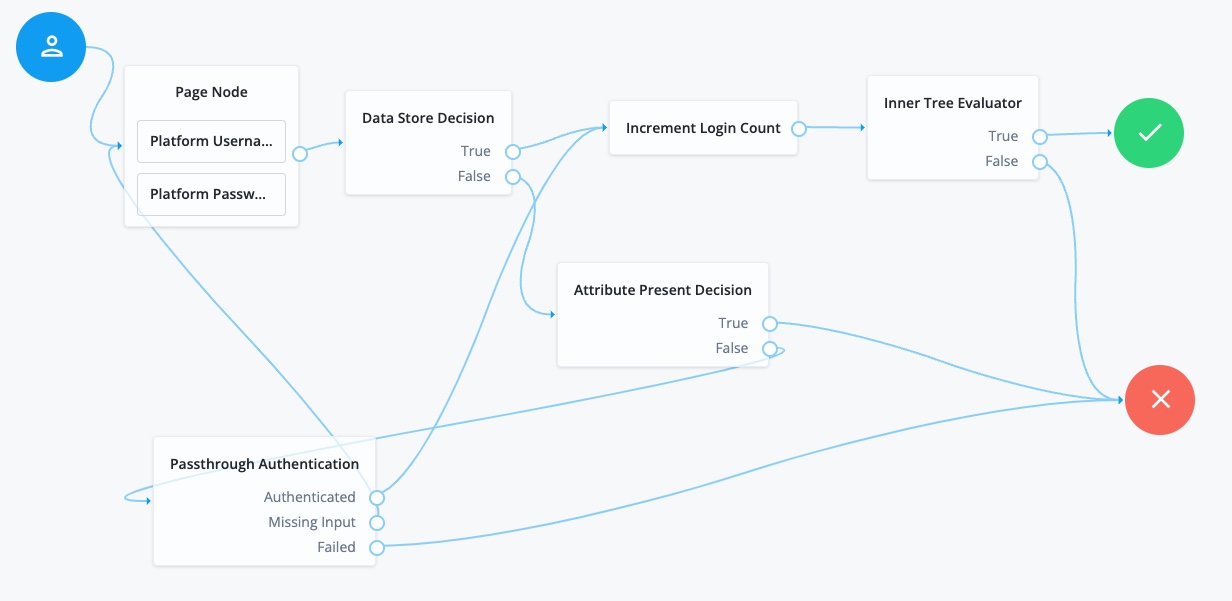
Create journey for: Remote password verification (Always)
-
In the Identity Cloud admin UI, go to Journeys > Login, click the … menu and select Duplicate.
-
Enter a unique name for your journey (for example, Pass-through) and click Save.
-
Drag the following nodes on to the canvas, and configure the settings and connections as follows:
| Node | Settings | Connections |
|---|---|---|
System Endpoint field: enter the name of the connector you just created (for example, AD). |
|
|
|
-
Click Save.
The resulting journey should look similar to this:
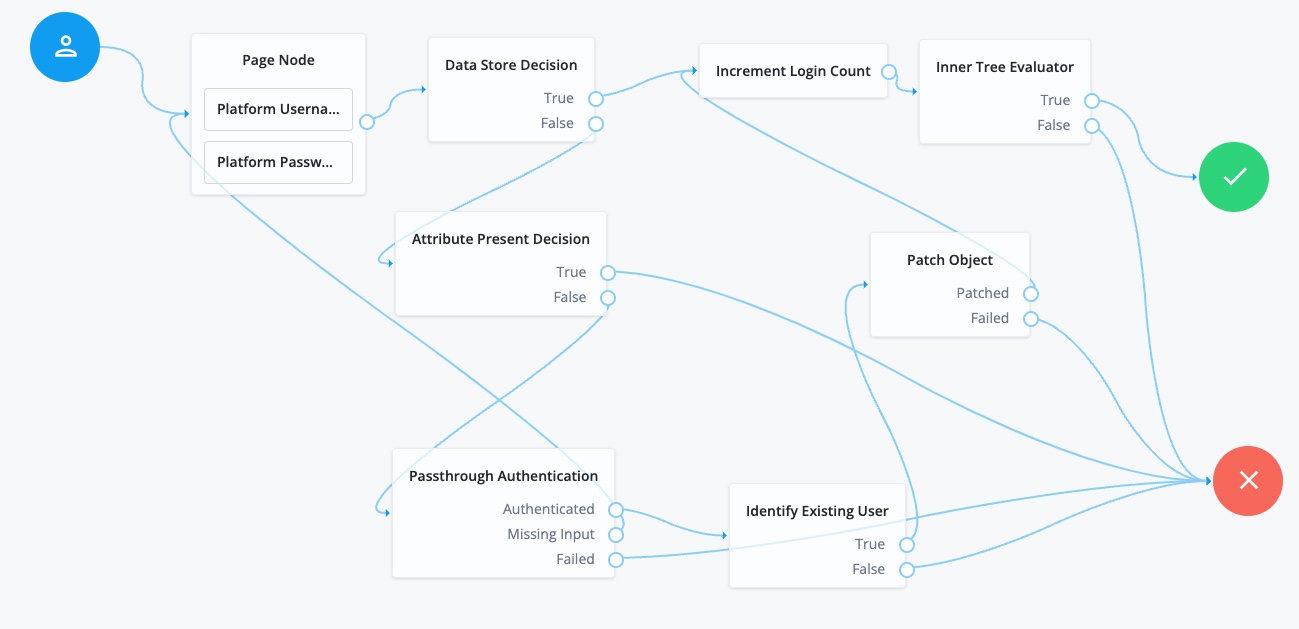
Create journey for: One-time remote password verification
This journey builds on the previous journey but all the steps are included here for completeness.
-
In the Identity Cloud admin UI, go to Journeys > Login, click the … menu and select Duplicate.
-
Enter a unique name for your journey (for example, Pass-through) and click Save.
-
Drag the following nodes on to the canvas, and configure the settings and connections as follows:
| Node | Settings | Connections |
|---|---|---|
Identity Resource: enter |
|
|
Identity Attribute: enter |
|
|
System Endpoint: enter the name of the connector you just created (for example, AD). |
|
|
|
-
Click Save.
The resulting journey should look similar to this:
Password policies
If the password policy in Identity Cloud is stricter than the one in the
remote datastore, you should modify the
Password
Policy in Identity Cloud to match the existing policy; otherwise this
journey will fail with a password Constraint Violation error.
If you want to enforce a stricter policy, you can:
-
Use the Force password change option when configuring the Password Policy to bring passwords in line with a newer password policy after
xnumber of days.
OR: -
For a more seamless approach, you could adjust the journey to call the …/openidm/policy/managed/alpha_user/*?_action=validateProperty endpoint after remote verification to pre-check the password conforms to the stricter password policy, and if not, prompt for a new compliant password.
Test the pass-through authentication journey
-
In the Identity Cloud admin UI, navigate to Journeys.
-
Click the journey that you want to test (for example, Pass-through).
-
Copy the Preview URL.
-
Paste the preview URL into a browser using Incognito or Browsing mode.
-
Enter the username and password of an AD user to check that you can log in successfully.