Setting Up An Active Directory Plugin For ForgeRock Identity Cloud
Author: |
Kevin Schneider |
Created at: |
Dec 2021 |
Updated at: |
Dec 2025 |
By Kevin Schneider
Originally posted on
https://medium.com/@kevsuisse
This post describes how to integrate the Active Directory (AD) Password
Synchronization Plugin with ForgeRock Identity Cloud (FIDC).
The full documentation can be found in the
Password
Synchronization Plugin Guide.
Overview
To store passwords securely, Identity Management Systems such as ForgeRock Identity Cloud and Active Directory normally don’t store a user’s password in cleartext, but as a non-reversible, secure hash. Passwords in FIDC can be hashed with a variety of algorithms. If a remote system is using a supported hashing algorithm to store passwords, the password hashes could simply be synchronized to FIDC. Active Directory, however, uses a hash algorithm that is not supported in FIDC; therefore, simply exchanging the hash values isn’t possible.
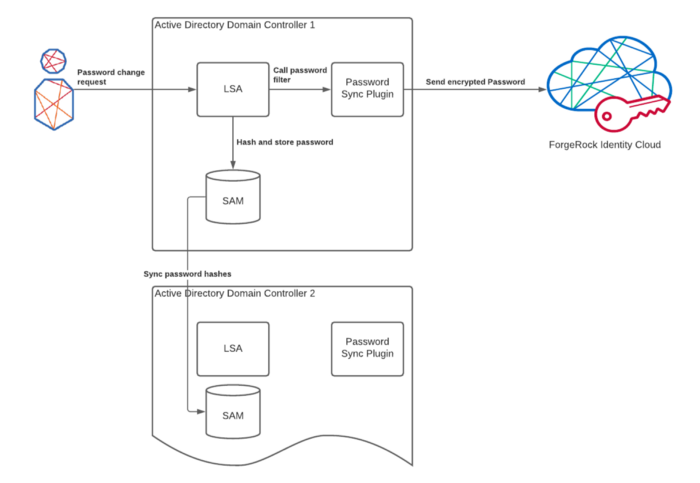
In order to synchronize passwords, a password change has to be
intercepted before the password is hashed. This is the job of the Active
Directory
password sync plugin that has to be installed on the Active Directory
domain controller. It is implemented as an LSA password filter and
gets
notified when a password is changed. As it receives the password in
cleartext before it is hashed, it can send it to FIDC before it is
irreversibly
hashed.
Important: Synchronization of passwords between multiple domain
controllers happens with the hashed password value, not the cleartext.
As
the cleartext password is only available on the domain controller that
handles the password change, the sync plugin has to be installed on
every
domain controller.
Security
In order to keep that operation secure, the password plugin communicates with FIDC through a TLS connection. In addition, the password is encrypted with a public key.
The following is a sample request payload sent by the plugin:
[{
  “operation”: “replace”,
  “field”: “/password”,
  “value”: {
    “$crypto”: {
      “value”: {
        “data”: “fPs+xYfitIV1srIH8CczCg==”,
        “cipher”: “AES/ECB/PKCS5Padding”,
        “key”: {
           “data”:    “GbEbplqzXeRzVp9l77p/yyAAHStO5Hcr9C5AFrb0xtLendbmhvYDDCoJtKHsGsSrUSOaaGgjNojTf7T+TT4ip7sMVPlS1Lzo0xMxd7dT6FPtjfl3m9tn0+6JqZCoiE04Yfb33aqB3yq0ZBQaR7tTJStq+GSC115udK+pEnyDdy1YF9Zgak3Ar5mIREPsgIx/PB02OLgdqtanSfU/rK+I4bCytF2yUQoLnnkXh/b/Gq7Xtj56Wlzal03B8dio5OOCYFJwsWgoZ7CJV6NkZmHlUhYEP9CExiQOJa61lWV7s6rNHoSV//TX8NarO8GVLjp9wlvUYy0Bl8LpuCOHe1e/Xw==”,
          “cipher”: “RSA/ECB/PKCS1Padding”,
          “key”: “openidm-localhost”
        }
      },
      “type”: “x-simple-encryption”
    }
  }
}]
The plugin authenticates to FIDC with an OAuth 2.0 token. This token is
requested from AM using the Client Credentials grant flow.
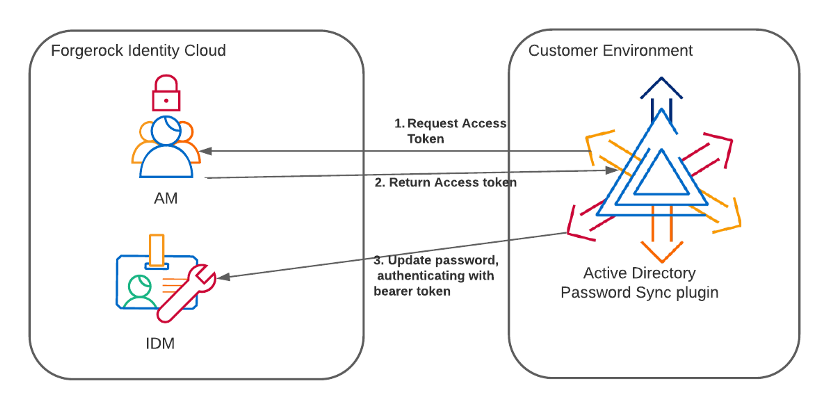
The following steps explain how to set up FIDC so only the password value can be changed by that client.
Set up the sync plugin
To set up the sync plugin and integrate it with FIDC, the following high-level steps need to be completed:
-
Setup an OAuth client to allow the password sync plugin to authenticate.
-
Configure authorization and access rules for the password sync plugin
-
Set up the key stores
-
Install the password sync plugin on all domain controllers
Prepare the OAuth client config
The following steps create a new OAuth client configuration that is used
by the password sync plugin to authenticate to FIDC using the client
credentials flow.
Create a new OAuth client configuration
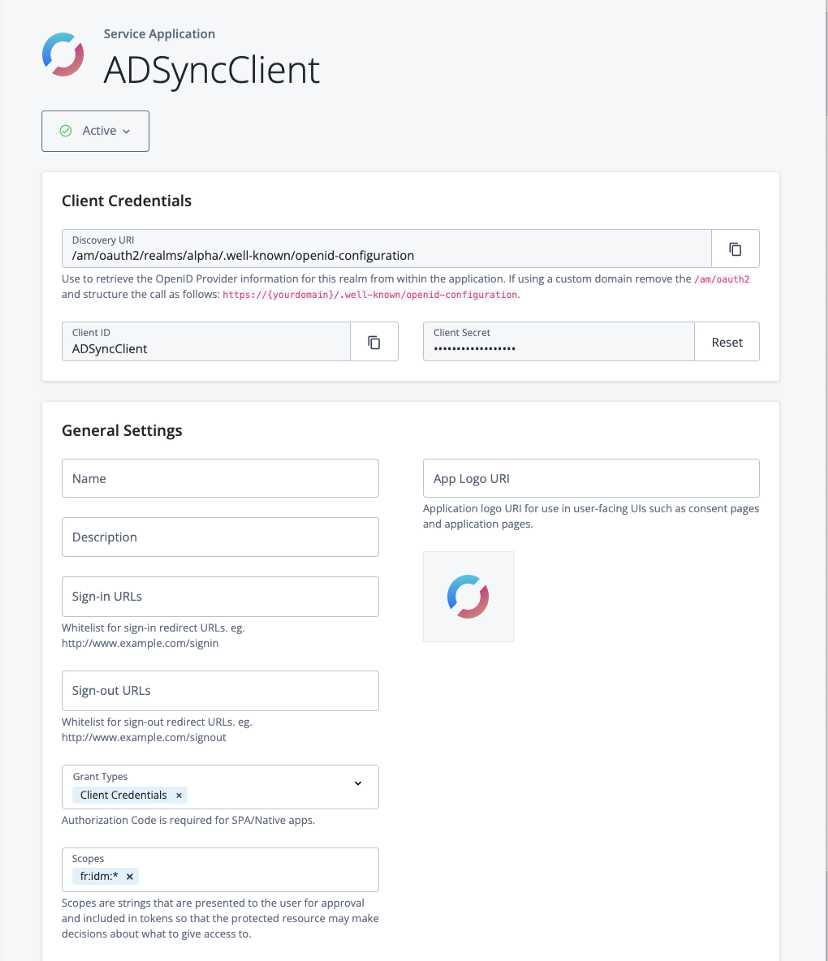
In the FIDC platform UI, create a new Service Application: Applications > Add Application > Service.
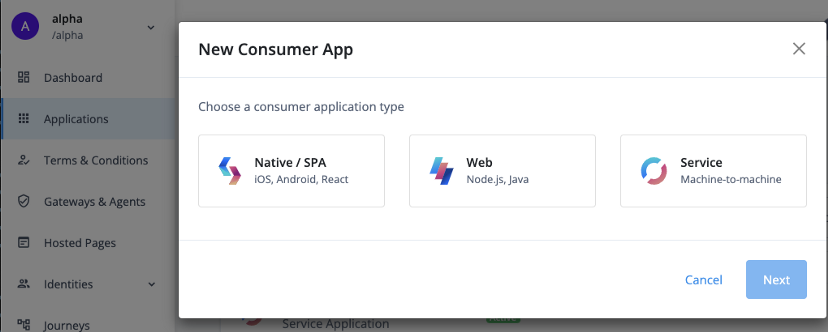
Enter the client ID and client secret, making sure to keep a note of the client secret. For the purpose of this guide the Client ID will be ‘ADSyncClient’.
Ensure that the Grant Types is set to Client Credentials and enter fr:idm:* in the Scopes field.
Set up authentication and access rules
Authorization
The sync plugin requires rights to read the user and change its
password. For this you have to set up an internal user and give the
appropriate rights:
Create a static user mapping in the authentication.json rsFilter that
maps the client ID to an internal user and role:
curl --location --request PATCH ‘https://<FIDC_URL>/openidm/config/authentication’ \
--header ‘Authorization: Bearer <ACCESS_TOKEN>’ \
--header ‘Content-Type: application/json’ \
--data-raw ‘[{
  “operation”: “add”,
  “field”: “/rsFilter/staticUserMapping/-”,
  “value”: {
   “localUser”: “internal/user/ADSyncClient”,
   “roles”: [
      “internal/role/adsyncplugin”,
      “internal/role/openidm-authorized”
   ],
   “subject”: “ADSyncClient”
  }
}]’
Modify access.json to give the internal role permission to update just the password:
curl --location --request PATCH 'https://<FIDC_URL>/openidm/config/access' \
--header 'Authorization: Bearer <ACCESS_TOKEN>' \
--header 'Content-Type: application/json' \
--data-raw '[{
  "operation": "add",
  "field": "/configs/-",
  "value":{
    "pattern": "managed/alpha_user/*",
    "roles": "internal/role/adsyncplugin",
    "methods": "update,action",
    "actions": "*",
    "customAuthz": "restrictPatchToFields(['\''password'\''])"
  }
}]'
Test the setup
At this point, it is advisable to test if the FIDC configuration is working as expected.
First get an access token to see if the authentication is working as expected. We will use the token for further tests:
curl --location \
--request POST \
'https://<FIDC_TENANT_URL>/am/oauth2/realms/root/realms/alpha/access
_token' \
--header ‘Content-Type: application/x-www-form-urlencoded' \
--data-urlencode 'client_id=ADSyncClient' \
--data-urlencode 'client_secret=<CLIENT_SECRET>' \
--data-urlencode 'scope=fr:idm:*' \
--data-urlencode 'grant_type=client_credentials'
The response should be similar to this:
{
"access_token":
"eyJ0eXAiOiJKV1QiLCJhbGciOiJIUzI1NiJ9.eyJzdWIiOiJBRFN5bmNDbGllbnQ0Ii
wiY3RzIjoiT0FVVEgyX0dSQU5UX1NFVCIsImF1ZGl0VHJhY2tpbmdJZCI6ImRkNGViZj
I1LTk2ZTUtNGYyOC1hODA5LWZkMjNlOTVlMGIzMC0xOTQ0NTEyIiwic3VibmFtZSI6Ik
FEU3luY0NsaWVudDQiLCJpc3MiOiJodHRwczovL29wZW5hbS1mci1rc2NobmVpZGVyLm
ZvcmdlYmxvY2tzLmNvbTo0NDMvYW0vb2F1dGgyL3JlYWxtcy9yb290L3JlYWxtcy9hbH
BoYSIsInRva2VuTmFtZSI6ImFjY2Vzc190b2tlbiIsInRva2VuX3R5cGUiOiJCZWFyZX
IiLCJhdXRoR3JhbnRJZCI6ImRNb0hBM1lqZzJvejZSS3pSR0t1LXlhaXpPRS5BZ3F3dl
RDZGMzd1VrUVNmS1U4NjVdEhoc2MiLCJhdWQiOiJBRFN5bmNDbGllbnQ0IiwibmJmIjo
xNjM1MTc3OTQ3LCJncmFudF90eXBlIjoiY2xpZW50X2NyZWRlbnRpYWxzIiwic2NvcGU
iOlsiZnI6aWRtOioiXSwiYXV0aF90aW1lIjoxNjM1MTc3OTQ3LCJyZWFsbSI6Ii9hbHB
oYSIsImV4cCI6MTYzNTE4MTU0NywiaWF0IjoxNjM1MTc3OTQ3LCJleHBpcmVzX2luIjo
zNjAwLCJqdGkiOiJkTW9IQTNZamcyb3o2Ukt6UkdLdS15YWl6T0UuU0pDbTlLMTM0cm1
MRmlmd283NkxMYmhiX3NRIn0.Ktjy_8O9b2cGS7e2k84VVy8gyIlzvxj_lh_-5o9_2Ww
",
"scope": "fr:idm:*",
"token_type": "Bearer",
"expires_in": 3599
}
With the access token you can now execute the request that the password
sync plugin makes to update the password. (Note that the plugin is
encrypting the password value. See above for a sample payload with
encrypted password):
This call should be successful and return the patched user object.
Prepare the keystore
The password synchronization plugin encrypts the password with a strong
symmetric key (AES128 or AES256). This key is in turn encrypted with a
public key that resides in a keystore configured in the plugin. IDM is
set up with the corresponding private key and can decrypt the password.
In FIDC
the private key has been created during the setup of the tenant. The
public key certificate can be requested via ticket.
Create a ticket under your subscription to request the certificate to
encrypt the password. Mention you need the openidm-localhost
certificate to setup the password synchronization plugin. The X509
certificate you receive will be in base64-encoded DER format. The
sync plugin requires a PKCS#12 keystore. The openssl command can be used
to create a new PKCS#12 keystore with the certificate.
On the command line, execute the following command:
$ openssl pkcs12 -export -nokeys -in /path/to/openidm-localhost.pem - out fidc.p12
You will be asked to enter and confirm a password.
Plugin installation
IMPORTANT: The sync plugin has to be installed on all domain controllers.
Tip: Start the installation from the command line with the /saveinf
parameter. This storse the setup information in an inf file. Further
installations can
then be completed by referencing the inf file.
C:\path\to\dir>ad-passwordchange-handler-1.7.0.exe /saveinf=C:\temp\adsync.inf
C:\path\to\dir>ad-passwordchange-handler-1.7.0.exe /verysilent /loadinf=C:\temp\adsync.inf
Download the latest version of the plugin from Backstage.
Start the installation
-
Connection
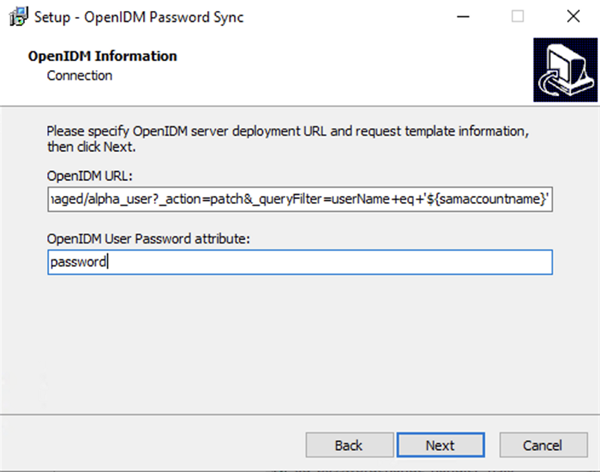
OpenIDM URL:
https://<FIDC_TENANT_URL>/openidm/managed/alpha_user?action=patch&_queryFilter=userName+eq+’${samaccountname}’
2._User Password attribute:* password
-
Authentication
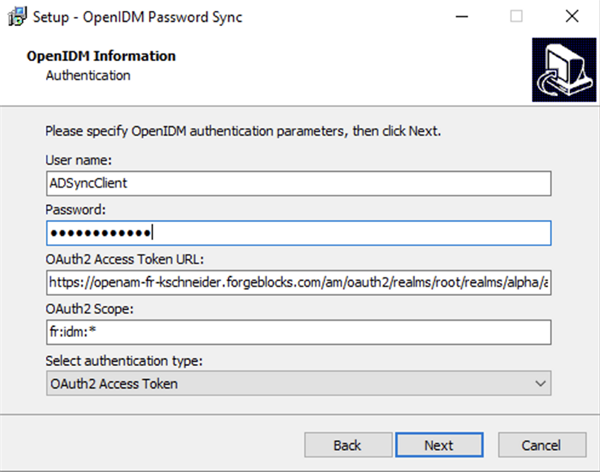
User name: The Client ID of the OAuth Client (ADSyncClient)
4.Password:* The Client Secret
5.OAuth2 Access Token URL:* https://<FIDC_TENANT_URL>/am/oauth2/realms/root/realms/alpha/access_token
6.Authentication Type:* OAuth2 Access Token -
Password Encryption
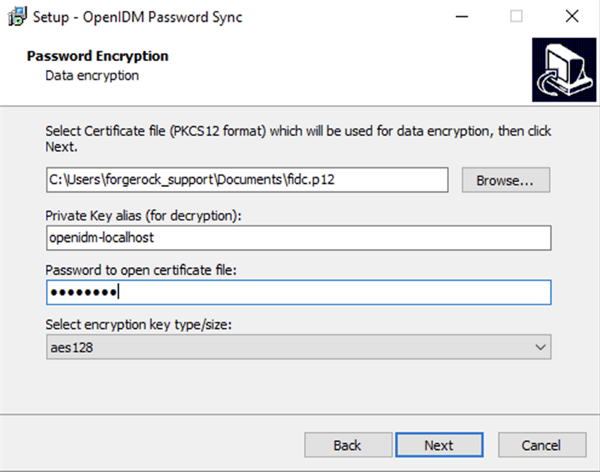
8.Path:* Select the PKCS12 file with the openidm certificate
9.Private Key alias:* openidm-localhost
10.Password to open the certificate file:* Keystore password
11.Select encryption key type/size:* aes128 or aes256
-
Data storage
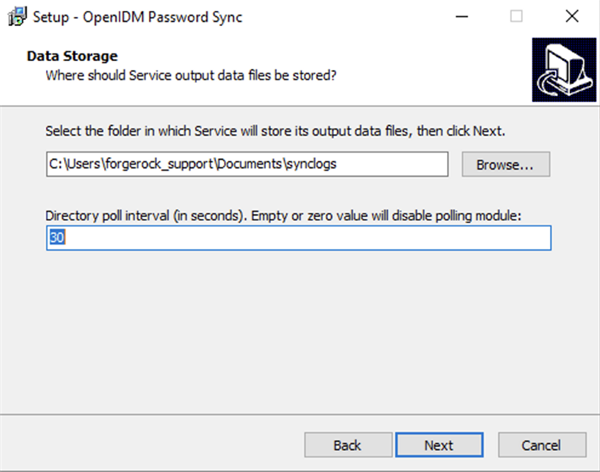
Enter the directory where the service data should be stored.
The poll interval is used to check if FIDC is available. Enter a time in seconds; for example, 30.
-
Log storage

Enter a directory where the logs should be stored and the log level.
Note that debug is very verbose. For production this should be set to
error.
Confirm that you want to install the program and it will ask to restart
the computer. Don’t restart yet.
Prevent endless loops
If FIDC also sends updates to Active directory when the password
changes, this will create an endless loop. To prevent this, set the
pwdChangeInterval
to ignore any updates for the set period of time.
Access the configuration with Registry Editor under HKEY_LOCAL_MACHINE > SOFTWARE > ForgeRock > OpenIDM > PasswordSync
Create a new key, pwdChangeInterval, and set it to 60.
All done
After a restart, the plugin will be set up.
Other Articles by This Author
![]() Sync
password updates from ForgeRock Identity Cloud to a remote LDAP
directory
[.badge-category__name#Setup#]
Sync
password updates from ForgeRock Identity Cloud to a remote LDAP
directory
[.badge-category__name#Setup#]
By Kevin Schneider Originally posted on https://medium.com/@kevsuisse [image] This post discusses how password changes in ForgeRock Identity Cloud can be pushed to remote LDAP directories such as Active Directory or an on-prem ForgeRock Directory Services. Let’s first discuss how passwords are stored and what implications this has when trying to sync them between different systems. Hashing algorithms In ForgeRock Identity Cloud, passwords are stored in a way that makes it practically impos…