Trying the ForgeRock Embedded Login JavaScript Library
Author: |
Sheila Albertelli |
Created at: |
Mar 2019 |
Updated at: |
Sep 2022 |
Written by Marc Craig
Summary
Instructions for trying the ForgeRock embedded login JavaScript
library.
ForgeRock provides a sample JavaScript library to help web clients
handle login interaction. The login API is
ForgeRock Access
Management’s (AM) /json/authenticate login API.
More Than Username-Password Login
As developers, when we think about login interactions, the first method that comes to mind is providing a username-password combination. Either the username-password credentials are correct and login is successful, or we get it wrong and have to try again (or select the forgotten password link). AM can handle this simple case, but AM excels at solving the more general authentication case. Providing a username-password combination might only be a first step in a multi-factor authentication process, followed up with a one-time password from an authenticator app on your phone. Or perhaps the authentication process does not involve a password at all.
In any case, the underlying model for authentication is one of challenge-response. Whether you enter your email address and password, or show your passport with your boarding pass, the authenticator challenges you for credentials that you provide as a response to the challenge. Although the general model is more abstract than hard-coded APIs for specific cases, it gives you the power to handle many more authentication use cases, including cases that you do not foresee when first building your application.
The AM
/json/authenticate
API implements the general model with a limited number of possible
challenges and responses. Each sequence of challenge-responses is
something the AM administrator configures at run time. The sequences
evolve as new authentication methods arise and new use cases are
enabled. Having a library that lets your web clients easily present the
challenges and gather the response data improves your productivity.
Sample Login Widget
The code for the sample library is publicly available at https://github.com/ForgeRock/forgerockEmbeddedLogin. The library is designed to work with no dependency on other libraries, and to fit with whichever front end technology you already use. Fork the repository and clone a local copy to try it.
The library wraps the challenge-responses with code to render the user interaction. By default, it creates HTML DOM Nodes and attaches them to the DOM. You can customize this rendering process as necessary to fit your web client.
The repository includes a sample.html page to demonstrate login with a
bare bones widget that shows the interaction sequentially to you as the
developer. The rest of this article uses the sample page to demonstrate
the library.
Basic Login
Before trying the sample.html page, set up basic authentication with
ForgeRock AM. You can do this repeatably, according to the instructions
at
forgeops-init/7.0/oauth2/development
at master · ForgeRock/forgeops-init · GitHub. When you follow those
instructions, you deploy the ForgeRock platform including AM into
minikube on your computer, or into the Google Kubernetes cloud. The
forgeops-init OAuth 2.0 sample configuration was created to
demonstrate standards-based profile management. It works well for this
use case, too.
In the OAuth 2.0 sample configuration, AM uses HTTPS to protect connections. When running the ForgeRock platform locally, the certificate is signed with a sample CA certificate that your browser does not trust by default.
Once you have AM up and running, perform these steps to try basic login:
-
If you have set up AM without using the configuration described above, edit the
authenticateUrlinsample.htmlto fit your installation. -
Serve the sample page through an HTTP server such as
http-server.For example: `cd /path/to/forgerockEmbeddedLogin && http-server -p 8888 ` -
Trust the certificate for HTTPS.Either trust import the CA cert in your browser, or run the browser in a mode that skips certificate errors, such as:
google-chrome --ignore-certificate-errors http://localhost:8888/sample.html. -
Log in with a basic username/password combination such as
user.0:`password`: When you select Login, the library makes the call to
AM and renders the result. The success message in the header indicates
that you are logged
in:
When you select Login, the library makes the call to
AM and renders the result. The success message in the header indicates
that you are logged
in: To log out, browse to the AM console and manually log out.
Simple Customization
You can customize the sample.html page to get a sense of how easy it
is to modify the UI.
For example, add a logout link to the result of a successful login, and try the commented customization that switches to labels for the login prompt text.
Here’s a diff of the changes:
diff
diff --git a/sample.html b/sample.html
index 77c6636..6e8ec62 100644
--- a/sample.html
+++ b/sample.html
@@ -24,7 +24,7 @@
         },
         successHandler: function() {
             document.getElementById("loginHeader").innerHTML = "Logged In!";
-            this.loginElement.innerHTML = '';
+            this.loginElement.innerHTML = '<a href="https://sample.iam.forgeops.com/am/XUI/#logout/&goto=http%3A%2F%2Flocalhost:8888/sample.html">Log out</a>';
         },
         failureHandler: function() {
             document.getElementById("loginHeader").innerHTML = "Login Failure!";
@@ -33,6 +33,7 @@
     });

     /* Example for how to customize various callbacks:
+    */
     login.renderNameCallback = function (callback, index, prompt) {
         let el = document.createElement("div");
         el.innerHTML = `<label>${prompt} : <input type="text" name="callback_${index}" value="${callback.input[0].value}"></label>`;
@@ -44,7 +45,6 @@
         el.innerHTML = `<label>${prompt} : <input type="password" name="callback_${index}" value="${callback.input[0].value}"></label>`;
         return Promise.resolve(el.firstElementChild);
     };
-    */
     login.startLogin();
     </script>
 </html>
When you reload the page, you see the labels:

On success, you see a logout link that logs you out of AM and returns to the sample page:

Extending Login to a Second Factor
As described above, AM lets you extend authentication. This section shows how the library supports extending authentication to a second factor.
First set up multi-factor authentication in AM:
-
Log in to the AM console as AmAdmin.If you use the
forgeops-init-based deployment locally, the AM console URL login page is under https://sample.iam.forgeops.com/am, and AmAdmin has credentialsamadmin:`password`. -
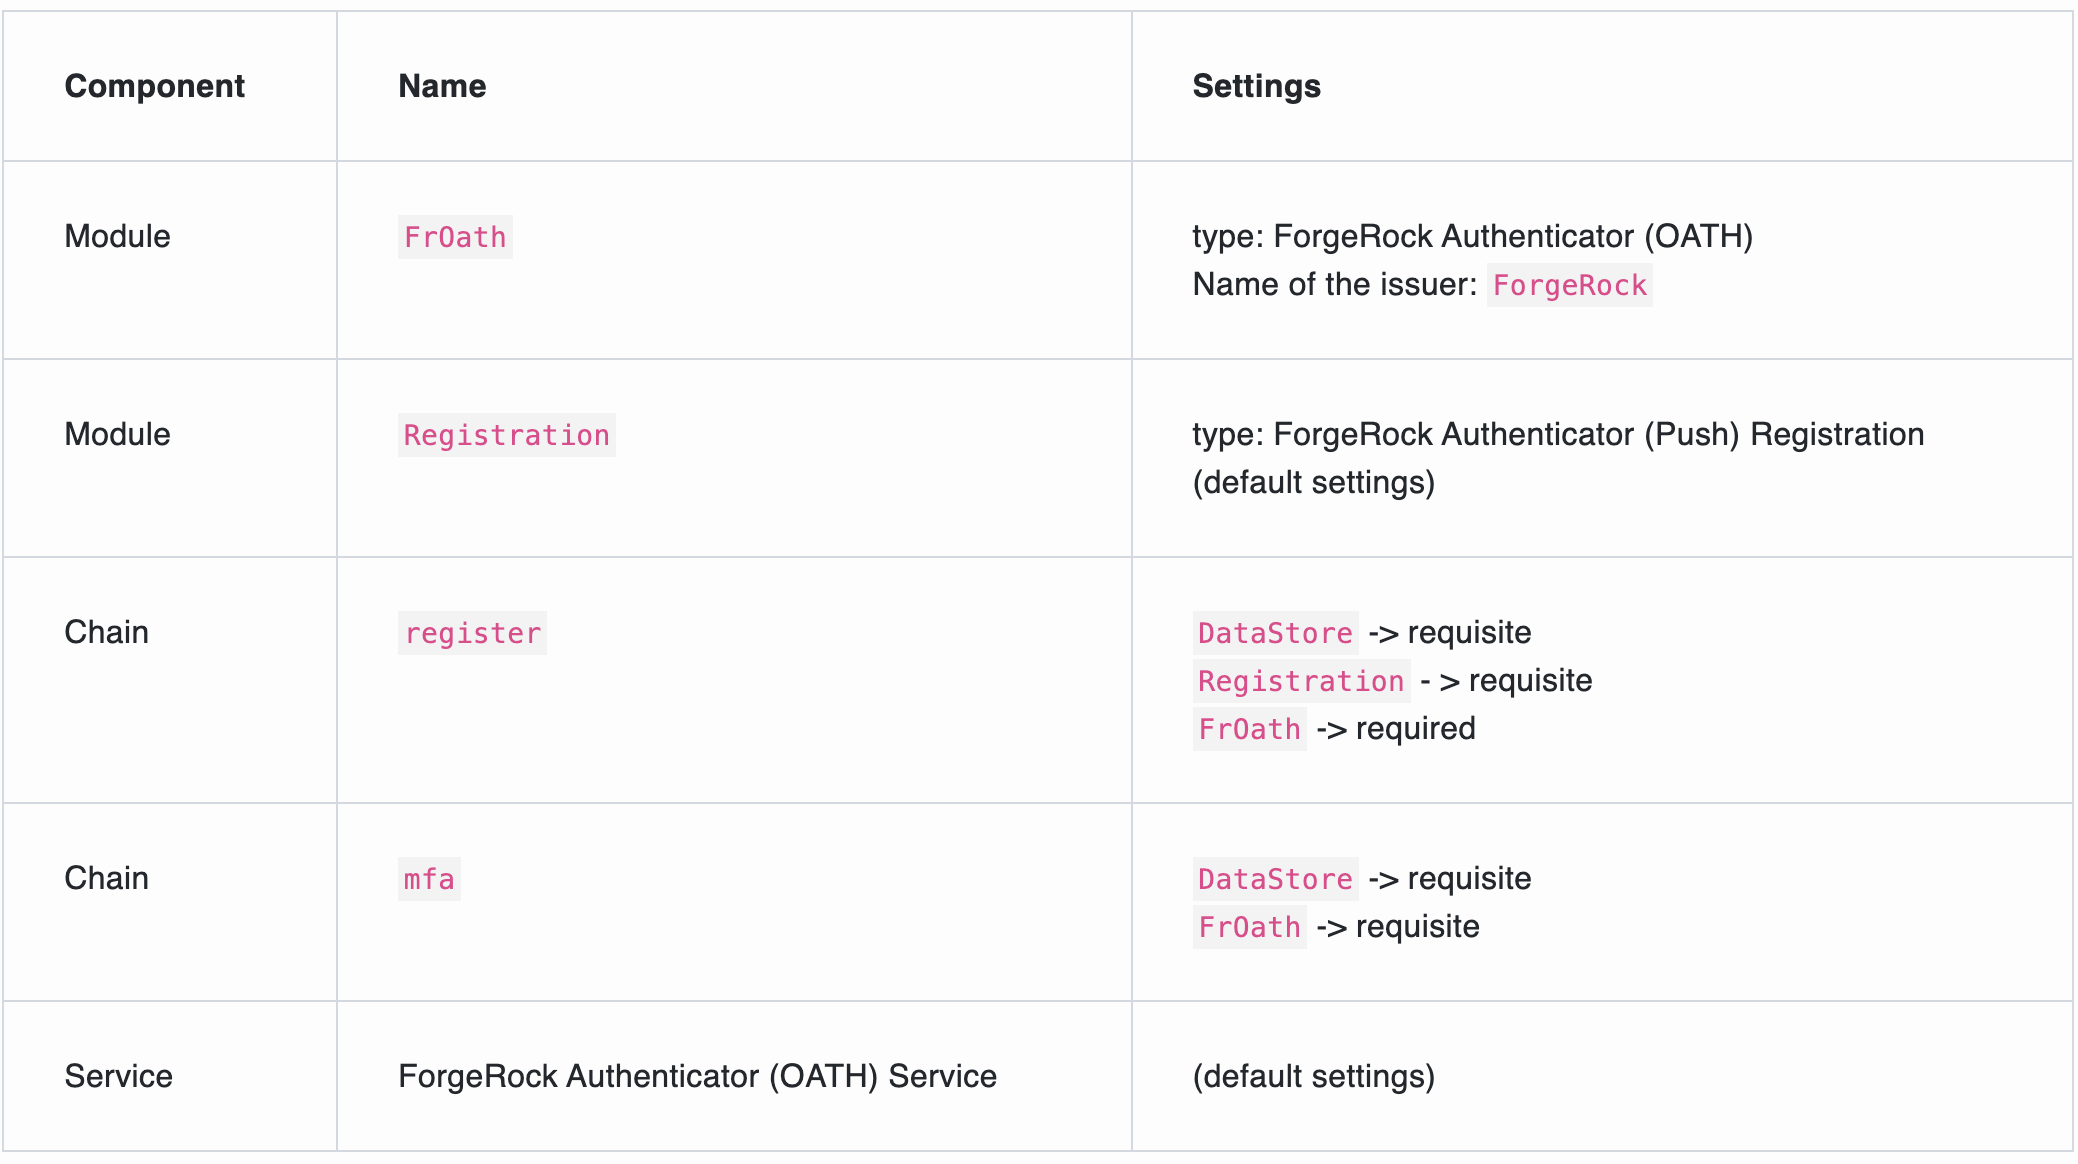
Configure the following components for two-factor authentication with the ForgeRock authenticator app as the second factor:
-
Log out of the AmAdmin account.
-
Register your device with AM using the ForgeRock authenticator.If you use the
forgeops-init-based deployment locally, the registration URL is https://sample.iam.forgeops.com/am/XUI/#login/&service=register.You can register as a user likeuser.0:`password`. -
Edit the
sample.htmlpage’sauthenticateUrlto use themfachain.If you use theforgeops-init-based deployment locally,
authenticateUrl: "https://sample.iam.forgeops.com/am/json/realms/root/authenticate?authIndexType=service&authIndexValue=mfa",-
Refresh the
sample.htmlpage, and log in:-
The initial screen is the same as before.Log in as the user who registered the ForgeRock authenticator.
-
The next screen requests a one-time password from the ForgeRock authenticator:
-

-
On success, you see the screen with the logout link as before.
Notice that the only change to your application was the URL to AM for the chain enabling multi-factor authentication. The sample library instantly adapts your client application to go beyond username-password login.