Using AM to Implement CIBA
Author: |
Sheila Albertelli |
Created at: |
Aug 2019 |
Updated at: |
Sep 2022 |
Written by Laetitia Ellison
Instructions for using AM to implement CIBA
 +
In this article, you will learn how to use AM to implement CIBA. Before
we get started, let's have a look at what CIBA actually is.
CIBA is an acronym for Client Initiated Backchannel Authentication, based on OpenID Connect.
CIBA works as an alternative to OAuth redirect flows, and aims to solve the problems OAuth redirect flows raise. OAuth redirect flows can be restrictive, requiring the user to authorize access on the same device as they are accessing a third-party service.
In comparison, CIBA allows a client application, known as a consumption device, to obtain authentication and consent from a user without requiring the user to interact with the client directly. Instead, the client application can initiate a backchannel request to the user’s authentication device, such as a smartphone with an authenticator app installed, to authenticate the user and consent to the operation.
There are many use cases where it would be useful for the consumption device and authentication device to be separate. For example:
-
A user wants to use their smartphone to authorize a payment they are making at a point of sale terminal; for example, a Square Terminal.
-
A smart speaker wants to authenticate and gain consent from its registered user after receiving a voice request to transfer money to a third-party.
The Backchannel Request grant is used when performing CIBA. The following diagram demonstrates the Backchannel Request grant flow:
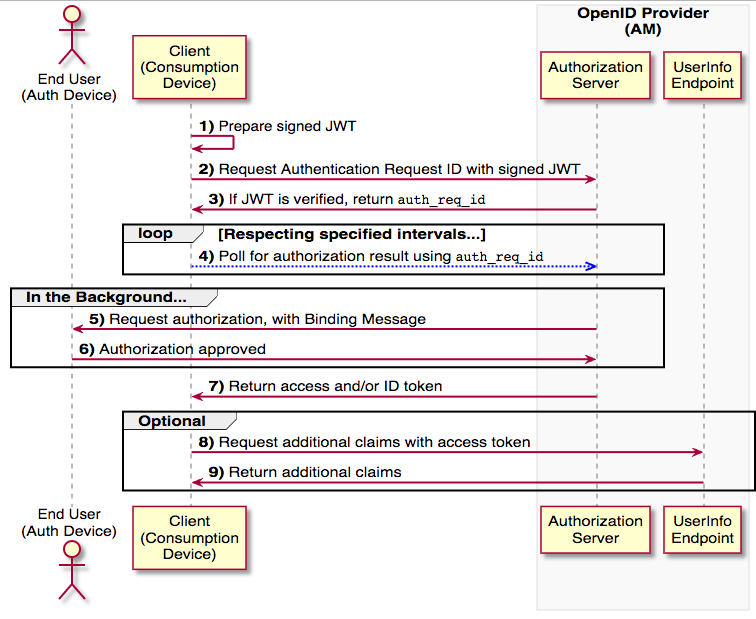
For more information, see Backchannel Request Grant.
Now that you know what CIBA is, let’s get started with implementing it. In order to implement CIBA, you will:
-
Generate signing keys
-
Create a signed JSON Web Token (JWT)
-
Configure AM to perform CIBA
-
Create a confidential client
-
Obtain an authentication request ID
-
Use the authentication request ID to obtain an access token.
Generate Signing Keys
To identify the user and initiate backchannel authentication, the client needs to create a signed JSON Web Token (JWT). Then, it sends the JWT to AM so it can authenticate and obtain consent for the operation from the user, as part of the CIBA flow.
First, you will generate a signing key pair which you will use to sign an example JWT. Then, you will configure AM to validate the JWT signature and to perform CIBA flow.
To generate this signing key pair:
-
In your web browser, go to JSON Web Key Generator.
-
On the Elliptic Curve tab, select the following values:
-
Curve:
P-256 -
Key Use:
Signing -
Algorithm:
ES256 -
Key ID:
myCIBAKey
-
-
Select New Key to generate the new keys.
-
Copy the Keypair, Keypair set, and Public key to a text file for later use. The keys should look like the following example:
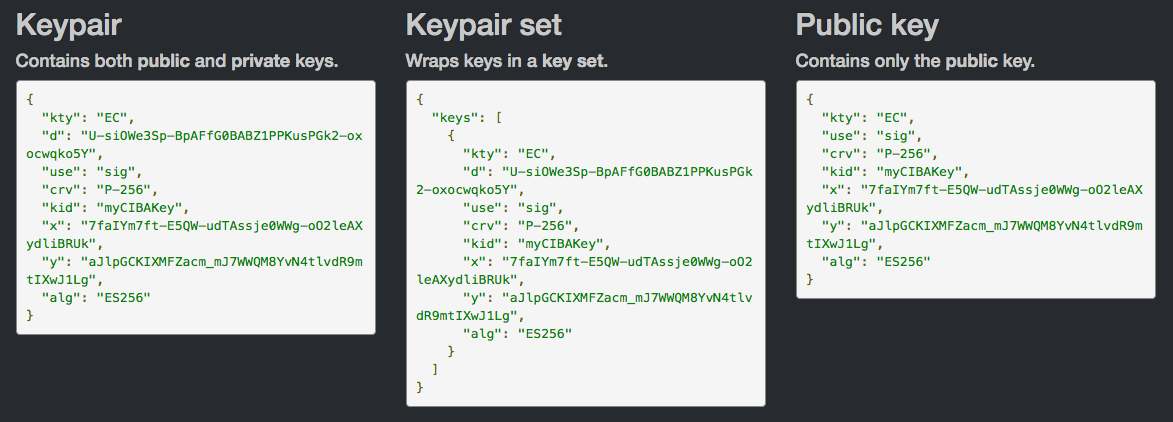
You have successfully generated a signing key pair!
Create a Signed JWT
Now that you have the signing key pair, you can create the signed JWT that contains the information AM requires to initiate authentication and gather consent.
To create a signed JWT:
-
In your web browser, go to JWT.io.
-
From the algorithm drop-down menu, select the same curve algorithm used to create the key pair previously:
ES256. -
In the Payload: Data field, paste the following example of a basic JWT:
{
 "login_hint": "demo",
 "scope": "openid profile",
 "acr_values": "push",
 "iss": "myCIBAClient",
 "aud":
 "https://openam.example.com:8443/openam/oauth2",
 "exp": 1562677833,
 "binding_message": "Allow ExampleBank to transfer £50 from your 'Main' account to your 'Savings' account? (EB-0246326)"
}
Note: In this example, a user is using their smartphone to authorize a payment they are making at a point of sale terminal. In your JWT, ensure that the
audelement contains the path to your AM instance, with/oauth2appended.
-
In a separate tab, go to TimestampConvert.com.
-
Add 10 minutes to the mins field, and then Convert to timestamp. Note that the maximum time allowed is 30 minutes.
-
Copy the new Timestamp in seconds value, and replace it as the
expvalue in the PAYLOAD: DATA text area back in JWT.io. -
In the Verify Signature section, paste the Public Key obtained earlier into the public key text area, replacing all the contents of the text area.
-
Paste the Key pair obtained earlier into the private text area, replacing all the contents of the text area.
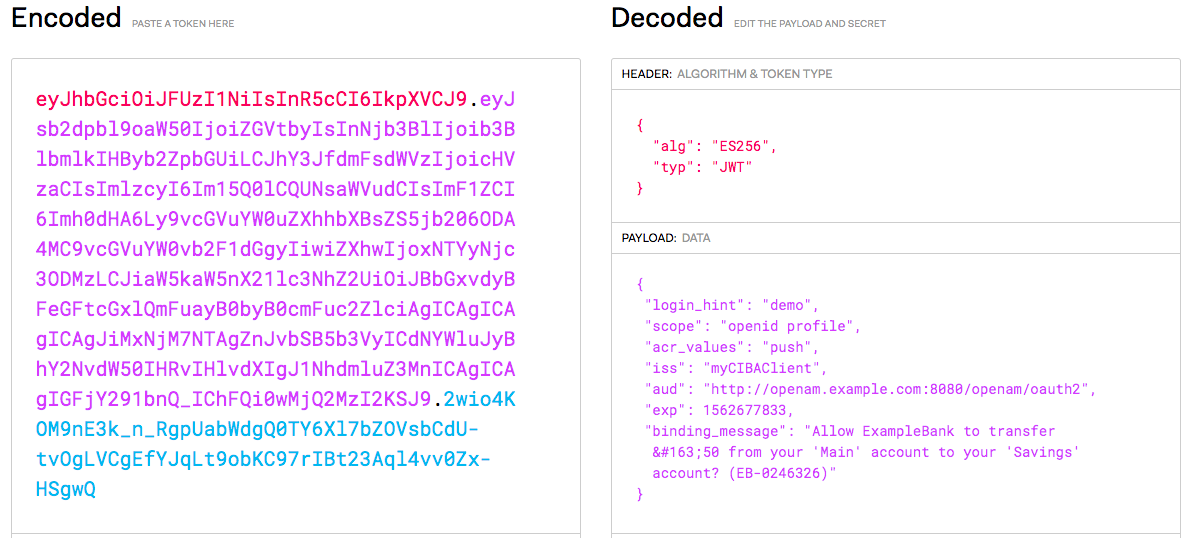
A signed JWT will appear in the Encoded text area, and underneath will read “Signature Verified”.
The signed JWT should look like the following example:
-
Copy the signed JWT into a text file, for future use.
You have successfully created a signed JWT! Later on, you’ll send it to AM, but first you’ll need to configure AM for CIBA.
Configure AM to Perform CIBA
In this section, you will first configure an authentication tree in AM that performs push authentication. Then, you will configure AM as an OIDC provider and associate it with the authentication tree. AM will use this tree to authenticate the user in the JWT during the CIBA flow.
Perform the following steps to prepare AM:
-
To create a push authentication tree, navigate to Realms > Realm Name > Authentication > Trees.
-
Enter a tree name, for example
myCIBAPushTree. The authentication tree must start with a “username Collector Node”.
The following is an example of a suitable authentication tree:
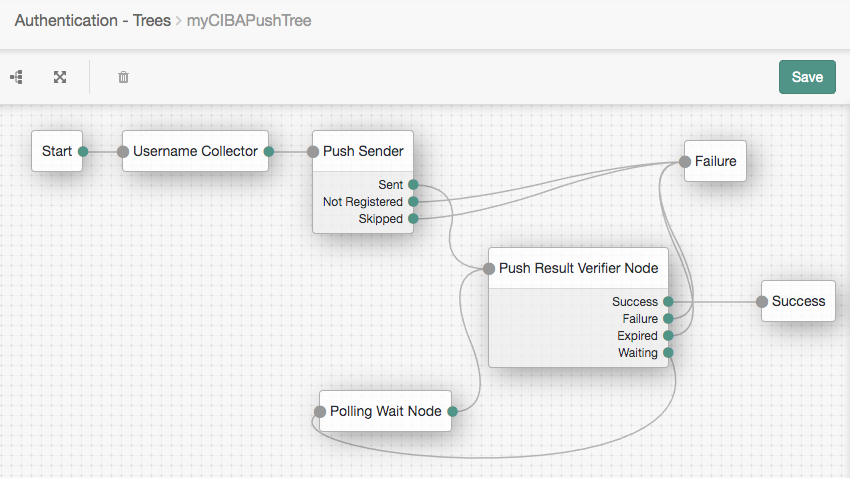
Note that this tree can only be used if the Push Notification Service has been configured. For information on provisioning the credentials required by the Push Notification Service, see “How do I set up OpenAM/AM Push Notification Service credentials?” in the ForgeRock Knowledge Base.Once you’ve set up your tree, save your changes.
-
Navigate to Realms > Realm Name > Dashboard > Configure OAuth Provider > Configure OAuth 2.0 to use the Configure OAuth Provider wizard to add an OpenID provider to the top-level realm.
-
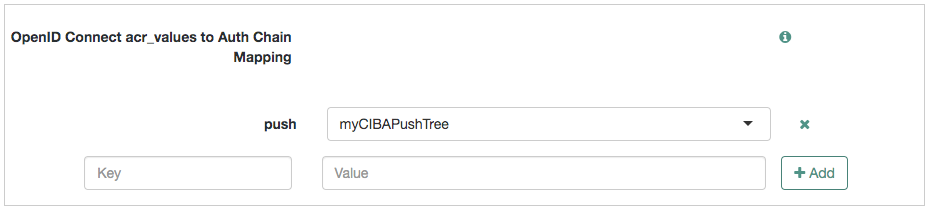
Navigate to Realms > Realm Name > Services > OAuth2 Provider > Advanced OpenID Connect.
-
In the OpenID Connect air_values to Auth Chain Mapping field, enter
pushin the Key field, and the name of the previously created authentication tree in the Value field; for example, myCIBAPushTree, and then select Add.
Note that the value in the Key field must match the value set in the
acr_valuesobjects in the JWT:
-
Save your changes.
AM has now been successfully set up to perform CIBA!
Set Up a Confidential Client
As with regular OAuth 2.0/OIDC flows, CIBA requests to AM are sent to a preconfigured client. In this case, you will configure a confidential client.
To create a confidential client:
-
Navigate to Realms > Realm Name > Applications > OAuth 2.0 > Clients, and then select Add Client.
-
Enter a Client ID. This must match the value of the
issclaim in the signed JWT prepared above. For example, `myCIBAClient:`
-
The client profile should have the following configuration:
-
Client secret:
forgerock -
Scopes:
openid profile
-
![]()
-
Grant Types:
Back Channel Request
![]()
4. Surround the public key value obtained earlier with:
{"keys": [and
]}On the Signing and Encryption tab, add the key to the Json Web Key field. For example:
{
 "keys": [
 {
 "kty": "EC",
 "use": "sig",
 "crv": "P-256",
 "kid": "myCIBAKey",
 "x": "m0CkpWpZyGu-FLRLjCGBVGC7Fwm5vGt8Lm3HhYU4ylg",
 "y": "U8NMtO-C2c3yhu2I_ApAELttmaittfPNPQaIJxvTCHk",
 "alg": "ES256"
} ] }-
In the Public key selector drop-down list, select JWKs.
-
Save your changes.
Your confidential client has been successfully set up!
Obtain an Authorization Request ID
Now that you’re all set up, it is time to perform the CIBA flow. First, you need to obtain an authentication request ID. For this, you will make a POST request to AM’s backchannel authorization endpoint, including the signed JWT, and the client credentials.
To obtain an authentication request ID, using CIBA:
-
Post a request that resembles this:
$ curl --request POST \
--header 'authorization: Basic bXlDSUJBQ2xpZW50OmZvcmdlcm9jaw==' \
--data request=eyJhbGci...kfPjAfnBg \ https://openam.example.com:8443/openam/oauth2/bc-authorize-
In the --header line, the basic authorization header contains the base64-encoded value of your client ID, a colon character (:) and the client secret. For example,
myCIBAClient:forgerock. -
In the --data line, the request parameter contains the entire signed JWT. AM returns a JSON-formatted response containing the
auth_req_idvalue:
{
  "auth_req_id": "35Evy3bJXJEnhll2ebacgROYfbU",
  "expires_in": 600,
  "interval": 2
}-
Copy the
auth_req_idto a text file for later use.
AM will also send the user a push notification message to request authorization. Before continuing, swipe the notification message to provide consent.
You have successfully obtained an authentication request ID!
Obtain an Access Token by Using an Authentication Request ID
After you have obtained an authentication request ID, you will use it to obtain an ID token (and an access/refresh token, if applicable).
-
Make an HTTP POST request to the token endpoint that resembles the following:
$ curl --request POST \
--header 'authorization: Basic bXlDSUJBQ2xpZW50OmZvcmdlcm9jaw==' \
--data grant_type=urn:openid:params:grant-type:ciba \
--data auth_req_id=35Evy3bJXJEnhll2ebacgROYfbU \
https://openam.example.com:8443/openam/oauth2/access_token
The basic authorization header is the base64-encoded value of your
client ID, a colon character (:), and the client secret. For example
myCIBAClient:forgerock.
Paste the auth_req_id you obtained earlier into the auth_req_id
element.
-
AM returns an ID token and an access token. For example:
{
  "access_token": "z4mWG0cxqwPwgjj7srJ2Jdxe9ag",
  "id_token": "eyJ0eXAiOi...YA9Hoqwew",
  "token_type": "Bearer",
  "expires_in": 3599
}
Congratulations, you’ve just performed the entire CIBA flow using AM!
For more information on CIBA, see OpenID Connect Client Initiated Backchannel Authentication Flow - Core 1.0 draft-02.