Getting Started with Scripting in ForgeRock Identity Cloud: Part 2 -
Author: |
Rajesh Rajasekharan |
Created at: |
Sep 2023 |
Updated at: |
Mar 2024 |
This is Part 2 of 5 in the series Getting started with Scripting in ForgeRock Identity Cloud.
Reviewing an existing journey in Identity Cloud ~ 5 minutes
-
In a supported browser, log into your Identity Cloud Admin UI.
-
In the alpha realm, go to Journeys > Registration.
-
Click on the Registration journey preview to open the journey editor.
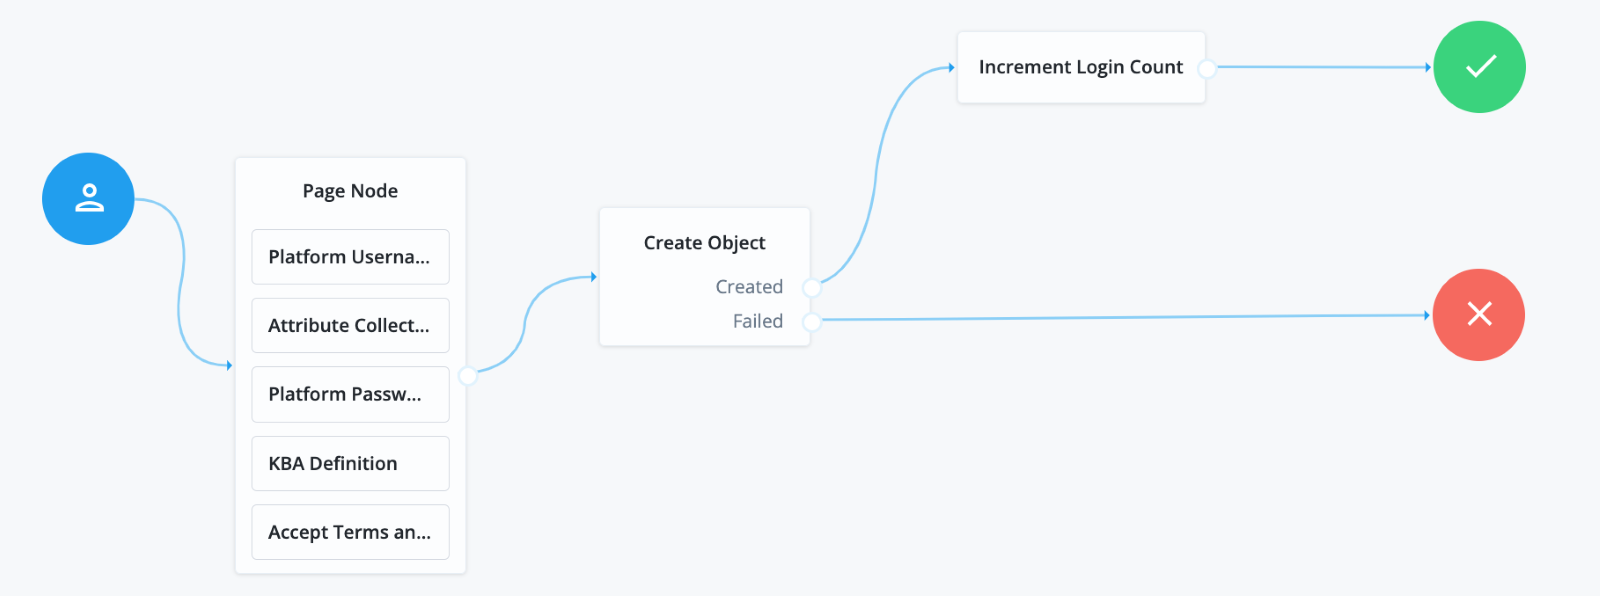
At the start of this journey, the nodes arranged in the Page Node prompt end users for information required to create their account, such as: * Username * Password * Profile attributes * Answer to security questions * Acceptance of Terms and Conditions
-
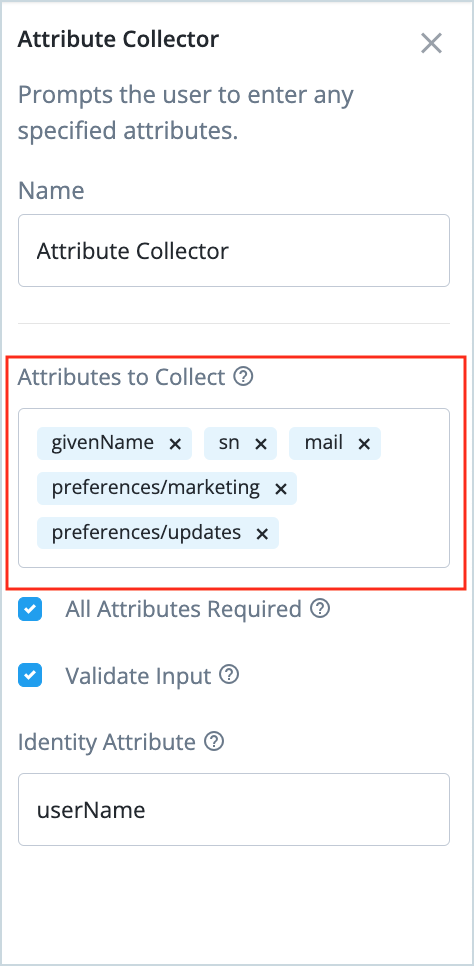
Click on the Attribute Collector node in the Page Node.
In the Attributes to Collect property, we can see the list of attributes the user is expected to provide during their self-registration. Although not all attributes are essential to creating an account, they help keep the user profile complete upon registration. It is a good practice to keep the self-registration process simple with minimum attributes and have Progressive Profiling in the subsequent login journeys to help the users complete their profile.
-
After collecting information from a user, the journey proceeds to create a user object in Identity Cloud using the Create Object node.
The journey increments the login count attribute of the new user created and displays the end user dashboard.
A few points to learn:
-
Information in one node of a journey is made available to the downstream nodes in certain state objects.
-
In the Registration journey above, values for several attributes are collected from the user using various nodes arranged in a Page Node.
-
The non-sensitive values are stored in a state object called
sharedState. -
The sensitive data such as passwords are stored in the
transientStateobject. -
The above states are encapsulated in a Java Class named NodeState.
-
A script invoked from a Scripted Decision node in the journey can use appropriate methods of the
NodeStateobject to access the shared state of the journey.{ "username": "a3655285-d900-4833-a92b-6dd1f9b07b22", "universalId": "id=a3655285-d900-4833-a92b-6dd1f9b07b22,ou=user,o=alpha,ou=services,ou=am-config", "realm": "/alpha", "latestAccessTime": "2023-05-14T09:19:19Z", "maxIdleExpirationTime": "2023-05-14T09:49:19Z", "maxSessionExpirationTime": "2023-05-14T11:19:18Z", "properties": { "AMCtxId": "98895ad5-7857-4062-b193-aa3ca16edd95-527704", "mySessionProperty": "Engineering" } }
Creating a Journey Decision Node script that prints the shared state ~ 3 minutes
-
In a supported browser, log into your Identity Cloud Admin UI.
-
In the alpha realm, go to Scripts > Auth Scripts > + New Script.

-
Select Journey Decision Node and click Next.

-
Provide the following details:
Name: print-shared-state
Description: Script to print shared state in TextOutputCallback
JavaScript: Replace the placeholder code with the code belowvar fr = JavaImporter( org.forgerock.openam.auth.node.api.Action, javax.security.auth.callback.TextOutputCallback ) if (callbacks.isEmpty()) { action = fr.Action.send( new fr.TextOutputCallback( fr.TextOutputCallback.ERROR, sharedState ) ).build() } else { action = fr.Action.goTo("true").build() }
-
Click Save and Close.
Understanding the script
-
The first section of the script uses
JavaImporterto access Java classes in a script. Scripts can only import Java classes on the allowlist. The Access Management (AM) component of Identity Cloud defines an allowlist per script type.var fr = JavaImporter( org.forgerock.openam.auth.node.api.Action, javax.security.auth.callback.TextOutputCallback ) -
In the next section, the script does the following:
-
Uses the send method of the
Actioninterface to sendTextOutputCallbackto the user. -
The TextOutputCallback is a read-only callback that provides a message to the user. The message, in this case, is
sharedState. -
Lastly, the goTo method of the
Actioninterface is used to define a script outcome,"true"in this case, to connect to the other nodes in the journey. A script can have many outcomes.if (callbacks.isEmpty()) { action = fr.Action.send( new fr.TextOutputCallback( fr.TextOutputCallback.ERROR, sharedState ) ).build() } else { action = fr.Action.goTo("true").build() } -
In a script, an outcome can also be defined by setting value for a variable named
outcome.E.g: outcome =
"true" -
If the script has outcome defined by the Action interface as well as the
outcomevariable, the one defined by the Action interface takes precedence.
-
Modifying the Registration journey to include a Scripted Decision node ~ 5 minutes
-
In a supported browser, log into your Identity Cloud Admin UI.
-
In the alpha realm, go to Journeys > Registration.
-
Make a copy of the Registration journey by clicking … next to the journey and selecting Duplicate.
-
Use the information below as a reference to complete the Duplicate Journey form:
Name: Registration with script sample
Identity Object: Alpha realm - Users managed/alpha_user
Description: Registration journey that uses a Scripted Decision Node to print sharedState -
Click Save.
-
Drag the Scripted Decision (Utilities) node onto the Registration with script sample journey.
-
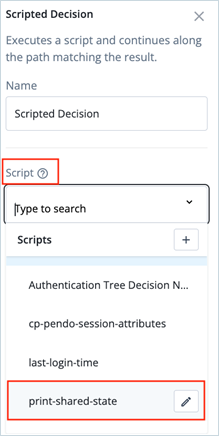
Select the Scripted Decision node.
-
Under the Script drop down, select the “print-shared-state” script you created earlier.
-
In Outcomes, type
trueand hit enter.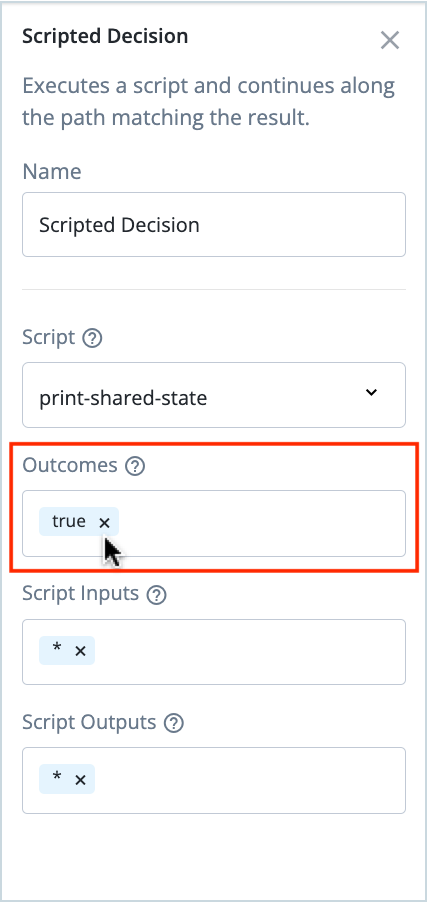
Notice that the Scripted Decision node now has an outcome that can be connected to other nodes in the journey.
-
Make the node connections shown in the following screenshot.

-
Click Save.
Testing the journey
-
In the top right corner of the journey edit page, copy the journey preview URL.

-
In a supported browser, different from the one that has an active Identity Cloud admin session, paste and go to the “Registration with script sample journey” preview URL.
The user registration screen appears.
-
Using the screenshot below as a reference, self register a user in Identity Cloud and click Next.

Notice that the print-shared-state script in the Scripted Decision node uses the
TextOutputCallbackto print thesharedState.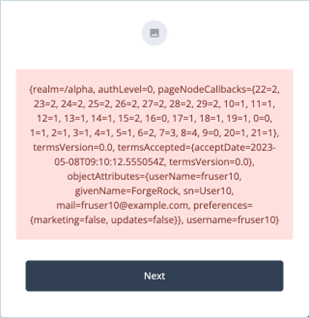
-
Click Next.
A new user is created in Identity Cloud and is logged into the end user dashboard.

-
Sign out of the end user dashboard
Further reading
Other guides in the Getting started with Scripting in ForgeRock Identity Cloud series:
Other useful links:
Please provide us your feedback on this guide.