Getting started with the ForgeRock Identity Cloud REST API: Part 7 -
Author: |
Rajesh Rajasekharan |
Created at: |
Jul 2023 |
Updated at: |
Mar 2024 |
This is Part 7 of 8 in the series Getting started with the ForgeRock Identity Cloud REST API.
Managed identities
This guide provides examples of running ForgeRock Identity Cloud managed
identity requests using both Postman and curl commands.
Before you begin
This guide assumes that you have already prepared the ForgeRock Identity Cloud Postman Collection environment and run the collection prerequisites. See Part 1 - Introduction and Part 2 - Prerequisite requests for further information.
Example using Postman ~ 5 min
-
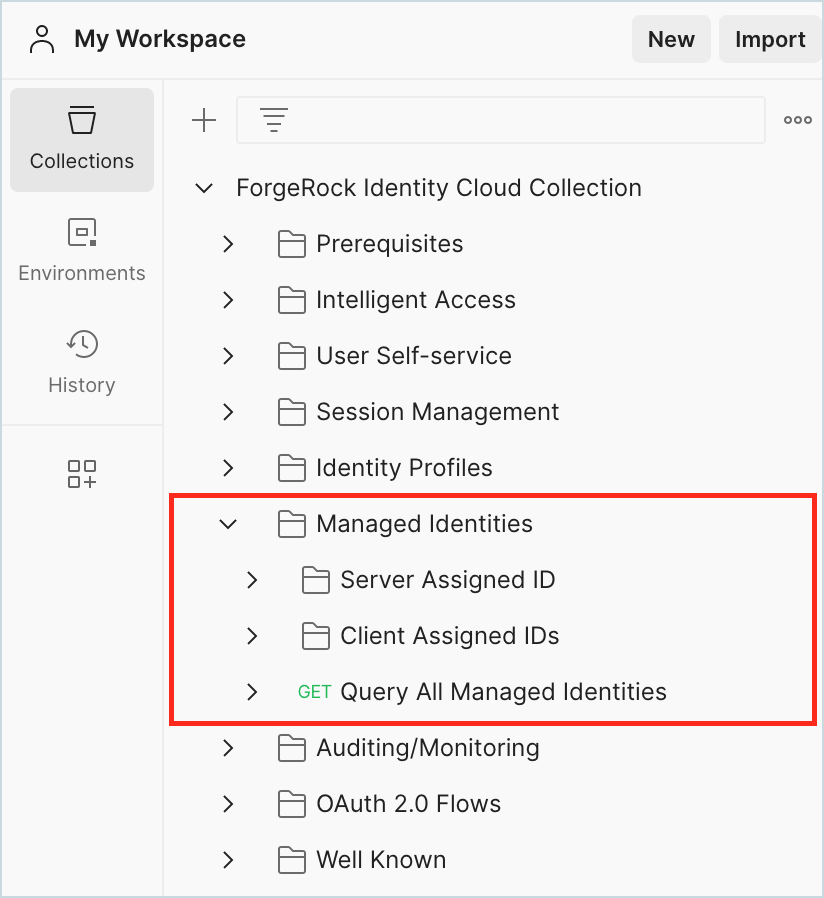
In Postman, select the ForgeRock Identity Cloud Postman Collection, and expand the Managed Identities section.
-
Go to Managed Identities > Query All Managed Identities and study the following:
-
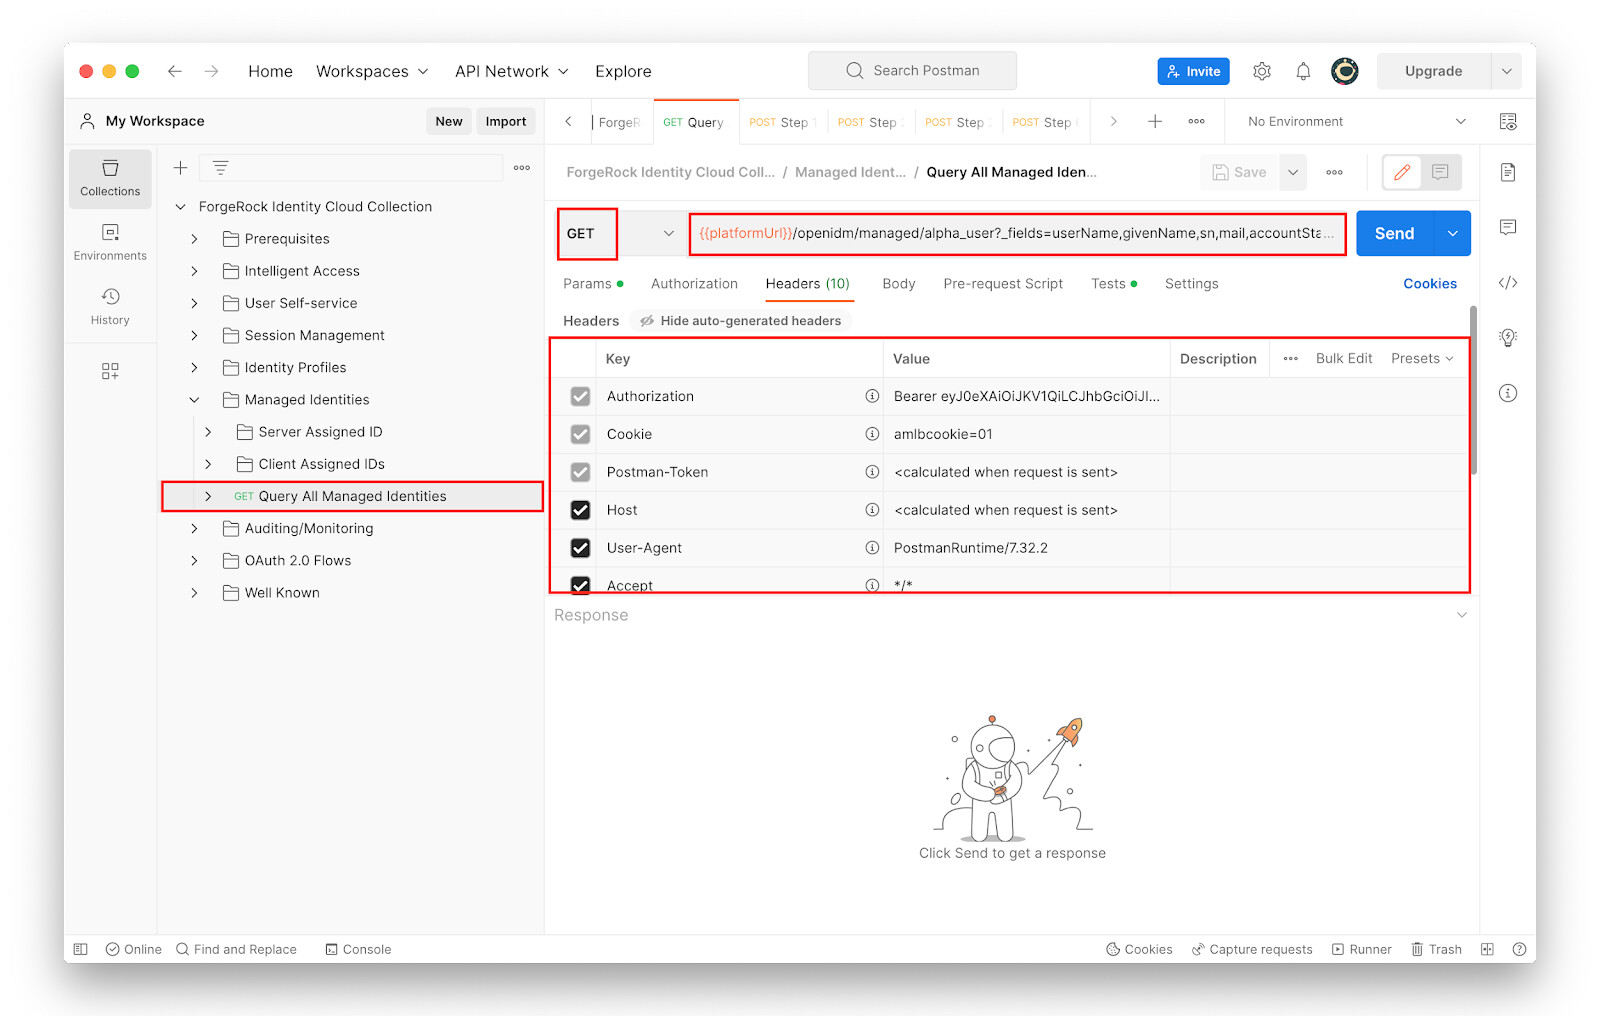
The request type: GET
-
The request URL:
{{platformUrl}}/openidm/managed/alpha_user?_fields=userName,givenName,sn,mail,accountStatus&_prettyPrint=true&_queryFilter=true -
The request header, specifically the “Authorization” header, where an access token is sent.
Note that user management in Identity Cloud is handled by the ForgeRock Identity Management component. The endpoint therefore is “/openidm”.
-
-
For the REST call above to work, an access token with appropriate permission (scope) should be included in the Authorization Header. In the Prerequisites part of the guide, an access token was obtained with the scope
fr:idm:*using the “postmanAdminClient” OAuth 2.0 client. If the access token has expired, the above REST call will return401 Unauthorizederror message. Obtain a new access token, by running the Step 6 in the Prerequisites folder of the ForgeRock Identity Cloud Collection.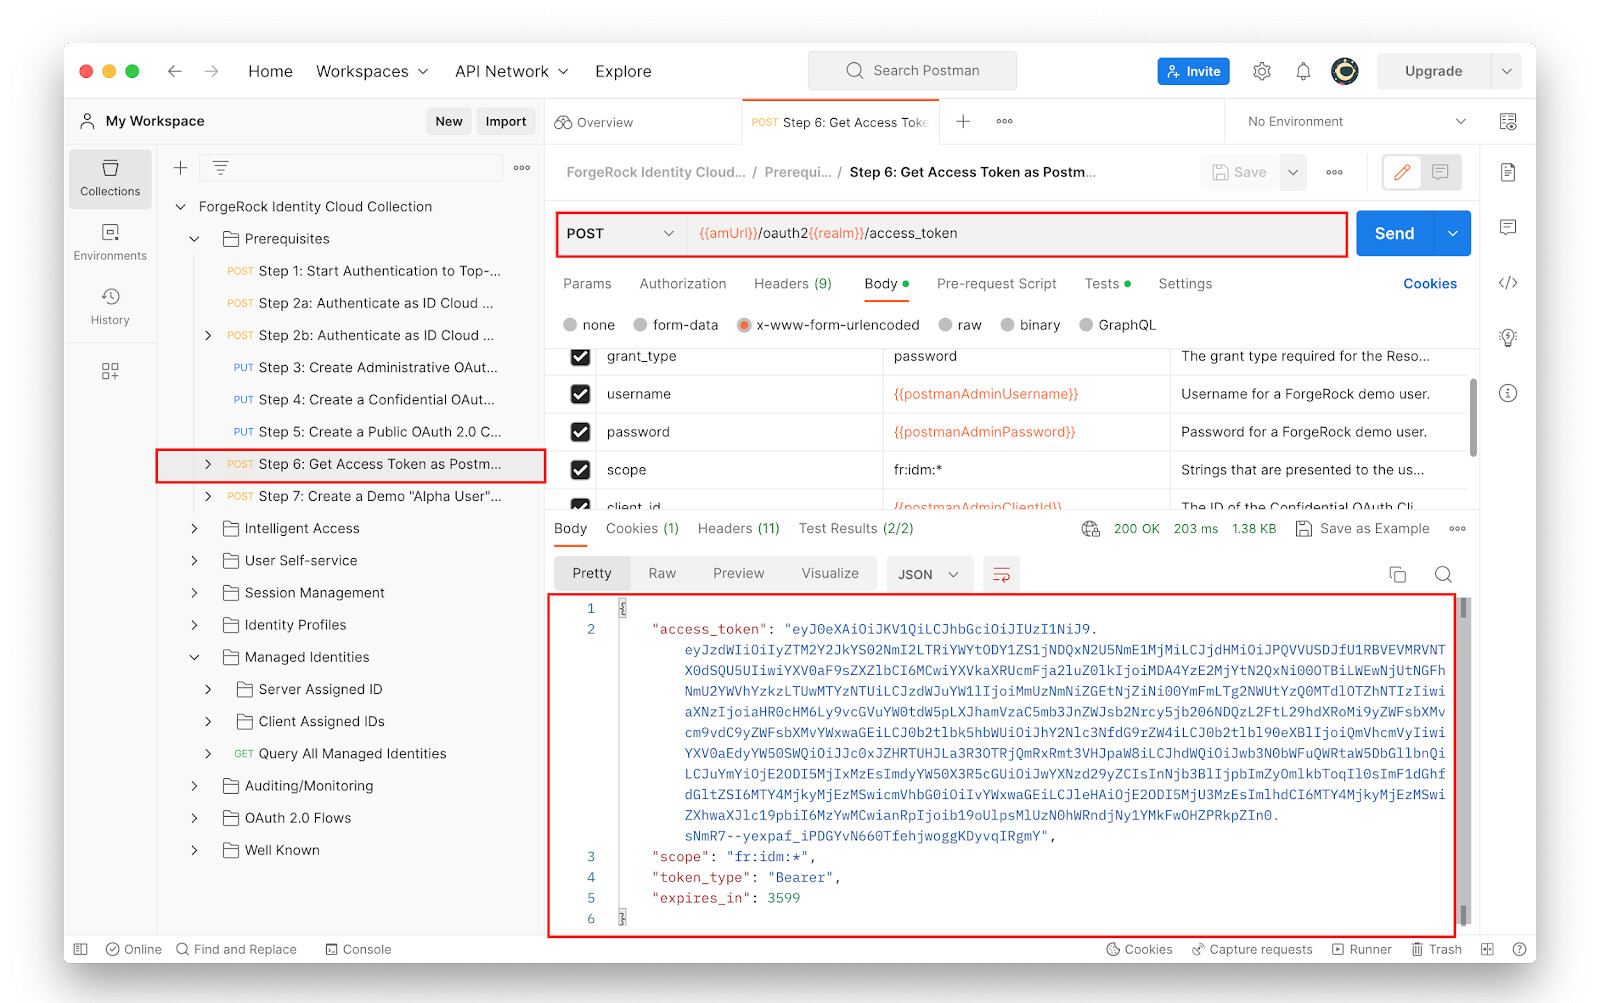
-
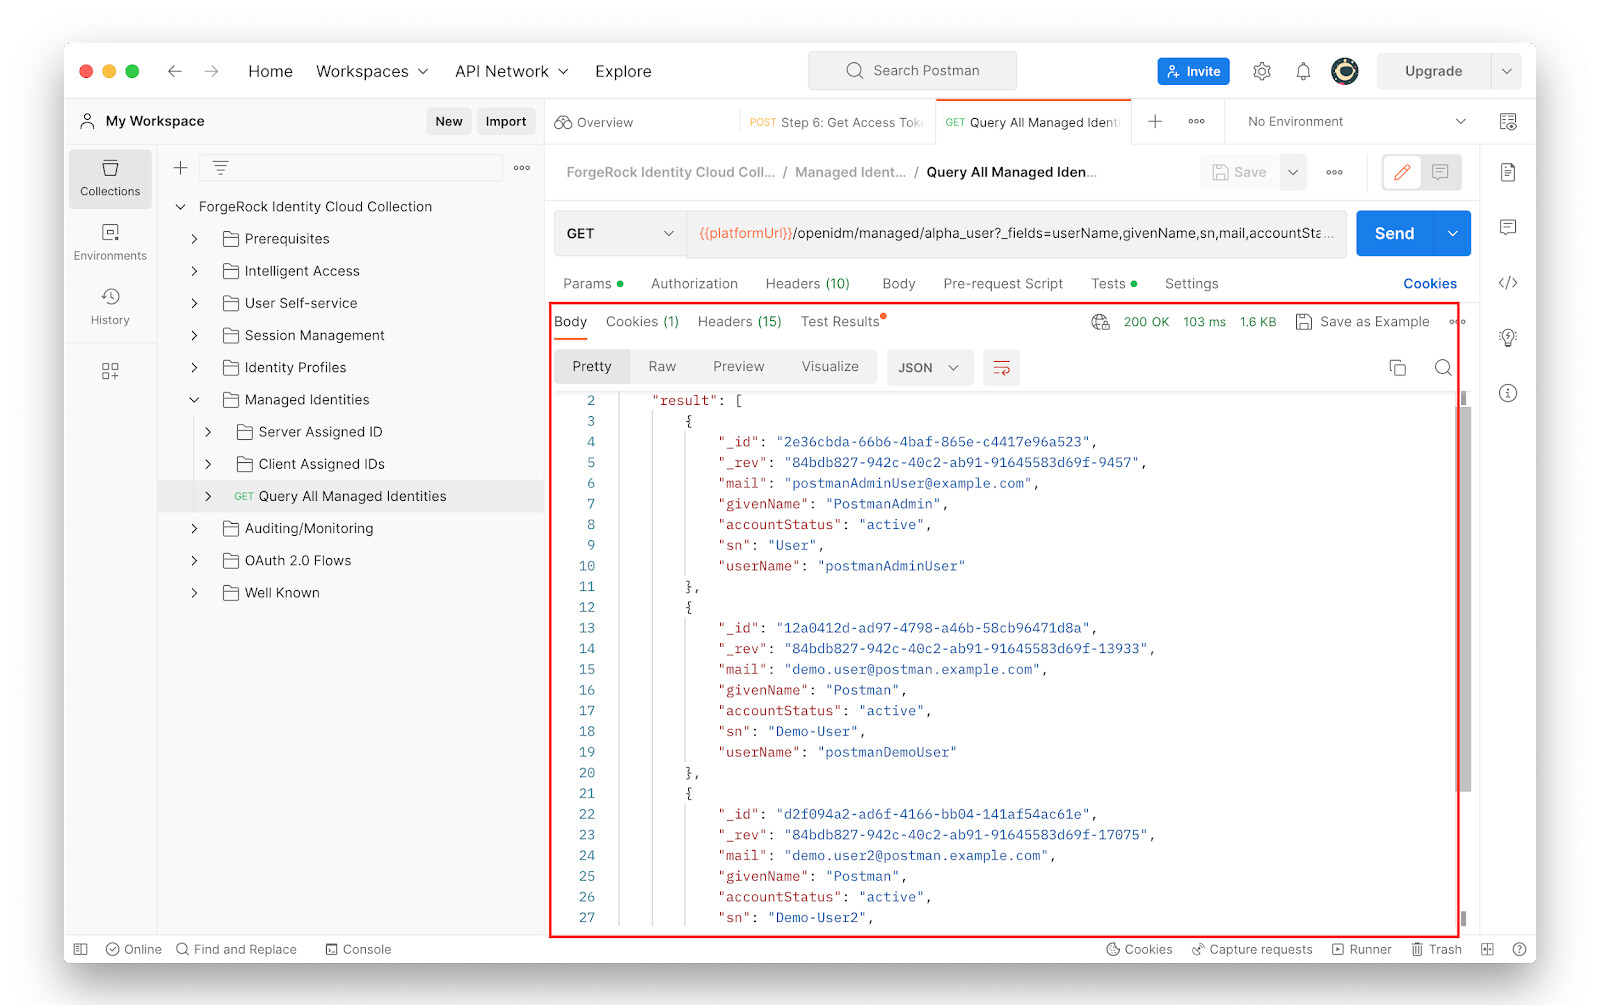
Once the access token is obtained, go to Managed Identities > Step Query All Managed Identities and click Send.
The result returned from Identity Cloud has details of all users in the Identity Cloud alpha realm.
-
Go to Managed Identities > Server Assigned ID.
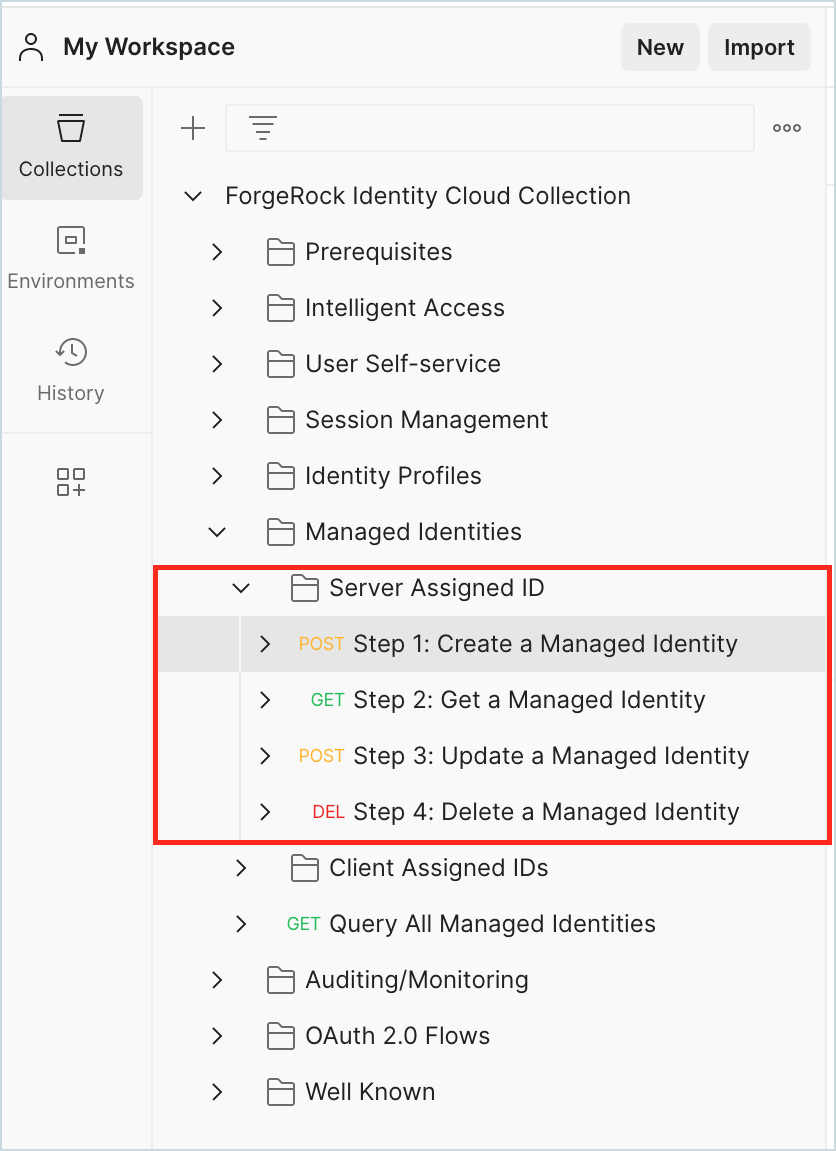
The examples in Step 1 through to Step 4 achieve the following: * Step 1: Creates a new user in Identity Cloud alpha realm. * Step 2: Queries the Identity Cloud alpha realm for a user. * Step 3: Updates profile of an Identity Cloud alpha realm user. * Step 4: Delete an Identity Cloud alpha realm user.
-
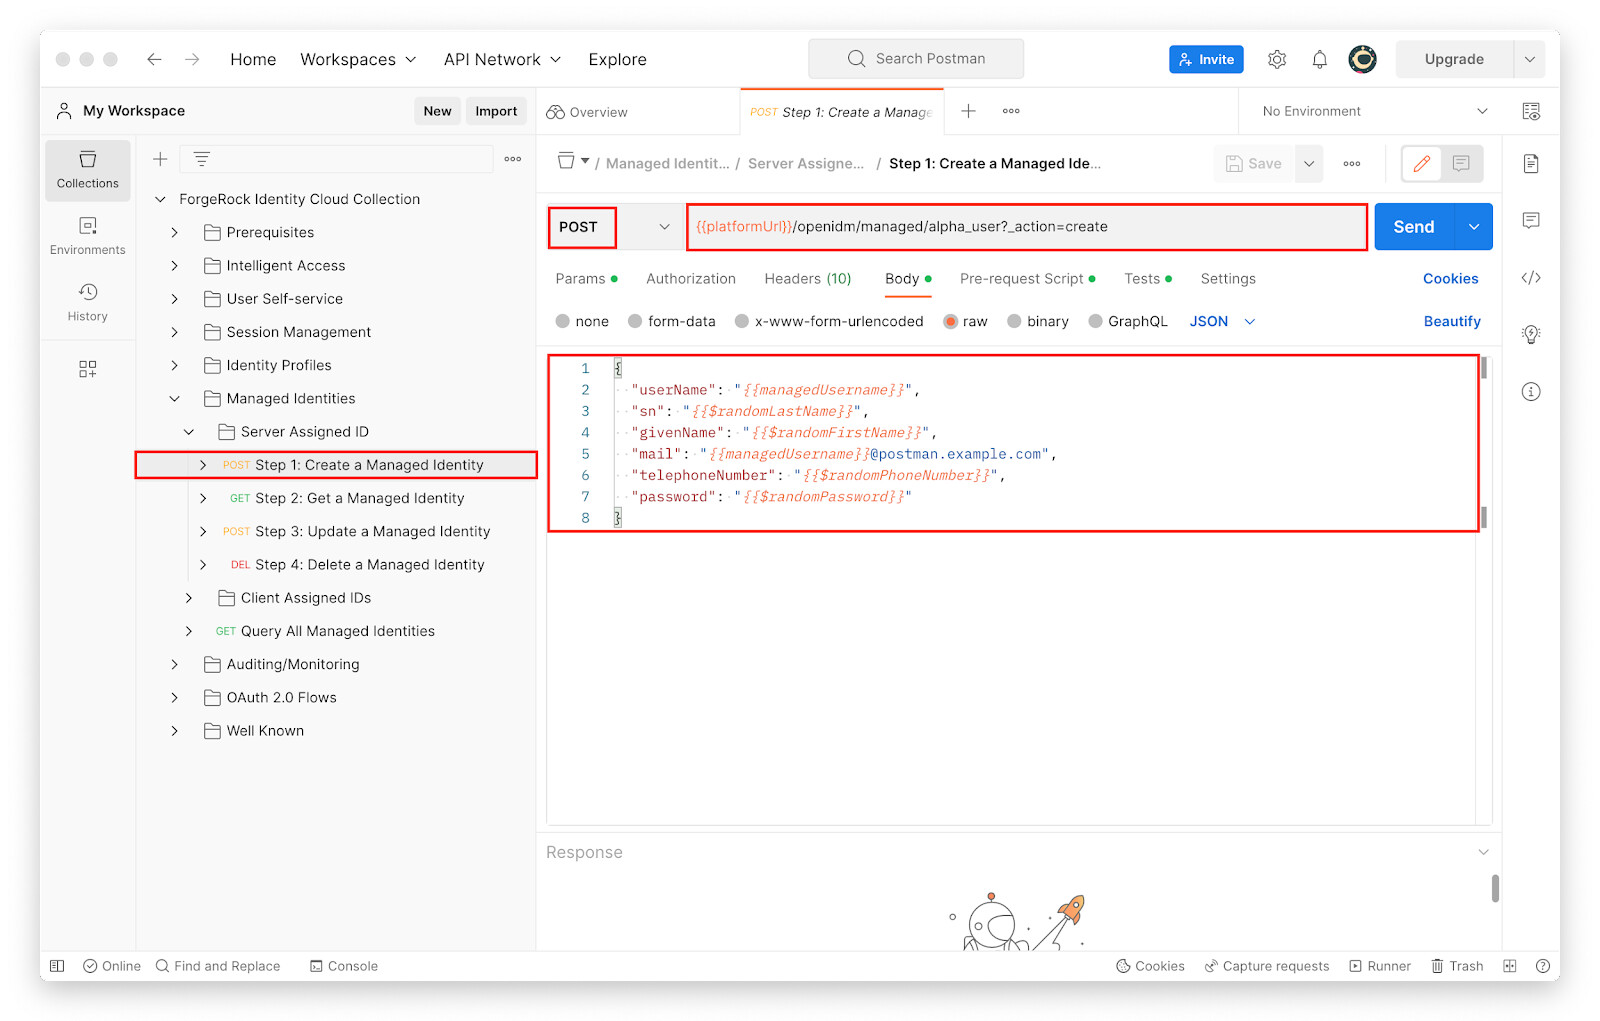
Go to Managed Identities > Server Assigned ID > Step 1 and study the following:
-
The request type: POST
-
The request URL: \{{platformUrl}}/openidm/managed/alpha_user?_action=create
-
The request body that has details of the new user to be created
-
-
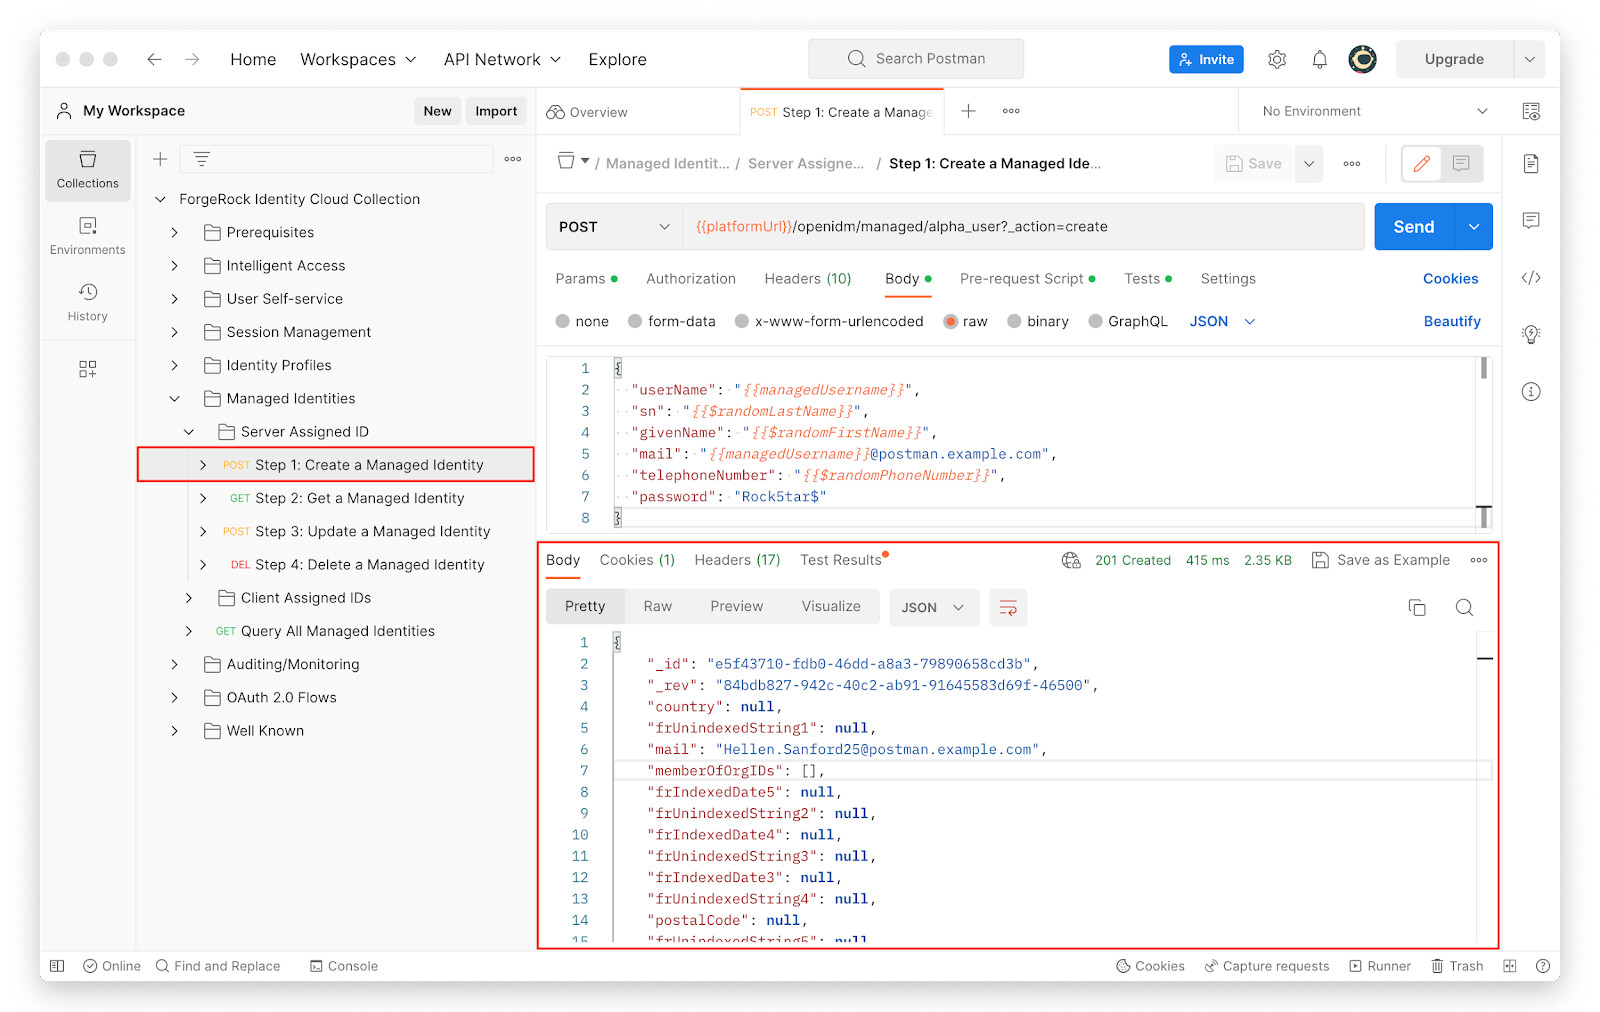
With Managed Identities > Server Assigned ID > Step 1 selected, click Send.
Note that if the request above returns a policy violation for the password property, go to Body and replace the
{{randomPassword}}placeholder with a password, say Rock5tar10$, and click Save and Send.The JSON response received confirms a new user created in the Identity Cloud alpha realm.
-
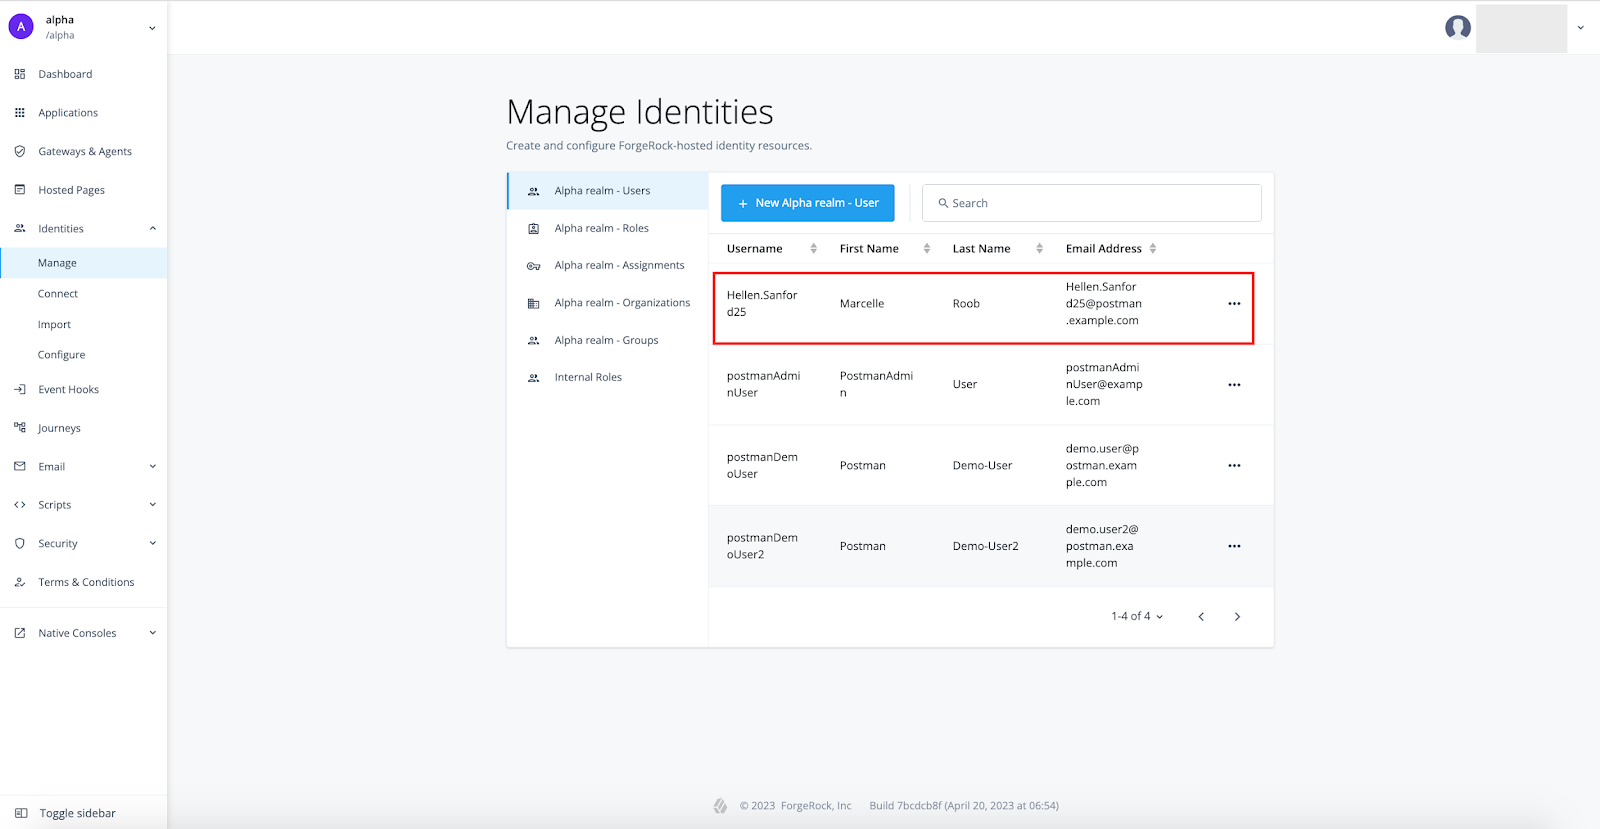
To confirm that the new user was created in the Identity Cloud alpha realm, log into the Identity Cloud Admin UI, and go to Identities > Manage. Notice the new Identity Cloud user list that was created in the above step.
-
In Postman, go to Managed Identities > Server Assigned ID > Step 2 and study the following:
-
The request type: GET
-
The request URL:
{{platformUrl}}/openidm/managed/alpha_user?_queryFilter=userName eq "{{managedUsername}}"Note that the
{{managedUsername}}variable in the query filter of request URL has a value set to the Identity Cloud user created in the above step. Hover the mouse over the variable to confirm. -
The request header
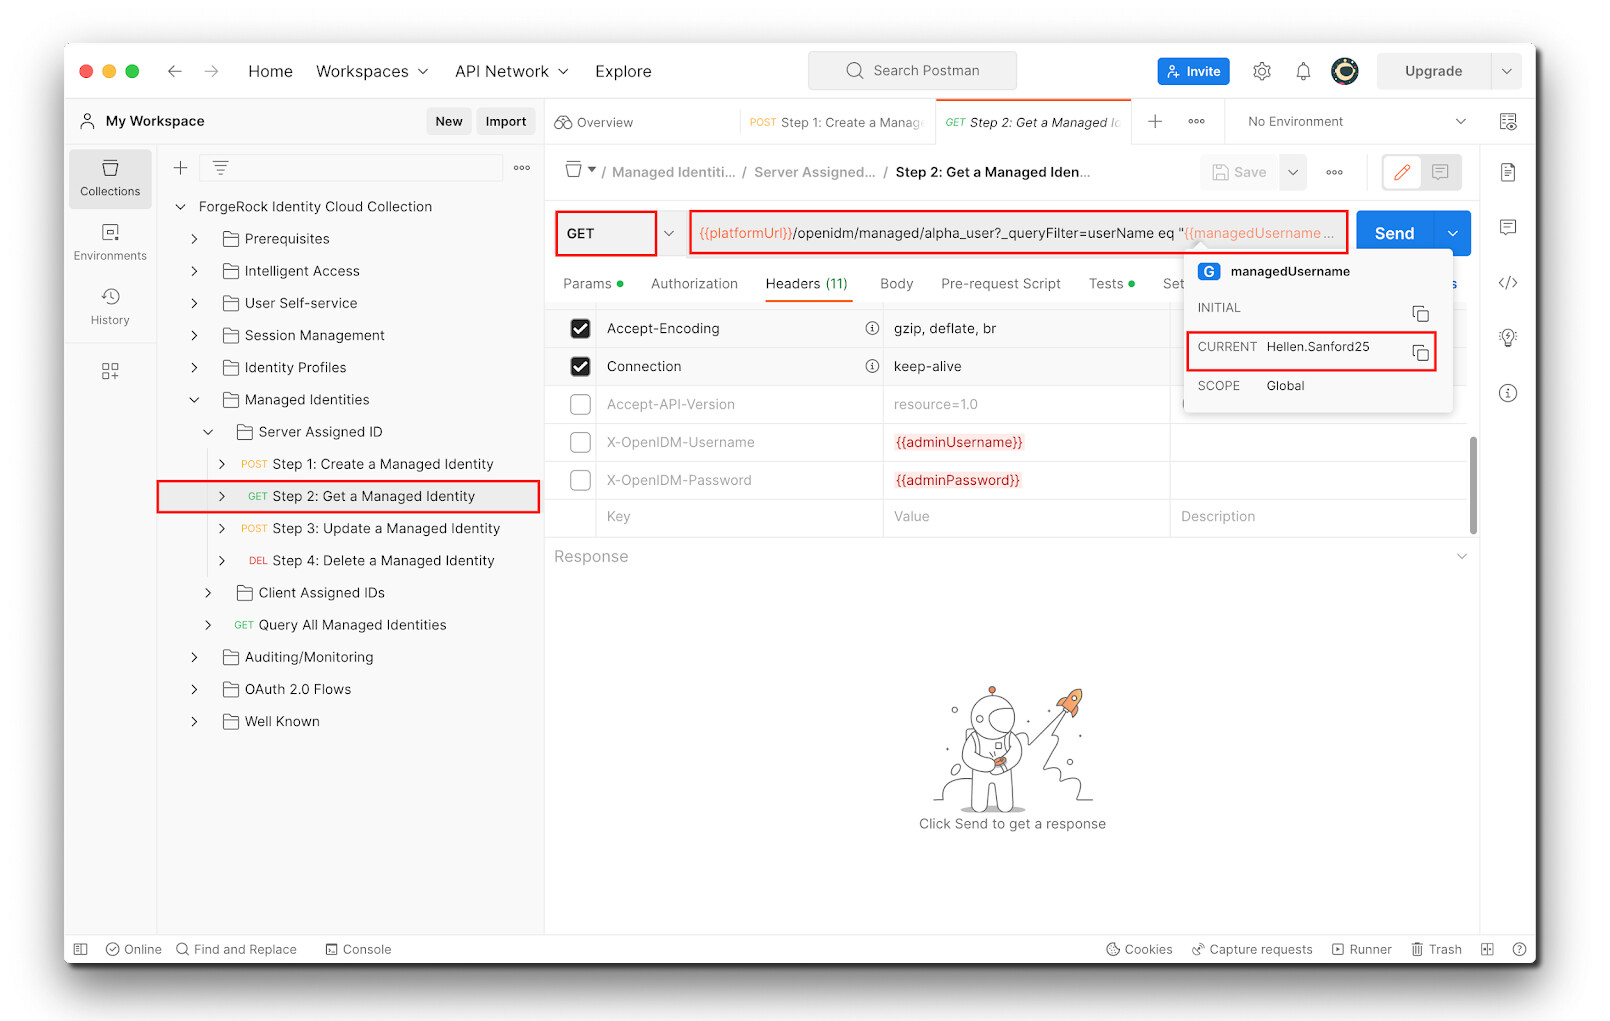
-
-
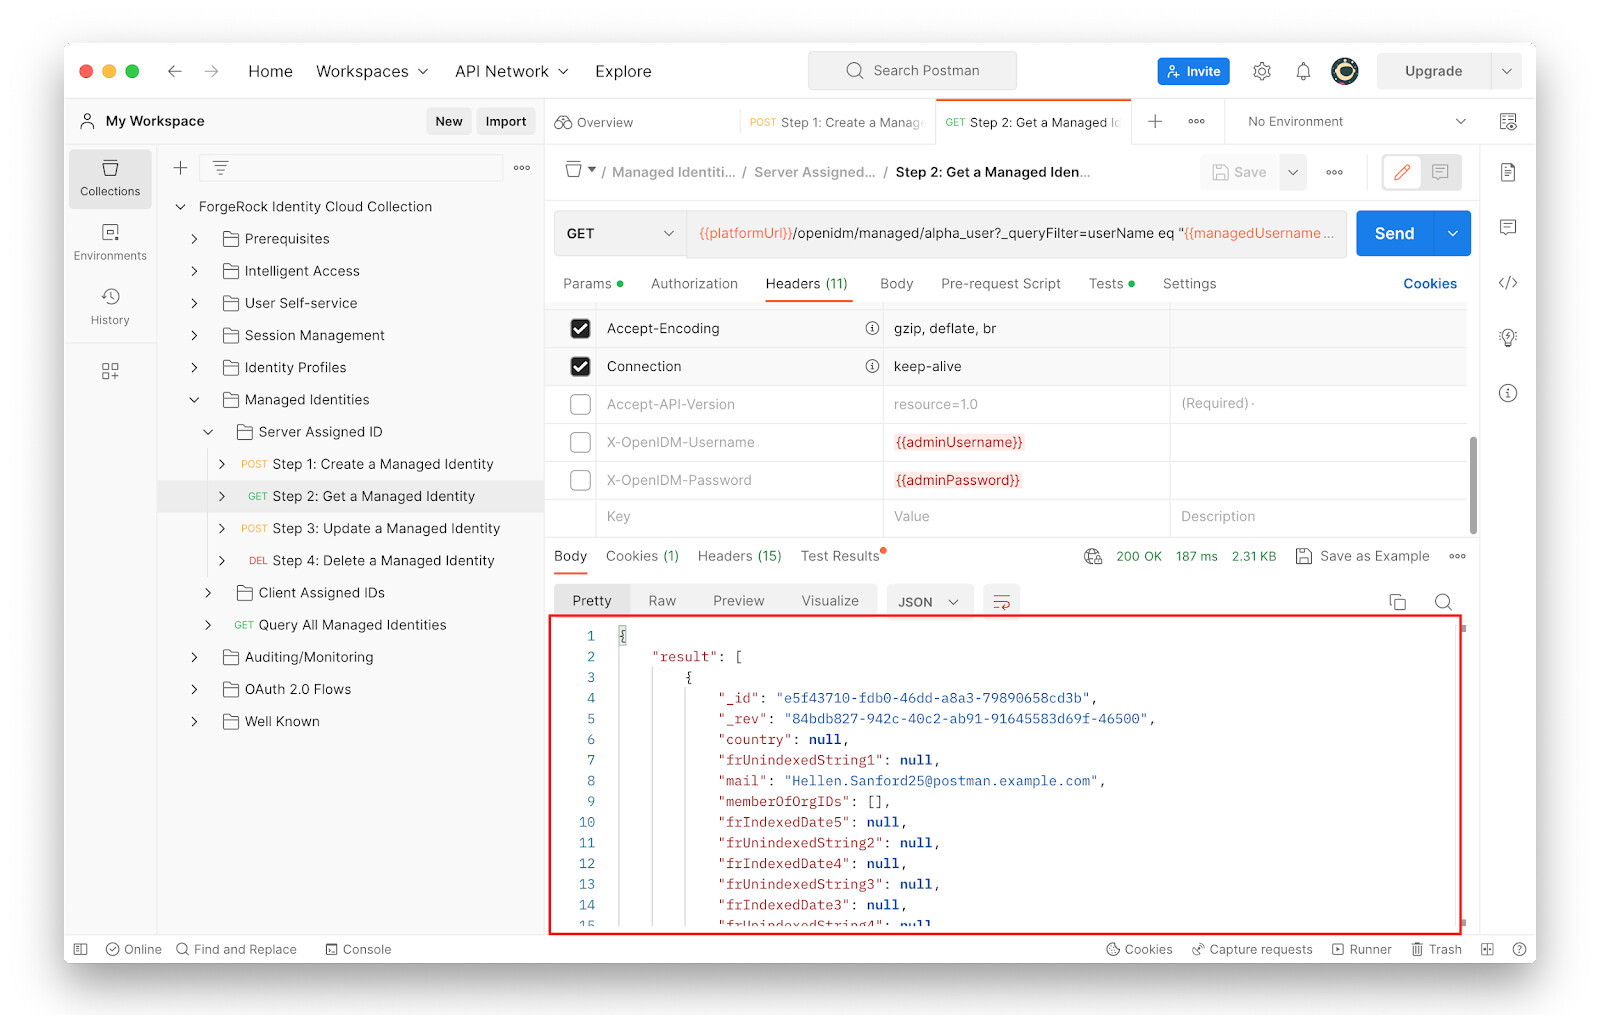
With Managed Identities > Server Assigned ID > Step 2 selected, click Send.
The user details are returned as a response to the above request.
-
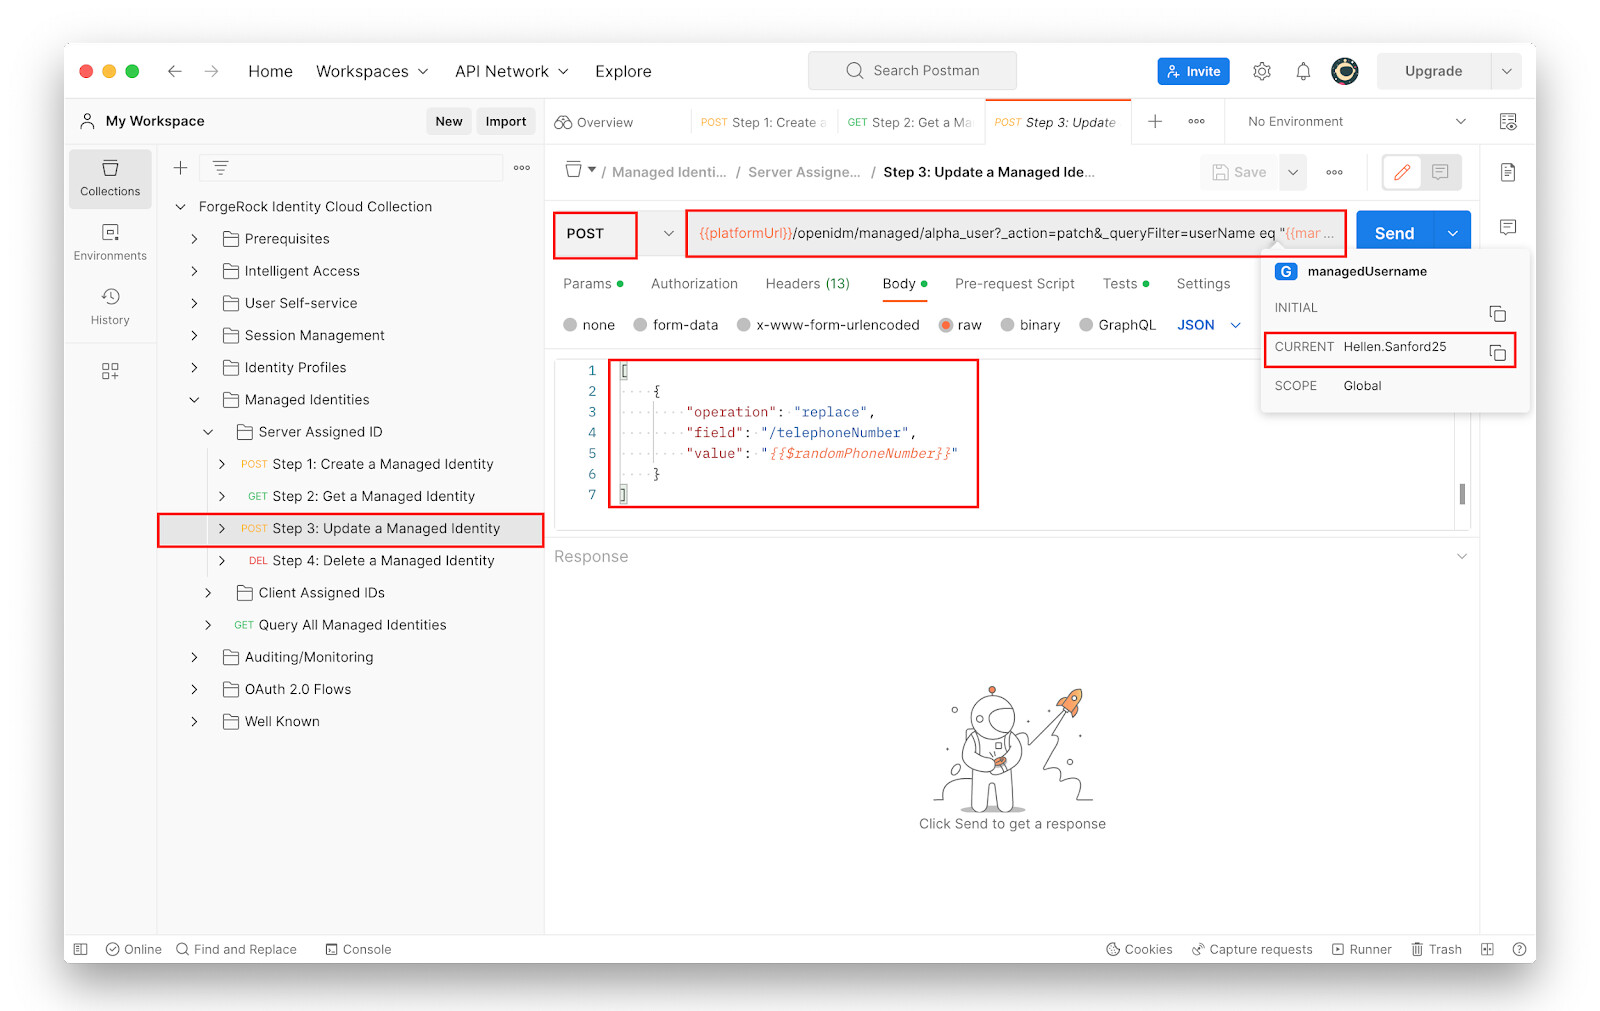
Go to Managed Identities > Server Assigned ID > Step 3 and study the following:
-
The request type: POST
-
The request URL:
{{platformUrl}}/openidm/managed/alpha_user?_action=patch&_queryFilter=userName eq "{{managedUsername}}" -
The request body and header
Note that the
{{managedUsername}}in the request URL has a value set to the username of the Identity Cloud user created in the earlier step.
-
-
With Managed Identities > Server Assigned ID > Step 3 selected, click Send.
The JSON response from Identity Cloud confirms an update to the user’s telephoneNumber attribute value. Send the request multiple times, if required, to notice a new value for the user’s telephoneNumber attribute.
-
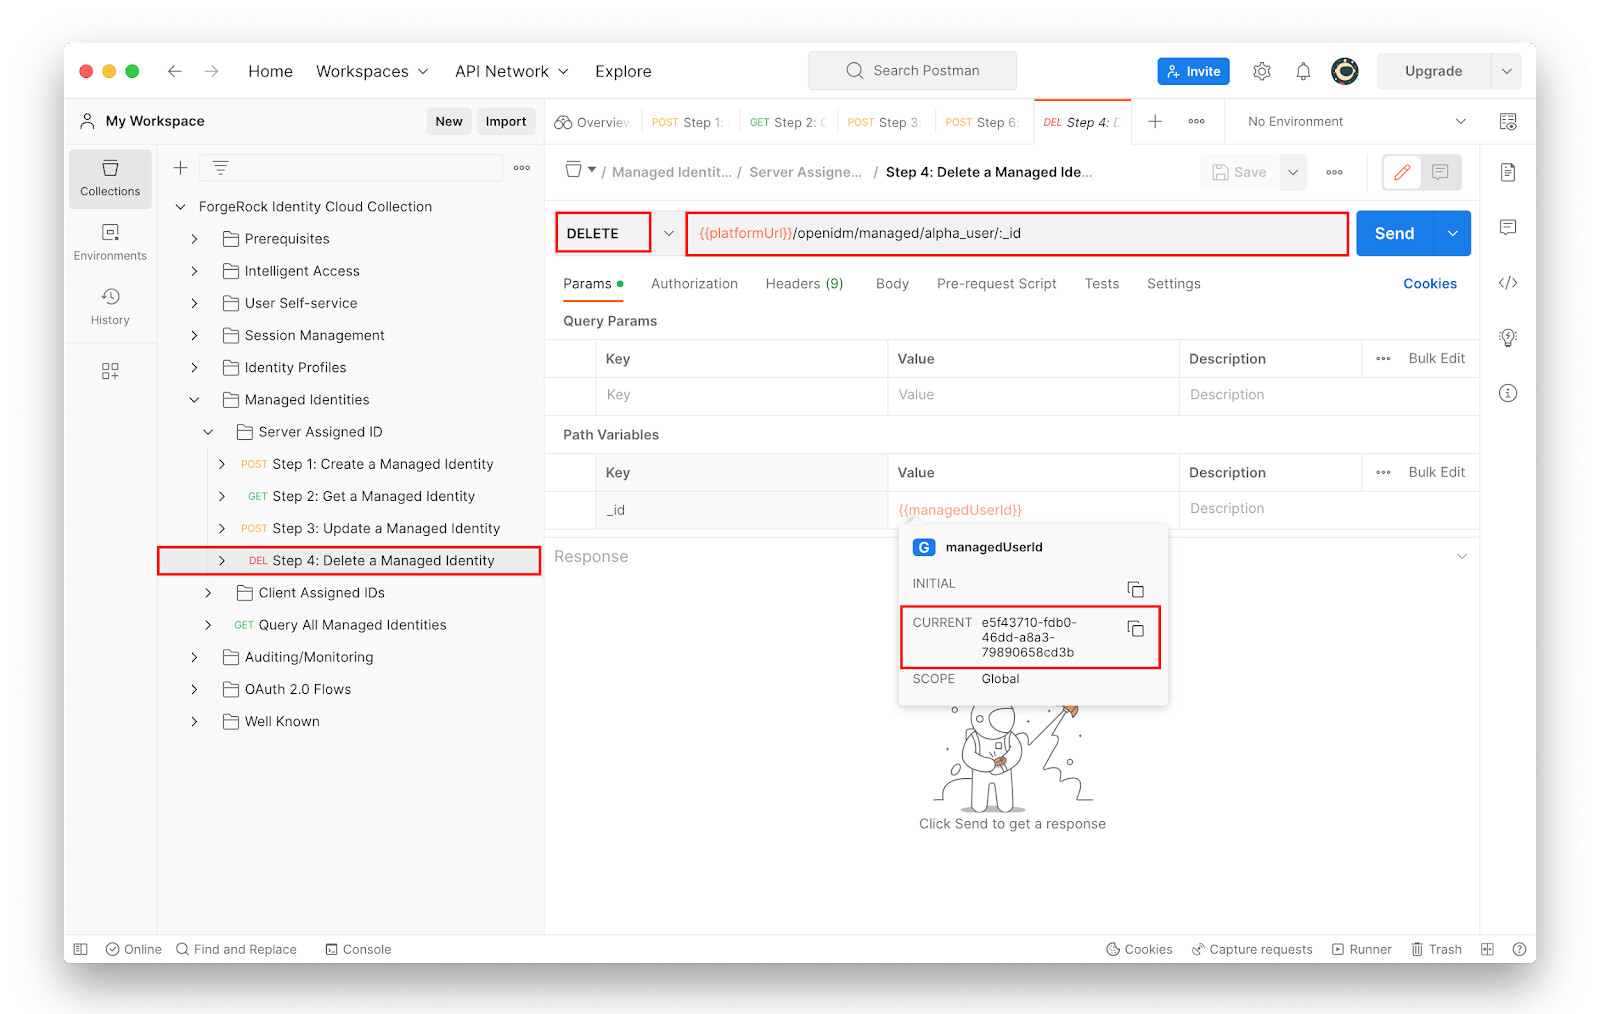
Go to Managed Identities > Server Assigned ID > Step 4 and study the following:
-
The request type: DELETE
-
The request URL: `\{{platformUrl}}/openidm/managed/alpha_user/:_id
-
The request body and header`
Note that the
_idparameter in the request URL is set to the value of the_idattribute of the user created in the earlier step.
-
-
With Managed Identities > Server Assigned ID > Step 4 selected, click Send.
-
The Identity Cloud alpha realm user created earlier is now deleted. To confirm this, go back to the alpha realm in your Identity Cloud Admin UI, and go to Identities > Manage.
Examples using curl ~ 5 min
The curl examples below perform the following tasks:
-
Send a request to the “/access_token” endpoint of Identity Cloud to obtain an access token with scope
fr:idm:*. -
Using the access token obtained above, send a call to the “/openidm/managed/alpha_user” endpoint with a
createaction to provision a new user in the Identity Cloud alpha realm. -
Using the access token, send a call to the “/openidm/managed/alpha_user” endpoint with a
patchaction to update the user’stelephoneNumberattribute. -
Using the access token, send a DELETE request to the “/openidm/managed/alpha_user” endpoint to delete the user created in the above step.
Curl commands:
-
Obtain an access token with the scope
fr:idm:*:$ curl --location 'https://<id-cloud-tenant>/am/oauth2/realms/root/realms/alpha/access_token' \ --header 'Content-Type: application/x-www-form-urlencoded' \ --header 'Cookie: amlbcookie=01' \ --data 'grant_type=password' \ --data 'username=postmanAdminUser' \ --data 'password=Rock5tar10$' \ --data 'scope=fr:idm:*' \ --data 'client_id=postmanAdminClient' \ --data 'client_secret=postmanClientSecret' | jq .Example response:
{ "access_token": "eyJ0eXAiOiJKV1QiLCJhbGciOiJIUzI1NiJ9.<-- output truncated for brevity-->.S6gTB4V-sJy6mFJrCDZnTgCAcfaeOB_egmoCBh9jr3E", "scope": "fr:idm:*", "token_type": "Bearer", "expires_in": 3599 } -
Replace the
{{access token}}placeholder in the following command with the access token obtained above and create a user with the details as mentioned in the data payload of the request.A major portion of the output (response) is omitted for brevity.
$ curl --location 'https://<id-cloud-tenant>/openidm/managed/alpha_user?_action=create' \
--header 'Content-Type: application/json' \
--header 'Authorization: Bearer {{access token}}' \
--data-raw '{
  "userName": "curlDemoUser-3",
  "sn": "DemoUser-3",
  "givenName": "Curl",
  "mail": "curl.demouser-3@curl.example.com",
  "telephoneNumber": "999-888-2700",
  "password": "Rock5tar10$"
}' | jq .
Example response:
{ "_id": "e3336558-bb96-40f2-8bbb-f884f8abba00", "_rev": "84bdb827-942c-40c2-ab91-91645583d69f-47837", "mail": "curl.demouser-3@curl.example.com", "memberOfOrgIDs": [], "frIndexedDate5": null, "telephoneNumber": "999-888-2700", "accountStatus": "active", <--------- output omitted for brevity --------------> "userName": "curlDemoUser-3", "frIndexedDate2": null, "frIndexedDate1": null, "effectiveRoles": [] } -
Replace the
{{access token}}placeholder in the command below with the access token obtained above and send a request to update the user’s telephone number with the new value mentioned in the data payload.$ curl --location 'https://<id-cloud-tenant>/openidm/managed/alpha_user?_action=patch&_queryFilter=userName%20eq%20%22curlDemoUser-3%22' \ --header 'Content-Type: application/json' \ --header 'Authorization: Bearer {{access token}}' \ --header 'Cookie: amlbcookie=01' \ --data '[ { "operation": "replace", "field": "/telephoneNumber", "value": "123-456-7890" } ]' | jq .Example response:
{ "mail": "curl.demouser-3@curl.example.com", "givenName": "Curl", <--------- output omitted for brevity ------------> "_id": "e3336558-bb96-40f2-8bbb-f884f8abba00", "telephoneNumber": "123-456-7890", "effectiveAssignments": [], "_rev": "84bdb827-942c-40c2-ab91-91645583d69f-47970", "accountStatus": "active", " } -
Replace the
{{access token}}placeholder in the command below with the access token obtained above, and the{{id_ of the user}}with the_idattribute of the user and send a DELETE request.$ curl --location --request DELETE 'https://<id-cloud-tenant>/openidm/managed/alpha_user/{{_id of the user}}' \ --header 'Authorization: Bearer {{access token}}'| jq .Example response:
{
 "_id": "e3336558-bb96-40f2-8bbb-f884f8abba00",
 "_rev": "84bdb827-942c-40c2-ab91-91645583d69f-47970",
 "mail": "curl.demouser-3@curl.example.com",
  "givenName": "Curl",
 "telephoneNumber": "123-456-7890",
  "sn": "DemoUser-3",
  "userName": "curlDemoUser-3"
  <--------- output omitted for brevity ------------>
}