Live Chat. Who’s Calling?
Author: |
Christian Brindley |
Created at: |
Nov 2021 |
Updated at: |
May 2022 |

 +
Web chat is a great tool for both companies and their customers. +
 +
Customers get immediate help without having to make a phone call or wait
for a response to an email. Companies can optimize the effort and cost
involved in keeping their customers happy and engaged. +
 +
However, the web chat experience can start off on the wrong foot.
Establishing the identity of the caller can be an awkward question and
answer process, requiring information a customer doesn’t always have on
hand or enjoy sharing. This dents the customer experience, and consumes
time which could be better spent addressing the reason for the
contact. +
 +
Ideally, the agent knows who the customer is as soon as the chat request
pops up. This is particularly helpful when handling an ongoing situation
with multiple chat sessions. +
 +
In this article, we’re going to look at a practical example of how to
achieve this with the https://aws.amazon.com/pm/connect/[Amazon Connect]
contact center platform, together with
https://www.forgerock.com/platform/identity-cloud[ForgeRock Identity
Cloud] as the identity provider. As well as reducing customer friction
when establishing the call, this approach provides the appropriate level
of identity assurance for dealing with sensitive customer requests. +
 +
However, the web chat experience can start off on the wrong foot.
Establishing the identity of the caller can be an awkward question and
answer process, requiring information which a customer doesn’t always
have to hand or enjoy sharing. This dents the customer experience,
andconsumes time which could be better spent addressing the reason for
the contact.
Ideally, the agent knows who the customer is as soon as the chat request
pops up. This is particularly helpful when handling an ongoing situation
with multiple chat sessions.
In this article, we’re going to look at a practical example of how to achieve this with the Amazon Connect contact center platform, together with ForgeRock Identity Cloud as the identity provider. As well as reducing customer friction when establishing the call, this approach provides the appropriate level of identity assurance for dealing with sensitive customer requests.
In the next article, we’ll look at how this is done in more detail.
Passing customer details into an Amazon Connect web chat session

 +
Amazon Connect lets you include customer contact details in a chat
session by
https://docs.aws.amazon.com/connect/latest/adminguide/pass-contact-attributes-chat.html[passing
in a signed JWT] with a series of customer attributes. These attributes
can then be used to personalize the chat experience, and display the
customer’s identity information to the agent. Attributes can also be
used for contact routing in Amazon Connect, to provide granular controls
on how the chat request is processed within the contact center.
The JWT needs to be signed using a secret key downloaded from the Amazon Connect administration portal. The JWT looks something like this when decoded:
{
  “typ”: “JWT”,
  “alg”: “HS256”
}
{
  “iat”: 1634561368,
  “exp”: 1634561868,
  “sub”: “1bbeebd5–8081–4cf8–8cde-fad9faa1b26e”,
  “attributes”: {
    “userName”: “jane.doe”,
    “cn”: “Jane Doe”,
    “givenName”: “Jane”,
    “sn”: “Doe”,
    “telephoneNumber”: “0763443392001”,
    “mail”: “jane.doe@idhub.cc”,
    “customerId”: “ABC123456”
  }
}
+
Any of the values in the attributes section can be used in Amazon Connect contact flows as $.Attributes.attributename.
How is this JWT passed into the chat session?

Amazon Connect provides a JavaScript snippet which can be embedded in a web page to provide a chat link. It looks something like this:
(function (w, d, x, id) {
  s = d.createElement('script');
  s.src = 'https://d2zasqxhmd6ne4.cloudfront.net/amazon-connect-chatinterface-client.js';
  s.async = 1;
  s.id = id;
  d.getElementsByTagName('head')[0].appendChild(s);
  w[x] = w[x] || function () { (w[x].ac = w[x].ac || []).push(arguments) };
})(window, document, 'amazon_connect', 'aaaaaaaa-bbbb-cccc-ddddeeeeeeeeeeee');
amazon_connect('styles', { openChat: { color: 'white', backgroundColor: '#123456' }, closeChat: { color: 'white', backgroundColor: '#123456' } });
amazon_connect('snippetId', 'QVFJREFIaGo1T2pOSWpLWW9NR2I3V2FjTU9DR3JoaHRWaTZZQ1d1K0FuWmJjbnVkNHd
  HbXY1V1ZBQUdRRVAwTHkvUXRYUENMQUFBQWJqQnNCZ2txaGtpRzl3MEJCd2FnWHpCZEF
  nRUFNRmdHQ1NxR1NJYjNEUUVIQVRBZUJnbGdoa2dCWlFNRUFTNHdFUVFNVExPS0NlRTU
  xWjh1M215aUFnRVFnQ3NnVHlDMEtVbUN3NXNIZXQ3SjV0Q0FBa2VPVXd0ZjRIV0JmOGF
  MdDBlVVE4Nk84MittOHhaazJXWS86Ok5HT3ZBc0pYM1ZiWmx6aGs0K2MzNHVXaXVkYXl
  xbm9LbC9QNkcwbHl4dHBKZHRkdXIvOXpzRmpnZ3dJcG5UZXlrV3hBdVBpcU1veXNTYXp
  JZWx4UzFLSkRNTGlsT2gzaVlOS284VFRnNWhvaWdMV1RlN1hjbm9CYk9NVnlYalphNHB
  3QmcrU3BHUEpMUkpXZkdZQkhNZW41Q2NqcVRNdz0=');
 +
After enabling security for the chat widget (through an option in the
Amazon Connect admin portal), you need to add an authentication callback
to the above snippet. This callback needs to return the signed JWT token
with the customer details. The example from Amazon looks like this:
amazon_connect('authenticate', function(callback) {
  window.fetch('/token').then(res => { res.json().then(data => {
    callback(data.data); });
  });
});
In this example, the callback connects to a service at /token (i.e., an endpoint on the same server as the widget page) which returns a JSON response containing the JWT in the parameter "data".
+
How is this JWT service implemented?

 +
Amazon does not provide the underlying technology for this JWT endpoint;
the implementation is up to you. The Amazon docs do provide a sample
snippet of Python to get you started: +
 +
import jwt<br /></span><span class="gs kq jc fv kr b dt lb lc ld le lf kt s ku" data-selectable-paragraph="">CONNECT_SECRET = "your-securely-stored-jwt-secret"<br /></span><span class="gs kq jc fv kr b dt lb lc ld le lf kt s ku" data-selectable-paragraph="">payload = {<br /> 'sub': 'widget-id',<br /> 'iat': datetime.datetime.utcnow(),<br /> 'exp': datetime.datetime.utcnow() + datetime.timedelta(seconds=500),<br /> 'attributes': {"name": "Jane", "memberID": "123456789", "email": "<a href="mailto:Jane@example.com" class="dy ja" target="_blank" rel="noopener ugc nofollow">Jane@example.com</a>", "isPremiumUser": "true", "age": "45"}<br />}<br /></span><span class="gs kq jc fv kr b dt lb lc ld le lf kt s ku" data-selectable-paragraph="">header = {<br /> 'typ': "JWT",<br /> 'alg': 'HS256'<br />}<br /></span><span class="gs kq jc fv kr b dt lb lc ld le lf kt s ku" data-selectable-paragraph="">encoded_token = jwt.encode((payload), CONNECT_SECRET, algorithm="HS256", headers=header)<br /></span>+ In real life, we can implement this easily in ForgeRock Identity Cloud service. This platform provides the missing pieces of the puzzle: + +
-
A cloud-based OpenID Connect provider which can identify and authenticate the user with little or zero friction.
-
A cloud-based implementation of the REST endpoint for issuing a JWT with the customer’s details in the format required by Amazon Connect.
What does this look like to the customer?
It can look however you want!
As a starter, here is the customer view of Amazon’s sample contact flow
when you include the verified customer name and account ID.
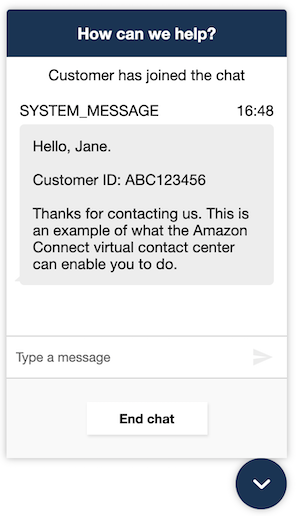
 +
 +
The agent view will contain these details as well. If you integrate the
Amazon Connect control panel into your own platform, you can also show
the customer details in an agent
https://aws.amazon.com/premiumsupport/knowledge-center/connect-contact-attributes-screenpop/[screen
pop].
+
What else can I do with customer contact details?

 +
These attributes are more than just contact details. They can include
any information you know about your customers, including attributes
which can be used to handle chat requests appropriately; e.g., routing
customers to priority queues if they have specific support levels, or
passing customers directly to specialist support teams if they have
certain subscription types.
+
More details, please

 +
 +
In the
link:securing-chat-with-amazon-connect-and-forgerock-identity-cloud/45[next
article], we’ll look in more detail at how Amazon Connect and ForgeRock
Identity Cloud are configured to support this integration.
+
+
Other Articles by This Author
![]() Securing
Chat with Amazon Connect and ForgeRock Identity Cloud
[.badge-category__name#Integrations#]
Securing
Chat with Amazon Connect and ForgeRock Identity Cloud
[.badge-category__name#Integrations#]
[image|0x0] A video demonstration is included at the end of this article to help guide you through testing the instructions. Overview In the previous article, we looked at the security settings for web chat in the Amazon Connect call center platform, and showed you how we can integrate ForgeRock Identity Cloud to provide an end-to-end solution for identifying callers, and personalizing the web chat experience. In this article, we’re going to look in more detail at how you configure both Am…