Securing Chat with Amazon Connect and ForgeRock Identity Cloud
Author: |
Christian Brindley |
Created at: |
Nov 2021 |
Updated at: |
Jul 2022 |

A video demonstration is included at the end of this article to help guide you through testing the instructions.
Overview
In the previous article, we looked at
the security settings for web chat in the
Amazon Connect call center platform,
and showed you how we can integrate
ForgeRock Identity
Cloud to provide an end-to-end solution for identifying callers, and
personalizing the web chat experience.
In this article, we’re going to look in more detail at how you configure both Amazon Connect and ForgeRock Identity Cloud to get this working in practice.
Architectural components
The components of this setup are as follows:
User Agent. We are going to use a JavaScript single-page application based on the sample app from the ForgeRock SDK. This page will host the Amazon Connect chat widget (used to initiate chat from within the page), plus the ForgeRock Token Manager (used to acquire OAuth2 access tokens to act onbehalf of the end user).
ForgeRock Identity Cloud. We are going to use the OAuth2 authorization server in Identity Cloud as the access token issuer, plus a custom REST endpoint to act as a contact token issuer.
Amazon Connect. The Amazon Connect platform includes the contact center backend for the chat widget. Communication between components is as follows:

Token acquisition sequence
-
On startup, the chat widget is configured with a callback which first calls the ForgeRock token manager for an access token.
-
If the user is already logged in to the app, the token manager will return the stored access token immediately. Otherwise, the token manager requests an access token from ForgeRock Identity Cloud.
-
ForgeRock Identity Cloud ensures the user is authenticated to the level required, then returns an access token to the token manager.
-
The token manager returns the access token to the chat widget.
-
The chat widget continues the callback process, presenting the acccess token to the JWT issuing endpoint in Identity Cloud.
-
The JWT issuing service verifies the access token, extracts the subject information to build an Amazon Connect-compliant contact JWT, and returns the JWT to the chat widget. The authentication callback is now complete.
-
The chat widget initiates the chat session with Amazon Connect, including the contact JWT in the request headers.
+
Next, we are going to go through the required configuration in Amazon.
+
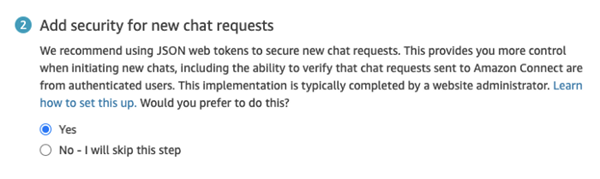
Step 1: Enable security for web chat in Amazon Connect
Sign in to the Amazon Connect dashboard, and click on Customize chat
widget. Select the option to enable security, as follows:
You’ll then get a dialogue showing the chat widget script, together with a security key:
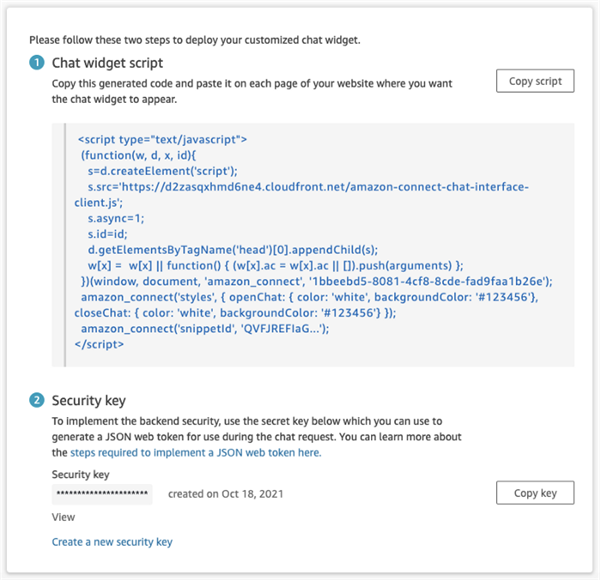
Copy the security key. We’re going to use it in the next step.
+
Step 2: Deploy the JWT issuing endpoint in ForgeRock Identity Cloud
ForgeRock Identity Cloud lets you define
custom
endpoints which execute your own logic based on JavaScript functions.
Your script is executed within the Identity Cloud context, meaning that
you know who is calling, and can tailor the response accordingly.
In this case, we’re going to define a custom endpoint which returns a
contact JWT in the format required by Amazon Connect, signed with the
security key you generated in Step 1. The JWT contains all the required
information about the authenticated user, which is then passed into the
Amazon Connect contact flow.
Here’s the endpoint script:
(function () {
|
|
var config = {
|
|
endpointName : "chatToken", |
|
userObject : "alpha_user", |
|
signingKey : "YOUR_SECRET_KEY", |
|
widgetId : "YOUR_WIDGET_ID", |
|
validitySeconds : 500, |
|
userAttributes : {
|
|
userName : "userName", |
|
emailAddress : "mail", |
|
fullName : "cn", |
|
firstName : "givenName", |
|
lastName : "sn", |
|
mobile : "telephoneNumber", |
|
customerId : "frIndexedString1" |
|
} |
|
}; |
|
var fr = JavaImporter( |
|
com.sun.identity.authentication.callbacks.ScriptTextOutputCallback, |
|
java.time.Clock, |
|
java.time.temporal.ChronoUnit, |
|
javax.crypto.spec.SecretKeySpec, |
|
org.forgerock.json.jose.builders.JwtBuilderFactory, |
|
org.forgerock.json.jose.jws.JwsAlgorithm, |
|
org.forgerock.json.jose.jws.handlers.SecretHmacSigningHandler, |
|
org.forgerock.json.jose.jwt.JwtClaimsSet, |
|
org.forgerock.secrets.SecretBuilder, |
|
org.forgerock.secrets.keys.SigningKey, |
|
org.forgerock.util.encode.Base64, |
|
org.forgerock.json.jose.jws.SignedJwt, |
|
org.forgerock.json.jose.jws.EncryptedThenSignedJwt, |
|
org.forgerock.json.jose.jwe.SignedThenEncryptedJwt, |
|
org.forgerock.secrets.keys.VerificationKey, |
|
javax.crypto.spec.SecretKeySpec, |
|
org.forgerock.json.jose.jwe.JweAlgorithm, |
|
org.forgerock.json.jose.jwe.EncryptionMethod, |
|
java.lang.String |
|
); |
|
function tag(message) {
|
|
return "***".concat(config.endpointName).concat(" ").concat(message);
|
|
} |
|
function getSigningKey(secret) {
|
|
var secretBytes = new fr.String(config.signingKey).getBytes(); |
|
var secretBuilder = new fr.SecretBuilder; |
|
secretBuilder.secretKey(new javax.crypto.spec.SecretKeySpec(secretBytes, "Hmac")); |
|
secretBuilder.stableId(config.issuer).expiresIn(5, fr.ChronoUnit.MINUTES, fr.Clock.systemUTC()); |
|
return new fr.SigningKey(secretBuilder); |
|
} |
|
function buildJwt(claims) {
|
|
logger.debug(tag("Building JWT"));
|
|
var signingKey = getSigningKey(config.signingKey); |
|
var signingHandler = new fr.SecretHmacSigningHandler(signingKey); |
|
var iat = new Date(); |
|
var iatTime = iat.getTime(); |
|
var attributes = {
attributes : claims }; |
|
var jwtClaims = new fr.JwtClaimsSet; |
|
jwtClaims.setIssuedAtTime(new Date()); |
|
jwtClaims.setExpirationTime(new Date(iatTime + (config.validitySeconds * 1000))); |
|
jwtClaims.setSubject(config.widgetId); |
|
jwtClaims.setClaims(attributes); |
|
var jwt = new fr.JwtBuilderFactory() |
|
.jws(signingHandler) |
|
.headers() |
|
.alg(fr.JwsAlgorithm.HS256) |
|
.done() |
|
.claims(jwtClaims) |
|
.build(); |
|
return jwt; |
|
} |
|
function logResponse(response) {
|
|
logger.debug(tag("HTTP Response: " + response.getStatus() + ", Body: " + response.getEntity().getString()));
|
|
} |
|
function getUserDetails(uid, fields) {
|
|
var frAttributes = []; |
|
Object.keys(fields).forEach(key => {
|
|
frAttributes.push(fields[key]); |
|
}); |
|
var user = openidm.read("managed/" + config.userObject + "/" + uid,
|
|
null, |
|
frAttributes); |
|
var jwtClaims = {};
|
|
Object.keys(fields).forEach(key => {
|
|
jwtClaims[key] = user[fields[key]]; |
|
}); |
|
logger.debug(tag("Got attributes " + jwtClaims));
|
|
return jwtClaims; |
|
} |
|
logger.debug(tag("endpoint executing"));
|
|
var callingUser = context.security.authenticationId; |
|
var userDetails = getUserDetails(callingUser, config.userAttributes); |
|
if (!userDetails) {
|
|
throw { code: 500, message: "Error getting user details" };
|
|
} |
|
var chatToken = buildJwt(userDetails); |
|
return {
|
|
result: 0, |
|
chatToken: chatToken |
|
}; |
|
})(); |
view rawhttps://gist.github.com/christian-brindley/a985a77ecc957adaa15bb945ad509c8a#file-chat-token-js[chat-token.js] hosted with ❤ by GitHub
 +
You need to replace the following values in the config section:
-
YOUR_SECURITY_KEY** This should be the key you generated in Step 1. -
YOUR_WIDGET_IDThis should be the widget ID displayed in your widget JavaScript snippet. -
userAttributesThis is a list of attributes to include in the JWT, in the formatjwtAttribute: “forgerockAttribute”.
Next, we need to squash the script and include it inline within an endpoint configuration file. Hold onto your hats…:
sed 's/\/\/.*//; s/^ *//g; s/\\/\\\\/g; s/"/\\"/g' chat-token.js \

| tr -d '\n\r' \

| sed 's/\(.*\)/{"type": "text\/javascript","source":"\1"}/' \

> endpoint-chat-token.json
This gives us the config file endpoint-chat-token.json with content like this:
{"type": "text/javascript","source":"(function () {var config =

{endpointName: \"chatToken\",userObject: \"alpha_user\",signingKey:

\"YOUR_SECRET_KEY\",widgetId: \"YOUR_WIDGET_ID\",validitySeconds:

500,userAttributes: {userName: \"userName\",emailAddress:

\"mail\",fullName: \"cn\",firstName: \"givenName\",lastName:

\"sn\",mobile: \"telephoneNumber\",customerId:

\"frIndexedString1\"}};var fr =

JavaImporter(com.sun.identity.authentication.callbacks.ScriptTextOut

putCallback,java.time.Clock,java.time.temporal.ChronoUnit,javax.cryp

to.spec.SecretKeySpec,org.forgerock.json.jose.builders.JwtBuilderFac

tory,org.forgerock.json.jose.jws.JwsAlgorithm,org.forgerock.json.jos

e.jws.handlers.SecretHmacSigningHandler,org.forgerock.json.jose.jwt.

JwtClaimsSet,org.forgerock.secrets.SecretBuilder,org.forgerock.secre

ts.keys.SigningKey,org.forgerock.util.encode.Base64,org.forgerock.js

on.jose.jws.SignedJwt,org.forgerock.json.jose.jws.EncryptedThenSigne

dJwt,org.forgerock.json.jose.jwe.SignedThenEncryptedJwt,org.forgeroc

k.secrets.keys.VerificationKey,javax.crypto.spec.SecretKeySpec,org.f

orgerock.json.jose.jwe.JweAlgorithm,org.forgerock.json.jose.jwe.Encr

yptionMethod,java.lang.String);function tag(message) {return

\"***\".concat(config.endpointName).concat(\"

\").concat(message);}function getSigningKey(secret) {var secretBytes

= new fr.String(config.signingKey).getBytes();var secretBuilder =

new fr.SecretBuilder;secretBuilder.secretKey(new

javax.crypto.spec.SecretKeySpec(secretBytes,

\"Hmac\"));secretBuilder.stableId(config.issuer).expiresIn(5,

fr.ChronoUnit.MINUTES, fr.Clock.systemUTC());return new

fr.SigningKey(secretBuilder);}function buildJwt(claims)

{logger.debug(tag(\"Building JWT\"));var signingKey =

getSigningKey(config.signingKey);var signingHandler = new

fr.SecretHmacSigningHandler(signingKey);var iat = new Date();var

iatTime = iat.getTime();var attributes = { attributes: claims };var

jwtClaims = new fr.JwtClaimsSet;jwtClaims.setIssuedAtTime(new

Date());jwtClaims.setExpirationTime(new Date(iatTime +

(config.validitySeconds *

1000)));jwtClaims.setSubject(config.widgetId);jwtClaims.setClaims(at

tributes);var jwt = new

fr.JwtBuilderFactory().jws(signingHandler).headers().alg(fr.JwsAlgor

ithm.HS256).done().claims(jwtClaims).build();return jwt;}function

logResponse(response) {logger.debug(tag(\"HTTP Response: \" +

response.getStatus() + \", Body: \" +

response.getEntity().getString()));}function getUserDetails(uid,

fields) {var frAttributes = [];Object.keys(fields).forEach(key =>

{frAttributes.push(fields[key]);});var user =

openidm.read(\"managed/\" + config.userObject + \"/\" +

uid,null,frAttributes);var jwtClaims =

{};Object.keys(fields).forEach(key => {jwtClaims[key] =

user[fields[key]];});logger.debug(tag(\"Got attributes \" +

jwtClaims));return jwtClaims;}logger.debug(tag(\"endpoint

executing\"));var callingUser =

context.security.authenticationId;var userDetails =

getUserDetails(callingUser, config.userAttributes);if (!userDetails)

{throw { code: 500, message: \"Error getting user details\" };}var

chatToken = buildJwt(
Next, we upload the config to ForgeRock Identity Cloud. As with all configs in Identity Cloud, we need an OAuth2 access token with administrative rights to allow changes to tenant configuration:
curl --request PUT "https://openam-acmedemo.

forgerock.io/openidm/config/endpoint/chat-token" \

--header "Authorization: Bearer $accessToken" \

--header "Content-Type: application/json" \

--data-binary "@endpoint-chat-token.json"
+ Finally, we add an entry to the access control list to authorize access to the endpoint for authenticated users.

WARNING: If you make a mistake here, you can end up blocking your tenant:
curl --location --request PATCH "https://openam-acme-demo.forgerock.io/openidm/config/access" \
--header "Authorization: Bearer $accessToken" \
--header "Content-Type: application/json" \
--data-raw '[
  {
    "operation": "add",
    "field": "configs/-",
    "value": {
        "actions": "*",
        "methods": "*",
        "pattern": "endpoint/chat-token",
        "roles": "internal/role/openidm-authorized"
    }
  }
]'
You can test whether this is working by presenting an end user access token to the endpoint like this:
curl --location --request GET 'https://openam-acme.forgerock.io/openidm/endpoint/chat-token' \
--header "Authorization: Bearer eyJ0eXAiOiJKV1Qi......78hrA"
{
  "_id": "",
  "result": 0,
  "chatToken": "eyJ0eXAiOiJKV1QiLCJhbGciOiJIUzI1NiJ9.eyJpYXQiOjE2MzQ4MjQzNDQsImV4cCI6MTYzNDgyNDg0NCwic3ViIjoiMWJiZWViZDUtODA4MS00Y2Y4LThjZGUtZmFkOWZhYTFiMjZlIiwiYXR0cmlidXRlcyI6eyJ1c2VyTmFtZSI6ImphbmUuZG9lIiwiZW1haWxBZGRyZXNzIjoiamFuZS5kb2VAaWRodWIuY2MiLCJmdWxsTmFtZSI6IkphbmUgRG9lIiwiZmlyc3ROYW1lIjoiSmFuZSIsImxhc3ROYW1lIjoiRG9lIiwibW9iaWxlIjoiMDc2MzQ4MzcyNjIyNzI3ODIyIiwiY3VzdG9tZXJJZCI6IkFCQzEyMzQ1NiJ9fQ.3-z7cEEJzmDWEaurdMx0-LMYerC4FR-JsCSY_8ICDwM"
}
+
Step 3: Configure Amazon Connect to use customer details for contact routing
You can use the ForgeRock identity attributes anywhere in your contact flows for the purposes of both personalization and contact flow routing (and anything else you can think of).
For example, we are going to update the default out of the box contact flow “Sample inbound flow (first contact experience)”, updating the initial prompt with the details of the authenticated user:
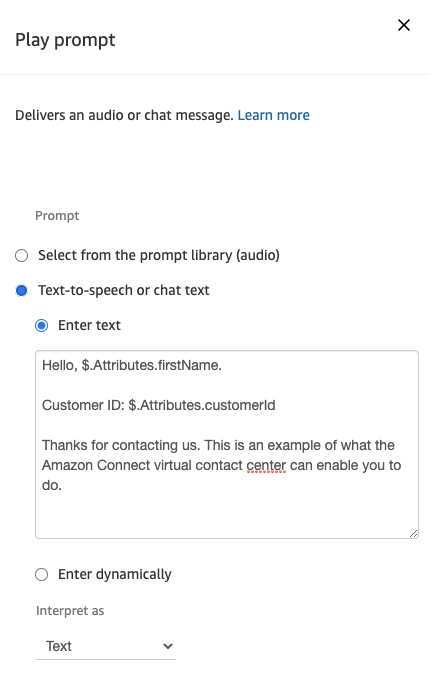
You’ll see that we are greeting the user with their first name, using
the attribute $.Attributes.firstName. This is mapped to the attribute
firstName from the contact details JWT, which in turn is mapped to the
givenName attribute of the user’s identity in ForgeRock Identity
Cloud. This mapping is a result of the config we included in our
endpoint script in Step 2.
We are also showing the customerId attribute from the JWT, which is
mapped to the custom field frIndexedString1 in ForgeRock Identity
Cloud.
This information can be seen in the agent view as well. You can also include the information in agent screen pops if you have these enabled.
Step 4: Embed the Amazon Connect chat widget in your web page
The JavaScript for the chat widget is copied from the Amazon Connect console into your web page. Once chat security is enabled, you need to add a callback to fetch the JWT from the Identity Cloud endpoint. The complete snippet will end up looking like this:
(function (w, d, x, id) {
        s = d.createElement('script');
        s.src = 'https://d2zasqxhmd6ne4.cloudfront.net/amazon-connect-chat-interface-client.js';
        s.async = 1;
        s.id = id;
        d.getElementsByTagName('head')[0].appendChild(s);
        w[x] = w[x] || function () { (w[x].ac = w[x].ac || []).push(arguments) };
      })(window, document, 'amazon_connect', '1bbeebd5-8081-4cf8-8cde-fad9faa1b26e');
      amazon_connect('styles', { openChat: { color: 'white', backgroundColor: '#123456' }, closeChat: { color: 'white', backgroundColor: '#123456' } });
      amazon_connect('snippetId', 'QVFJREFIaGo1T2pOSWpLWW9NR2I3V2FjTU9DR3JoaHRWaTZZQ1d1K0FuWmJjbnVkNHdHbXY1V1ZBQUdRRVAwTHkvUXRYUENMQUFBQWJqQnNCZ2txaGtpRzl3MEJCd2FnWHpCZEFnRUFNRmdHQ1NxR1NJYjNEUUVIQVRBZUJnbGdoa2dCWlFNRUFTNHdFUVFNVExPS0NlRTUxWjh1M215aUFnRVFnQ3NnVHlDMEtVbUN3NXNIZXQ3SjV0Q0FBa2VPVXd0ZjRIV0JmOGFMdDBlVVE4Nk84MittOHhaazJXWS86Ok5HT3ZBc0pYM1ZiWmx6aGs0K2MzNHVXaXVkYXlxbm9LbC9QNkcwbHl4dHBKZHRkdXIvOXpzRmpnZ3dJcG5UZXlrV3hBdVBpcU1veXNTYXpJZWx4UzFLSkRNTGlsT2gzaVlOS284VFRnNWhvaWdMV1RlN1hjbm9CYk9NVnlYalphNHB3QmcrU3BHUEpMUkpXZkdZQkhNZW41Q2NqcVRNdz0=');      amazon_connect('authenticate', function (callback) {
        forgerock.TokenManager.getTokens().then(userTokens => {
          window.fetch("https://openam-acme-demo.forgerock.io/openidm/endpoint/chat-token",
            {
              headers: {
                'Authorization': 'Bearer ' + userTokens.accessToken
              }
            }).then(res => {
              res.json().then(data => {
                callback(data.chatToken);
              });
            });});
A couple of things to note about this script:
-
The callback acquires an access token on behalf of the user, via the ForgeRock
TokenManagerinterface included with the ForgeRock JavaScript SDK. If the user is not already logged in, they are authenticated using their ForgeRock credentials. -
This access token is presented to the ForgeRock JWT endpoint as a bearer token in the Authorization header. The user information is then available to the endpoint script we created in Step 2.
Step 5: Try it out!
Here is what the chat widget looks like in action. This is using the sample single page app from the ForgeRock JavaScript SDK. This just a stub app, so go easy on the looks.
The video (below) shows the user first being authenticated by ForgeRock Identity Cloud to get into a portal app. In this case, we’re not bothering the user for their userid or password—we’re just remembering them from before and doing a quick device check.
The portal app does exactly one thing; i.e., a printout of who the user
is. We have embedded the Amazon Connect chat widget in the page; when
clicking on the chat icon, the widget acquires a token from our custom
JWT endpoint, and sends this along to the Amazon Connect platform, which
can then display the user’s first name and customer ID.

Conclusion
We’ve seen how you can personalize the web chat experience in Amazon Connect by adding a secure identity layer, courtesy of the ForgeRock Identity Cloud platform. This gives you:
-
Better security vs. traditional Q&A.
-
More convenience for the customer: they are straight into the topic they want to discuss.
-
Contact routing specific to the customer’s profile.
-
A more personal feel to the chat experience.
And it’s all in the cloud!
+
Other Articles by This Author
![]() Live Chat. Who’s Calling?
[.badge-category__name#Integrations#]
Live Chat. Who’s Calling?
[.badge-category__name#Integrations#]
[image|0x0] Web chat is a great tool for both companies and their customers. Customers get immediate help without having to make a phone call or wait for a response to an email. Companies can optimize the effort and cost involved in keeping their customers happy and engaged. However, the web chat experience can start off on the wrong foot. Establishing the identity of the caller can be an awkward question and answer process, requiring information a customer doesn’t always have on hand or enj…