Protecting an application with ForgeRock Identity Gateway
Author: |
Mark Nienaber |
Created at: |
Mar 2022 |
Updated at: |
Jul 2022 |
Originally posted on marknienaber.medium.com
Protecting an application with ForgeRock Identity Gateway
Using Identity Gateway to send HTTP Headers to a protected backend application
Introduction
ForgeRock Identity Gateway integrates web applications, APIs, and microservices with the ForgeRock Identity Platform. For more information about IG, see About IG.
We will solve a relatively common use case in this blog. We are protecting an application using IG, the requirements are:
-
The application allows authenticated traffic only.
-
Authentication must be via ForgeRock Identity Cloud.
-
The application requires some attributes of the authenticated user to be sent as HTTP headers. The application will use this information to personalize user experience.
In this use case IG is integrated with ForgeRock Identity Cloud, but this could be ForgeRock Access Management (AM) in your environment.
The Diagram below provides a high level view of the goal.

IG protecting an application
Outline of steps in the above diagram:
-
User access an application protected by IG
-
IG intercepts the request, as the user is not authenticated, the user is redirected to ForgeRock Identity Cloud for authentication
-
The authenticated user can now access the protected application
-
IG makes a call to Identity Cloud to get required attributes
-
IG injects headers into request to backend application
Rather than re-invent the wheel, steps 1–3 can be setup quickly by following this blog, run the relevant scripts and rapidly deploy yourself an environment that has an application protected by ForgeRock Identity Gateway.
This blog will focus on steps 4 and 5 of the diagram above.
Identity Gateway Route
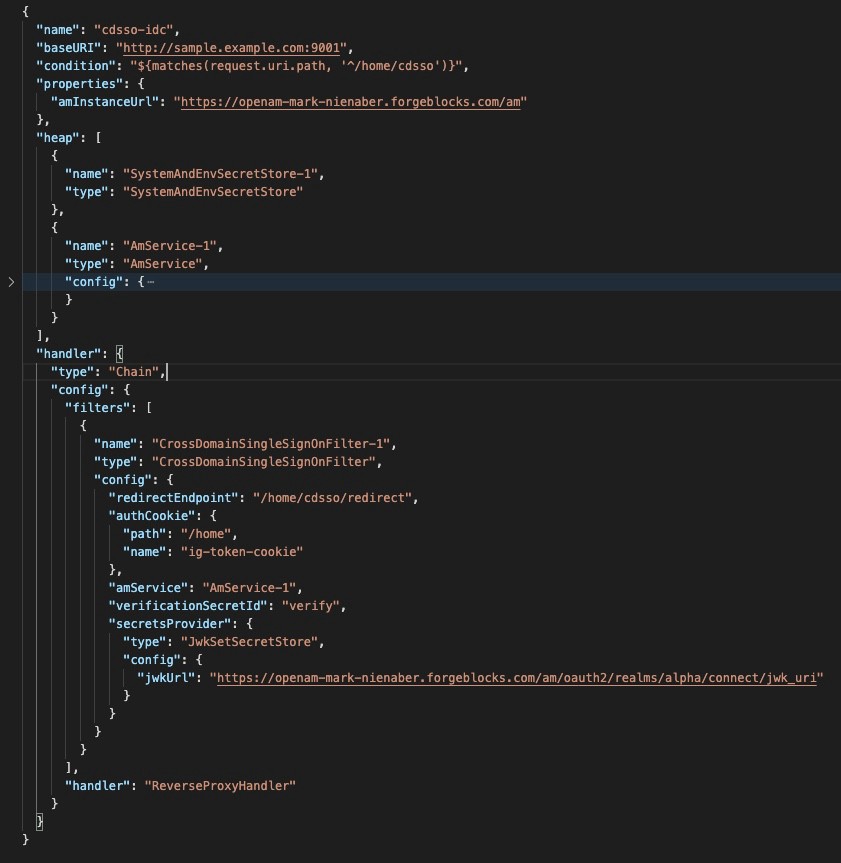
We start this task with a route that has the following (to meet steps 1–3 above)
-
Condition that says this route deals with the path …/home/cdsso i.e. https://ig.example.com:9443/home/cdsso.
-
AM Service — that is, a configuration object that details how IG should communicate to AM (or Identity Cloud).
-
CDSSO Filter — that is, a config object that redirects user to the configured AM in the amService, and sets an auth cookie.
i.e. see the following route: (again, this route is a product of the script run in the blog mentioned above.
When we hit the URL https://ig.example.com:9443/home/cdsso we are directed to authenticate, then allowed through without any additional headers being injected.
Follow the video below and see the CDSSO route in action.

IG using CDSSO Filter
Inject Headers into the request to the backend application.
In our use case we are going to inject some headers stored on the users profile in Identity Cloud. We will need two additional Identity Gateway objects to do this:
UserProfileFilter
This filter will make a request to the AM configured in the amService to retrieve the required profile attributes.
As an example, the following block can be added to retrieve the listed attributes.
      {
          "name" : "UserProfileFilter-1",
          "type" : "UserProfileFilter",
          "config" : {
            "username" : "${contexts.ssoToken.info.uid}",
            "userProfileService" : {
              "type" : "UserProfileService",
              "config" : {
                "amService" : "AmService-1",
                "profileAttributes" : [
                  "mail",
                  "sn",
                  "givenName",
                  "fr-attr-str1",
                  "fr-attr-istr1"
                ],
                "cache" : {
                  "enabled" : false,
                  "maximumTimeToCache" : "30 minutes"
                }
              }
            }
          }
        },
In the UserProfileFilter above, notice the following
-
The name of the filter is UserProfileFilter-1
-
It’s of type UserProfileFilter.
-
The the username is retrived from $\{contexts.ssoToken.info.uid}, this is available because of the CDSSO Filter that came before it, and provides the UID of the user so IG can call the AM user object to get the attributes.
-
the amService value determines the AM that is contacted to retrieve the values, this is defined higher up in the route in it’s own object.
-
The following attributes are retrived, mail, sn, givenName, fr-attr-str1 and fr-attr-istr1. The first few are obvious, however fr-attr-str1 and fr-attr-istr1 are specific to Identity Cloud. It’s important to take note that these attributes are retrieved from AM, so they need to be mapped as attributes in the identity store. In Identity Cloud, you can reference the appropriate attributes here: https://backstage.forgerock.com/docs/idcloud/latest/identities/user-identity-properties-attributes-reference.html#reference_tables[User
- identity attributes and properties reference
-
ForgeRock Identity Cloud Docs]
-
Caching has been disabled, which will allow updates to the user profile to be reflected in the requests to the backend. This is not recommended as every request to the backend will require a call to AM, this will incur a significant performance hit.
The end result of this filter is the userProfile context populated with the required attributes, we can now inject these as headers.
HeaderFilter
This filter allows IG to add or remove headers to both the request (to the backend) or response (to the caller). We will “add” headers to the “request” to meet the requirements of this use case.
As an example, the following code block can be added to inject headers into the request.
  {
          "name" : "HeaderInjection",
          "type" : "HeaderFilter",
          "config" : {
            "messageType" : "REQUEST",
            "add" : {
              "aa-username": [
                "${contexts.userProfile.username}"
              ],
              "aa-firstname": [
                "${contexts.userProfile.rawInfo['givenName'][0]}"
              ],
              "aa-sn": [
                "${contexts.userProfile.rawInfo['sn'][0]}"
              ],
              "aa-mail": [
                "${contexts.userProfile.rawInfo['mail'][0]}"
              ],
              "aa-fr-attr-str1": [
                "${contexts.userProfile.rawInfo['fr-attr-str1'][0]}"
              ],
              "aa-fr-attr-istr1": [
                "${contexts.userProfile.rawInfo['fr-attr-istr1'][0]}"
              ]
            }
          }
        }
Some important points to note in the code block above:
-
This filter is placed after the UserProfileFilter which populated the context named userProfile, and is accessible at $\{contexts.userProfile}.
-
The format of the context is important. More details about the context and the values that are accessible can be found here.
-
We are modifying the ‘request’, and that we are ‘adding’ the listed headers to the request. We can add or remove headers from the request or the response, for more details about that, see here.
-
If there is a significant amount of processing required, it may be worth calling a ScriptableFilter to build and populate the attributes, then the HeaderFilter can just refer to the populated attributes.
Testing end to end
To test this we will add the relevant filters to the route, and access the same endpoint. The difference will be the headers sent to the back end, but the user experience should be the same.

IG configured with CDSSO Filter and header injection
Hope that helps :)
Other Articles by This Author
![]() Moving to ForgeRock Identity
Cloud
[.badge-category__name#Architecture#]
Moving to ForgeRock Identity
Cloud
[.badge-category__name#Architecture#]
You’ve decided to move to ForgeRock Identity Cloud! First of all, congratulations! We look forward to helping you simplify your life, lower your risks, realize business benefits earlier, and provide you with the latest technology wrapped up in our ForgeRock Identity Cloud Platform. Let’s answer some of the more common questions: How will you build your ForgeRock Identity Cloud solution? Where is ForgeRock Identity Cloud? What is available in ForgeRock Identity Cloud? What components sit in Fo…
Originally posted on marknienaber.medium.com Protecting an application with ForgeRock Identity Gateway Using Identity Gateway to send HTTP Headers to a protected backend application Introduction ForgeRock Identity Gateway integrates web applications, APIs, and microservices with the ForgeRock Identity Platform. For more information about IG, see About IG. We will solve a relatively common use case in this blog. We are protecting an application using IG, the requirements are: The application…
By Mark Nienaber Originally posted on marknienaber.medium.com Summary Configuring ForgeRock Identity Cloud as a SAML identity provider using ForgeRock Identity Gateway as SAML service provider. Introduction This article will guide you through configuring IG as a SAML 2.0 Service Provider (SP), delegating authentication to ForgeRock Identity Cloud, our Identity Provider (IDP). This solution uses SP-Initiated Single Sign On. Specifically, we aim to address two commonly requested ForgeRock…
This article comes from an issue raised by multiple customers, where ForgeRock Access Management (AM) was not able to retrieve a user’s group memberships when using Active Directory (AD) as a datastore with nested groups. I’ve read in different docs about the “embedded groups” expression, as well as the “transitive groups” or “recursive groups” or “indirect groups”, and finally, the “parent groups” expressions. I’m just quoting them all here for search engines. As a consequence, it was not, for…