Configuring the ForgeRock Identity Cloud Postman Collection (Part 2 of
Author: |
Keith Daly |
Created at: |
Jul 2023 |
Updated at: |
Jul 2023 |
Originally posted on keithdaly-identity.medium.com
Why use Postman?
Before digging into the specifics of how to use Postman with ForgeRock, let’s ask why and look at the choice of using Postman in the first place.
As described on postman.com, “Postman is an API platform for building and using APIs. Postman simplifies each step of the API lifecycle and streamlines collaboration so you can create better APIs — faster.”
While there are other tools on the market with these capabilities, we provide Postman libraries specifically because it does the job that we need relatively simply, a free version is available, and it is one of the most ubiquitous tools on the market for building REST libraries. For developers, it also has a bunch of handy features, such as automatic code generation.
On the ForgeRock side, we provide REST APIs for all the functionality that you can see in the console, for managing objects directly, for executing journeys, etc. We also have SDKs and embeddable “widgets” available to assist with application development and add additional functionality (e.g. OAuth token management), but these components ultimately call the same REST interfaces.
Therefore, it is very important to understand how the REST interfaces work and have a tool that helps with organize REST request libraries for testing and prototyping code.
Note: This is part 2 in a series. Here is the links to the first 1in
case you would like to start there:
All
about Postman variables (Part 1 of 3)
Pre-requisites for this article
The only three pre-requisites for following along and trying this out are:
-
A ForgeRock tenant.
-
Postman:
Download it from here: https://www.postman.com/download
Installation is very simple on all platforms. -
The ForgeRock ID Cloud Postman library:
Download from here: https://backstage.forgerock.com/docs/idcloud/latest/developer-docs/postman-collection.html[Identity- Cloud Postman collection
-
ForgeRock Identity Cloud Docs]
4.(Installation and use instructions will follow…)*
Postman workspaces
The top level organizational construct in Postman is the workspace. Think of this as an ebook that you may own or check-out from a library: it is a self-contained unit that has one table of contents, you can switch the collection of contents by getting a new book, and you can share it.
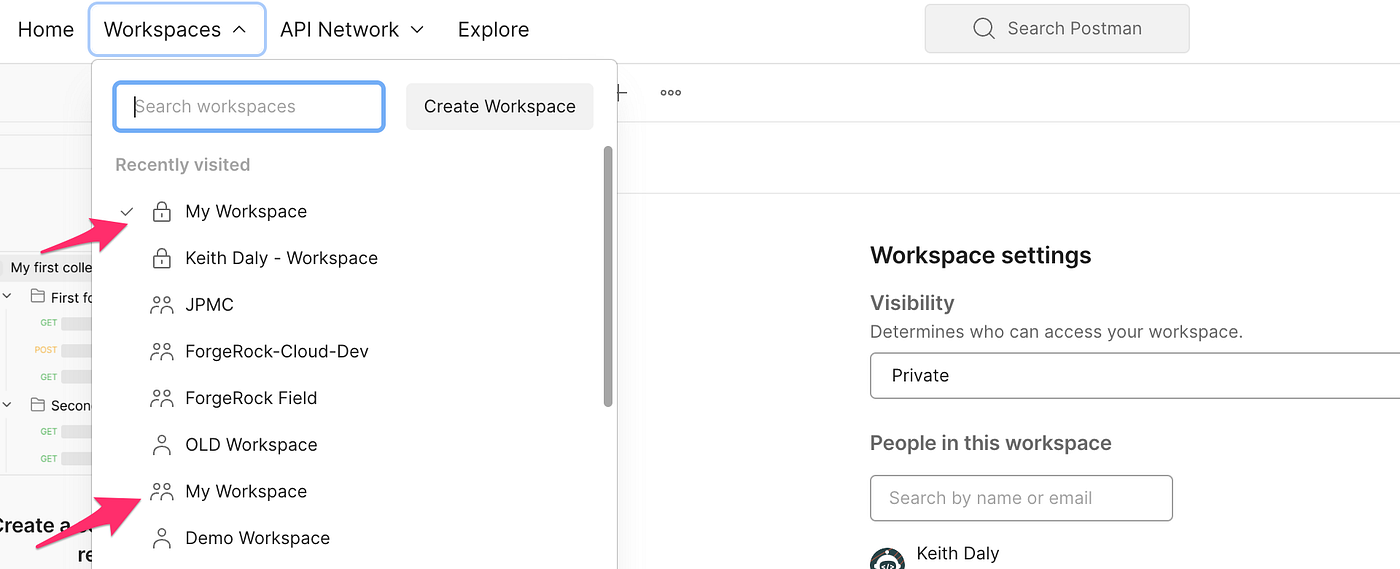
When you start up Postman for the first time, you will have a local workspace called “My Workspace” with “Personal” visibility. You can see this at the top left just under the menu bar. In the menu itself, you will be able to select an active workspace from workspaces that you can access. Workspaces will have icons to reflect their visibility, but is does not show which ones are shared or owned by you.
To examine the workspace details, double-click the workspace name. In the tab that opens you will see Workspace Settings that you can click on. From there you can configure the Postman sidebar and set your Workspace’s visibility.
![]() Note:
Visibility of a workspace can be changed from “Personal” one of the
shared varieties, but not back to “Personal” from a shared variety. In
this case, my suggestion would be to recreate it as “Personal” if
possible, if not (such as if you want someone to access your personal
space for a while, then later remove access) then use “Private” for your
personal workspace and ensure that there are no “people in the
workspace” (members). That way, you can ensure that nobody has access:
Note:
Visibility of a workspace can be changed from “Personal” one of the
shared varieties, but not back to “Personal” from a shared variety. In
this case, my suggestion would be to recreate it as “Personal” if
possible, if not (such as if you want someone to access your personal
space for a while, then later remove access) then use “Private” for your
personal workspace and ensure that there are no “people in the
workspace” (members). That way, you can ensure that nobody has access:

![]() Note:
DO NOT make your “My Workspace” available to any team members. Since
there is no way to distinguish owners in the drop-down, you would
otherwise get an identical-looking entry for all team members and not
know which one to select. Instead create a new workspace so that won’t
annoy your team members if you ever share your workspace (I use “Keith
Daly- Workspace”). This way, you will be able to toggle on and off
visibility to your personal workspace without annoying everyone on your
team.
Note:
DO NOT make your “My Workspace” available to any team members. Since
there is no way to distinguish owners in the drop-down, you would
otherwise get an identical-looking entry for all team members and not
know which one to select. Instead create a new workspace so that won’t
annoy your team members if you ever share your workspace (I use “Keith
Daly- Workspace”). This way, you will be able to toggle on and off
visibility to your personal workspace without annoying everyone on your
team.
Obtain and import the ID Cloud Postman library
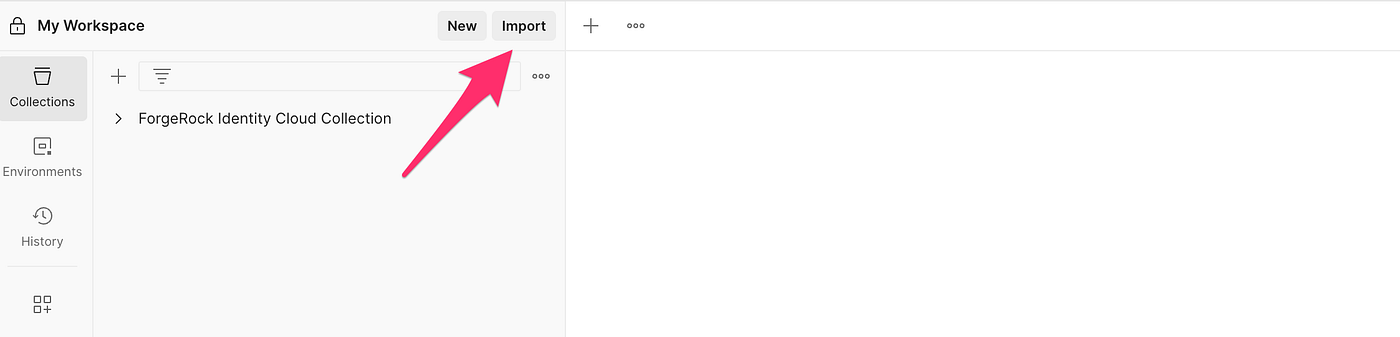
The next step is to import the ID Cloud Postman collection. This file is a long JSON file and is very simple to load into Postman:
-
Download from here:
https://backstage.forgerock.com/docs/idcloud/latest/developer-docs/postman-collection.html[Identity- Cloud Postman collection
-
ForgeRock Identity Cloud Docs]
-
Import into your current workspace by clicking Import next to your workspace name and selecting the file that was just downloaded.
The variables defined the collection (collection scope)
Please see the first part of this series for an explanation of variables and scopes. ( https://medium.com/@keithdaly-identity/configuring-the-forgerock-identity-cloud-postman-collection-8b8f8aeb87a4)
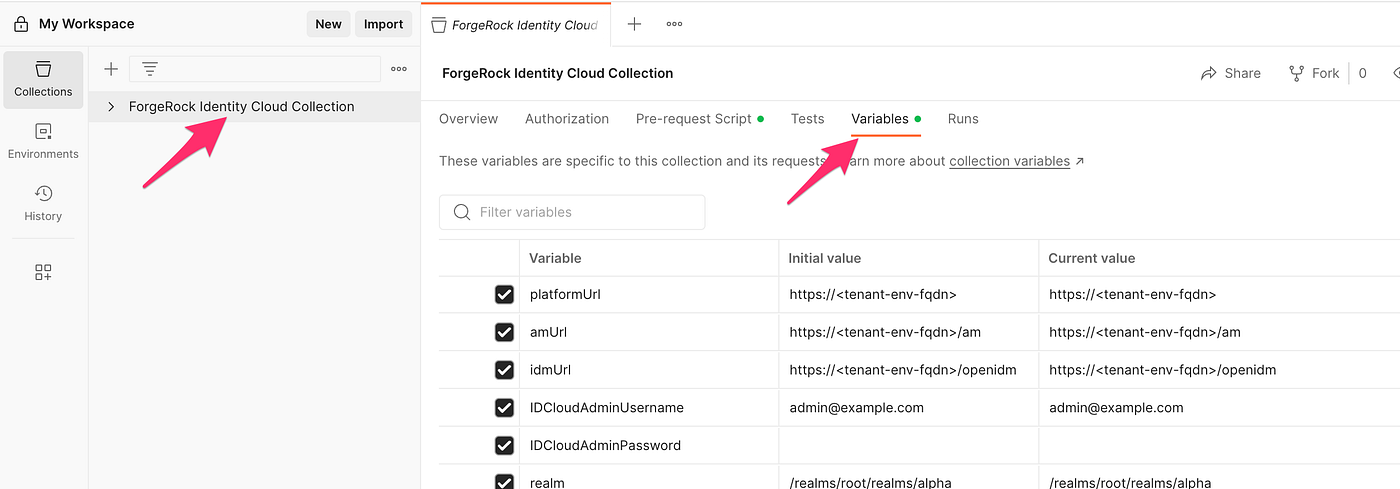
If you expand the items on the left under “ForgeRock Identity Cloud Collection” and select a request somewhere in the file structure, it will open the details on the right. In the request, you will see variables referenced with \{{name}} notation and these will appear with a red font.
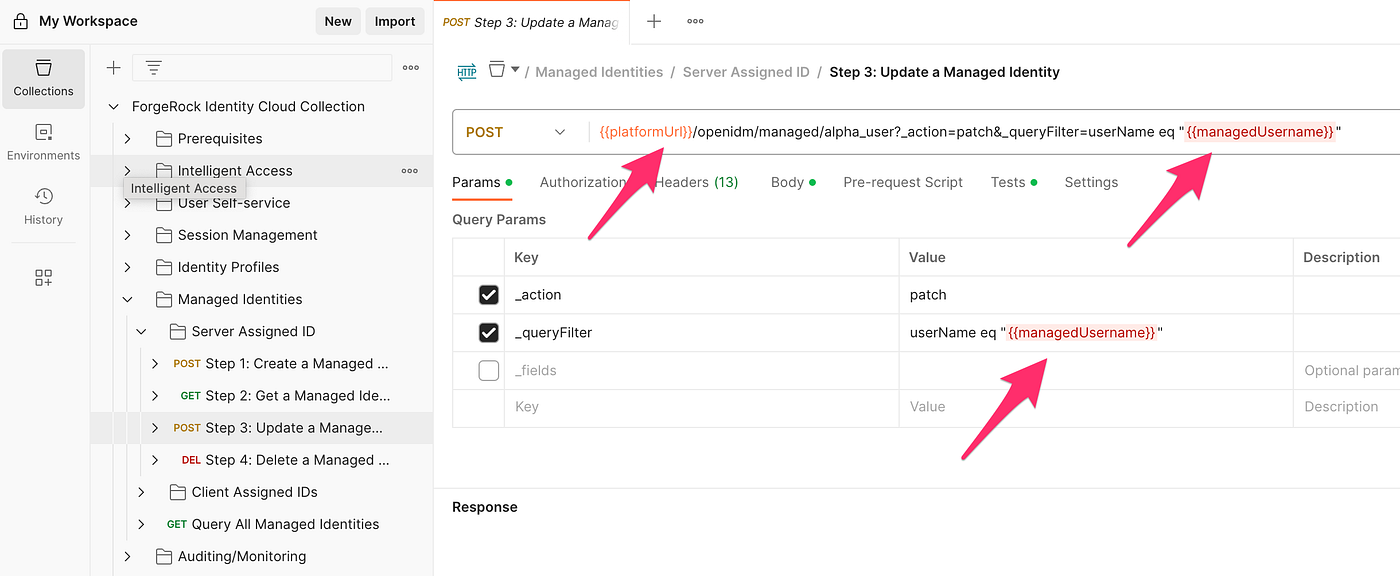
Before being able to use the library, you will need to set these configuration parameters (variables).
Please see the first part of this series for an explanation of variables and scopes. (The important thing to understand is that environment variables override collection variables.)
The ForgeRock ID Cloud Postman collection ships with a large number of variables used in the REST calls, defined in the collection. These are available by clicking the collection name on the left and selection the variables tab on the right tab.
Once you replace these values with your own real ones, the collection starts working: the variable definitions are replaced with their defined values. This works great for exactly one environment in one organization.
This is functional, but to support multiple organizations or environments without having to redefine variables or use multiple collections, create a new variable set using “Environments”.
A better way to use variables (environment variables):
(Note: Scroll down for a pre-written library)
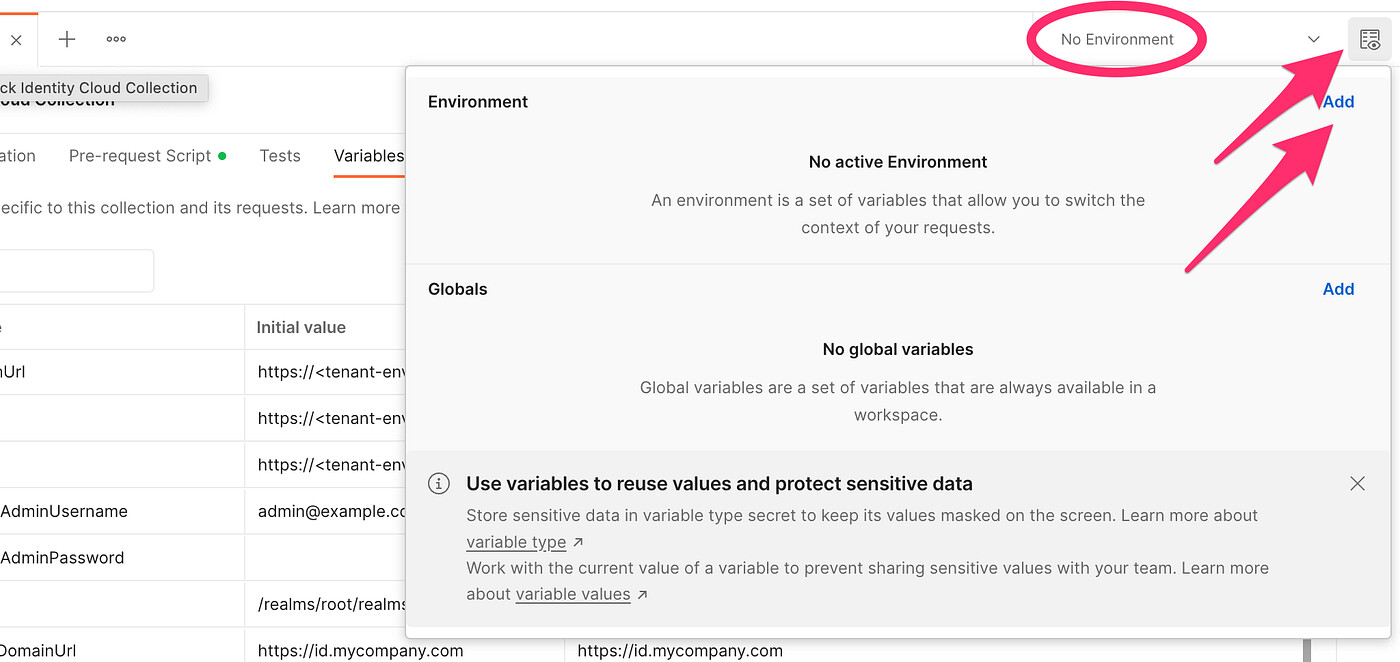
To create a new environment:
-
Click on the “Environment Examiner” icon to the right of the box displaying “No Environment”.
-
Click “Add” in the box.
Once the new environment has been created, set a name. No variables will be defined yet. To use variables from the environment, you will need to:
-
Create environment variables with the same name as the ones defined in the collection out of the box.
-
Disable the variables in the collection. This can be done by opening the collection variables and unselecting the appropriate checkbox.
You will be done when all variables have been disabled in the collection. Test that the variables are correctly defined by opening a request and confirm that the value defined in your environment is substituted.
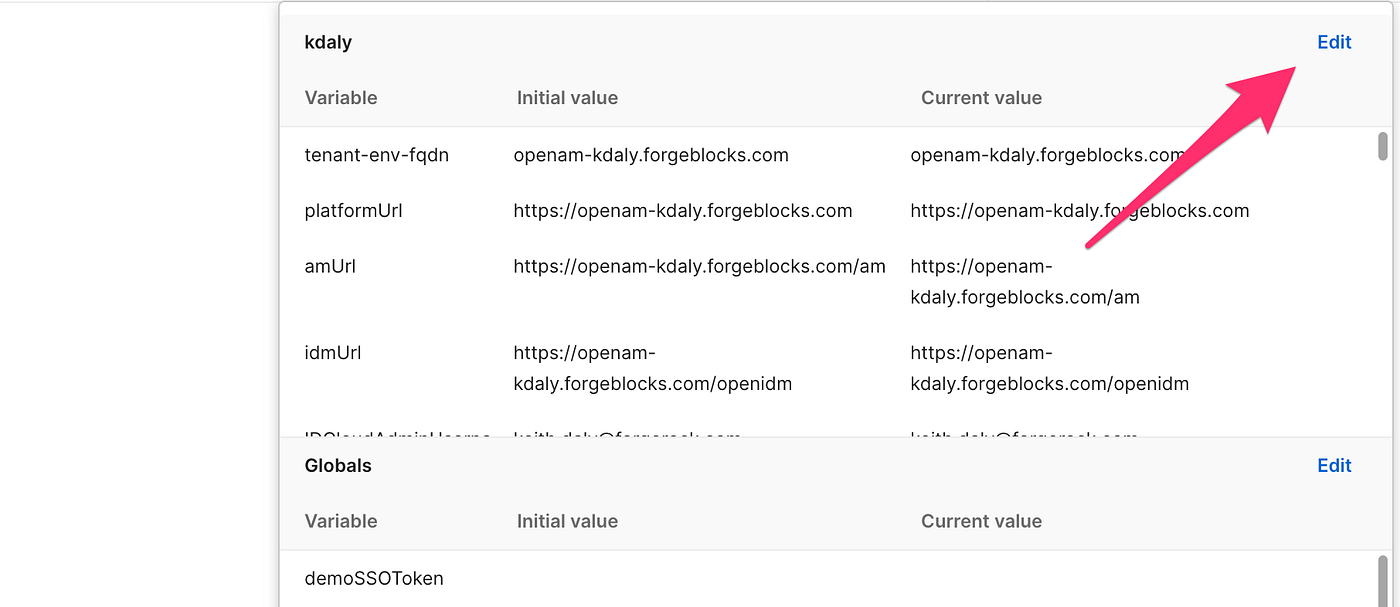
![]() Note:
Environments are specific to workspaces. If you would like to use the
same environment in a new workspace, your current environment can be
exported from the environment configuration screen:
Note:
Environments are specific to workspaces. If you would like to use the
same environment in a new workspace, your current environment can be
exported from the environment configuration screen:
Once the full edit screen is shown…
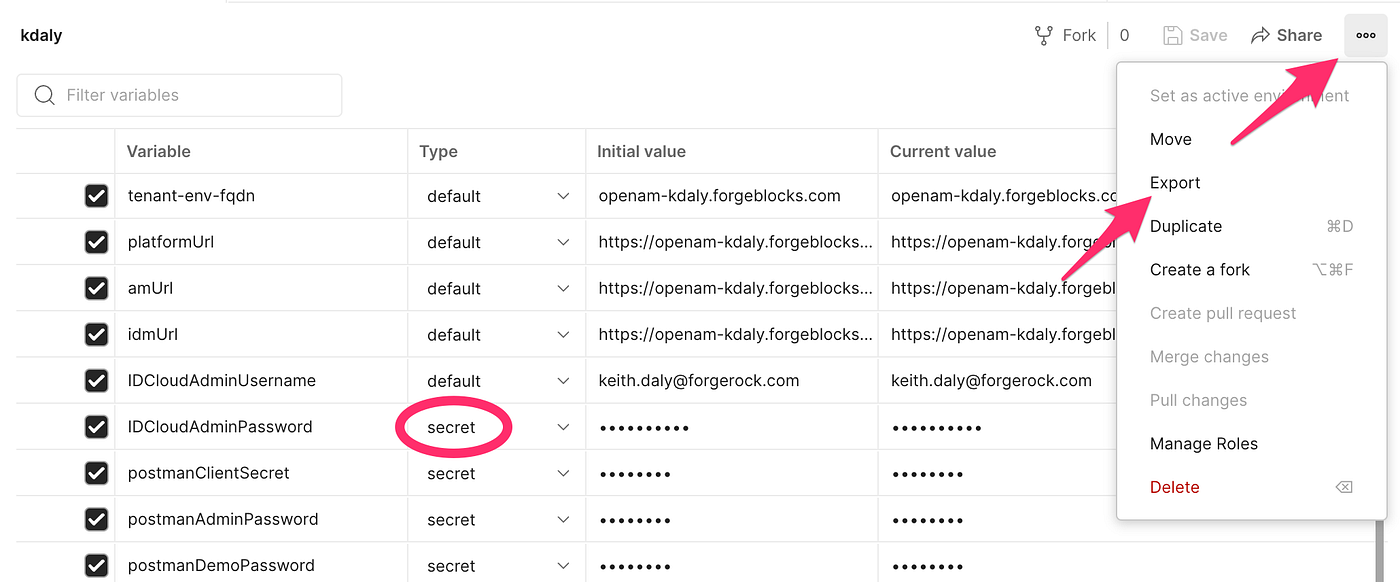
![]() Note:
This image also brings up another important option. Change the type for
any sensitive information to secret. This will prevent casual shoulder
surfing or screen capture for a blog. Just keep in mind that passwords
are exposed in export files and in any generated code.
Note:
This image also brings up another important option. Change the type for
any sensitive information to secret. This will prevent casual shoulder
surfing or screen capture for a blog. Just keep in mind that passwords
are exposed in export files and in any generated code.
This validation step can be done by using the code generation functionality. When your request is open, click on the </> icon and select your favorite language (I usually use cURL for simplicity). If the \{{variables}} have been replaced, you are correctly configured.
![]() Note:
If you are working with multiple environments or customers, define a
separate environment for each one. After it is defined, you can switch
easily back-and-forth using the environment selector drop-down.
Note:
If you are working with multiple environments or customers, define a
separate environment for each one. After it is defined, you can switch
easily back-and-forth using the environment selector drop-down.
The quick method to define your variables…
After disabling the collection variables, simply import this JSON to define variables at the environment level. (Replace the values in square brackets prior to or after importing the file.)
\{
“name”: “openam-[tenant-name].forgeblocks.com”,
“values”: [
\{
“key”: “platformUrl”,
“value”: “https://[tenant-env-fqdn]”,
“type”: “default”,
“enabled”: true
},
\{
“key”: “amUrl”,
“value”: “https://[tenant-env-fqdn]/am”,
“type”: “default”,
“enabled”: true
},
\{
“key”: “idmUrl”,
“value”: “https://[tenant-env-fqdn]/openidm”,
“type”: “default”,
“enabled”: true
},
\{
“key”: “IDCloudAdminUsername”,
“value”: “admin@example.com”,
“type”: “defauly”,
“enabled”: true
},
\{
“key”: “IDCloudAdminPassword”,
“value”: “”,
“type”: “secret”,
“enabled”: true
},
\{
“key”: “realm”,
“value”: “/realms/root/realms/alpha”,
“type”: “default”,
“enabled”: true
},
\{
“key”: “customDomainUrl”,
“value”: “https://[id.mycompany.com]”,
“type”: “default”,
“enabled”: true
},
\{
“key”: “cookieName”,
“value”: “[iPlanetDirectoryPro]”,
“type”: “default”,
“enabled”: true
},
\{
“key”: “loginJourney”,
“value”: “Login”,
“type”: “default”,
“enabled”: true
},
\{
“key”: “redirect_uri”,
“value”: “[https://httpbin.org/anything]”,
“type”: “default”,
“enabled”: true
},
\{
“key”: “postmanAdminClientId”,
“value”: “postmanAdminClient”,
“type”: “default”,
“enabled”: true
},
\{
“key”: “postmanConfidentialClientId”,
“value”: “postmanConfidentialClient”,
“type”: “default”,
“enabled”: true
},
\{
“key”: “postmanPublicClientId”,
“value”: “postmanPublicClient”,
“type”: “default”,
“enabled”: true
},
\{
“key”: “postmanClientSecret”,
“value”: “”,
“type”: “secret”,
“enabled”: true
},
\{
“key”: “postmanAdminUsername”,
“value”: “postmanAdminUser”,
“type”: “default”,
“enabled”: true
},
\{
“key”: “postmanAdminPassword”,
“value”: “”,
“type”: “secret”,
“enabled”: true
},
\{
“key”: “postmanDemoUsername”,
“value”: “postmanDemoUser”,
“type”: “default”,
“enabled”: true
},
\{
“key”: “postmanDemoPassword”,
“value”: “”,
“type”: “secret”,
“enabled”: true
},
\{
“key”: “postmanDemoEmail”,
“value”: “demo.user@postman.example.com”,
“type”: “default”,
“enabled”: true
},
\{
“key”: “logApiKey”,
“value”: “”,
“type”: “default”,
“enabled”: true
},
\{
“key”: “logApiSecret”,
“value”: “”,
“type”: “secret”,
“enabled”: true
}
],
“_postman_variable_scope”: “environment”
}
Tests: Passing data between requests
This is also covered in part one of this series.
As explained in that post, to handle more complex multi-step calls, we need a way to store return values from one response so that they can be used in future requests. We also need a way to store authentication tokens for use with multiple requests later. We use the “Tests” script for this.
For example, the following code comes from the post-call test for a step in an authN journey. In this code, the return is parsed to find an authId value, then stores it in the globally scoped variable.
const JSONResponse = JSON.parse(responseBody);
if(JSONResponse.authId && JSONResponse.authId != “”)
\{
pm.globals.set(“authId”, JSONResponse.authId);
}
After this code executes, subsequent requests can use the variable \{{authId}}.
![]() TIP:
When debugging these types of requests, keep in mind the variable
scoping rules shown earlier in this post.
TIP:
When debugging these types of requests, keep in mind the variable
scoping rules shown earlier in this post.