Developing a Groovy Connector
Author: |
Patrick Diligent |
Created at: |
Apr 2023 |
Updated at: |
Apr 2024 |
Identity Management
Developing a Groovy Connector
By Patrick Diligent
INTRODUCTION
Reconciliation uses connectors to provision identities from external resources into the ForgeRock platform. Most commonly used connectors are bundled with the distribution package, while others can be downloaded from the ForgeRock Download pages.
When no connectors are available to connect to a resource, then the fallback plan is to develop it. This article provides general guidance in doing so.
As a prerequisite, to make the best of this article, it is highly recommended to have a strong experience in implementing IDM data synchronisation; if you have not done so, please read Synchronization in the ForgeRock documentation first.
Also, please look through the provided samples in the IDM distribution as we go through the different features, under the samples folder: scripted-rest-with-dj, and scripted-sql-with-my-sql.
The Synchronisation Architecture
This diagram below will make sense if you already have an experience with IDM synchronisation:
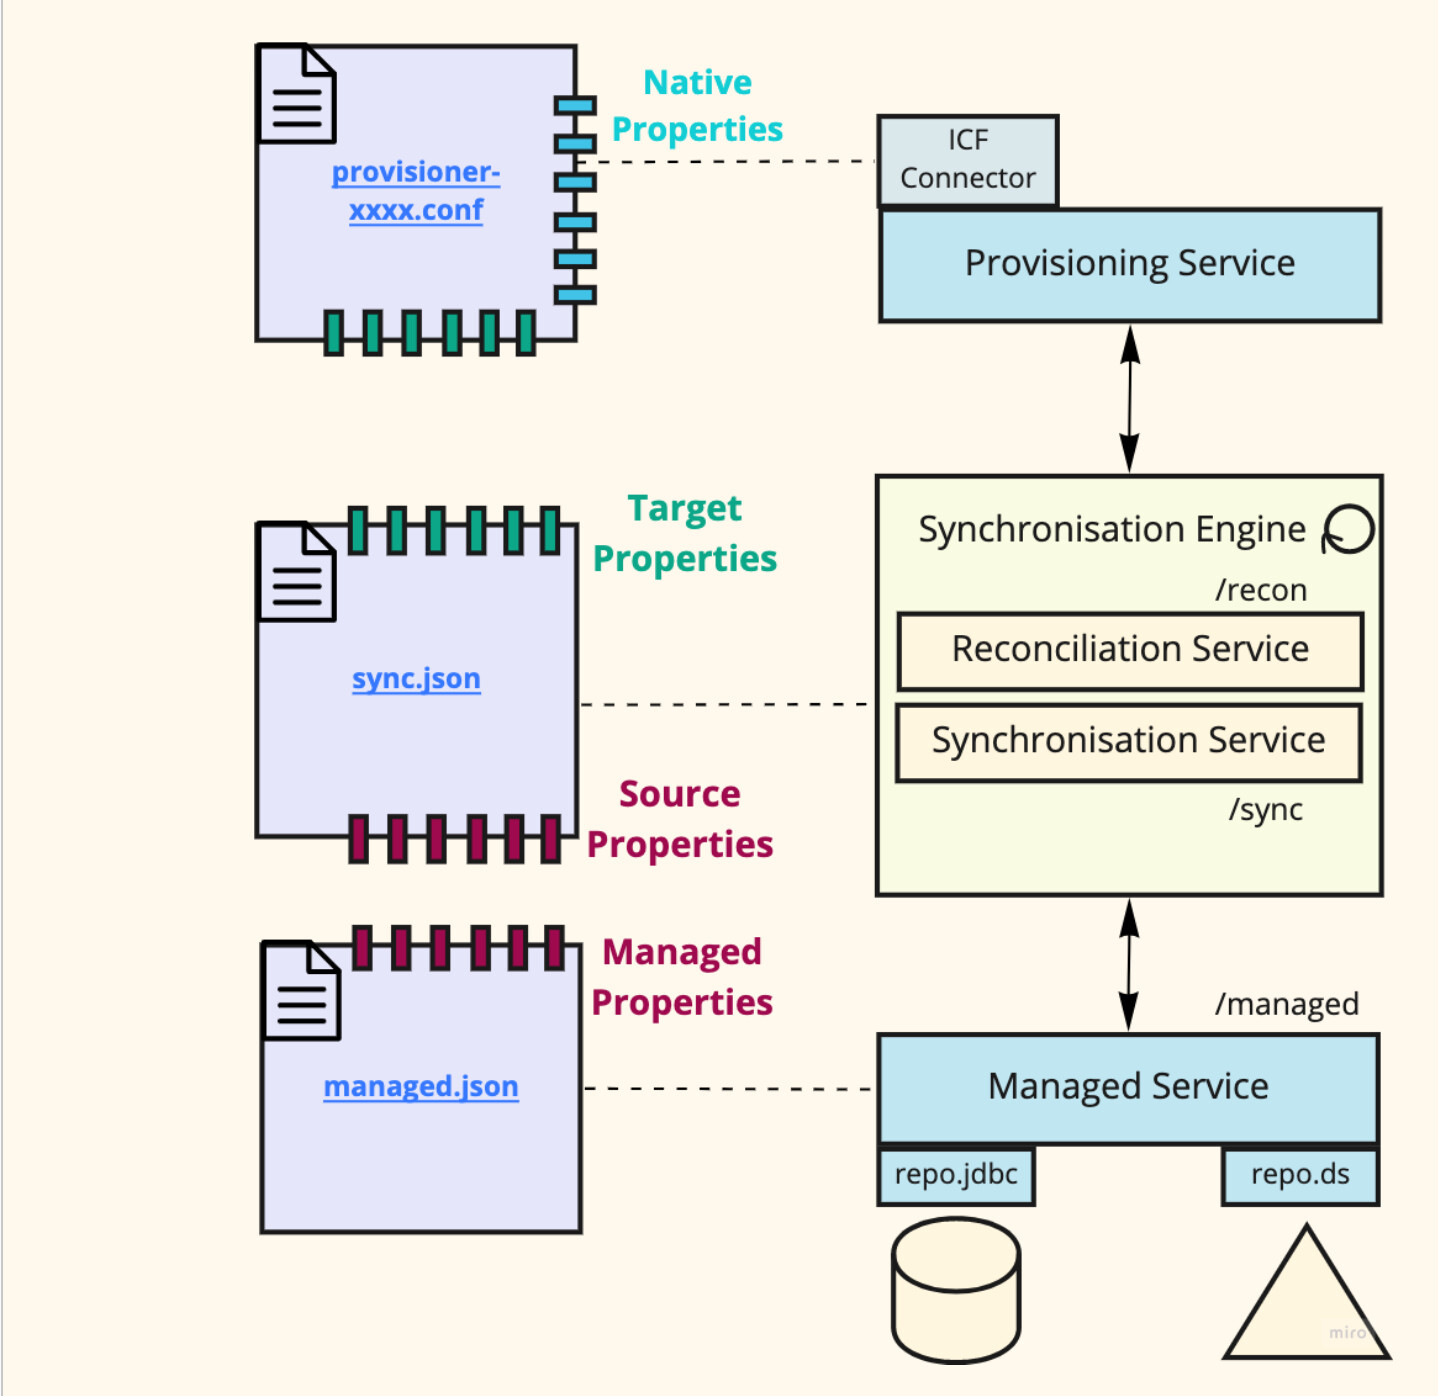
The Synchronisation Service provide two functionalities:
-
Reconciling data between two resources
-
Capturing latest changes from a resource and propagating them to mapped resources.
A “resource” is a system which holds data, to which IDM connects with common protocols such as JDBC, HTTP or LDAP. There is one resource that is particular, this is the IDM repository: it is already accessible via the managed service. To connect to an external resource, IDM uses the Provisioning Service to interact with connectors through a generic interface (an SPI - Service Provider Interface) that is dictated by the Identity Connector Framework design.
The reconciliation configuration consist into mapping specifications, where each indicates:
-
The source
-
The destination
-
What needs to be synchronised
-
How it is synchronised
All of this is detailed in the documentation, but let’s go through this configuration from the perspective of developing a connector.
The source and destination are specified as URLs. For the IDM
repository, it is the endpoint to access an object type, such as
/managed/user. For the Provisioning service, the endpoint is /system
followed by the resource type which is the connector name to the
resource (for example ldap), and followed by the object type (for
example account for user profiles), therefore /system/ldap/account.
Updates are propagated via Implicit Synchronisation or Livesync :
-
Implicit Synchronisation: on updating a managed object, the managed service propagates a change notification to the synchronisation service which then synchronise the change to mapped resources.
-
Livesync: the provisioning service, when the connector supports the feature, polls the external service for latest changes at regular intervals (specified with a schedule), and propagates them to the synchronisation service, which then synchronise to mapped resources.
The Identity Connector Framework
A connector is built on top of the Identity Connector Framework (ICF) - it comes as a java bundle. Developing a connector at this level is rather involved, and this is where the Groovy scripted connector comes into play; it is further specialised into the Scripted REST Groovy connector, and the Scripted SQL Groovy connector. Chance is that one of these latter connectors will cover the project needs. If not, using the Groovy Scripted connector directly is possible, but requires more effort.
The Scripted REST connector provides the HTTP connection handling, while the SQL Scripted connector handles the creation of JDBC connections. Each comes with its specific configuration.
The list of operations provided by the connector are listed here: ICF operations with Groovy scripts :: IDM 7.2.2. For sake of simplicity, we’ll discuss here the most essential operations. For a deep dive, please read: Connector Development in the ForgeRock documentation.
Development Strategy
The optimum strategy to develop a connector is to adopt a gradual and incremental approach. Don’t try to implement all the functionality at once and launch reconciliations to test the implementation - troubleshooting will be hardly possible. Here is below a proposed gradual approach which will enable a smooth and progressive implementation while providing increasing functionality at each step.
Immediate gratification - A validated connector
Implementing the following operations is a first start which will provide you a sense of accomplishment:
-
Test script
-
Schema script
For the time being the Test script can be left empty, but it must be provided. The Schema script must be fully operational.
-
The Test script is executed by IDM to check that the connected resource is up and running.
-
IDM is able to generate a default connector (provisioner) configuration using the schema returned by the Schema script.
Factorise the code for extensibility ease
Provide an helper script to factorise away the data model - that is, how the data is structured, and named. Avoid hardcoding it. For example, if the design is optimised, then you should only have to change the helper rather than all the scripts when for example changing the name of a property.
Make it live
Once the test and schema scripts are provided, configure the connector
(providing the provisioner.openicf-<name>.conf file). In the admin UI,
the new connector should show up as “Active”. Select it, and navigate to
Object Types, they should be displayed without errors, and you should be
able to navigate down to the properties of each object type.
If there are runtime errors causing uncaught exceptions, the connector will be marked as “Disabled”. Then start troubleshooting. It’s probable that the exception can be seen in the IDM logs (or in the RCS logs). However, it will not always be meaningful, which means you’ll need to add some traces to help this out.
Instrument the code
To help troubleshoot issues, add logging statements in the connector
code. Scripts receive in their scope the log object of type
org.identityconnectors.common.logging.Log
To log a debug message, you use : log.ok("<message>"). Use these
statements for development purposes - the log level should be lowered in
production to avoid filling the disk and disclose sensible information.
Reserve some log statements for production as an aid to isolate
environmental issues. Use the proper level according to the severity of
the situation: log.warn (Warning),log.error (Error), log.info
(Information) .
Second big leap - Query Ready
The next step is to provide the Configuration Initialisation
(CustomizerScript.groovy) script , and Search operation. It is likely
that you can already re-use the sample code untouched. Note that this
applies only to the Scripted CREST connector, as there is no such script
for the Scripted SQL connector.
Once the Search script is implemented, navigate to the data tab in the connector configuration; if you’re lucky, data will be displayed. If it works, fine, but it does not prove that the search operation is without defects. So the best way to test the connector is to exercise the connector at the provisioning service endpoint.
Let’s assume the connector configuration is in a file named
provisioner.openicf-myconnector.conf and the object type to test is
account.
Let’s assume that you start with a small dataset, relieving you from completing the filtering implementation as yet. The first practical test is to perform a query with the default filter (e.g ‘everything’):
GET /openidm/system/myconnector/account?_queryFilter=true
Verify that the objects in the response are correct, and that you get the correct count.
Then refine the request to test whether paging is working:
GET /openidm/system/myconnector/account?_queryFilter=true&_pageSize=10
Then add the _pagedResultsCookie to test further the paging function,
verify that the resulting count and the newly generated cookie is
correct.
Finally, check you can read one single object using its id - this will test that the filtering is properly working:
GET /openidm/system/myconnector/account/:id
and of course, check that all supported filter operations are working as expected.
At this stage, once the tests are conclusive, you can access the data from the admin console in total trust.
Implement the remaining operations - Reconciliation Ready
Comparatively, the Create, Update and Delete operations are far simpler
to implement. The idea here is the same, implement the operation, then
test it via the /system endpoint. Once all is implemented and working
as expected, this is when you can think of testing a reconciliation. At
this stage, reconciliation may uncover new issues, due to data types,
incompatible values and so on. So this is where you might slightly
change the connector to alter the data format to accommodate the
reconciliation process. For example you might revisit how to return
property values for absent or null data - the idea is to make this data
as close as possible to the validation policies in the destination, thus
minimising contribution from transform scripts.
Similarly to testing the Search, you go through the /system endpoint to test the UPDATE and CREATE operations. For a CREATE operation, the REST endpoint is:
POST /system/system-name/system-object?_action=create
{
  ... payload
}
and for an update:
PUT /system/system-name/system-object/<_id>
{
 ... payload
}
The keys in the JSON payload are the property names as defined in the object properties in the provisioner configuration.
Last but not least: Livesync Ready
At this stage, you have gained so much experience in implementing the main operations that providing this functionality should be a breeze. The core of the task here is to determine which criteria will be used to track changes.
Note that it is better implementing (or testing) the livesync operation once the reconciliation is functioning as expected. Once it is implemented you can test by making changes to the database, launch a livesync run via RESTand verify that the updates are propagated to IDM’s repository. In addition, with proper traces in the code, you can verify that the sync tokens are evolving correctly.
Initiate a livesync using this endpoint:
POST /system/system-name/system-object?_action=livesyncDeep dive
So let’s inspect the implementation of each operation. However, this article is not a substitute for the documentation, where you can already find a valuable guide: ICF operations with Groovy scripts. Rather, we’ll look at complementary information to clarify a few points that should help you make the best from the documentation.
The Groovy goodness
The first time I was exposed to the Groovy code demonstrated in the samples I ended up scratching my head a lot - until I got acquainted with this remarkable Groovy feature : the closure delegate ( The Apache Groovy programming language - Closures ).
Here is the construct in the Scripted SQL sample that troubled me at first sight:
builder.schema({
   objectClass {
        type ObjectClass.ACCOUNT_NAME
        attributes {
            uid String.class, REQUIRED
            password String.class, NOT_READABLE, NOT_RETURNED_BY_DEFAULT
            firstname String.class, REQUIRED
It made sense once I understood the following :
-
Parenthesis are optional in Groovy.
-
When the method receiver is omitted, it is directed at the closure delegate.
Therefore :
type ObjectClass.ACCOUNT_NAMEis equivalent here to
delegate.type(ObjectClass.ACCOUNT_NAME)Similarly the closure passed to the #attributes method is assigned a
delegate to build the attribute schema where the default method takes as
arguments the attribute name, syntax and options.
So we will see next how this pattern is used to build the schema and return objects for the search and livesync operations.
Schema Operation
Constructing the schema with the builder delegate
So we talked briefly about the builder’s schema method and its delegates. These are documented here: Using the builder parameter.
The schema provides information about the property names and types in the target objects. These are also used by the other operations - Search, Update, Create and Sync - it needs to be consistent across, and the connector configuration has to be aligned as well. To avoid duplication, the strategy is to provide a Helper script to encapsulate a central model that drives the different operations. So the code we’ve seen previously can be written as :
import static Helper.enumerateAttributes
import static Helper.attributeClass

builder.schema({
    objectClass {
        type ObjectClass.ACCOUNT_NAME
        enumerateAttributes { attr ->
            "${attr}" attributeClass(attr)
        }
    }
})
where the class Helper is provided in a Helper.groovy script in the same folder, and which implements the enumerateAttributes# and [.hashtag]attributeClass# methods.
However, when it comes to adding flags for some of the definitions, this style can become quickly unmanageable. The alternative, in this case is to use the original builder AttributeInfoBuilder like this:
import static Helper.enumerateAttributes
import static Helper.attributeClass
import static Helper.readOnly

builder.schema({
    objectClass {
        type ObjectClass.ACCOUNT_NAME
        enumerateAttributes { attr ->
            def attrAIB = new AttributeInfoBuilder(attr, attributeClass(attr))
            if (readOnly(attr) == true) {
                attrAIB.setUpdateable(false)
            }
            attribute attrAIB.build()
        }
    }
})
Note that this latter approach is demonstrated in the
scripted-rest-with-dj sample.
Create the Connector Configuration with a REST call
At this stage, instead of manually writing the
provisioner.openicf.xxx.json file, let’s have IDM generate it. It’s
also a great test to ensure that you have correctly written the Schema
script. Here is how this is done:
Call the system endpoint with the minimal acceptable configuration, for example with the Scripted SQL connector:
curl --request POST 'http://localhost:8080/openidm/system?_action=createFullConfig' \
--header 'Content-Type: application/json' \
--header 'Authorization: Basic b3BlbmlkbS1hZG1pbjpvcGVuaWRtLWFkbWlu' \
--data-raw '{
{
    "_id": "provisioner.openicf/mssql",
    "connectorRef": {
        "bundleName": "org.forgerock.openicf.connectors.scriptedsql-connector",
        "bundleVersion": "[1.5.0.0,1.6.0.0)",
        "connectorName": "org.forgerock.openicf.connectors.scriptedsql.ScriptedSQLConnector"
    },
    "configurationProperties": {
        "username": "SA",
        "password": "password",
        "driverClassName": "com.microsoft.sqlserver.jdbc.SQLServerDriver",
        "url": "jdbc:sqlserver://localhost:1401;encrypt=false;databaseName=maindata",
        "autoCommit": true,
        "validationQuery": "SELECT GETDATE()",
        "validationInterval": "2000",
        "testOnBorrow": true,
        "authenticateScriptFileName": "",
        "createScriptFileName": "",
        "testScriptFileName": "TestScript.groovy",
        "searchScriptFileName": "",
        "deleteScriptFileName": "",
        "updateScriptFileName": "",
        "syncScriptFileName": "",
        "schemaScriptFileName": "SchemaScript.groovy",
        "scriptRoots": [
            "&{idm.instance.dir}/tools"
        ]
    }
}’
The response is the complete configuration, including the object types and properties, as constructed by the Schema script:
{
    "connectorRef": {...
    },
    "configurationProperties": {...
    },
    "objectTypes": {
        "ObjectClass.ACCOUNT_NAME": {
            "$schema": "http://json-schema.org/draft-03/schema",
            "id": "ObjectClass.ACCOUNT_NAME",
            "type": "object",
            "nativeType": "ObjectClass.ACCOUNT_NAME",
            "properties": {
                "firstname": {
                    "type": "string",
                    "nativeName": "firstname",
                    "nativeType": "string"
                },
                "email": {
                    "type": "string",
                    "nativeName": "email",
                    "nativeType": "string"
                }, …
            }
        }
    },
    "operationOptions": {...
    }
}
You can then use this response to create the
provisioner.openicf-xxx.json file and do some adjustments.
Dynamic schema
Some resources will provide the schema on request, for example, this is the case with directory servers. In this case, the Schema script task is to fetch the schema from the target system, and use this information to construct the schema with the builder delegate.
In this case, the Test script should actually check the server health, and connections should be properly set up during configuration init.
Configuration Init
First, please have a look at the table in Connector types to understand the connector life cycle.
The Scripted SQL and the Scripted REST connectors have both Stateful Configuration and implement the Connector Interface. This means:
-
The configuration is created once and just once, and shared with all connector instances.
-
Each time an operation is invoked, a new connector instance is created (re-using the shared configuration object) and then destroyed when the operation completes.
Concretely this means that any expensive computation should be avoided in an operation implementation when possible. If this is not possible, then you’ll need to consider the harder path of building a Poolleable Connector using the groovy connector framework.
So this comes to the question: where should be placed custom initialisation? The answer is: in the Helper script, with static methods and static initialisers. Here is an example:
import groovy.sql.GroovyResultSet
import groovy.sql.Sql

private static model = [
    "users" : [
        "firstname" : [
            "col" : "firstname",
            "type" : "String"
        ],
        "lastname" : [
            "col" : "surname",
            "type" : "String"
        ],
        "uid" : [
            "col" : "id",
            "type" : "String",
            "readonly" : true
        ], // ...
    ]
]

// ...

private static colMap = [:]
private static castMap = [:]
private static typeMap = [:]
private static flagMap = [:]
private static attributeNames = []

static {
    // Build the supporting maps
    // ....
}

static columnName(attrName) {
colMap[attrName]
}

static enumerateAttributes(Closure handler) {
    attributeNames.each { attr ->
        handler(attr)
    }
}
Search Operation
At this stage, you have installed the connector, and the schema script is working as expected. So let’s have a go now at querying objects from the external system.
Implementing the Search operation is the most extensive work among all other operations.
There are four main distinctive parts in the Search Operation:
-
Process the filter, if any, translating to the destination system filter representation - for the SQL example, forge the WHERE condition.
-
Process the paging parameters (
_pageSize,` _pagedResultsOffset` or_pagedResultsCookie). This includes generating the proper response to the request based on the requested paging options. -
Perform the actual request to the destination system, providing filtering and paging instructions and processing the response from the target, handing back to IDM, one by one, the objects formatted from the response.
To get acquainted with Common REST’s Query operation, refer to : Query in the documentation.
NAME and UID
These are default names placed in the connector configuration that have particular meaning:
-
UID stands for the property which identifies uniquely a resource and is preferably identity idempotent. For example, the
entryuuidattribute in Directory Server. -
NAME stands for the property that names the resource, and is required if mentioned. For example
cnis a good candidate with LDAP . If you don’t have any for your resource don’t worry, there is no need to specify one.
These special properties must be translated into a representation as understood by the target resource.
Filtering
In the scripted-rest-with-dj sample the search script uses a
SimpleCRESTFilterVisitor to process the filter - which produces a
filter structure that can be directly used in the request - as Directory
Server API conforms to CREST - the only work here is to convert some
values and names as the data may be structured a little bit differently.
MapFilterVisitor
With SQL or a non CREST resource, the processing is different; the
filter parameter (a string) can be converted with the MapFilterVisitor
into a map representation of the filter; then recursed through the map
structure to produce the WHERE condition and parameter array for the
select statement.
scripted-sql-with-mysql demonstrates all the possible options in the
query map, with those keys in the item:
-
#leftfor the property name, or a sub filter for AND, OR operators (e.g the left hand side of the expression). -
#rightfor the value, or sub filter for the AND , OR operators (e.g the right hand side of the expression). -
#operation: "OR”, or “AND” for a composed filter, and for a leaf expression “CONTAINS”, “ENDSWITH”, “STARTSWITH”, “EQUALS”, “GREATERTHAN”, “GREATERTHANEQUAL”, “LESSTHAN”, “LESSTHANEQUAL”, or “PRESENT”. -
#notis true if the expression is negated.
When encountering OR and AND, the left and right expressions are sub filters that can then be processed recursively:
def queryParser
queryParser = { queryObj ->
    if (queryObj.operation == "OR" queryObj.operation == "AND") {
        return "(" + queryParser(queryObj.right) + " " + queryObj.operation + " " + queryParser(queryObj.left) + ")"
    } else {

    }
}
Filtering with a CREST resource
If you develop a REST Connector to synchronise with IDM’s REST API (therefore, compatible with Common REST), processing the filter is as simple as:
if (filter != null) {
    queryFilter = filter.accept(SimpleCRESTFilterVisitor.INSTANCE, [
        translateName: {
            String name -> if (AttributeUtil.namesEqual(name, Uid.NAME)) {
                return '_id'
            } else if (AttributeUtil.namesEqual(name, Name.NAME)) {
                return '_id'
            }
        }
    ] as VisitorParameter).toString();
}

query['_queryFilter'] = queryFilter
Filter Visitor
Instead of using a MapFilterVisitor, and processing the resulting query map, you could implement your own visitor, and generate the WHERE condition and parameters array directly in the implementation. The interface is documented here: Interface FilterVisitor<R,P>.
Using the Helper
This altered code below inspired from scripted-sql-with-mysql
demonstrates the use of the Helper script to abstract away the database
model from the operation logic. The method #columnName returns the
column name from the requested property name, including those for
UID and NAME:
def query = filter.accept(MapFilterVisitor.INSTANCE, null)
def queryParser
queryParser = {
    queryObj -> if (queryObj.operation == "OR" queryObj.operation == "AND") {
        return "(" + queryParser(queryObj.right) + " " + queryObj.operation + " "
            + queryParser(queryObj.left) + ")"
    } else {
        def left = queryObj.get('left')
        // Get mapped column from DBModel
        left = columnName(left) ?: left
        def not = queryObj.get('not')
        def template = ""
        switch (queryObj.get('operation')) {
            case 'CONTAINS':
            template = "$left ${not ? "NOT " : ""}LIKE ?"
            whereParams.add("%" + queryObj.get("right") + "%")
            break case 'ENDSWITH':
                ...
        }
        return template.toString()
    }
}

filterQuery = queryParser(query) as String
Ordering
You may wish to implement ordering in the connector. This is useful if indeed the reconciliation task needs to retrieve the source ids in a very specific order. Most of the time, you can probably skip it, but it’s nice nonetheless if it obeys your ordering instructions.
The _sortKeys parameter is available in the options map as
options.sortKeys.
Paging
Implementing paging is crucially important as it is an effective means to optimise synchronisation performances using paged reconciliations. Actually, a clustered reconciliation is always paged, so not supporting it in the connector will be a major impediment.
There are two ways in implementing paging with Common REST: use the
_pagedResultsCookie parameter to resume the search where it ended last
time - which was provided in a previous response, or use
_pagedResultsOffset to indicate the position from which to return the
results. For both, _pageSize indicates the number of records to
return. To use the cookie method, the target system must be able to
provide one. Otherwise use the offset method.
These parameters are available in the option map as
options.pagedResultsCookie, options.pageSize, and
options.pagedResultsOffset.
For an SQL database, the row id value is a good candidate for the paged results cookie value. Otherwise, to implement paging with pagedResultsOffset, it should suffice to request ordering on the id column, and use the LIMIT OFFSET directive for example with an SQL server.
Handling the response
A query results in multiple objects, which are handed back to the ICF framework, one by one.
This is all described here : Returning Search Results
For this, the Search script receives the handler object, which is a closure object. You pass to the handler another closure that builds the object or you can pass the handler a ConnectorObject that you build with a ConnectorObjectBuilder. This is actually what the handler delegate does behind the scene.
There are #attribute methods for each possible type in the
ConnectorObject delegate. The #id method is for providing the name
value aka NAME; if the object class has a property whose name is
NAME then it is required to provide it. The #uid method is for
providing the UID, aka “_id”.
So here is an example, with the Helper script support, in processing the response:
import static Helper.handleRow
import static Helper.eachSelectedRow

def resultCount = 0
switch (objectClass) {
    case ObjectClass.ACCOUNT:
    eachSelectedRow(sql, where, limit, whereParams, {
            row -> log.ok("MSSQL Search script - ROW: " + row)
            handler {
                // Hand row processing over to DB Model
                handleRow(row, {
                    attrName, value -> attribute attrName, value
                }, {
                    uidValue -> uid uidValue as String
                    lastId = uidValue
                })
            }
            resultCount++
        }
        break default:
        throw new UnsupportedOperationException(
            operation.name() + " operation of type:" + objectClass.objectClassValue
                + " is not supported."
        )
}
eachSelectedRow executes the SQL query based on the WHERE condition,
params and paging parameters; the select statement is constructed within
the Helper script. The closure passed to the method is called for each
row received from the database which in turn uses the handler to return
the formatted object. As part of formatting the object, the Helper
provides support via #handleRow which iterates over the sql result
set, handing back the attribute name and value to construct the
connector object - two closures are provided - one to construct a
regular attribute, and one to construct the uid (UID).
Note that here we keep track of the latest record with lastId. It is
used to return the pagedResultsCookie once all rows have been processed:
return new SearchResult(lastId.toString(), -1)If no paging was requested, then use:
if (options.pageSize == null || resultCount < options.pageSize) {
    return new SearchResult()
}
You can find more information here: SearchResult.
Create & Update Operations
These are documented at Update script and Create script.
The Create and Update operations are pretty similar in implementation - they differ by which method is called against the target system, and by that the uid is known for the Update Script, whereas for Create, the uid is obtained only after creating the resource in the target system.
In the Update script, the uid of the object to update is passed in the
uid variable, of type Uid.
For both the Update and Create scripts, once the target resource is
created or updated, the script return a Uid object that identifies the
resource:
return new Uid(id)or for Update:
return uidThe details of the update or creation (e.g attributes) are passed in the
script scope as the attributes object, which can be wrapped into an
AttributeAccessor
object. In order to access a value from the accessor with its property
name, you need to know its type. For example, if the name is “count” and
the type integer, then to get the value you need to call
#findInteger("count"). You can also test whether the value is provided
using the #hasAttribute("count") and further refine the request. In
this example, below, the Helper script is used to determine the proper
type for the property - the valueHandler closure here returns the
value retrieved from the accessor using attribute name and type
parameters - which the Helper method then uses to construct the
parameter bindings for the update statement. The requested attributes
are driven by the model held by the Helper script:
import static Helper.columnName
import static Helper.eachSelectedRow
import static Helper.executeUpdates

def connection = connection as Connection
def sql = new Sql(connection)
def updateAttributes = new AttributesAccessor(attributes as Set < Attribute >)

switch (operation) {
    case OperationType.UPDATE:
        switch (objectClass) {
            case ObjectClass.ACCOUNT:
                executeUpdates(
                    sql, uid.uidValue, {
                        attrName, type, valueHandler -> if (updateAttributes.hasAttribute(attrName)) {
                            valueHandler(updateAttributes."find${type}"(attrName))
                        }
                    }
                )
                break
            default:
                throw new ConnectorException("UpdateScript can not handle object type: " + objectClass.objectClassValue)
        }
        return uid.uidValue
    default:
        throw new ConnectorException("UpdateScript can not handle operation:" + operation.name())
}
In the documentation, the sample for the Update script is directly
interacting with the attributes object (which is a
Set<Attribute>).
This method is more involved, since the #getValue method returns a
list of java.lang.Object values. This method would be valuable if the
conversion from attributes to the request can be performed generically -
otherwise using the AttributeAccessor is a better option as it already
does the job in checking the type and casting the value.
Delete Operation
This is documented at : Delete script. There is not much to talk about here, as this is rather straightforward, this is the simplest operation to implement. Just use the uid object to forge the request to delete the target resource, and return the same uid value. That’s it.
Sync Operation
Implementation
Since you have already implemented the Query (or Search script), you’ll find the Sync operation easier to tackle. This operation is documented here: Synchronisation script. Since by now you’ve figured out how the handler is working, there is enough in the documentation to implement this script. Let’s look, though, at some tips in developing and testing the functionality.
With the sync operation, there are two different operation types:
-
SYNC : the IDM engine is requesting the latest changes
-
GET_LAST_SYNC_TOKEN : the synchronisation engine is requesting a value (the sync token) for the latest change reference, and stores it persistently for the next sync run.
The first time ever a SYNC is requested, there is no persisted sync token yet. You can trigger a livesync with IDM REST as documented here: Manage livesync. IDM passes to the script the token value if it exists. If it’s not, then you’ll need to compute it. However, IDM should first invoke GET_LAST_SYNC_TOKEN.
So the first thing to do in the SYNC operation is to check the token, and obtain it if not provided, here using a Helper method:
import static Helper.lastSyncToken
    ...
def connection = connection as Connection
def sql = new Sql(connection);

switch (operation) {
    case OperationType.SYNC:
        def options = options as OperationOptions
        def token = token as Integer
        if (token == null) {
            token = lastSyncToken(sql)
        }
        def lastToken = token
        switch (objectClass) {
            case ObjectClass.ACCOUNT: …
You can then reuse the same method for the GET_LAST_SYNC_TOKEN operation:
case OperationType.GET_LATEST_SYNC_TOKEN:
    switch (objectClass) {
        case ObjectClass.ACCOUNT:
            token = lastSyncToken(sql)
            break;
        default:
            throw new UnsupportedOperationException(
                operation.name()
        + " operation of type:" + objectClass.objectClassValue + " is not supported."
            )
    }
    return token;
The next step in the SYNC operation is to
-
Format the WHERE condition to capture the latest changes that occurred since the previous livesync run (marked by the last sync token)
-
Hand over the changes via the handler. This is rather the same as for the Search script, but here, you add change notification details, and pass the object using the ConnectorObject delegate. All of this is documented at Synchronisation script.
So with the Helper script support, this leads to something like this:
switch (objectClass) {
    case ObjectClass.ACCOUNT:
        eachRowSinceToken(sql, token, { row ->
                handler ({
                    CREATE_OR_UPDATE()
                    handleRowVersion(row, {
                        version -> lastToken = version
                    })
                    object {
                        handleRow(
                            row, {
                                attrName, value -> attribute attrName, value
                            }, {
                                uidValue -> uid uidValue as String
                            }
                        )
                    }
                })
            })
        break
As a last note, the sample above uses the special ‘rowversion’ type in an MS SQL server to track the latest changes. If the model is spread over several tables, then retrieving the records in the order of the rowversion values is going to be tricky, as the rowversion is unique across ALL tables. IDM remembers the sync token returned with the last reported change. So the trick here is to update lastToken only if the new value is higher as these results can not be ordered.
Testing
While you are testing livesync, the last token will evolve. You’ll get errors, which you fix as you discover them. You are making updates to the test database to verify that changes are detected. Then the data has diverged so much that it’s time to refresh the database. Then you make an update to the database, launch a livesync, this time, nothing happens… why? Simply, the last sync token is not anymore accurate, it needs to be reset. There are two ways in doing this:
-
Update the new last sync token value
-
Delete it.
The sync token is stored in the repository, and you can access it with this endpoint:
/repo/synchronisation/pooledSyncStage/<connector name>The connector name here is the entire system endpoint string converted
to big letters and the “/” removed, for example SYSTEMLDAPACCOUNT for
/system/ldap/account.
To obtain the current sync token value:
curl 'https://localhost:8080/openidm/repo/synchronisation/pooledSyncStage/SYSTEMMSQLACCOUNT' \
--header 'Authorization: ...'
{
"_id": "SYSTEMMSSQLACCOUNT",
"_rev": "1f0dfa90-6ebf-4d16-9ff3-0b99ae46f75e-4298",
"connectorData": {
"nativeType": "JAVA_TYPE_LONG",
"syncToken": 32006
}
}To reset :
curl –request DELETE 'https://localhost:8080/openidm/repo/synchronisation/pooledSyncStage/SYSTEMMSQLACCOUNT' \
--header 'Authorization: ...’
To update:
curl –request PUT 'https://localhost:8080/openidm/repo/synchronisation/pooledSyncStage/SYSTEMMSQLACCOUNT' \
--header 'Authorization: ...’
--header 'Content-Type: application/json'
--data-raw '{
    "connectorData": {
        "nativeType": "JAVA_TYPE_LONG",
        "syncToken": 2009
    }
}'
Troubleshooting the Helper
A difficulty with the Help script is instrumenting with logging statements. The log object is in the scope of the operation scripts and not in the Helper script scope. In order to be able to log from the Helper script, you’ll have to make the log object available (for example passing it as an argument in calls, but this is tedious and inflexible), or you’ll have to create a new log object - which is involved as well. Another approach is to pass a closure to the method call which will ‘act’ as the ‘log’ object, such as this:
switch (objectClass) {
    case ObjectClass.ACCOUNT:
        eachSelectedRow(sql, where, limit, whereParams, {row ->
            log.ok("MSSQL Search script - ROW: " + row)
            handler {
                // Hand row processing over to DB Model
                handleRow(row, {
                    attrName, value -> attribute attrName, value
                }, {
                    uidValue -> uid uidValue as String
                    lastId = uidValue
                })
            }
            resultCount++
            },
            {
                trace -> log.ok(trace)
            })
        break
And in the Helper script:
import static Helper.handleRow
import static Helper.eachRowSinceToken
import static Helper.handleRowVersion

static eachSelectedRow(groovy.sql.Sql sql, where, limit, params, Closure handler, Closure debug = {})
{
    def statement = …
    debug("MSSQL DBModel script - executing " + statement + " " + params)
    sql.eachRow(statement, params) {
        row -> handler(row)
    }
}
Wrap Up
Developing a connector is quite involved, and you should have good reasons to embark in this way. This is the last resort, most often, when there is no out of the box connector to synchronise the data from. Hopefully this article gives you an implementation strategy and guidelines to optimise the development effort.