Password Acquisition Doesn’t Have To Be Difficult
Author: |
Darinder Shokar |
Created at: |
Oct 2021 |
Updated at: |
May 2024 |
Introduction
ForgeRock Identity Cloud is revolutionizing the way businesses, consumers, and customers execute on their IAM strategy. Our Identity Cloud customers repeat three common feedback themes over and over again:
-
Quicker time to value: Customers no longer have to worry about the build, run, operate and feed process of standing up an IAM system—ForgeRock Identity Cloud is managed by the people who build the underlying software; us (ForgeRock).
-
Introduction of cool new stuff quicker and with zero customer effort: ForgeRock is constantly innovating the platform to either conform to new/evolving standards, or bring new market differentiating features we know our customers will love like ForgeRock Go, WebAuthN, and (spoiler alert!), the new Passthrough Authentication node. These features are introduced seamlessly and with accelerated velocity. A administrator can literally log out for the day on Monday and, come Tuesday morning, see there’s a cool new feature they can introduce to their customers.
-
Flexibility: The world of IAM is often complex. As companies grow, they acquire technical debt, find they need to manage a myriad of backend systems, lots of different user populations, and even at times multiple personas for the same underlying user (sad panda). The ForgeRock Identity Platform is able to handle and harmonize all this, because at its heart, is the same ForgeRock platform which powers our non-Cloud customers consisting of some of the largest and most complex organizations in the world.
It’s this flexibility which we will harness in this post to discuss options for password verification from a remote DataStore.
Passwords: they won’t die….yet
Passwords have been around seemingly forever, but asking humans to remember a string to allow access to a system is fraught with problems. Humans are poor at remembering random facts, and so tend to try to make it easier for themselves by perhaps using the same password string for all systems (breach one system, you breach them all), making passwords as short as can be. Often, passwords are related to their life in some way (the street they live on, their kid’s name, spouse/partner’s name, etc.). All of these factors mean in many cases passwords can be easily breached, yet they still won’t die!
For many, the username/password prompt is the de facto authentication (AuthN) process to gain access to their system. At ForgeRock, we believe we shouldn’t just remove this experience, but introduce the ability to enhance it through Intelligent Access and our secure Authentication Journeys.
Through the power of Authentication Journeys, standard username/password flows can be strengthened by:
-
Additional security layers like multi-factor authentication
-
Additional context like environmental signals such as IP and geo-location
-
User driven choice, perhaps the user prefers to use OTPs, a voice call, or Push AuthN
This is all while minimizing friction, perhaps introduce high friction for first time login, but lower friction for subsequent logins or low friction for low value content and services, and increased friction for high value.
The possibilities are endless, and all of this is driven through an easy to understand GUI, where Authentication “Nodes” can be dragged, dropped, and connected in a myriad of different ways.
Options for acquiring user passwords
So, we have established that while passwords are not good, they won’t be dying anytime soon. Until they do, we can enhance the user experience and an organization’s security posture through the power of Authentication Journeys, but how do we go about acquiring passwords from a legacy system in the first place?
There are three common approaches:
-
Don’t acquire any passwords and force password reset:From a customer experience perspective, this is the most intrusive option. In this scenario, we synchronize all user identity attributes into Identity Cloud except the user password; and, on login, check if the password attribute is populated via the Attribute Present Node. If so, prompt for the password, and if not, go through the process of password acquisition, either directly, or after additional verification, like sending a one-time password (OTP) to a user’s email address.
-
Seamless synchronization: This is the optimal solution. Through the power of the Remote Connector Service (RCS) and OpenICF DataStore Connectors, Identity Cloud can interface with almost any backend datastore for synchronization and attribute acquisition, and do so without the need to open inbound firewall rules to allow external access to services deep within a customer environment.
The sync can be one-way (typically remote DataStore → Identity Cloud), or best of all, two-way (bi-directional between DataStore and Identity Cloud) to handle scenarios where legacy systems still rely on the remote DataStore, and so need to be informed when data changes occur in Identity Cloud itself. If the password is retrievable as a hash and in a format supported by Identity Cloud, then passwords can be automatically synchronized to Identity Cloud, and the end-user will be able to seamlessly log in without any intrusion at all. For more on this approach and how to set it up, see this link. -
PassThrough authentication: Seamless sync is the optimal approach, and forcing a user to set a new password is the least optimal approach, but what about seamless password acquisition from a DataStore where a password cannot be extracted? One common example is Active Directory, where in some deployments, the password attribute will not be returned, and in other cases, it is stored in a format not supported by Identity Cloud. This is where PassThrough authentication comes in, and lets you leverage the full power of Authentication trees. This will be the focus of the rest of this article.
What is PassThrough authentication and how do we set it up?
PassThrough authentication leverages a combination of RCS, OpenICF connectors, and the flexibility of Authentication Journeys to enable secure verification of a password against a remote DataStore.
For this example, we will use Microsoft Active Directory as the remote DataStore. The complete topology looks like this.
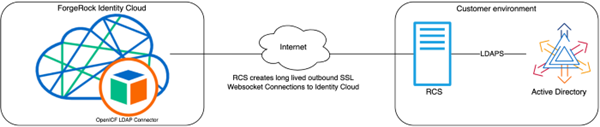
ForgeRock Identity Cloud, OpenICF Connector, RCS, & AD topology
 +
To set this up, follow these steps:
Deploy RCS
-
Deploy RCS close to the target DataStore. For ease of reading follow steps 1–6 from here. You can call the RCS instance whatever you want, but in this article, I’ve called it
newrcs. -
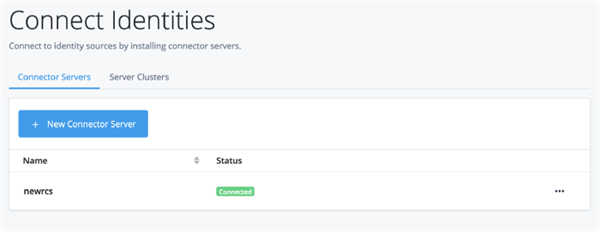
Once deployed, log in to the Identity Cloud admin UI, Expand Identity on the left panel, and select Connect. The RCS instance should be visible with a green Connected status.
Configure the Active Directory (AD) Connector
Now that RCS has been deployed, we need to configure an OpenICF connector. In this example, we will interface with AD using the out-of-the-box LDAP connector shipped with RCS. This OpenICF connector will then interface with the downstream AD DataStore. Configuring AD is out of scope, but to configure the connector, execute these steps:
Note: The RCS node must be able to connect to AD. Test this via `ldapsearch`or even a basic telnet.
-
-
From the Identity Cloud admin UI, Expand Native Consoles and click Identity Management. From the resulting Identity Management window, click the Configure dropdown on the top menu bar, Connectors and finally the New Connector button. For ease of reading, see step 7 from the previous link for the complete configuration, but here are some key points:
-
-
Connector Name: <code">AD
-
Remote host:
newrcs(this is the name of the RCS instance deployed above) -
Connector Type:
LDAP Connector -
LDAP Type:
AD LDAP Configuration -
Host Name or IP:
<Address of AD, must be resolvable and reachable from RCS> -
Port:
636with Use SSL enabled. Note the LDAPS/SSL certificate for AD must be imported into the trusted CA file on the RCS host viakeytool.The default Java truststore iscacerts -
Account Distinguished Name (DN): Bind user for AD e.g.
CN=service_account,CN=Users,DC=ad,DC=example,DC=com -
Password: Bind password for the above account
Base DN: Base Distinguished Name where users can be found. Note: an additional DN can be added if Groups are located in a different location e.g.OU=users,OU=MyOrg,DC=ad,DC=example,DC=com
-
-
The complete configuration looks like the following:
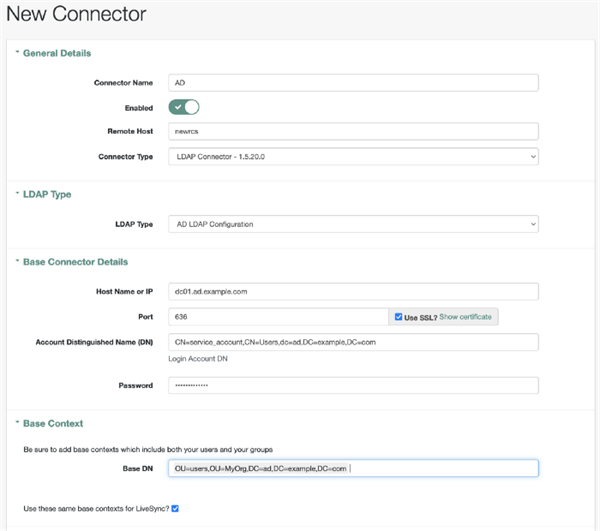
 +
Sample Active Directory Connector Configuration +
 +
-
-
-
-
Once complete, scroll down to the bottom of the page and select Save.
-
To test the connector, click on the Data tab and users should return.
-
-
-
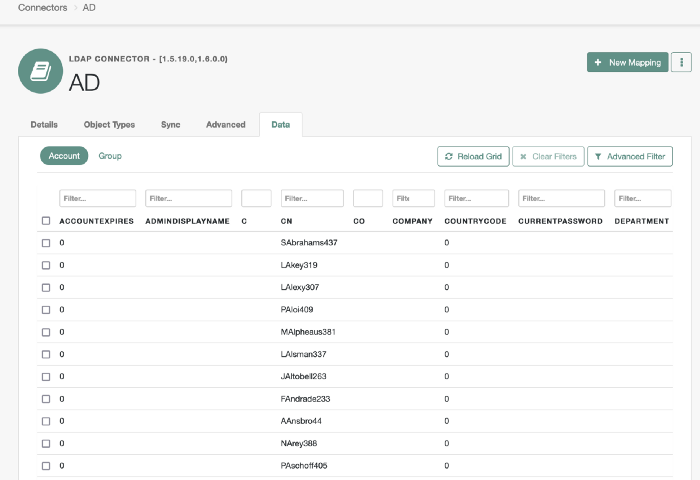
Data view from the Connector
At this point, if there is no need to synchronize users, then feel free to skip down to Configure PassThrough AuthN using Journeys section. To execute a basic test for PassThrough Authentication, we can execute the following in an SSH window or in PostMan:
Acquire an Access token for an IDM administrative user and set as the AT variable
Now execute a call to this AD system resource as follows:

curl \

--header 'Authorization: Bearer '${AT}'' \

--header "Content-Type: application/json" \

--request POST \

--data '{

"username" : "AAnsbro44",

"password" : "XXXXXXXXXX"

}' \

"https://<Identity Cloud tenant>/openidm/system/AD/account?

_action=authenticate"

If all is well a HTTP 200 response with the remote _id will return:

{

"_id": "31966242-e24f-4c4f-b531-3f215a861d6c"

}
Configure a sync mapping to sync users from AD into Identity Cloud
Next up, we need to create a sync mapping that will import users from AD into Identity Cloud without the password attribute. For this example, we’ll sync just a few attributes, but adjust as required:
-
-
From the Identity Cloud admin UI, Expand Native Consoles and click Identity Management. From the resulting Identity Management window, Click Configure and Mappings.
-
Click New Mapping and select
ADfor the Source,alpha_userfor the Target, select Create mapping, and in the resulting pop-up window, select Create.
-
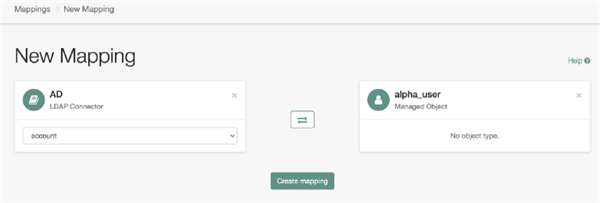
Source to Target Mapping Example
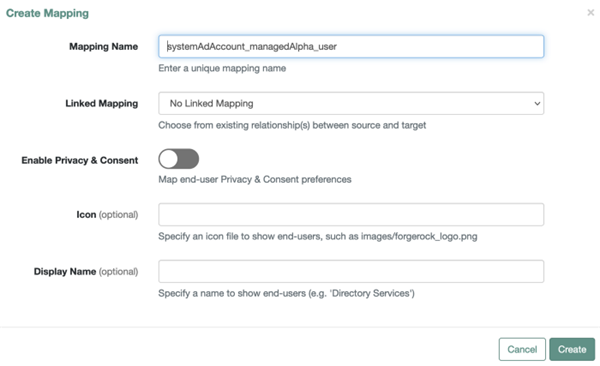
Create Mapping dialog box
-
-
From the new Mapping configuration page, click Add Missing Required Properties to add the minimal attributes required (mail, sn, givenName, and userName).
-
Click on each attribute and add the associated source attribute from AD. For
mailusemail, forsnusesn, forgivenNameusegivenNameand foruserNameusesAMAccountName. -
We can now test all is well by entering a user into the Sample Source Preview box, and the user should return. In my example, I used the
AAnsbro44user.
-

 +
Sample mapping configuration +
 +
-
Now, click on the Behavior tab, change the Current Policy to Default Actions, click Save, followed by Reconcile, to sync the users.
-
To check all is well, from the Identity Cloud admin UI, click the Identities drop down, Manage and the user(s) from the source DataStore should now be present. Example below for
AAnsbro44: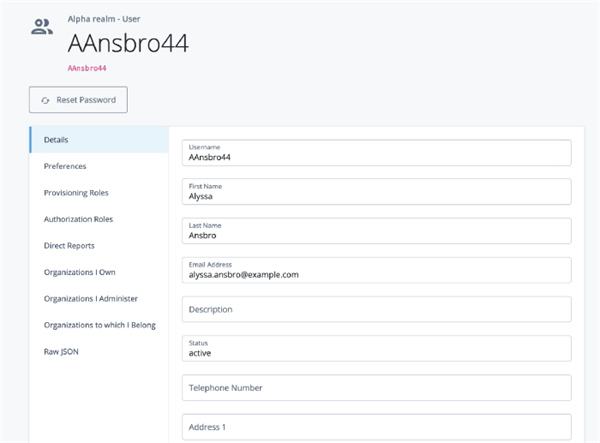
Example synchronized user
=== Configure PassThrough AuthN using Journeys
We now have all the key moving parts in place. RCS has been deployed, a Connector configured to interface with AD, we’ve tested PassThrough via REST, and optionally, have imported users into Identity Cloud. However, authentication will still fail as we don’t yet have a given users’ password. We’ll remedy that now!
As I mentioned earlier, new innovations and features are deployed into Identity Cloud all the time; one such feature is the new shiny`Passthrough Authentication` node, which forms part of the wider rich tapestry that is Authentication Journeys. Through this simple node, we can interface seamlessly with all the above components to verify a password against a remote datastore and execute action. Here’s how: .. First, we need to create a new Journey to make use of this node. From the Identity Cloud admin UI, click Journeys, find the default Login journey, and select Duplicate from the widget. Set the name to
PassThroughand select Save. .. On the left panel, expand` Identity Management` and drag thePassthrough Authentication nodeto the canvas. Set the System Endpoint to the connector name, which isADin our example, and select save. Also, go ahead and drag in theAttribute Present Decisionnode; we’ll use this later to verify if a user has its password attribute set or not.+
Passthrough Authentication nodebr
+ Now let’s expand on some of the scenarios this Passthrough Authentication node can cater to through the flexility of Authentication Journeys.
+ ===== Scenario 1: Remote password verification every time a user logs in
+ There could be a business reason which mandates that a user must always go to the source DataStore (AD, in our case) every time a user logs in. One example might be where SSO has been migrated to Identity Cloud; however, self-service has not …yet. In this scenario, the Journey would be configured as follows:
-
-
-
-
Rewire the
Data Store Decisionnode’sFalseoutcome to theAttribute Present Decisionnode. This means on local DataStore authentication failure, check if the user has their password attribute populated. -
Link the
Attribute Present Decisionnode’sTrueoutcome to the red Failure node, and theFalseoutcome to this newPassthrough Authenticationnode.
This configuration checks if the user has their password attribute set. If so (True outcome), then we know the user just entered their password incorrectly, or perhaps they are not an AD sourced user, and we fail the Journey.
If the outcome is False it means the user does not have their password attribute set, so it must be a remote user (an AD-synced user, in our case), so call thePassthrough Authenticationnode. -
Wire the
Passthrough Authenticationnode’s Authenticated outcome to theIncrement Login Count `node to continue on down the default successful login path, `Missing Inputto the firstUsername and Password Pagenode andFailedto the redFailurenode.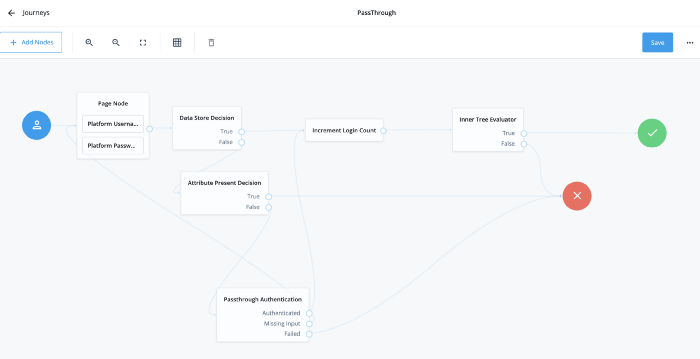
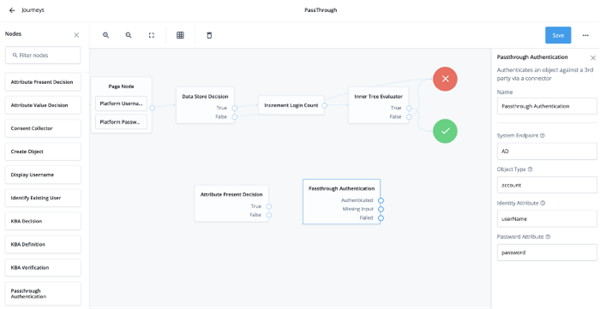
Always verify passwords against remote datastore PassThrough Journey
The end result of this is that for every login attempt, the Journey will first verify if the credentials are correct against the Identity Cloud DataStore. If so, it continues on the happy success path. If not, it checks whether the user has their password attribute populated. If so, an error, and if not, call the Passthrough Authentication node.
This node will then interface with the remote DataStore (AD) via RCS and our connector over SSL and LDAPS to validate the supplied username and password. If no password is supplied, prompt the user to re-enter. If verification fails, fail the Journey. If verification succeeds, continue down the happy success path. Note the password in this instance is never stored in Identity Cloud.===== Scenario 2: One time remote password verification and storage into Identity Cloud
This is the most likely scenario: synchronization has brought all identities into Identity Cloud except passwords, and it is now the authoritative source for authentication as well as all IDM use cases such as forgotten credentials, self-service, and password reset flows.
In this scenario, we want Identity Cloud to verify the credentials of a user where the password attribute is not populated against the remote DataStore. If successful, PATCH the user to add the password, which the backend will then hash and store in a secure format. Subsequent logins for this user will execute via local DataStore authentication only. Lets go ahead and configure the journey:
-
-
-
-
-
-
Assuming we take the base journey created in the above scenario 1: on the left panel, drag, expand Identity Management. Drag the
Identify Existing Usernode to the canvas and set its Identity Attribute touserName. -
Now drag the
Patch Objectnode to the canvas and set theIdentity Resource`attribute to `managed/alpha_user. -
Link the
Pass Through Authenticationnode’sAuthenticatedoutcome to theIdentify Existing Usernode. -
Now link the
Identify Existing Usernode’sFalseoutcome to the red Failure node, and theTrueoutcome to thePatch Objectnode. This means if an existing user is found, continue on. If not, error. -
Link the
Patch Objectnode’sFailedoutcome to the red Failure node, andPatched`to the`Increment Login Countnode. This means if the system is able to successfully patch the user, continue on the happy path. If not, error.The end tree looks like this:
PassThrough tree showing Identify Existing User node configuration
+

PassThrough tree showing Path Object node configuration
One word of caution: if the password policy in Identity Cloud is more stringent than the password policy in the remote datastore, then the above flow will fail with a password constraint violation error as below. Modify the policy as appropriate: from the Identity Cloud admin UI, expand Policy, then Password Policy, and modify to allow the password to be stored. Note: implementing Force Password change after X days would then be an approach to bring passwords in line with a newer password policy. Better still, the
../openidm/policy/managed/alpha_user/*?_action=validatePropertyendpoint could be called after remote verification to pre-check that the password conforms to policy and if not handle this via a new password prompt :)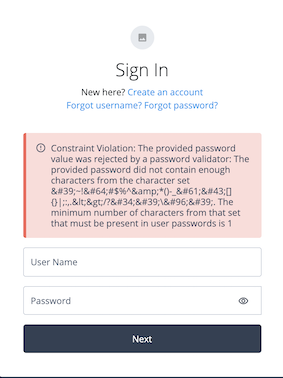
Password constraint violation error
=== Conclusion
So there you have it; with the flexibility, capability, and seemingly daily new feature set of Identity Cloud ,we have tackled the complex problem of password acquisition through intelligent access and authentication journeys.
To take things further, we could add nodes to acquire identity information from the remote datastore for just in time provisioning, or perhaps use this approach to acquire passwords stored in a format not supported by Identity Cloud; there are plenty of opportunities for further development :)
Thanks for reading.
More by this author:
 A
Script for Executing the OAuth 2.0 Authorization Code Flow with PKCE in
AM [.badge-category__name#Setup#]
A
Script for Executing the OAuth 2.0 Authorization Code Flow with PKCE in
AM [.badge-category__name#Setup#]Introduction I often meet customers who want to quickly understand how the OAuth2 Authorization Code grant type works, how Proof Key for Code Exchange (PKCE) works, and how they can execute the flows programatically to understand how it all hangs together. This blog provides a sample script to execute the OAuth2 Authorization Code grant flow, along with support for PKCE using cURL. What is the OAuth2 Authorization Code Grant Flow? The Authorization Code grant is a two-step interactive process …
Integrating IG with Identity
Cloud
[.badge-category__name#Integrations#]Introduction It’s an exciting time here at ForgeRock. The ForgeRock Identity Cloud helps customers rapidly embrace next generation IAM, and quickly realize a return on their investment. For more on what this service offers, check out the following links: ForgeRock Identity Cloud overview here. ForgeRock Identity Cloud documentation here. In this exciting world, helping customers quickly and easily integrate with the ForgeRock Identity Cloud platform is critical. In this article, we’ll show yo…
Locking
Out a User and Deleting All of Their Active Tokens in AM
[.badge-category__name#Maintenance#]Introduction Customers often ask, “We have a business security requirement where we want to not only lock a given user out of the system, but also find and delete all SSO tokens they have created using the AM API. How do we do that?” This article shows you how to do this using the delete_tokens.sh script ;) In order to achieve this, we’ll be making using of the following AM endpoints: …/authenticate: Endpoint for authenticating users. …/users: Endpoint for getting and setting user profile a…
-
-
-