Shadow Session Creation To Ease Application Migration to ForgeRock
Author: |
Darinder Shokar |
Created at: |
Mar 2023 |
Updated at: |
May 2024 |
By
Darinder
Shokar
Originally posted on https://medium.com/@darinder.shokar
Introduction
During migration to a new Identity and Access Management platform, relying applications typically need to re-point from their existing IdP to the new IdP for login and token validation interactions. Application owners may have different release cycles and priorities so it’s advantageous to look for opportunities to ease migration, while maintaining the seamless login experience users are accustomed to.
One technique which can help is creating a “shadow session” in the existing IdP as part of the login journey of the new IdP. In this scenario, two session cookies are stored against the user-agent; one for the new IdP and one for the existing. This enables new applications to leverage the session from the new IdP, while allowing applications yet to migrate to make use of legacy sessions seamlessly.
This blog will dive into this approach using the powerful flexible journeys of ForgeRock Identity Cloud against a self-managed implementation of the ForgeRock platform via a single additional node.
Configuration Steps
The following will configure ForgeRock Identity Cloud to request a session from a self-managed ForgeRock implementation seamlessly via the user credentials acquired earlier in the login journey.
As a prerequisite, bidirectional sync needs to be enabled between the self-managed ForgeRock implementation and ForgeRock Identity Cloud. Also, session lifetimes between the two systems should be aligned to ensure a consistent user experience.
Note to get up and running quickly you can just import the complete journey with script from here; the “Create Environment Secrets and Variables (ESVs) step is still required though.
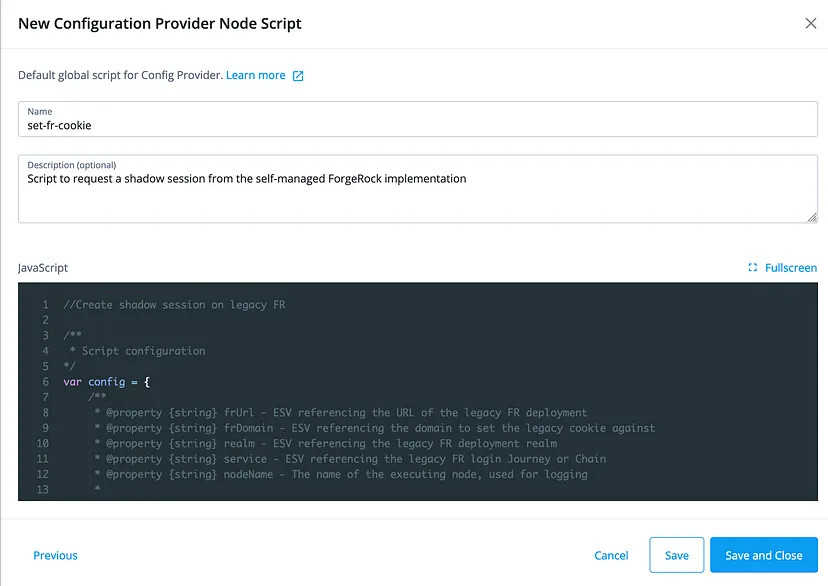
Import the set-fr-cookie script
-
From the ForgeRock Identity Cloud Platform UI, goto Scripts on the left panel > Auth Scripts > Blue New Script button > Configuration Provider Node > Next. Provide a Name of
set-fr-cookie, Description ofScript to request a shadow session from the self-managed ForgeRock implementationand copy and paste the contents of set-fr-cookie.js into the editor and hit Save. Example below:
Create Environment Secrets and Variables (ESVs)
ESVs are a great way to set values which need to be different per environment and also allows administrators to change values in the ESV configuration (via UI or REST) rather than editing scripts directly. Let’s go ahead and configure some ESVs which reference the existing ForgeRock implementation
-
From the Platform UI click the name at the top right > Tenant settings > Environment Secrets & Variables > Variable tab > Blue Add Secret and add the following:
Name: esv-legacy-fr-cookie
Type: string
Value: Name of the cookie from the existing system e.g.
iPlanetDirectoryPro
-
Repeat step 1 for the following
stringESVs:
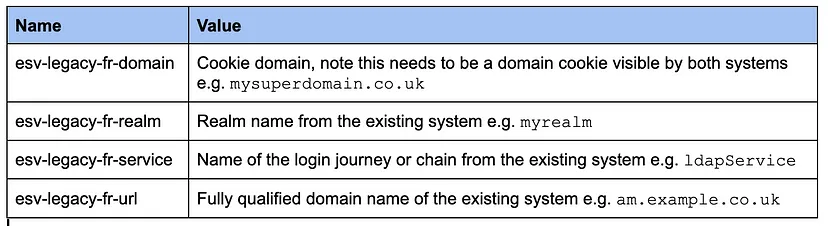
ESV Configuration table
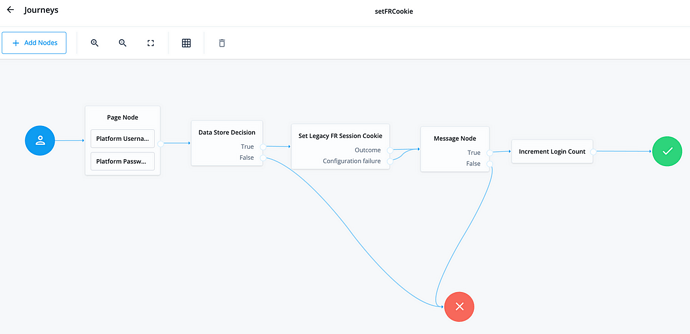
Build the Login Journey
-
From the Platform UI goto Journeys > Click the ellipses next to the default
Loginjourney and hit Duplicate > Provide a name ofsetFRCookieand hit Save. The new journey will then render in the UI. -
Search for
Configuration Provideronto the top left Filter Nodes box and drag the node onto the canvas -
Provide a name of
Set Legacy FR Session Cookie, select theset-fr-cookiescript we created above, set the Node Type toSet Custom Cookieand connect the journey as below (note for simplicity I’ve also removed the Inner Tree and added a Message Node to pause authentication but you don’t need to do these steps):

Journey to acquire a shadow session from the existing system and set as a cookie
Note the Configuration failure path for this new node is not connected
to the red error; this is intentional as we want authentication to
continue on even if the existing system has an issue to decouple the two
platforms.
Execute the Journey
Now the fun bit! Let’s execute the journey and make sure everything hangs together as expected.
-
Copy the Preview URL link from the top right of the Journey Editor. It will look something like this:
https://<tenant>/am/XUI/?realm=alpha&authIndexType=service&authIndexValue=setFRCookie -
Open a new Incognito Window or fire up a different browser app and paste in the URL from above, login with a valid username and password
-
Assuming the user exists on both systems, you’ll now see an additional cookie set as below, which applications yet to migrate to the new IdP can consume. Nice!
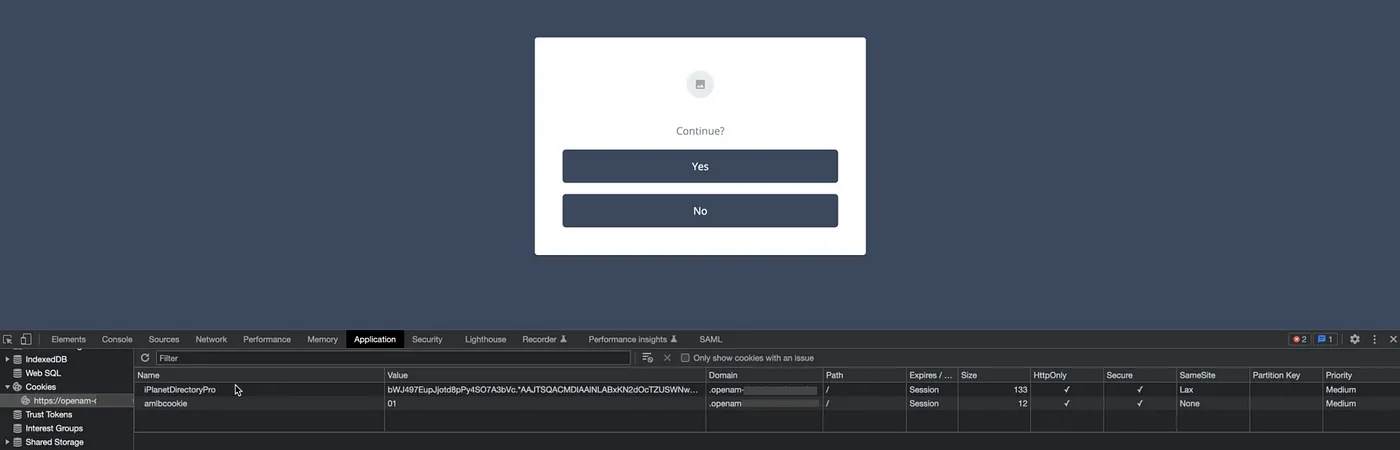
__
Journey illustrating a cookie being set via shadow session execution
Conclusion
There you have it, one technique which can help ease application migration to ForgeRock Identity Cloud via a single additional node. While this is a great approach to add to the toolbox, it should only be leveraged for a short period of time. Applications should still be migrated quickly to the new platform for a number or reasons:
-
Operational overhead — Running two systems at the same time incurs additional operational overhead.
-
Increased response times — The login journey now needs to interact with an external system, this will increase response times and the impact should be quantified.
-
Introduces an additional dependency — The solution is dependent on accounts being synchronised on both systems.
In addition, this example uses the default ldapService login chain
when interacting with the existing system. To improve the security
posture and add additional control, a stronger login journey or chain
should be defined in the existing system, such as consumption of a
signed and encrypted JWT token from ForgeRock Identity Cloud. Perhaps a
blog for another day.
Lastly, this example uses a self-managed ForgeRock implementation to mimic the existing system, the node can also be adapted for use against another IdP which supports REST based authentication.
Thanks for reading!
+
Shadow Session Creation To Ease Application Migration to ForgeRock Identity…
A technique which can help ease migration to ForgeRock Identity Cloud — all via the addition of a single authentication node
Reading time: 5 min read
![]() A
Scripted Approach for Creating and Using Service Accounts in ForgeRock
Identity Cloud
[.badge-category__name#Setup#]
A
Scripted Approach for Creating and Using Service Accounts in ForgeRock
Identity Cloud
[.badge-category__name#Setup#]
By Darinder Shokar Originally posted on https://medium.com/@darinder.shokar Introduction In this blog I’ll present a scripted approach for Service Account creation and use in ForgeRock Identity Cloud. However, before I do let’s discuss a little context for the why and how: Many customers want to manage the configuration they apply to ForgeRock Identity Cloud as code from a central repository and push via a CI/CD pipeline. This approach has multiple benefits: Single repository to manage — Co…
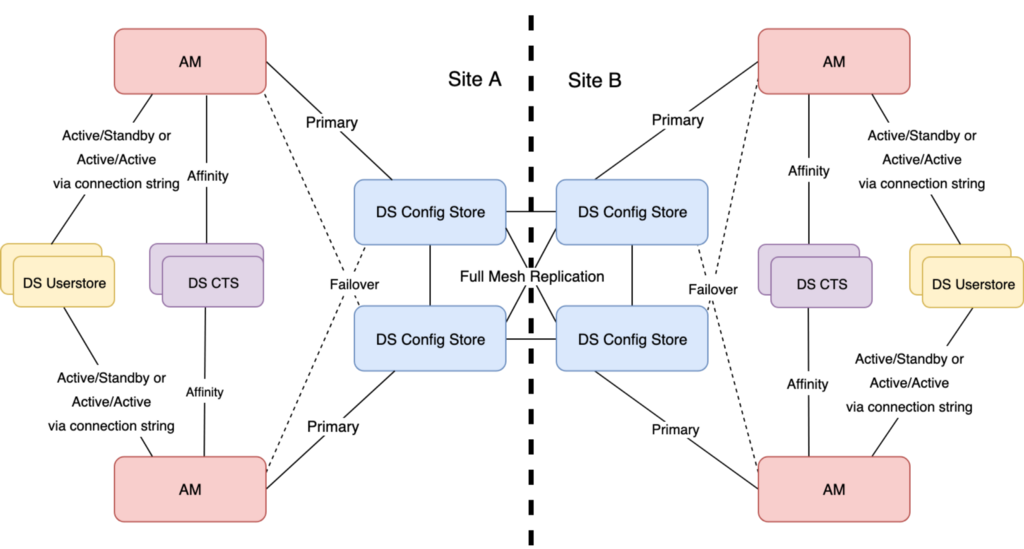
Problem statement Most database technologies (Cloud DB as a Service offerings, traditional DBs, LDAP services, etc.) typically run in a single primary mode, with multiple secondary nodes to ensure high availability. The main rationale is it’s the only surefire way to ensure data consistency, and integrity is maintained. If an active topology was enabled, replication delay (the amount of time it takes for a data WRITE operation on one node to propagate to a peer) may cause the following to occu…
![]() Use
case: Use email address as the username in ForgeRock Identity Cloud
[.badge-category__name#Setup#]
Use
case: Use email address as the username in ForgeRock Identity Cloud
[.badge-category__name#Setup#]
Use case overview Many organizations, particularly those in the Consumer Identity & Access Management (CIAM) space, want to enable a slick low friction experience for their customers. One easy way to achieve this is by using the email address as the username, rather than customers having to remember words or a set of characters. Steps to achieve this use case A key feature and differentiator of ForgeRock Identity Cloud is its flexibility. You can take advantage of this flexibility to configur…
![]() Immutable
Deployment Pattern for AM Configuration Without File- Based
Configuration
[.badge-category__name#Architecture#]
Immutable
Deployment Pattern for AM Configuration Without File- Based
Configuration
[.badge-category__name#Architecture#]
[image] Introduction The standard production grade deployment pattern for ForgeRock Access Management (AM) is to use replicated sets of configuration directory server instances to store all of AM’s configurations. The deployment pattern has worked well in the past, but is less suited to the immutable, DevOps-enabled environments of today. This article presents an alternative view of how an immutable deployment pattern could be applied to AM in lieu of the upcoming, full file-based configura…
![]() Immutable
Deployment Pattern for ForgeRock Access Management (AM) Configuration
without File Based Configuration (FBC)
[.badge-category__name#Architecture#]
Immutable
Deployment Pattern for ForgeRock Access Management (AM) Configuration
without File Based Configuration (FBC)
[.badge-category__name#Architecture#]
Introduction The standard Production Grade deployment pattern for ForgeRock AM is to use replicated sets of Configuration Directory Server instances to store all of AM’s configuration. The deployment pattern has worked well in the past, but is less suited to the immutable, DevOps enabled environments of today. This blog presents an alternative view of how an immutable deployment pattern could be applied to AM in lieu of the upcoming full File Based Configuration (FBC) for AM in version 7.0 of…
![]() IDM
Deployment Patterns: Centralized Repo- Based vs. Immutable File-Based
[.badge-category__name#Architecture#]
IDM
Deployment Patterns: Centralized Repo- Based vs. Immutable File-Based
[.badge-category__name#Architecture#]
Introduction I recently blogged about how customers can architect ForgeRock Access Management to support an immutable, DevOps style deployment pattern — see link. In this post, we’ll take a look at how to do this for ForgeRock Identity Management (IDM). IDM is a modern OSGi-based application, with its configuration stored as a set of JSON files. This lends itself well to either a centralized repository- (repo) based deployment pattern, or a file-based immutable pattern. This article explores …
![]() A
Script for Executing the OAuth 2.0 Authorization Code Flow with PKCE in
AM [.badge-category__name#Setup#]
A
Script for Executing the OAuth 2.0 Authorization Code Flow with PKCE in
AM [.badge-category__name#Setup#]
Introduction I often meet customers who want to quickly understand how the OAuth2 Authorization Code grant type works, how Proof Key for Code Exchange (PKCE) works, and how they can execute the flows programatically to understand how it all hangs together. This blog provides a sample script to execute the OAuth2 Authorization Code grant flow, along with support for PKCE using cURL. What is the OAuth2 Authorization Code Grant Flow? The Authorization Code grant is a two-step interactive proces…
Introduction ForgeRock Identity Cloud is revolutionizing the way businesses, consumers, and customers execute on their IAM strategy. Our Identity Cloud customers repeat three common feedback themes over and over again: Quicker time to value: Customers no longer have to worry about the build, run, operate and feed process of standing up an IAM system—ForgeRock Identity Cloud is managed by the people who build the underlying software; us (ForgeRock). Introduction of cool new stuff quicker and …
![]() Integrating IG with Identity
Cloud
[.badge-category__name#Integrations#]
Integrating IG with Identity
Cloud
[.badge-category__name#Integrations#]
Introduction It’s an exciting time here at ForgeRock. The ForgeRock Identity Cloud helps customers rapidly embrace next generation IAM, and quickly realize a return on their investment. For more on what this service offers, check out the following links: ForgeRock Identity Cloud overview here. ForgeRock Identity Cloud documentation here. In this exciting world, helping customers quickly and easily integrate with the ForgeRock Identity Cloud platform is critical. In this article, we’ll show yo…
![]() Locking
Out a User and Deleting All of Their Active Tokens in AM
[.badge-category__name#Maintenance#]
Locking
Out a User and Deleting All of Their Active Tokens in AM
[.badge-category__name#Maintenance#]
Introduction Customers often ask, “We have a business security requirement where we want to not only lock a given user out of the system, but also find and delete all SSO tokens they have created using the AM API. How do we do that?” This article shows you how to do this using the delete_tokens.sh script ;) In order to achieve this, we’ll be making using of the following AM endpoints: …/authenticate: Endpoint for authenticating users. …/users: Endpoint for getting and setting user profile a…