Getting started with ForgeRock Identity Cloud journeys: Part 2 -
Author: |
Rajesh Rajasekharan |
Created at: |
Jul 2023 |
Updated at: |
Mar 2024 |
This is Part 2 of 8 in the series Getting started with ForgeRock Identity Cloud journeys.
Building a journey with multiple factors of authentication (MFA) ~ 15 minutes
A journey can include multiple factors such as:
-
Password
-
Device
-
Biometric
ForgeRock Identity Cloud comes with ready-to-use nodes that can be used to build an MFA journey. The steps below guide you to build a journey with MFA.
MFA journey with the ForgeRock Authenticator app
Before getting started, install the ForgeRock Authenticator app from the App store on iOS devices or Play Store on Android devices.
The expected outcome of the MFA journey with the ForgeRock Authenticator app is as follows:
-
The journey starts with nodes that collect the username and password of the user.
-
The Data Store Decision node in the journey validates the collected credentials against a datastore.
-
If the validation against the datastore is true, the user can register a device by scanning a QR code on the screen using the Authenticator app installed on the device.
-
Upon successful registration of the device, the journey can be modified to optionally display a list of recovery codes.
-
By supplying the OTP generated in the ForgeRock Authenticator app, the user can gain access to the Identity Cloud end user dashboard.
Building the Authenticator application MFA journey
-
In a supported browser, log into your Identity Cloud Admin UI.
-
Go to Journeys > + New Journey.
-
Using the following information as a reference, complete the new journey form:
-
Name: frAuthApp
-
Identity Object: Alpha realm – Users managed/alpha_user
-
Description: Journey that uses ForgeRock Authenticator Application for MFA
-
-
Click Save.
-
Drag the following nodes from the Nodes list onto the journey canvas. Use the Filter nodes search facility if needed:
-
Page Node (Utilities)
-
Platform Username (Identity Management)
-
Platform Password (Identity Management)
-
Data Store Decision (Basic Authentication)
-
-
Drag the Platform Username into the Page Node. Drag the Platform password node to under the Platform Username node in Page node.
-
Connect nodes as shown in the screenshot below. To make a connection, hover the mouse over the outcome points of a node and drag the dotted arrow to another node.

-
Drag the following nodes onto the canvas. Use the Filter nodes search facility if needed:
-
OATH Token Verifier (Multi Factor Auth)
-
OATH Registration (Multi Factor Auth)
-
-
Connect the nodes as shown in the screenshot below.
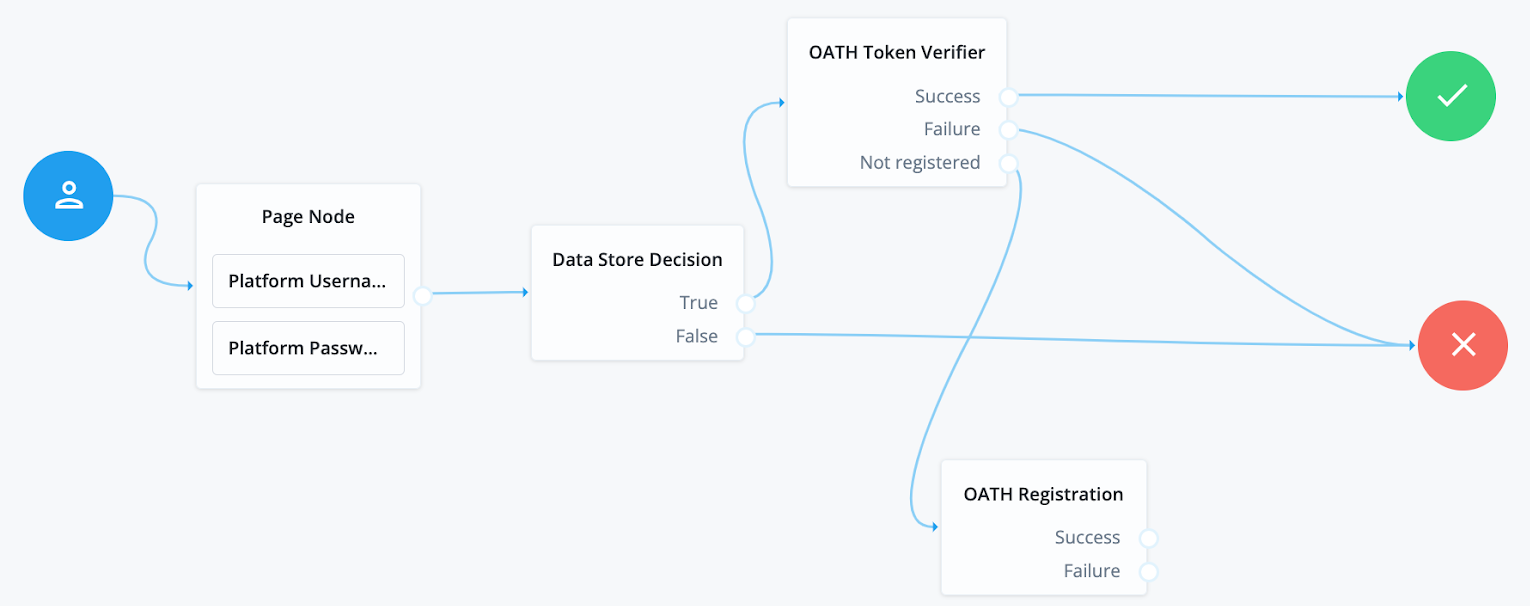
To complete the journey, a few more items are needed: * An option to display recovery codes once a device is registered. * A step to validate the OTP generated by the Authenticator application on the mobile device. * A step to configure the OATH Token Verifier to accept the recovery codes and add another node to validate the recovery code.
-
Drag the following nodes onto the canvas. Use the Filter nodes search facility if needed.
-
Recovery Code Display (Multi Factor Auth)
-
Recovery Code Collector Decision (Multi Factor Auth)
-
-
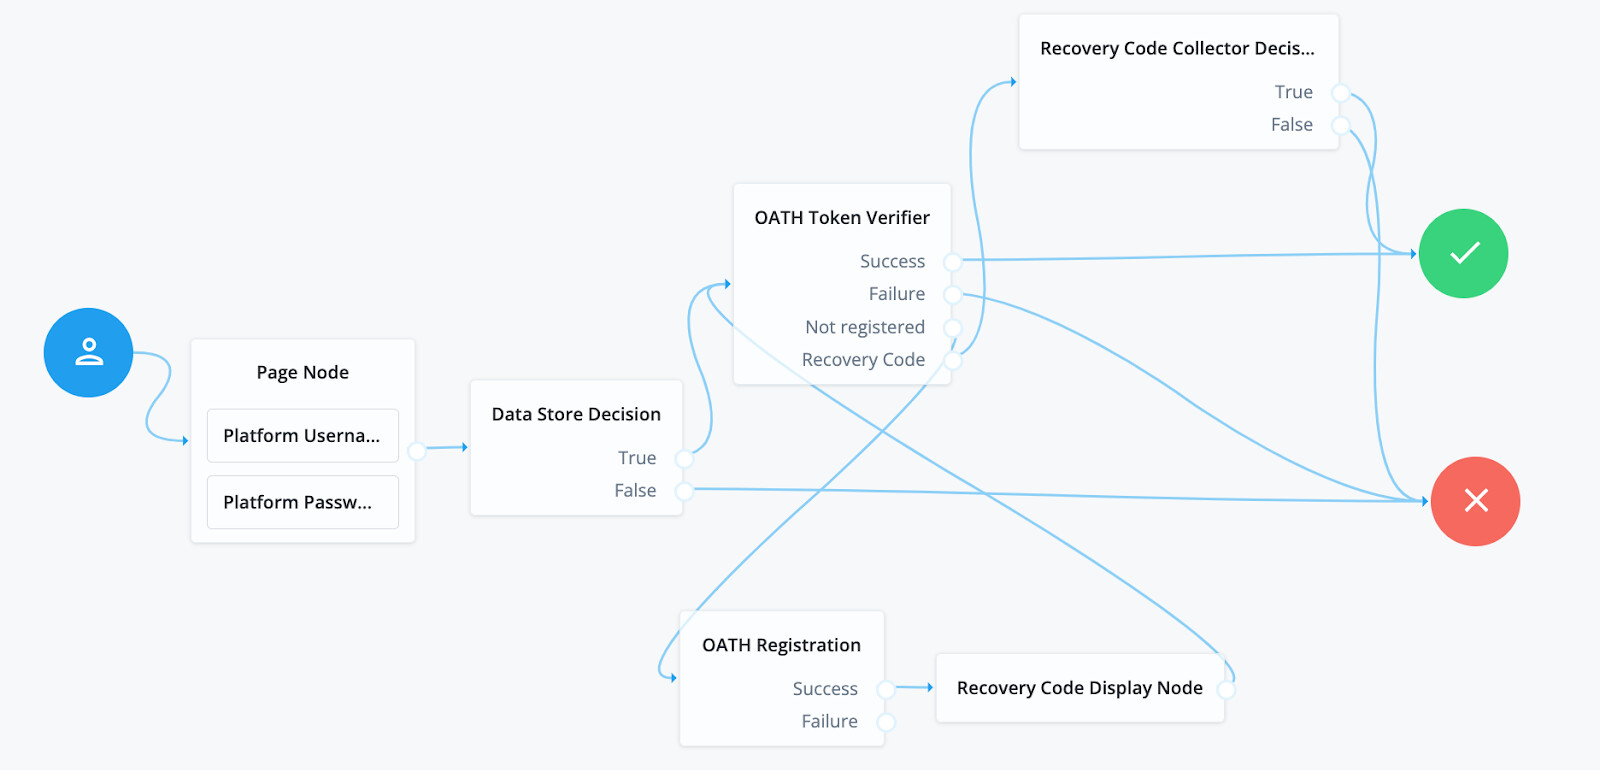
Make the following node connections:
-
OATH Registration node Success outcome → Recovery Code Display node
-
Recovery Code Display node → OATH Token Verifier node
-
-
Click on the OATH Token Verifier node to open the node properties window. Select the Allow Recovery Codes property at the bottom of the node property window.
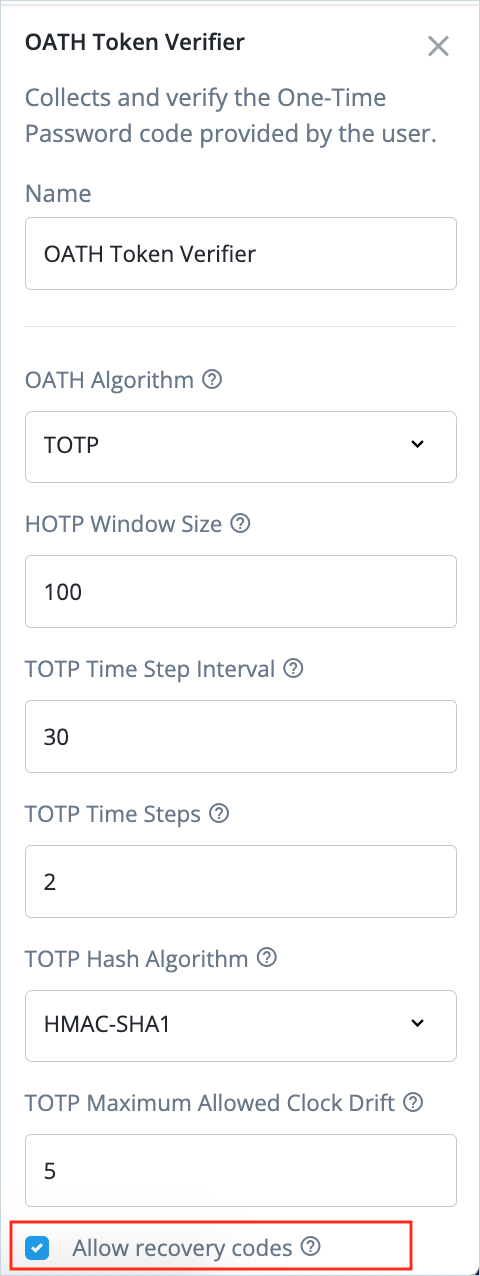
-
Close the OATH Token Verifier node property window. Notice the new outcome “Recovery Code” on the OATH Token Verifier node.
-
Make the following node connections:
-
OATH Token Verifier node Recovery code outcome → Recovery Code Collector Decision node
-
Recovery Code Collector Decision node True outcome → Success node
-
Recovery Code Collector False outcome → Failure node
-
-
Click Save.
Testing the ‘frAuthApp’ journey
The following steps expect that the ForgeRock Authenticator application is installed on an iOS or an Android device
-
Go to the list of journeys in the alpha realm of Identity Cloud and select the ‘frAuthApp’ journey.
-
Copy the preview URL of the journey and paste it on a text editor for review. Note that the URL has the authentication endpoint set to /alpha realm and the value for the
authIndexValueURI parameter is set to the journey name. It appears as follows:https://<tenant_name>.forgeblocks.com/am/XUI/?realm=alpha&authIndexType=service&authIndexValue=frAuthApp -
In a supported browser, different from the one that has the Identity Cloud administrator’s active session, paste and go to the journey URL copied above.
-
If you followed the steps Part 1 of this Getting Started series, enter the credentials for the user ‘fruser1’ and click Next. If not, go ahead and enter credentials of a test user that you might already have in your Identity Cloud tenant UI > Identities > Manage.

The Success outcome of the Data Store Decision node will take the user to the OATH Token Verifier node. When a device is not registered, the journey proceeds to the OATH Registration node, which then displays a QR code to the user to register a device.

-
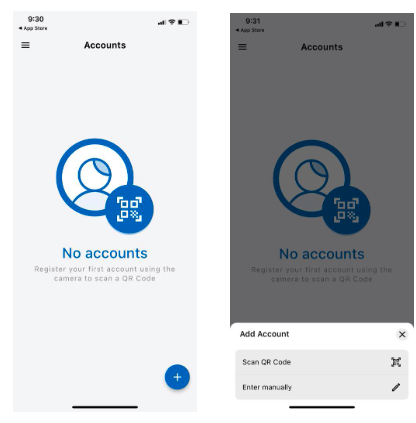
Scan the QR code displayed by the user using ForgeRock Authenticator application installed on a mobile device. Use the + option at the bottom right corner of the FR Authenticator app and the Scan QR Code to complete device registration.
-
Click Next on the browser.
The journey is now at the Recovery Code Display node and a set of recovery codes is displayed. Each code is valid only once.
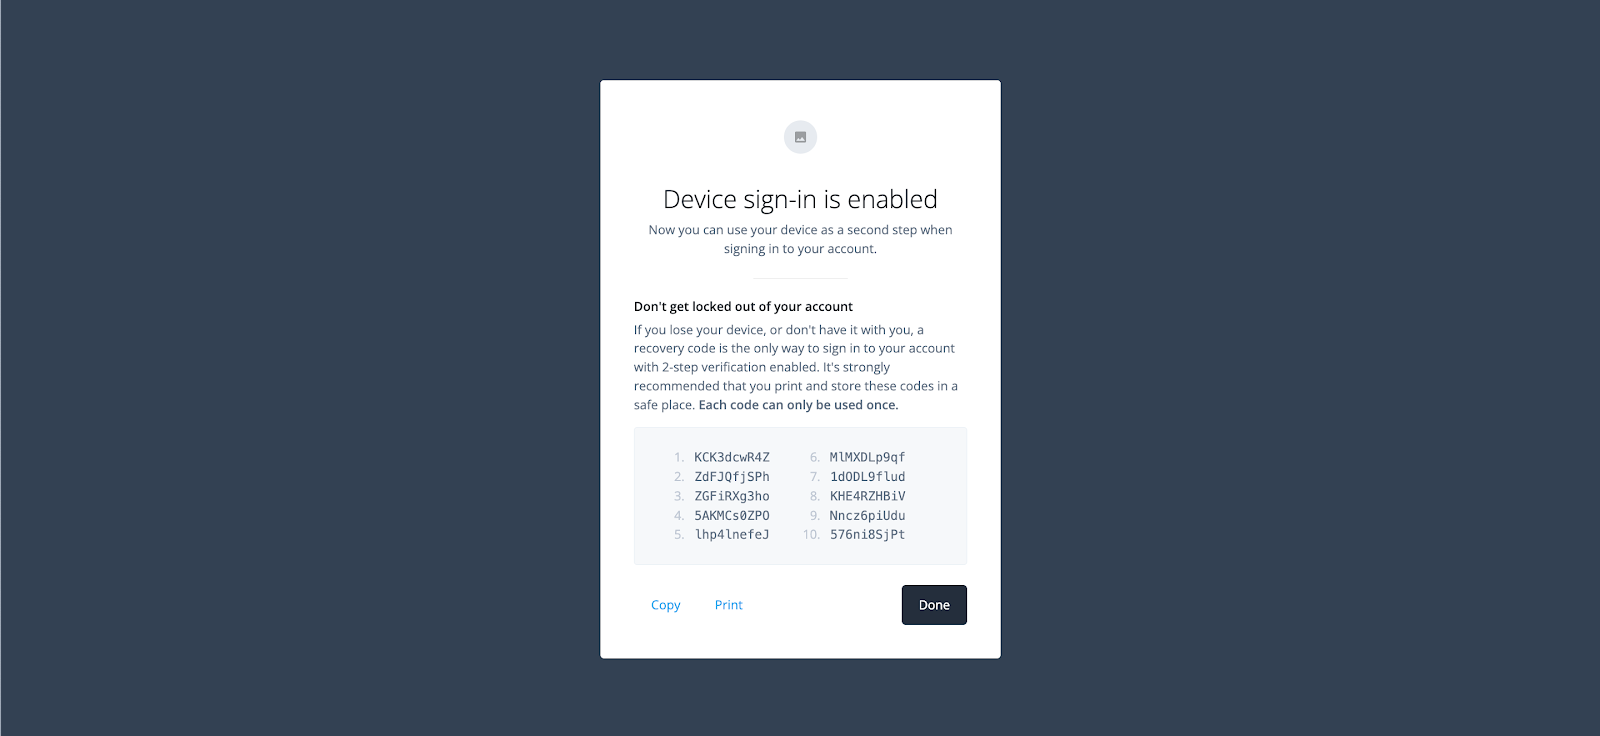
-
Copy the codes or print them for future use when the device registered is not accessible during authentication.
-
Click Done.
The journey is now back at OATH Token Verifier node, expecting a one-time passcode (OTP).
-
Use the ForgeRock Authenticator application on the registered mobile device to view OTP generated for the user account.
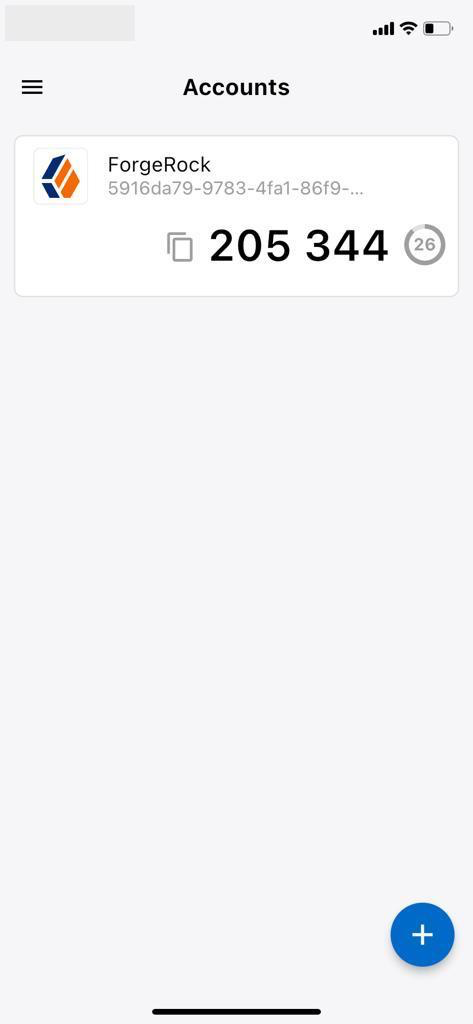
-
Enter the OTP from the Authenticator application in the browser and click Submit. If it times out, use the newly generated OTP from the Authenticator application.

The user has completed two factors of authentication to get to the end user dashboard page of Identity Cloud.
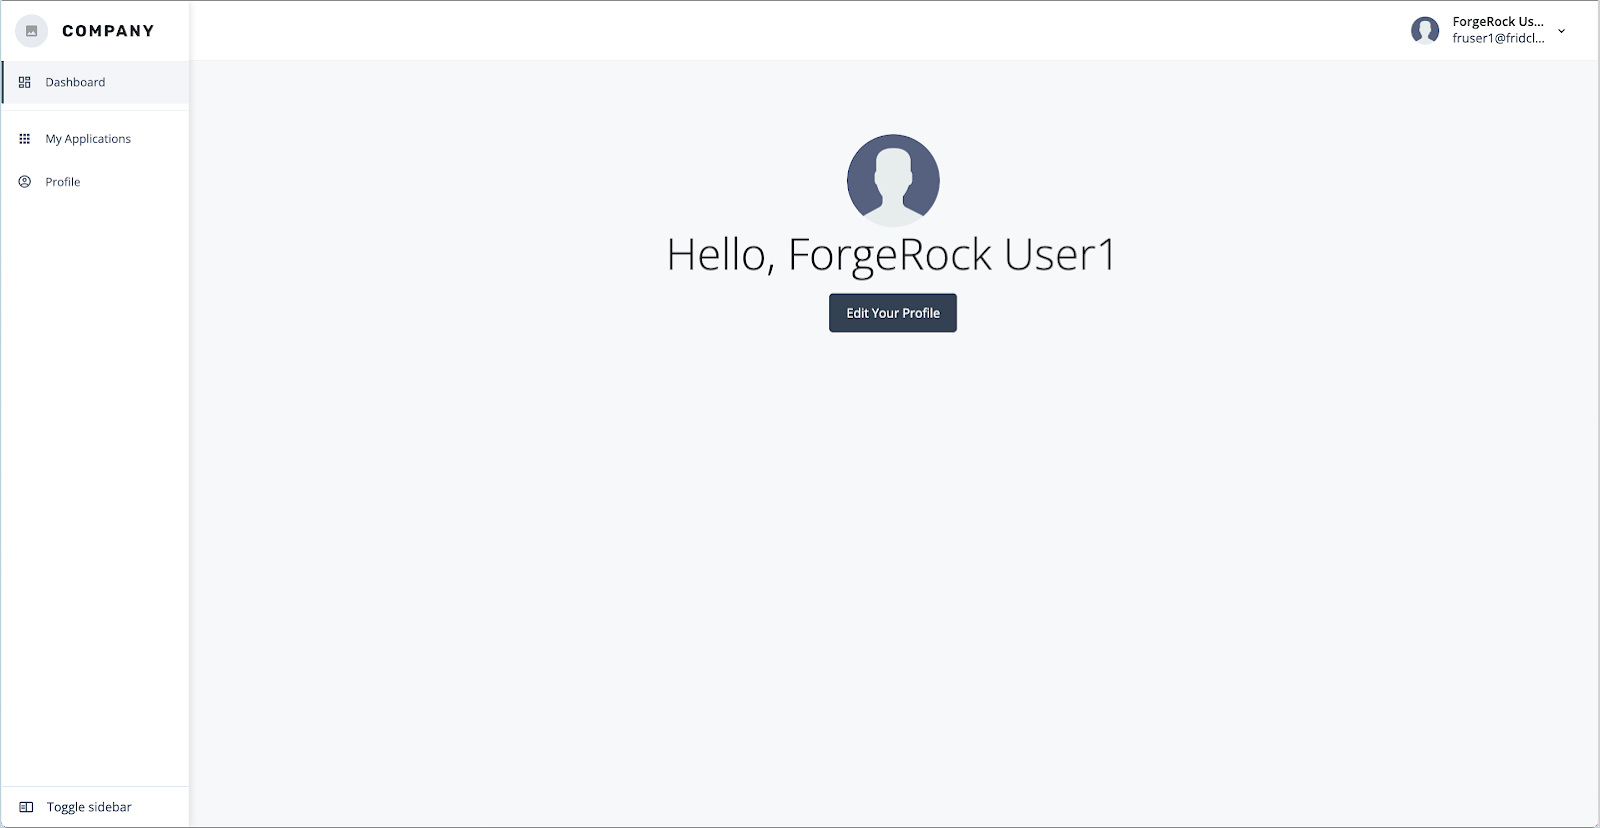
-
Click Edit Your Profile to confirm that 2-Step Verification is turned on for the user.
-
Sign out of the end user dashboard.
Modifying the ‘frAuthApp’ journey to provide MFA registration options
There may be situations where users expect flexible options to be presented to them, such as the option to defer device registration to a future login session.
This section covers adding additional nodes to the ‘frAuthApp’ journey to provide the following MFA options when the user’s device is not registered yet.
-
Register the device
-
Defer the registration of device
To modify the journey to provide MFA registration options:
-
Access the Identity Cloud tenant URL and log in with the administrator credentials.
-
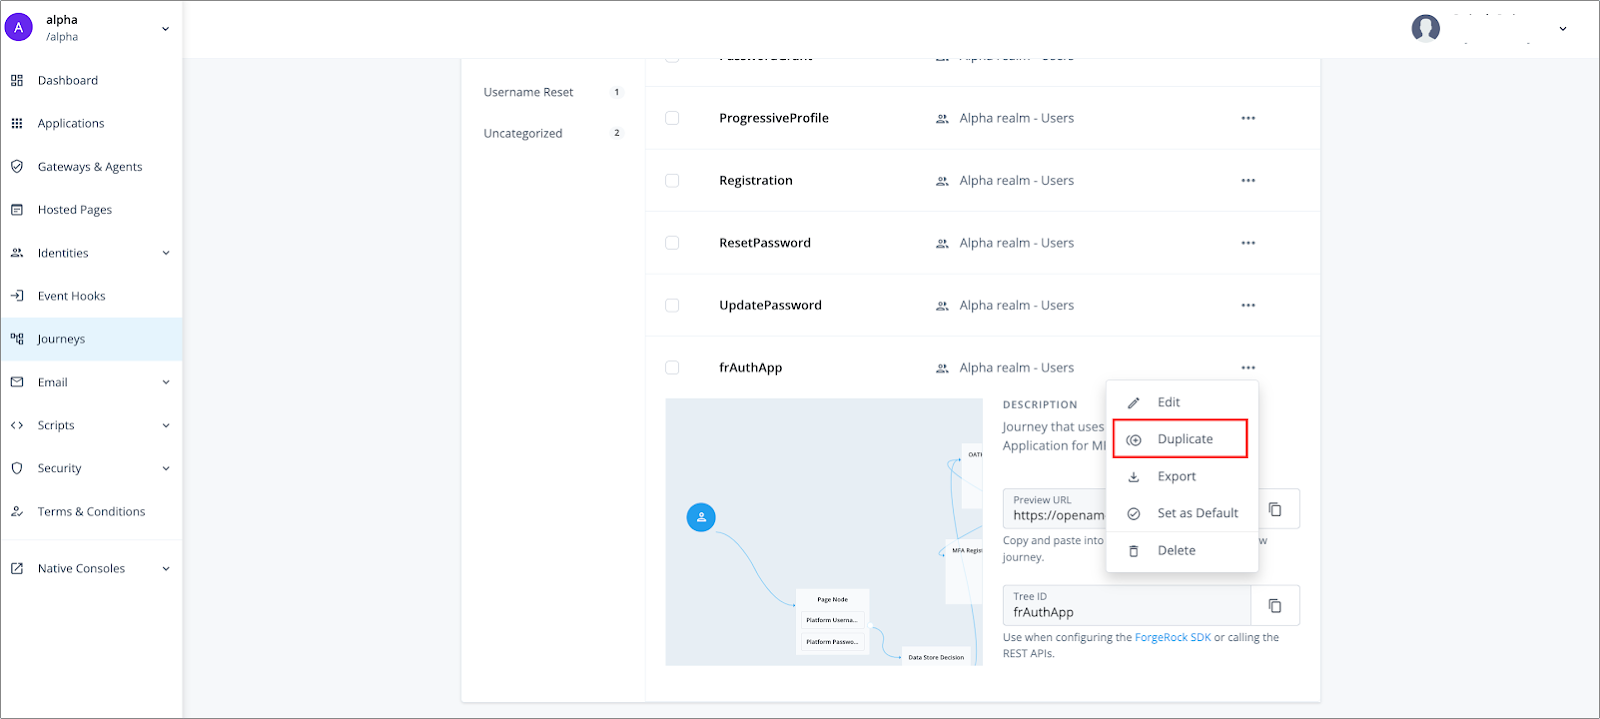
Go to alpha > Journeys and click on the ‘frAuthApp’ journey.
-
Make a copy of the ‘frAuthApp’ journey by clicking … next to the journey and selecting Duplicate.
-
Keep the default values for a new journey and click Save.
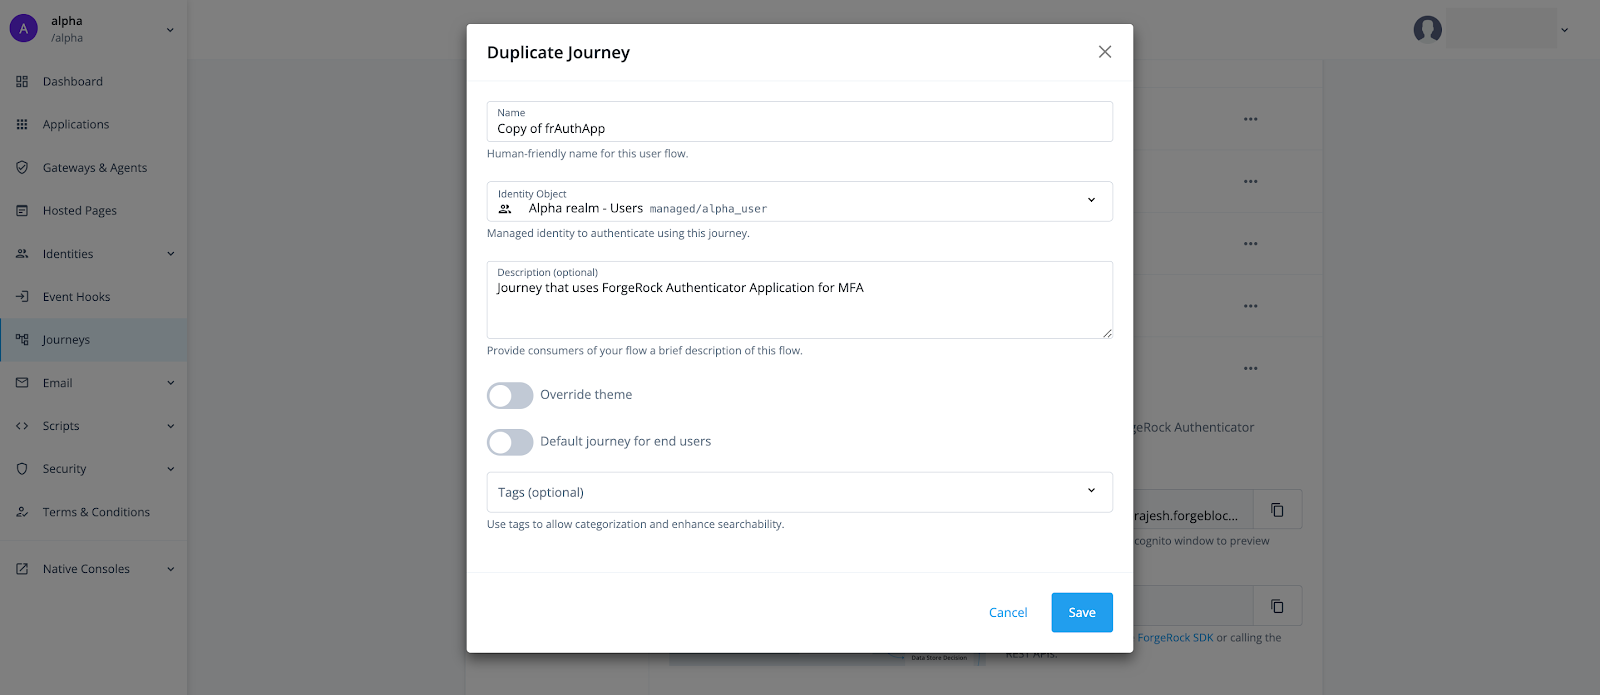
Save a copy of ‘frAuthApp’ as a backup. The new nodes will be added to the original ‘frAuthApp’ journey.
-
Click ← Journeys to go back to the alpha realm Journeys list and edit the ‘frAuthApp’ journey.
-
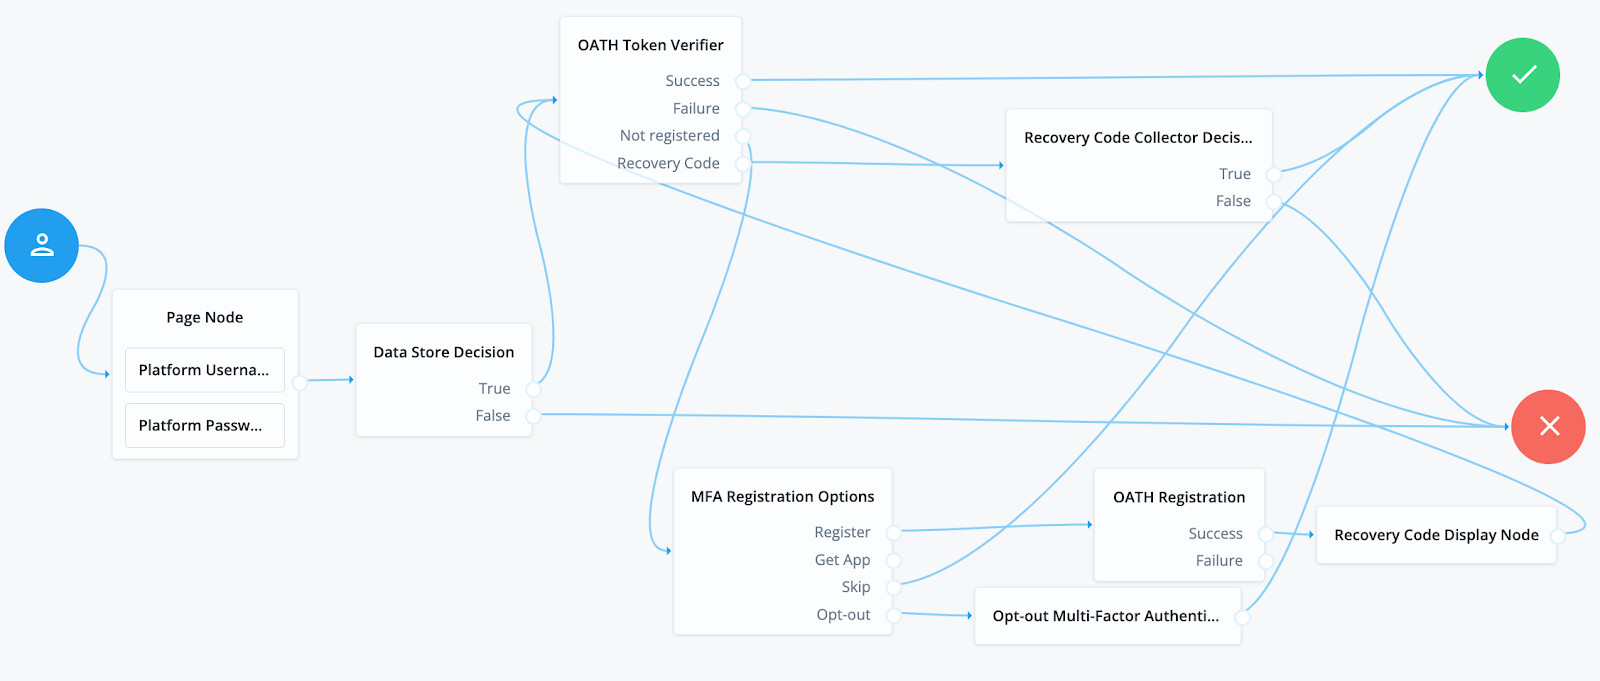
Click and drag the following nodes onto the journey.
-
MFA Registration Options (Multi Factor Auth)
-
Opt-out Multi-Factor Authentication (Multi Factor Auth)
-
-
Connect nodes to build the journey as shown in the screenshot below.
-
Click Save to save the journey.
-
Click ← Journeys to return to the main page of Identity Cloud Admin UI.
-
Create two more users in the alpha realm in your Identity Cloud Admin UI by going to Identities > Manage > +New Alpha realm – User. Use the following as a reference:
Username |
fruser2 |
First Name |
ForgeRock |
Last Name |
User2 |
Email Address |
|
Password |
Rock5tar10$ |
Testing the modified ‘frAuthApp’ journey with MFA registration options
-
In the Identity Cloud Admin UI, go to alpha > Journeys, select the ‘frAuthApp’ journey and copy its preview URL.
-
In a supported browser different from the one that has the Identity Cloud administrator’s active session. Open the ‘frAuthApp’ preview URL.
-
On the login page, enter the credentials of one of the newly created fruser2 and click Next.
Since the user does not have a device registered with Identity Cloud yet, additional registration options are displayed.
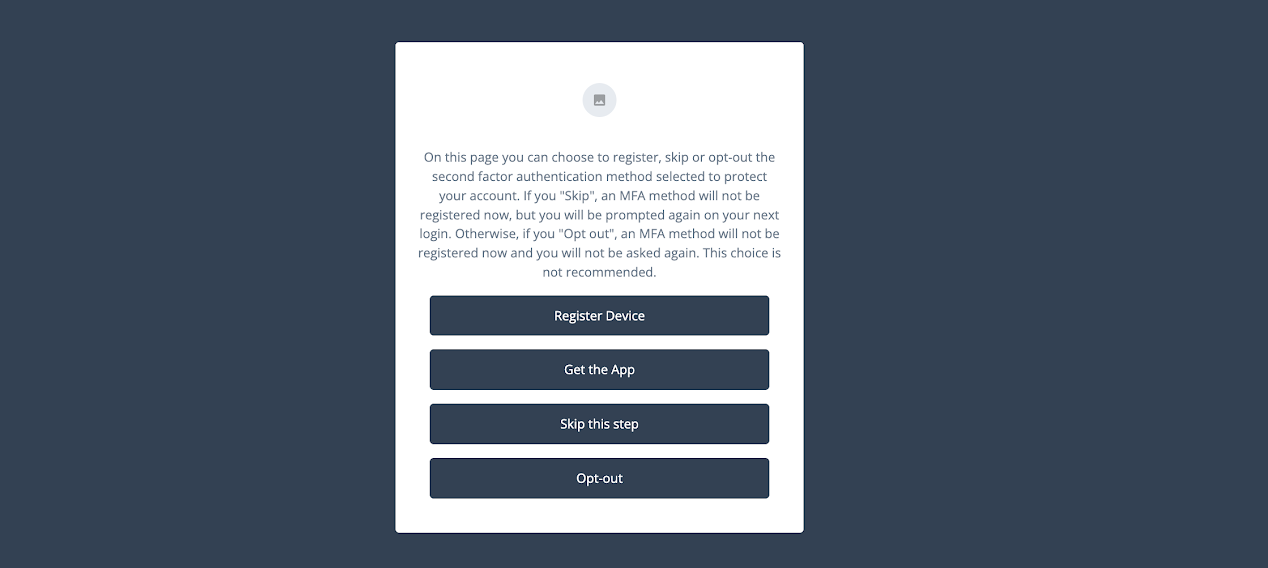
-
Click Skip this step.
The user is logged into the end user dashboard successfully without MFA.
-
Sign out of the end user dashboard.
Modifying the ‘frAuthApp’ journey with Get the App option
-
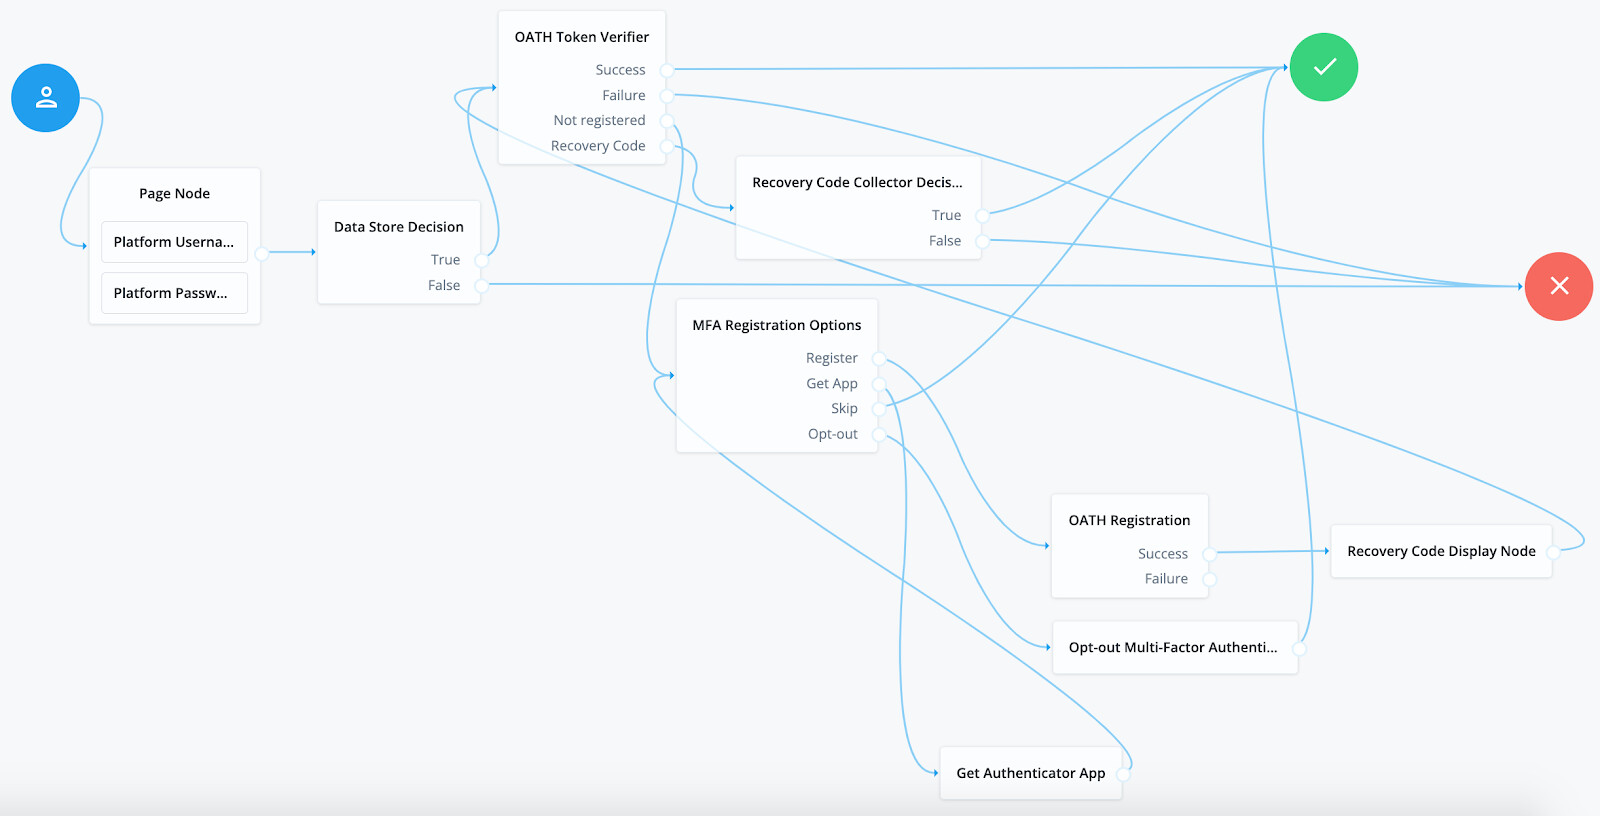
In the Identity Cloud Admin UI Journeys > ‘frAuthApp’ journey and click on preview image.
-
Drag the Get Authenticator App (Multi Factor Auth) node onto the journey.
-
Make the following node connections:
-
MFA Registration Options Get App Outcome → Get Authenticator App node
-
Get App Authenticator App node → MFA Registration Options node
The below screenshot of the modified journey can be used as a reference.
-
-
Click Save.
Testing the modified ‘frAuthApp’ journey with Get the App option
-
Access the ‘frAuthApp’ journey again.
-
On the login page, enter the credentials of the same user you tested previously, for example, fruser2, and click Next.
-
On the MFA registration options page, click on an option to get the app.

Clicking on either of the links in the window displayed opens a new browser tab with ForgeRock Authenticator application details in Apple App Store or Google Play.
-
Click Continue.
-
Complete the journey by skipping the registration step.
-
Sign out of the end user dashboard.
Debugging journeys
You can debug end user journeys in your development environment as you create them. By setting a journey to debug mode, you can view information stored in shared, transient, and secure state, as you navigate the journey. This lets you confirm that information is being passed correctly from node to node in the journey. Here is a detailed documentation on debugging Identity Cloud end user journeys.