Getting started with ForgeRock Identity Cloud journeys: Part 5 -
Author: |
Rajesh Rajasekharan |
Created at: |
Jul 2023 |
Updated at: |
Mar 2024 |
This is Part 5 of 8 in the series Getting started with ForgeRock Identity Cloud journeys.
Social authentication ~ 15 minutes
Users can onboard themselves in ForgeRock Identity Cloud by authenticating against their preferred social sites such as Google or Facebook. The user data shared by such sites post successful authentication is used to create or identify their account in Identity Cloud.
To achieve this, Identity Cloud should include a journey that gives end users an option to authenticate with social providers like Google, Facebook, Apple and more. The journey should include nodes to identify an existing Identity Cloud user or create a new one, based on data about the authenticated user it receives from the social provider.
For the Identity Providers like Google to share their authenticated users’ data with Identity Cloud, the Identity Cloud instance should be registered as their trusted client. This step requires an active Google account.
In the following two-part exercise, the first part walks through steps to configure the Identity Cloud tenant as a client of Google Identity Provider. The second part builds a journey in Identity Cloud with the Google Identity Provider as an option to authenticate with.
Configuring Identity Cloud as a Google client
First, register a ForgeRock app with Google:
-
Log in using an active Google account, if required.
If it’s the first time logging into the Google Cloud console, select the country and agree to the Terms of Service.
-
Click on the Select a project drop-down menu and click NEW PROJECT.
-
Enter a name for the project, say ‘FIDC Social Authentication’, and click CREATE.
Note that the newly created project is in focus now on the drop-down menu.
-
On the left navigation pane of Google Cloud console, click Enabled APIs & Services.
-
Click +ENABLE APIs AND SERVICES.
-
Select Google+ API under the Social category.
-
Click ENABLE.
-
On the left navigation pane, click OAuth consent screen.
-
Under User Type, select External and click CREATE.
-
On the App information page, enter the required details using the following information as a reference:
-
App name: ForgeRock ID Cloud
-
User support email: <active gmail address>
-
Authorized Domain: <forgerock identity cloud tenant url>
-
Developer contact information: <active gmail address>
-
-
Click SAVE AND CONTINUE.
-
On the Scopes page, click ADD or REMOVE SCOPES and select to update the following scopes:
-
…/auth/userinfo.email
-
…/auth/userinfo.profile
-
Openid

-
-
Click SAVE AND CONTINUE.
-
On the Test users page, click SAVE AND CONTINUE.
The Summary page is displayed.
-
With the ‘FIDC Social Authentication’ project selected on the top left menu, select Credentials on the left navigation pane.
-
Click +CREATE CREDENTIALS and select OAuth client ID.
-
Select Web Application in the Application type drop-down menu.
-
Using the following information as reference, complete the OAuth Client details:
-
Name: FIDC
-
Authorized JavaScript origins: https://<;forgerock_id_cloud_tenant_url>
-
Authorized redirect URIs: https://<forgerock_id_cloud_tenant_url>/am
-
-
Click CREATE.
-
Copy the Client ID and Client secret generated for the FIDC client and keep them handy. You can also download a JSON file containing the Client ID and Client secret.
Next, configure the Google Identity Provider service in Identity Cloud:
-
In a supported browser, log into your Identity Cloud Admin UI.
-
In the alpha realm, go to Native Consoles > Access Management.
The Access Management Admin UI opens in a browser tab/window.
-
Go to Services > Social Identity Provider Service.
-
Confirm the Enabled toggle is turned on in the Configuration tab.
-
Select the Secondary Configurations tab and click Add a Secondary Configuration > Client configuration for Google.
-
Enter the following details:
-
Name: Provide a name for the new configuration, say “Google IDP”.
-
Client ID: Paste the Client ID copied during the client registration step with Google.
-
Redirect URL: Enter the URL that exactly matches the value specified for Authorized Redirect URIs during the OAuth client configuration in Google. Eg: https://forgerock_id_cloud_tenant_url/am
-
Scope Delimiter: Hit the spacebar.
-
-
Click Create.
-
Paste the Client secret copied during the client registration step with Google in the Client secret field.
-
Click Save Changes.
Building the social authentication journey
-
In the alpha realm of your Identity Cloud Admin UI, go to Journeys > +New Journey.
-
Using the following information as a reference, provide values for the new journey:
-
Name: GoogleIDP
-
Identity Object: Alpha realm – Users managed/alpha_user
-
Description: Journey that lets users authenticate with Google
-
-
Click Save.
-
Click and drag the following authentication nodes onto the journey canvas:
-
Page Node (Utilities)
-
Platform Username (Identity Management)
-
Platform Password (Identity Management)
-
Select Identity Provider (Identity Management)
-
-
Arrange the three nodes from the Identity Management category inside the Page Node in the following order:
a. Platform Username
b. Platform Password
c. Select Identity Provider -
Connect the Start node to the Page Node.

-
Drag the following nodes onto the canvas:
-
Data Store Decision (Basic Authentication)
-
Increment Login Count (Behavioral)
-
-
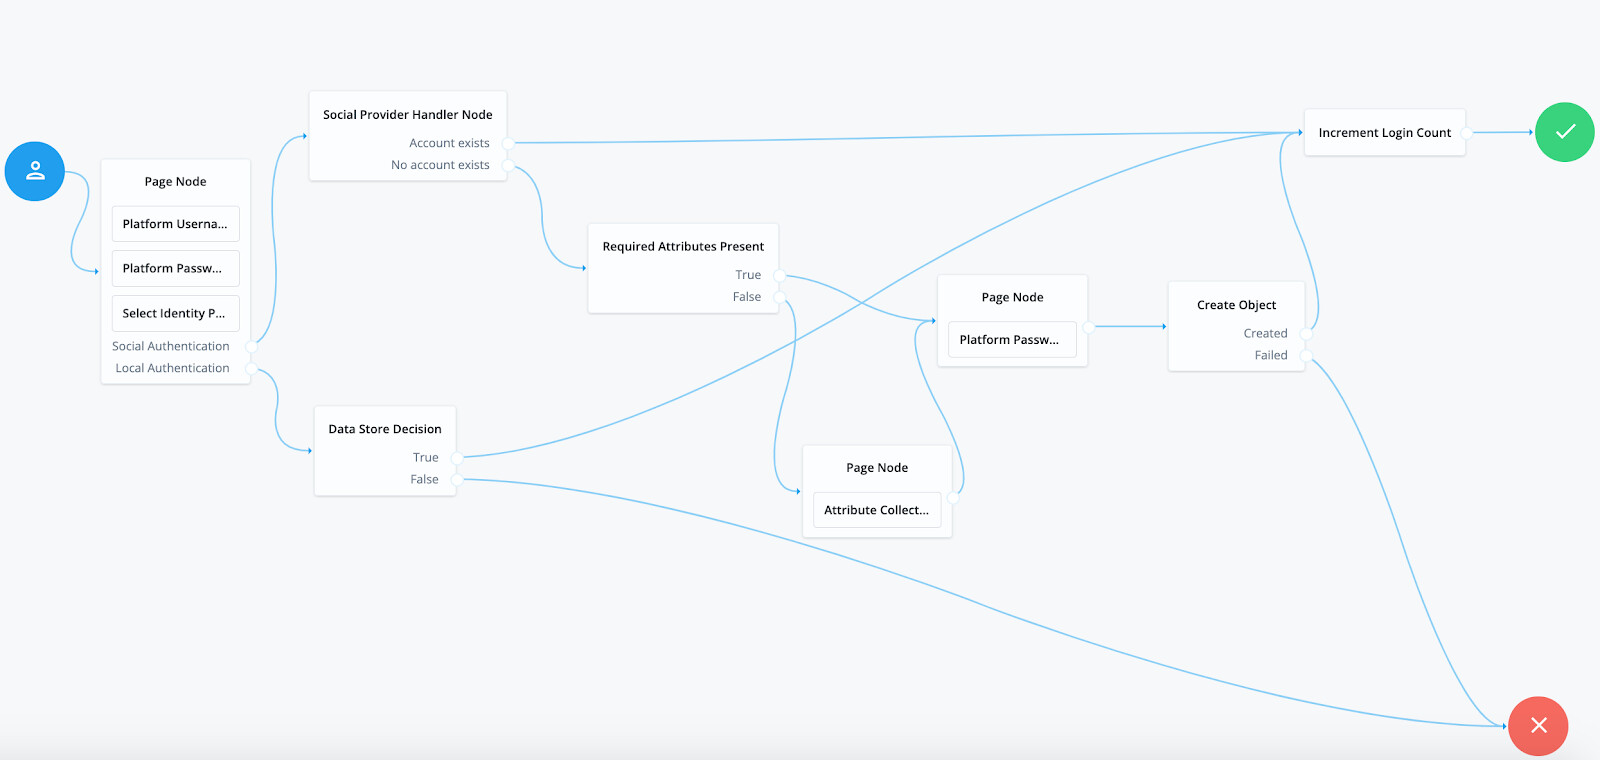
Build the journey by connecting nodes as shown in the screenshot below.
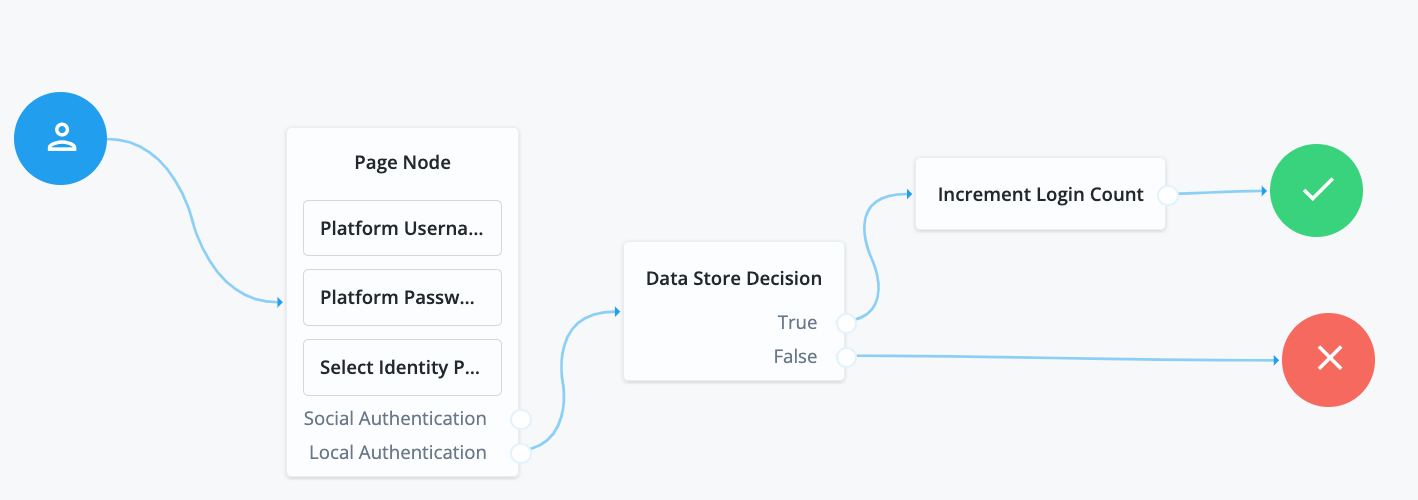
If the user opts for Local Authentication, the user credentials are validated against the datastore. If successful, the login count for the user is incremented and the user lands on to Identity Cloud end user dashboard.
-
Drag the Social Provider Handler Node (Federation) onto the canvas.
-
Click on the Social Provider Handler Node and select “Normalized profile to Managed User” in the Transformation Script property.

-
Connect the newly dragged nodes to extend the journey as shown in the screenshot below.

If the user opts for Social Authentication, a social provider handler node handles the request, authenticates the user with the Social ID provider like Google, and checks if the user has a local account in Identity Cloud. If the Google user already has an account with Identity Cloud, meaning the user has used the social authentication facility before, then the authentication is successful and the user lands on to the Identity Cloud end user dashboard.
-
Drag the following nodes onto the canvas:
-
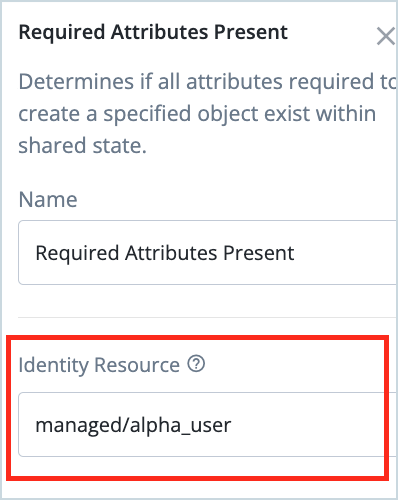
Required Attributes Present (Identity Management)
-
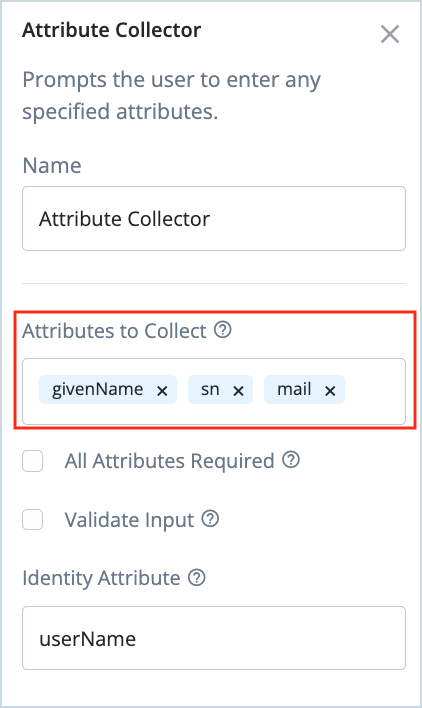
Attribute Collector (Identity Management)
-
Platform Password (Identity Management)
-
-
Click on the Required Attributes Present node and modify the Identity Resource node property to the value “managed/alpha_user”.
-
Click on the Attribute Collector node, and enter the following values in the Attributes to Collect field. Hit enter after keying in each of the following values.
-
givenName
-
sn
-
mail
-
-
Drag two Page Nodes (Utilities) onto the canvas.
-
Drag the Attribute Collector node into one of the Page Nodes and drag the Platform Password node into the other one.
-
Connect the newly added nodes as shown in the screenshot below.

If the Google-authenticated user does not yet have a local account with Identity Cloud, the journey should check that the Google IDP has sent all the required attributes of the user to create an account in Identity Cloud. If not, it should prompt the user for additional attributes, collect a new password to be set for their Identity Cloud account and eventually create an account using the information gathered.
-
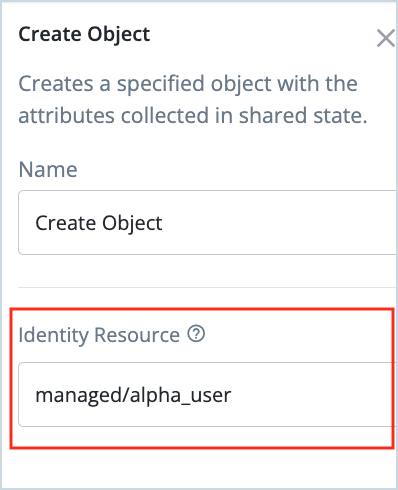
Drag the Create Object (Identity Management) node onto the canvas.
-
Click on the Create Object node and modify the Identity Resource property to the value “managed/alpha_user”.
-
Connect the nodes to complete the journey as shown in the screenshot below.
-
Click Save to save the journey.
Testing the ‘GoogleIDP’ journey
-
Go back to the list of journeys in the alpha realm, click on the newly created journey ‘GoogleIDP’ and copy the preview URL.
-
In a supported browser, different from the one that has the Identity Cloud administrator’s active session, log out of any active Google session, and open the journey URL copied above.
The login page now has an option to authenticate with Google.

-
Click Sign in with Google.
Google login screen appears.
-
Log in using Google account credentials.
Google returns a token with the Google user data to Identity Cloud and, if the token has all required attributes to create an account in Identity Cloud, the journey prompts you for a password to be set for the account that gets created for the user in Identity Cloud.

-
Click Next.
A user account for the Google user is created in Identity Cloud and the user lands on the end user dashboard of Identity Cloud.
-
Sign out of the end user dashboard.
-
Repeat the ‘GoogleIDP’ journey, signing in using the same Google account. This time the journey takes the user directly to the Identity Cloud end user dashboard.
-
Sign out of the Identity Cloud end user dashboard.