JWT Generation and Validation using PingOne AIC Next Generation
Author: |
Darinder Shokar |
Created at: |
Jun 2024 |
Updated at: |
Jun 2024 |
By Darinder Shokar
Originally posted on
https://medium.com/@darinder.shokar
Introduction
Things never stay still in the world of SaaS platforms and PingOne Advanced Identity Cloud (AIC) is no different. Next Generation scripting has been introduced, read all about it here, but the highlights are:
-
Stability — The introduction of a stable set of enhanced bindings to cover both common and utility operations
-
Ease of use — Simplified script generation via fewer imports, more intuitive return types, better debugging and an enhanced HTTP client
-
Reduced complexity — Ability to modularise scripts via library functions to reuse common code as
CommonJSmodules, along with seamless access toopenidmbindings
As part of Next Generation scripting, JWT (Json Web Token, overview here) generation and validation bindings were introduced. There are many use cases for JWT generation and validation, but a couple of common ones are to securely package and transport data or to create magic links to validate email addresses.
This blog walks through how to generate and validate a JWT in 4 easy
steps.
So let’s get to it!
Configuration Steps
The following will configure a sample journey in PingOne AIC to demonstrate JWT generation and validation using the Next Generation scripting engine and as an added bonus demonstrate the use of library functions to log debug messages.
Note uniquely the PingOne AIC SaaS runs the same software offered to self-managed customers, which means these steps can also be followed on a PingAM 7.5 deployment. Nice!
Code repository here.
Create the library function
The first step is to create the library function. As discussed earlier, library functions promote both reuse of common code and modularisation of code. In this example, a library script is created to record SLF4J debug and error messages to log files:
-
From the PingOne AIC administrative platform UI, navigate to Scripts on the left panel > Auth Scripts and hit the blue New Script
-
Select library , set the name to
ds-node-logger-lib, the description toA logger library function, copy the contents of this file into the Javascript box and hit Save and close
Import the journey
The next step is to import a JSON file which will create the journey, with all the required nodes, linkages and associated scripts in one go:
-
Download the JSON export from here
-
From the PingOne AIC administrative platform UI, navigate to Journeys > Import > Browse > Select the file from step 1 and hit next
-
A prompt confirming the journey name (
DS_JWT_Testing) along with the 3 scripts that will be imported (ds-create-jwt,ds-debug-outputandds-validate-jwt) will appear. Hit Start Import -
After import, click DS_JWT_Testing. The journey should look like this:

DS_JWT_Testing journey
+
Create a sample test user
Now we need to create a sample user to test with:
-
From the PingOne AIC administrative platform UI, navigate to Identities > Manage and hit the blue New Alpha realm — user
-
set the username and email address to
jwt@pingidentity.com. Example below:

Create a test user called jwt@pingidentity.com
Give it a whirl
The last step is to test it :)
-
From the PingOneAIC administrative platform UI, navigate to Journeys > click on DS_JWT_Testing and copy the Preview URL
-
Open an Incognito/Private browser window and paste in the URL
-
Enter the jwt@pingidentity.com email address and a JWT should be created, validated and then a debug screen displayed to show an attributed called
claimAttributecontaining the_idvalue of the user extracted from the JWT
Video demo:
Nice! So how does this all work then?
So at this point, you should be in a position where the journey is deployed and you can play around with it, but just to provide a bit more detail on what’s going on:
Journey — The journey first hits an Attribute Collector node to take
the email address as an input. Identify Existing User then checks if
the email address matches a user in the datastore; if so, the JWT logic
executes; if not, a retry loop is invoked to try again in case a typo
was made
JWT generation logic — The Create JWT node invokes the
ds-create-jwt.js
script, which first invokes a library function called
ds-node-logger-lib
to handle logging before generating a JWT token containing the issuer,
audience, subject (_id value of the user from sharedState), plus two
custom claims (uid set to _id of user and a static test_claim) all
wrapped in a HS256 compliant signed JWT valid for 5 minutes. The
signing key is a 256 bit key generated using openssl rand -base64 32
JWT validation login — The Validate JWT node then invokes the
ds-validate-jwt.js
script which pulls in the JWT token from sharedState plus issuer,
audience and signingKey variables and goes on to validate the
signature, extract the uid claim and insert it into the
claimAttribute sharedState variable
Debugger — A debug scripted node
(ds-debug-output.js)
is then invoked to output state variables and shows this
claimAttribute sharedState variable set to the user’s uid value
extracted from the JWT
An example JWT decoded using the Ping JWT Decoder looks like this (you can get the JWT value from the debug output’s`nodeState.jwt` field):
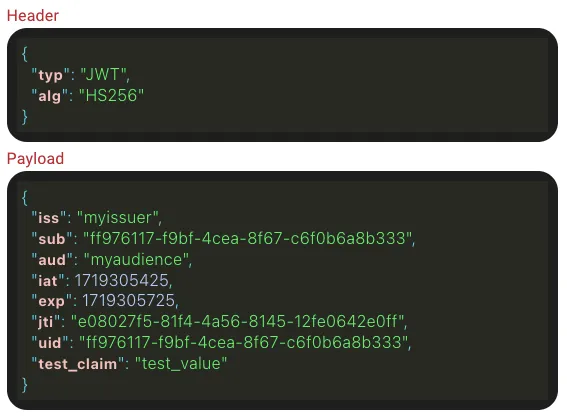
Example decoded JWT token
Log messages — Lets not forget that debug library script, which outputs log messages like this:
Note — The scripts output below records the secret to logs, this is for illustration/demo purposes only. Be sure to remove this for security reasons from the create and validate scripts:
 "***ds-create-jwt: logger initialised",
 "***ds-create-jwt: Node execution started",
  "***ds-create-jwt: secret = dm9vz3sSIJDwZhQM4/YPS4iGeOqYm1qm8pNKKkhAYQc=",
  "***ds-create-jwt: claims = {\"jwtType\":\"SIGNED\",\"jwsAlgorithm\":\"HS256\",\"issuer\":\"myissuer\",\"audience\":\"myaudience\",\"subject\":\"ff976117-f9bf-4cea-8f67-c6f0b6a8b333\",\"validityMinutes\":5,\"signingKey\":\"dm9vz3sSIJDwZhQM4/YPS4iGeOqYm1qm8pNKKkhAYQc=\",\"claims\":{\"uid\":\"ff976117-f9bf-4cea-8f67-c6f0b6a8b333\",\"test_claim\":\"test_value\"}}",
  "***ds-create-jwt: Generated JWT = eyJ0eXAiOiJKV1QiLCJhbGciOiJIUzI1NiJ9.eyJpc3MiOiJteWlzc3VlciIsInN1YiI6ImZmOTc2MTE3LWY5YmYtNGNlYS04ZjY3LWM2ZjBiNmE4YjMzMyIsImF1ZCI6Im15YXVkaWVuY2UiLCJpYXQiOjE3MTkzMDU0MjUsImV4cCI6MTcxOTMwNTcyNSwianRpIjoiZTA4MDI3ZjUtODFmNC00YTU2LTgxNDUtMTJmZTA2NDJlMGZmIiwidWlkIjoiZmY5NzYxMTctZjliZi00Y2VhLThmNjctYzZmMGI2YThiMzMzIiwidGVzdF9jbGFpbSI6InRlc3RfdmFsdWUifQ.ysEdeTxZZzu2VgKuA5SmV-Cs9A65UdxUMY7qRELmHT4",
 "***ds-create-jwt: Node execution completed",

 "***ds-validate-jwt: logger initialised",
 "***ds-validate-jwt: Node execution started",
  "***ds-validate-jwt: Secret = dm9vz3sSIJDwZhQM4/YPS4iGeOqYm1qm8pNKKkhAYQc=, assertionJwt = eyJ0eXAiOiJKV1QiLCJhbGciOiJIUzI1NiJ9.eyJpc3MiOiJteWlzc3VlciIsInN1YiI6ImZmOTc2MTE3LWY5YmYtNGNlYS04ZjY3LWM2ZjBiNmE4YjMzMyIsImF1ZCI6Im15YXVkaWVuY2UiLCJpYXQiOjE3MTkzMDU0MjUsImV4cCI6MTcxOTMwNTcyNSwianRpIjoiZTA4MDI3ZjUtODFmNC00YTU2LTgxNDUtMTJmZTA2NDJlMGZmIiwidWlkIjoiZmY5NzYxMTctZjliZi00Y2VhLThmNjctYzZmMGI2YThiMzMzIiwidGVzdF9jbGFpbSI6InRlc3RfdmFsdWUifQ.ysEdeTxZZzu2VgKuA5SmV-Cs9A65UdxUMY7qRELmHT4",
 "***ds-validate-jwt: uid = ff976117-f9bf-4cea-8f67-c6f0b6a8b333",
 "***ds-validate-jwt: Node execution completed",

 "***ds-debug-output: logger initialised",
 "***ds-debug-output: Node execution started",
Conclusion
So there you have it — a quick and easy way to generate and validate JWT tokens using the shiny new Next Generation JWT bindings in 4 easy steps.
This example signs the JWT using a static symmetric key (HS256). To
maintain a good security posture it’s recommended to set the
signingKey variable to an
Environment
Secret Variable (ESV) which can then be set to a unique value per
environment.
Further fun and excitement can be had by signing JWT tokens using
asymmetric keys (RS256), encrypting and then signing JWTs or signing
and then encrypting :)
Thanks for reading!