Voice authentication with Whispeak and ForgeRock
Author: |
Stephane Orluc |
Created at: |
Oct 2022 |
Updated at: |
Oct 2022 |
Voice authentication with Whispeak and ForgeRock
ForgeRock’s mission is to Help You Simply and Safely Access the Connected World. To do so, one strategy is to get rid of passwords and use modern authentication mechanisms. These alternatives can be configured out of the box with ForgeRock’s user journey Orchestrator but in some situations you may need different technologies. With Whispeak you can authenticate with your voice; you don’t need any additional device (no mobile, no card, no token/usb key, …), you just have to be you and speak. This is really powerful when there is a high employee turnover in your company or when your workforce can’t use their hands (in a factory for instance). Let’s see how we can easily combine ForgeRock and https://whispeak.io/en/home-voice-biometrics/.
A few words about Whispeak and ForgeRock

Whispeak is a company that provides voice recognition software that uses artificial intelligence to identify and authenticate someone with biometrics. This company is built with a strong focus on GDPR and CNIL compliance and it can be used in Saas or self-managed mode (OnPremVM or Private Cloud).

ForgeRock is a Web company that provides the only Identity platform that can be used for any type of identities (workforce, customer, IoT, etc…) and consumed either as a Saas or as a self-managed software. ForgeRock’s Identity platform covers the full Identity scope : Access Management, Identity Management, Identity Governance and Directory.
How it works
To authenticate with your voice you first have to register it (i.e. to associate your voice with your user profile). This journey to register your voice will be configured in ForgeRock. The following figure shows the sequence diagram to register/enroll your voice.
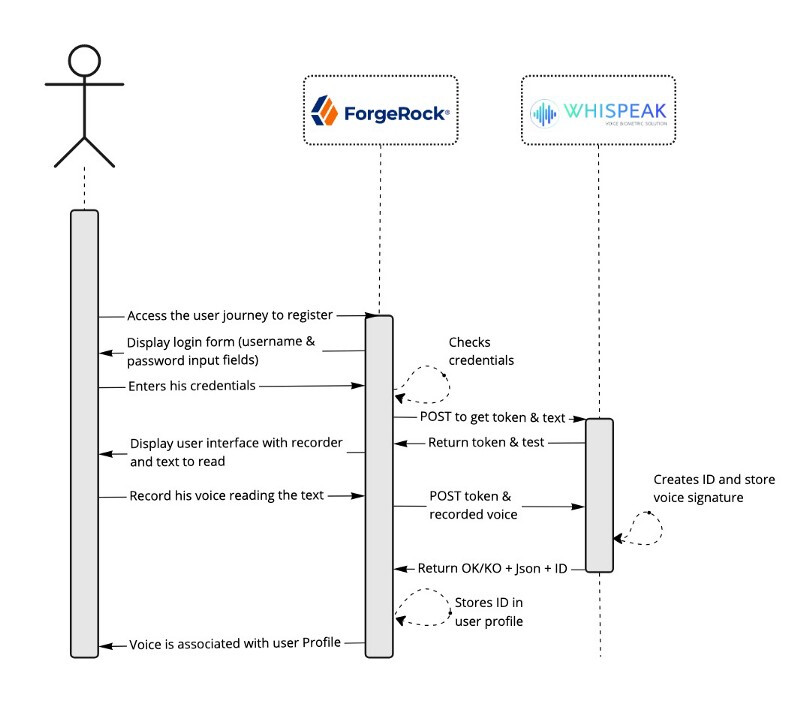
Sequence Diagram : Enrolling voice
Once your voice is registered/enrolled and associated to your user user profile you can use it to authenticate. The authentication sequence diagram is detailed in the next figure.
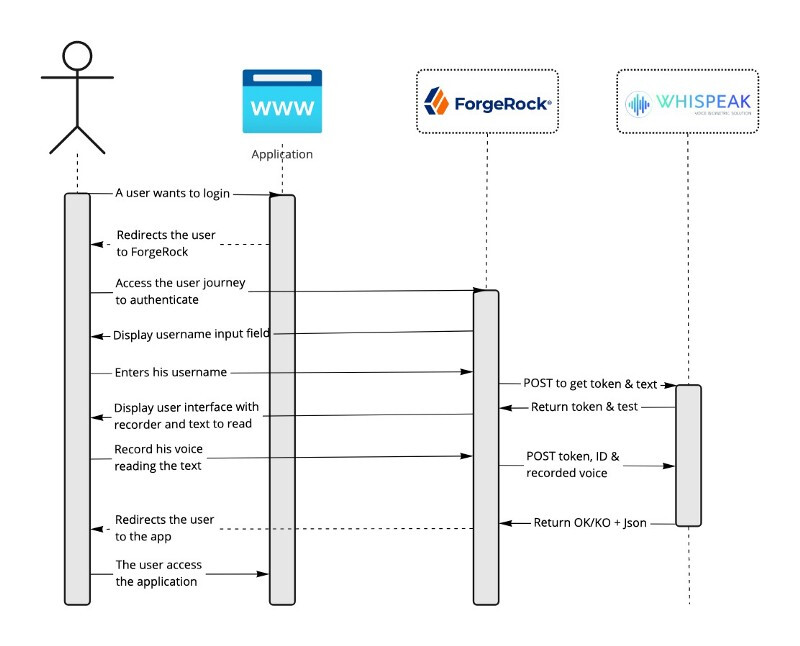
Sequence Diagram: Authenticating with voice
These two sequence diagrams will be done in one user journey configured in ForgeRock. The figure below shows this user journey.

Voice authentication user journey
Note: I this blog I’m using Whispeak API v1. The documentation id available here https://doc.whispeak.io/v1.
Let’s see how to configure it in ForgeRock!
How to configure it in ForgeRock
First of all we will create the scripts that we’ll use in the tree.
Connect to your ForgeRock Identity platform console
(https://<YOUR-FORGEROCK-TENANT>/platform/) and follow theses steps.
Create a script to display a voice Recorder and to get a token from Whispeak:
Info: This script is uploading a client-side javascript that will display a voice recorder and then send it back to ForgeRock. Then ForgeRock will use it in the journey.
-
Select your realm (default is alpha), browse to Scripts and click on New Script to create a new one and choose a Journey Decision Node type,
-
On the script creation page, name your script VoiceRecorder,
-
In the script field enter the following code and click on Save Changes.
https://gist.github.com/sorluc/1c9ed30bb226fd47b81d6b5b129784cd
VoiceRecorder.js
var apiKey = 'YOUR WHISPEAK API KEY';
var myCustomer = 'YOUR CUSTOMER NAME AT WHISPEAK';
var myApplication = 'with-asr/YOUR WHISPEAK APPLICATION ID';
function createScript(text) {
    return String("\n\
    var div = document.createElement('div'); \n\
    div.id = 'voiceRecorder'; \n\
    div.innerHTML = '<div class=\"container\">' +\n\
                        '<h2>Record your voice</h2>' + \n\
                        '<span style=\"font-size:20px;\">Please read the text below:</span>' + \n\
This file has been truncated. show original
Create a second script to send the recorded voice, the ID and the token to Whispeak to validate it:
Info: This script is creating a multipart form containing the ID and the recored voice to send it in an HTTP POST request to Whispeak to check if the recorded voice is valide compared to the voice signature associated to the ID.
-
Browse to Scripts and click on New Script to create a new one and choose a Journey Decision Node type,
-
On the script creation page, name your script whispeakCheck,
-
In the script field enter the following code and click on Save Changes.
https://gist.github.com/sorluc/a7223905140d719c1b74b95eb7eb7860
whispeakCheck.js
var myCustomer = 'YOUR CUSTOMER NAME AT WHISPEAK';
var myApplication = 'with-asr/YOU WHISPEAK APPLICATION ID';
var id = idRepository.getAttribute(sharedState.get("_id"), "fr-attr-istr2").iterator().next();

var token, text;

var result = sharedState.get("voiceRecordedBlob").slice("data:audio/wav;base64,".length);
var decodedString = java.lang.String(org.forgerock.util.encode.Base64.decode(result),"ISO-8859-1");
This file has been truncated. show original
Create a third script to display a voice Recorder and to get a token from Whispeak:
Info: This script is the same as VoiceRecorder except that this time we all the
/enrollAPI from Whispeak to enroll the voice and associate it to the user Profile.
-
Browse to Scripts and click on New Script to create a new one and choose a Journey Decision Node type,
-
On the script creation page, name your script voiceEnroll,
-
In the script field enter the following code and click on Save Changes.
https://gist.github.com/sorluc/0e8482f6035dce8f20a9363bf3b26b18
voiceEnroll.js
var apiKey = 'YOUR WHISPEAK API KEY';
var myCustomer = 'YOUR CUSTOMER NAME AT WHISPEAK';
var myApplication = 'with-asr/YOUR WHISPEAK APPLICATION ID';
function createScript(text) {
    return String("\n\
    var div = document.createElement('div'); \n\
    div.id = 'voiceRecorder'; \n\
    div.innerHTML = '<div class=\"container\">' +\n\
                        '<h2>Record your voice</h2>' + \n\
                        '<span style=\"font-size:20px;\">Please read the text below to register:</span>' + \n\
This file has been truncated. show original
Create a fourth script to send the recorded voice to Whispeak to enroll it:
Info: This script is creating a multipart form containing the recored voice to send it in an HTTP POST request to Whispeak to create the user ID and store the voice signature. Here we also store the Whispeak ID associated to the voice into ForgeRock User profile to use it later when we want to authenticate.
-
Browse to Scripts and click on New Script to create a new one and choose a Journey Decision Node type,
-
On the script creation page, name your script whispeakEnroll,
-
In the script field enter the following code and click on Save Changes
https://gist.github.com/sorluc/c5a3c3d5bc892dd550baa96f5d05e825
whispeakEnroll.js
var myCustomer = 'YOUR CUSTOMER NAME AT WHISPEAK';
var myApplication = 'with-asr/YOUR WHISPEAK APPLICATION ID';

var token, text;

var result = sharedState.get("voiceRecordedBlob").slice("data:audio/wav;base64,".length);
var decodedString = java.lang.String(org.forgerock.util.encode.Base64.decode(result),"ISO-8859-1");


var requestCheckVoice = new org.forgerock.http.protocol.Request();
This file has been truncated. show original
Note 1: In all these scripts you’ll have to change a few parameters to
match you Whispeak setup. apiKey should be updated to match your
Whispeak API KEY, myCustomer is equal to your customer name in
Whispeak admin console and myApplication is equal to your
application Id in Whispeak.
Note 1: In theses script we store Whispeak ID and Revokation links &
key in ForgeRock user profile. Whispeak ID is stored in fr-attr-istr2
and Revokation links & key are stored in `fr-attr-imulti1`.
Now that all scripts are ready, let’s create the journey. This journey will be able to register a voice and use it to authenticate.
Note: This user Journey is designed for ForgeRock Identity Cloud Login UI (platform-login-ui) and can’t be used as is with AM UI.
-
Browse to Journeys and click on New Journey to create a new one called LoginWhispeak for Identity Object Alpha realms — User,
-
Add a Scripted Decision node, name it Register Whispeak, select whispeakEnroll script, add
trueandfailedoutcomes, linktrueto Success exit (Green circle icon) andfalseto Failure exit (red circle icon), -
Add a Scripted Decision node, name it voiceEnroll, select voiceEnroll script, add
trueoutcomes, linktrueto Register Whispeak node, -
Add a Message Node, name it Do you want to Enrol?, add a message: “Your voice is not yet enrolled in our system. Do you want to enrol it ?”, a Positive answer: “Yes” and a Negative answer: “No”. Link
trueto voiceEnroll node and linkfalseto Success exit (Green circle icon), -
Add a Data Store Decision node and link
trueto Do you want to Enrol? node and linkfalseto Failure exit (red circle icon), -
Add a Platform Password node, leave default parameters and link it to Data Store Decision node,
-
Add a Scripted Decision node, name it whispeakCheck, select whispeakCheck script, add
true,failedaddunregisteredoutcomes, linktrueto Success exit (Green circle icon), linkunregisteredto Platform password node,failedoutcome will be linked in the next step, -
Add a Retry Limit Decision node, leave default parameters, link
rejectoutcome to Failure exit (red circle icon),Retryoutcome will be linked later, -
Add a Scripted Decision node, name it voiceRecorder, select voiceRecorder script, add
trueoutcomes, linktrueto whispeakCheck node, -
Link
unregisteredoutcome from whispeakCheck node toRetry Limit Decision node, -
Link
Retryoutcome from Retry Limit Decision node to voiceRecorder node, -
Add an Attribute Present Decision node, set Present Attribute parameter to
true, linktrueto voiceRecorder node and linkfalseto Platform Password node, -
Add an Identify Existing User node, leave default parameters, link
trueto Attribute Present Decision node and linkfalseoutcome will be linked later, -
Add a Platform Username node, leave default parameters and link it to Identify Existing User node. Link the start (Blue circle icon) to this node,
-
Finally, Link
falseoutcome from Identify Existing User node to Platform Username node. Et voila !
The following figure presents the journey in ForgeRock Intelligent Authentication web designer.
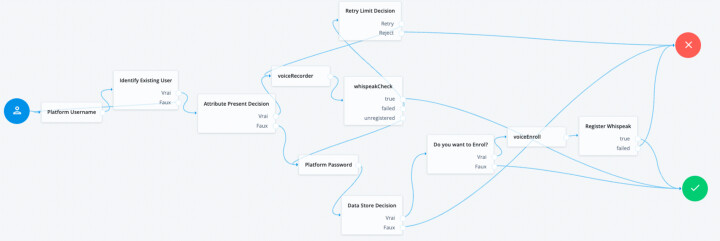
Voice registration and authentication user journey
Demonstration
The next figure shows the result in action from the user perspective.
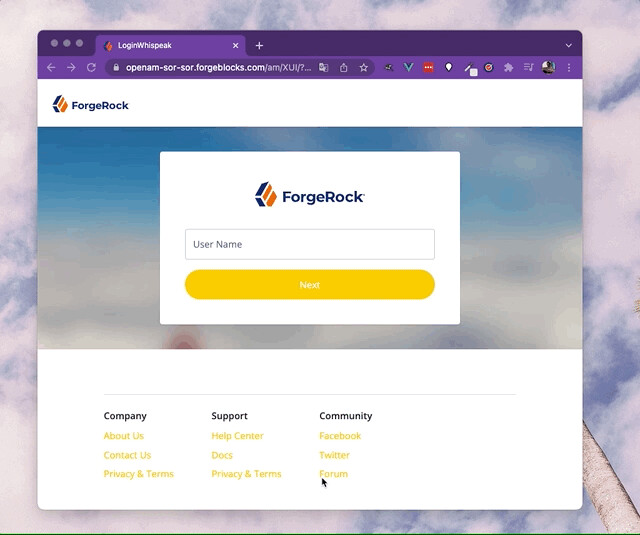
Voice authentication with Whispeak and ForgeRock
Important note: This scenario is only possible if you enrolled your voice with Whispeak and it has been associated with your ForgeRock account.
Conclusion
This guide how to configure ForgeRock Identity Cloud to use Whispeak to authenticate with your voice is another example of an integration of ForgeRock with a tier component; It’s quick and easy. In addition, this use case with biometric voice authentication can answer to a frequent question from our customers : how can I strongly authenticate someone without being forced to use a tier device (mobile, usb key, smart card, …)?