Getting started with the ForgeRock Identity Cloud REST API: Part 2 -
Author: |
Rajesh Rajasekharan |
Created at: |
Jul 2023 |
Updated at: |
Mar 2024 |
This is Part 2 of 8 in the series Getting started with the ForgeRock Identity Cloud REST API.
Prerequisite requests
This guide provides examples of running the ForgeRock Identity Cloud
Collection prerequisite requests using both Postman and curl commands.
Before you begin
This guide assumes that you already have already prepared the ForgeRock Identity Cloud Postman Collection environment. See Part 1 - Introduction for further information.
Example using Postman ~ 5 min
-
In Postman, select the ForgeRock Identity Cloud Postman Collection, and expand the Prerequisites section.
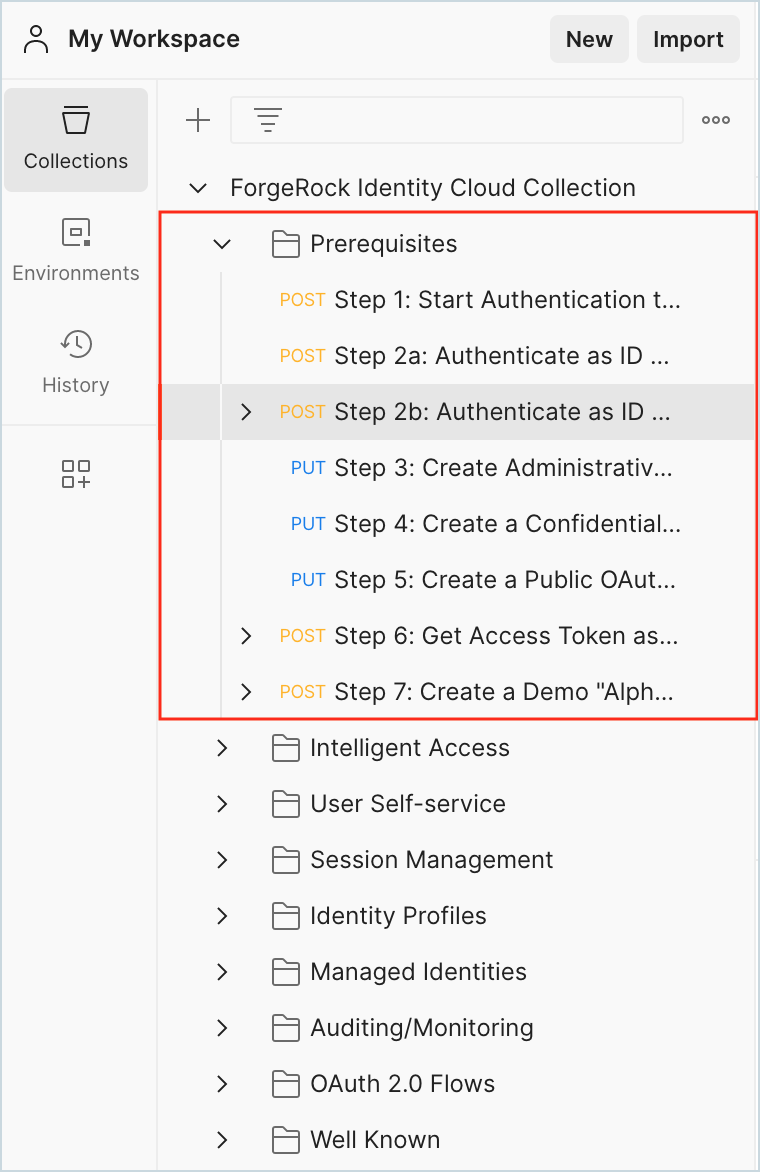
At a high level, the REST API calls from Step 1 through to Step 2b do the following: * Step 1: Sends a request to the Identity Cloud authenticate REST endpoint for the authentication requirements. * Step 2(a): Using the authentication requirements received in Step 1, another request is sent to the authenticate REST endpoint by adding user credentials in the body of the request. * Step 2(b): Sends one more request to the authenticate REST endpoint, responding to the choice to set up a device for Multi Factor Authentication or skip it. On completing this step, a user session is created in Identity Cloud and a session token is returned.
-
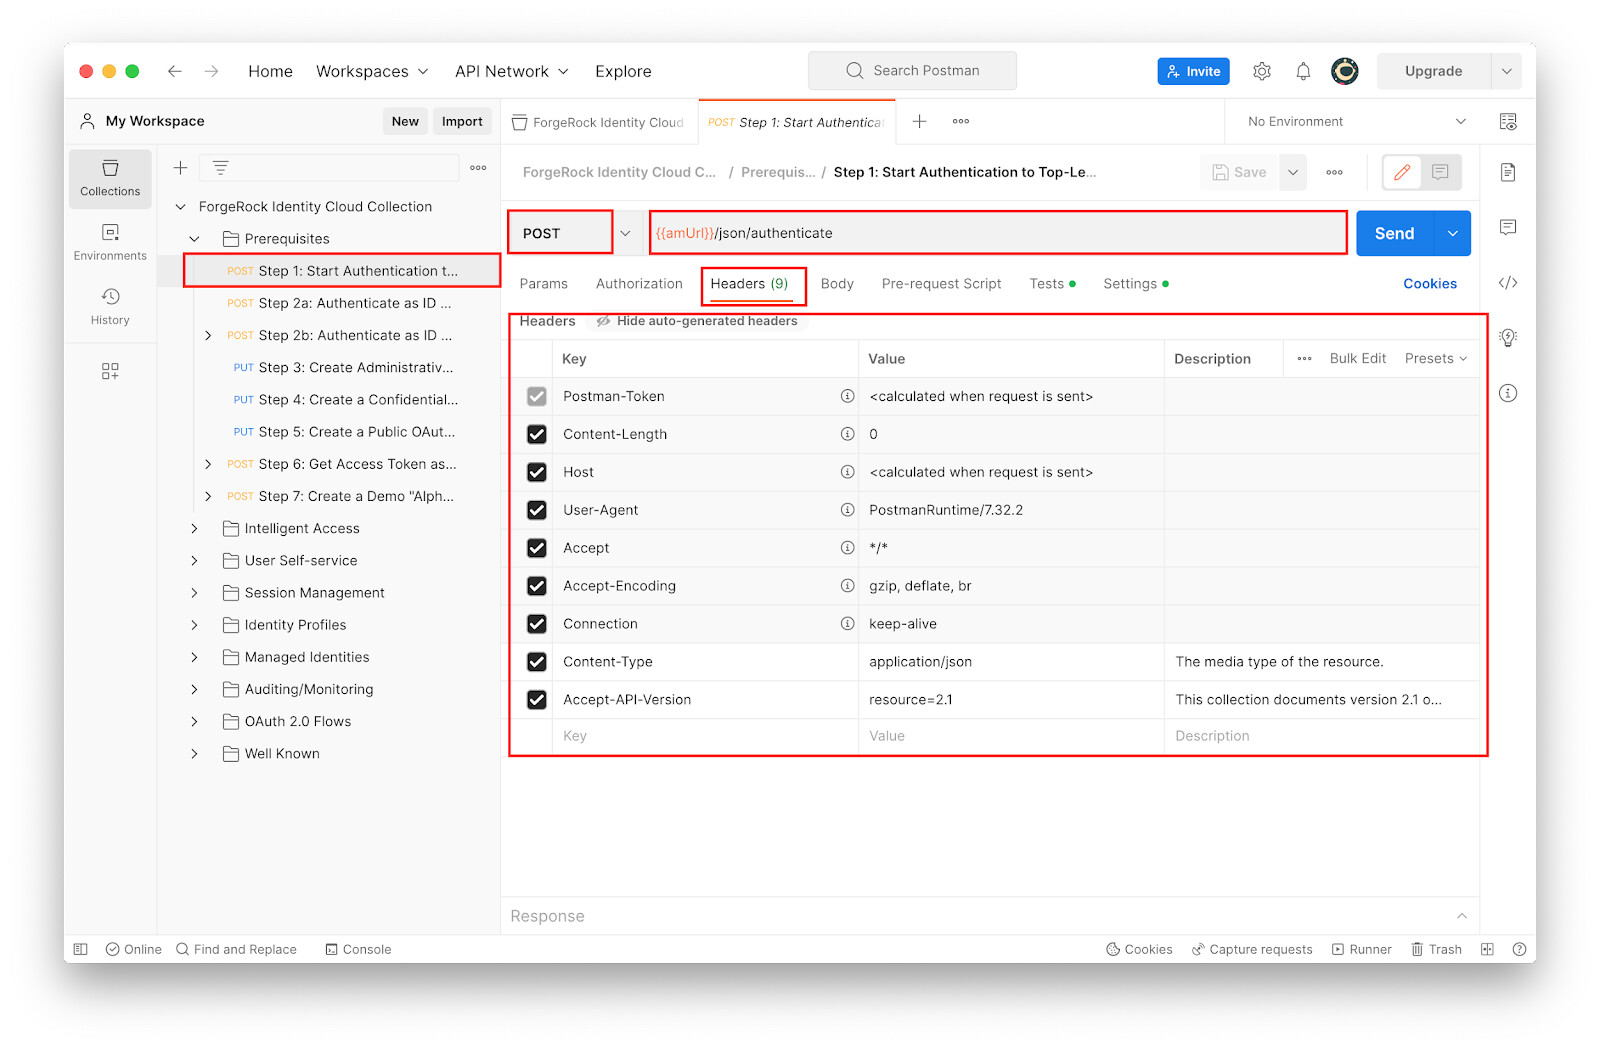
Under Prerequisites, click Step 1 to study the following:
-
The request type: POST
-
The request URL:
{{amUrl}}/json/authenticate -
The Headers section
-
-
With Prerequisites > Step 1 selected, click Send.
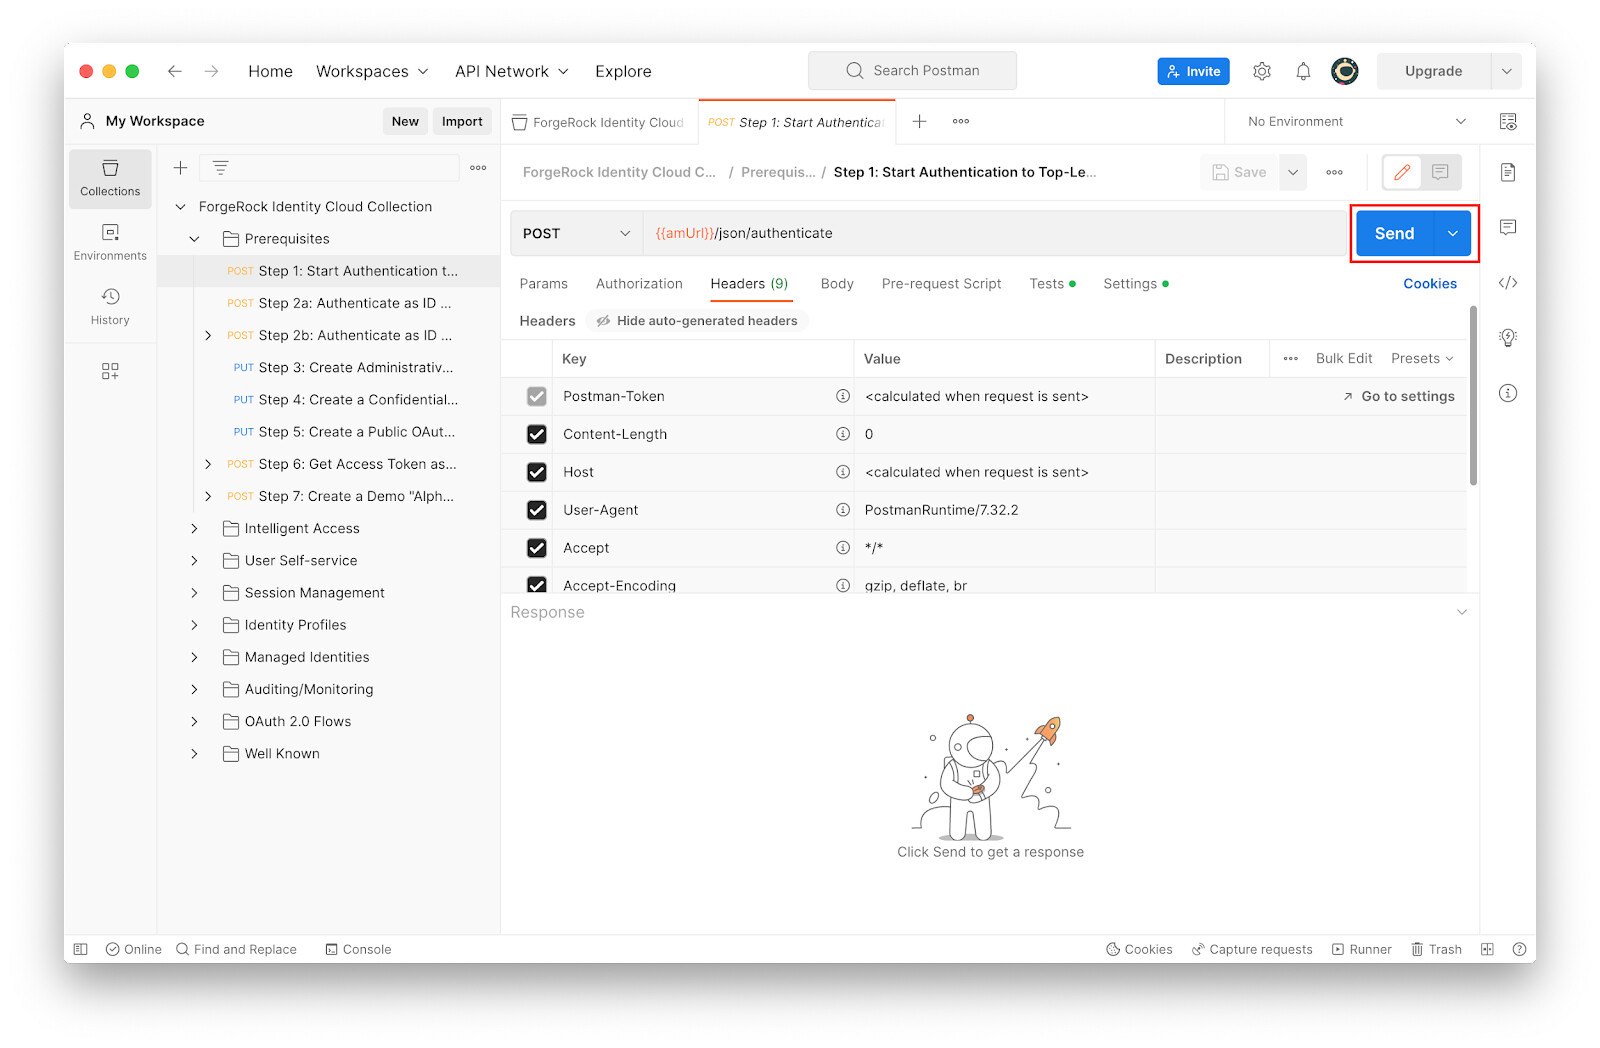
The JSON response from the Identity Cloud authenticate REST endpoint gives the authentication requirement. In this instance, the requirements are a username and a password.
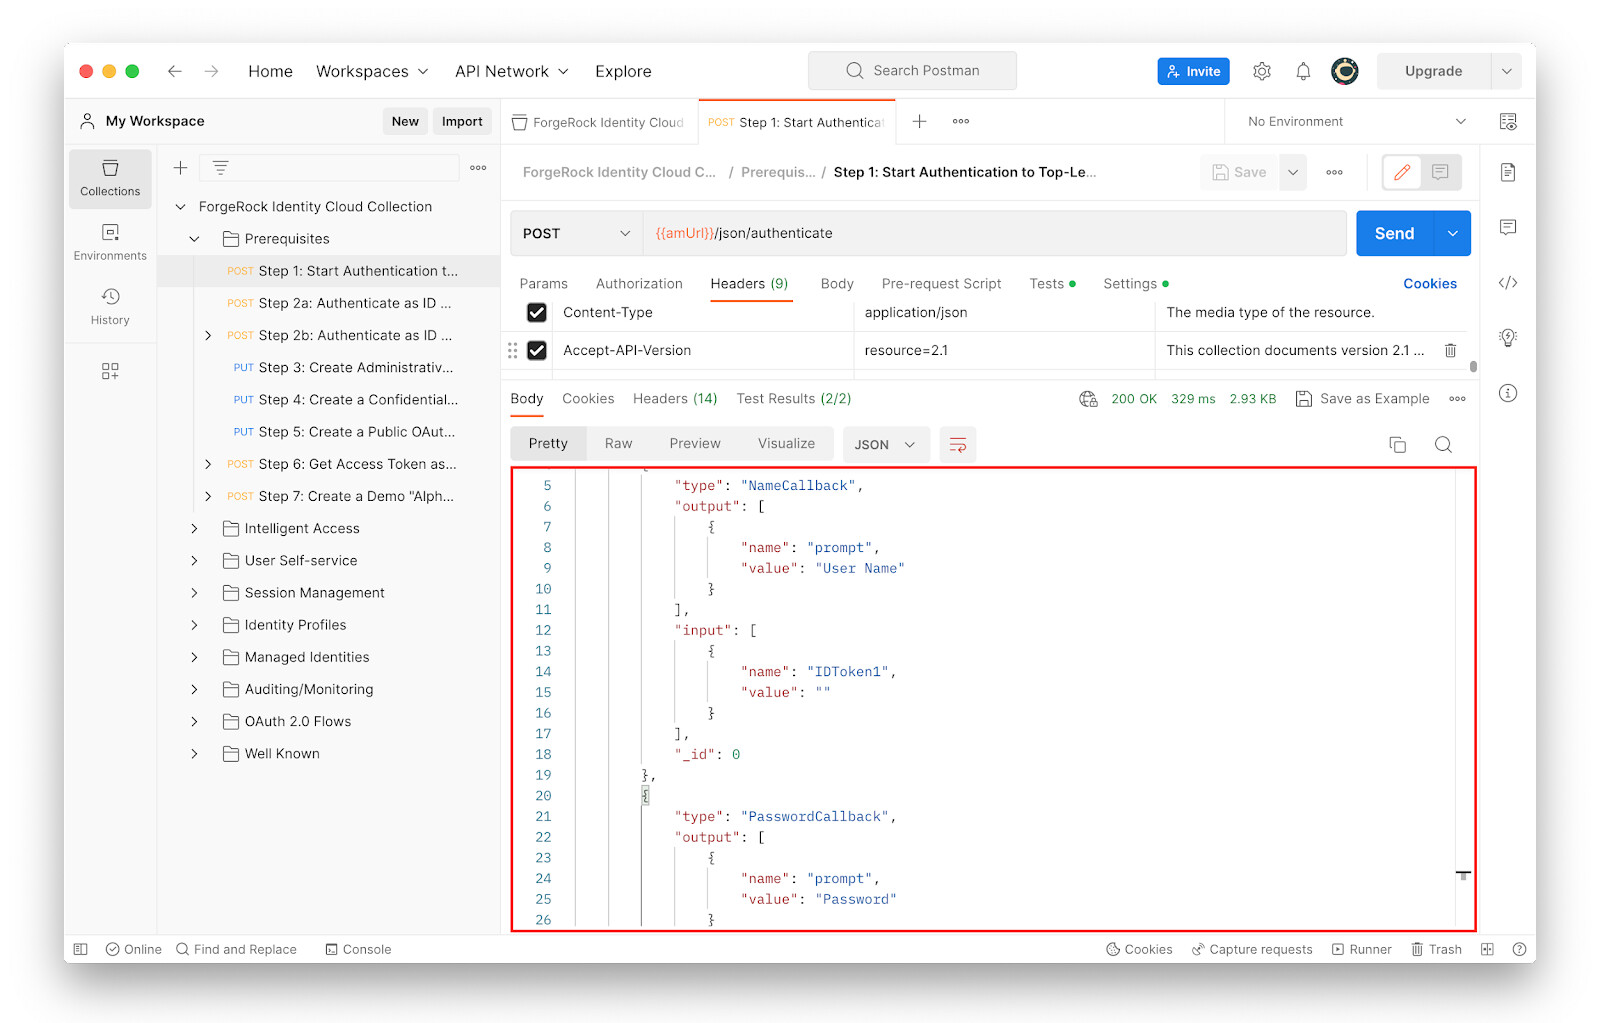
-
Under Prerequisites, click Step 2a to study the following:
-
The request type: POST
-
The request URL:
{{amUrl}}/json/authenticate -
The Body Section where the postmanAdminUser credentials, set as variable values, are sent
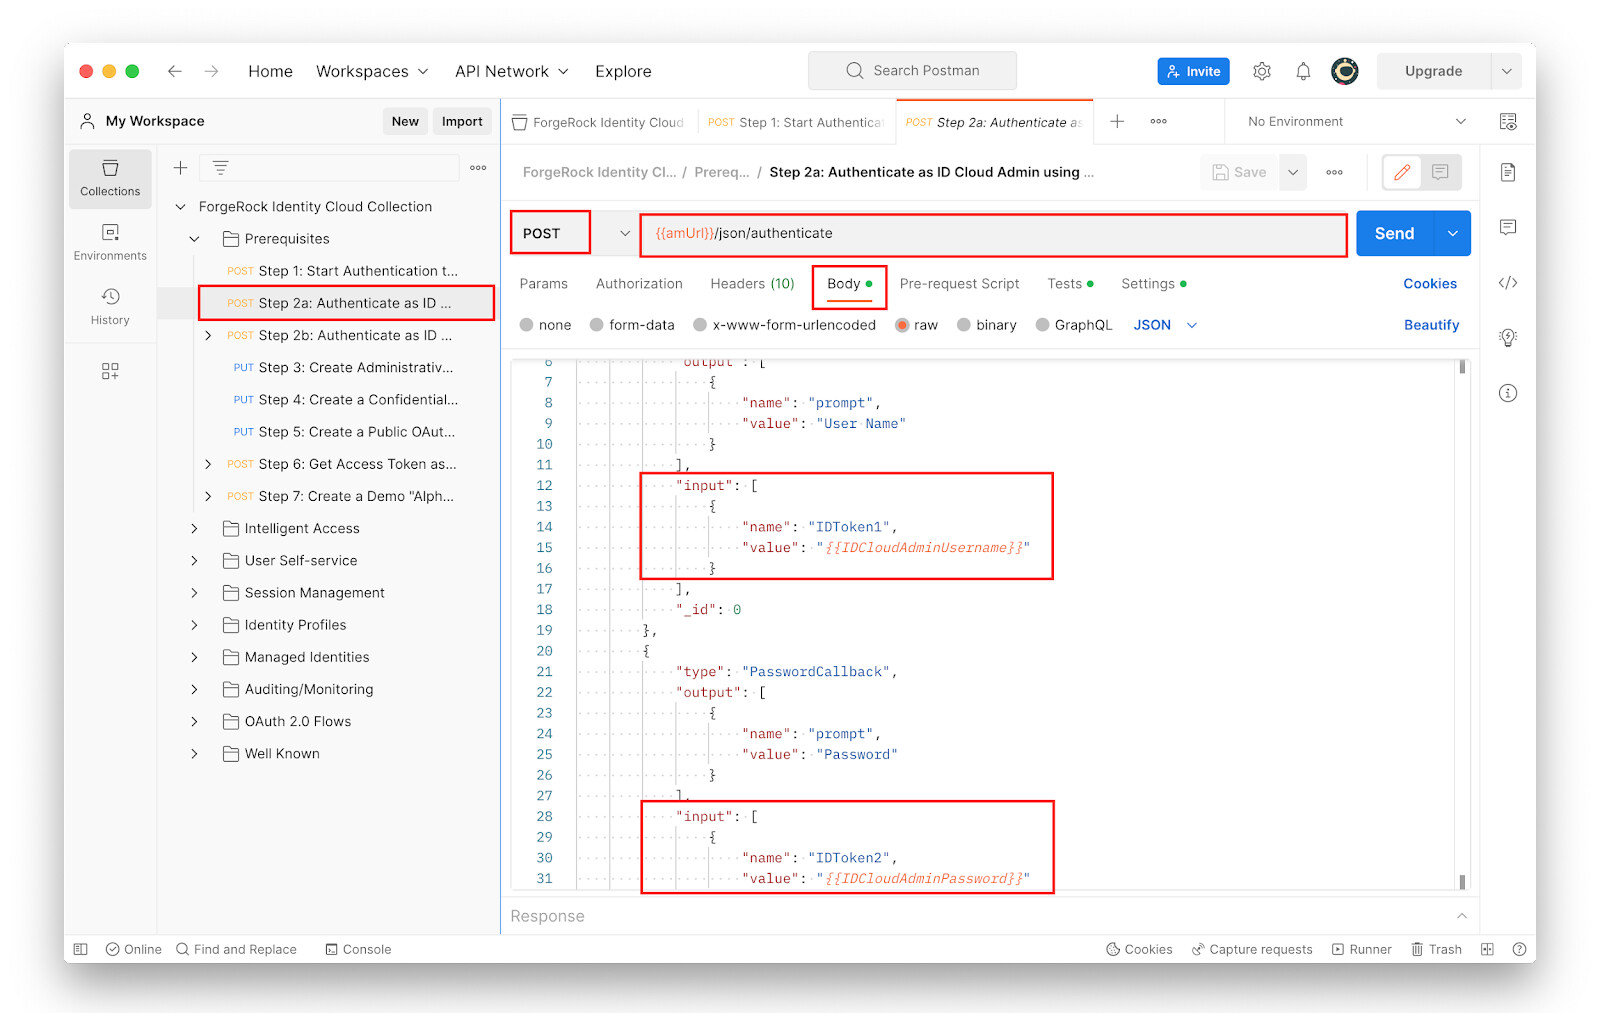
-
-
With Prerequisites > Step 2a selected, click Send.
The JSON response is returned from the authenticate REST endpoint, and prompts the user to either set up a device for Multi Factor Authentication or skip it.
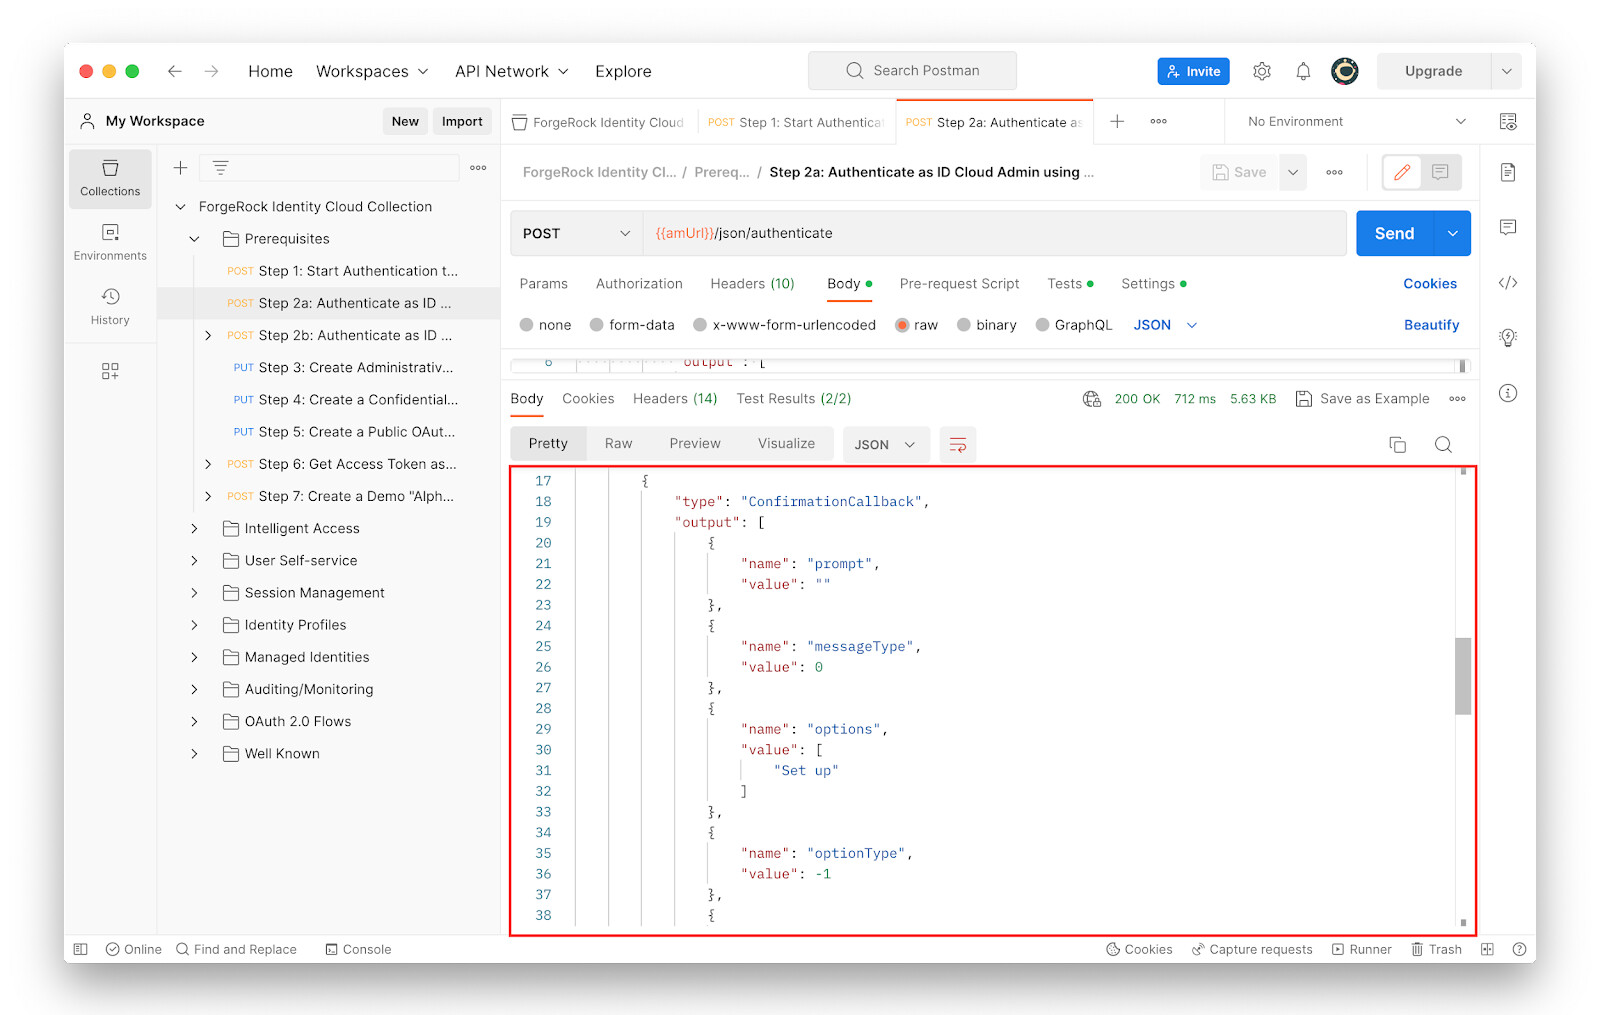
-
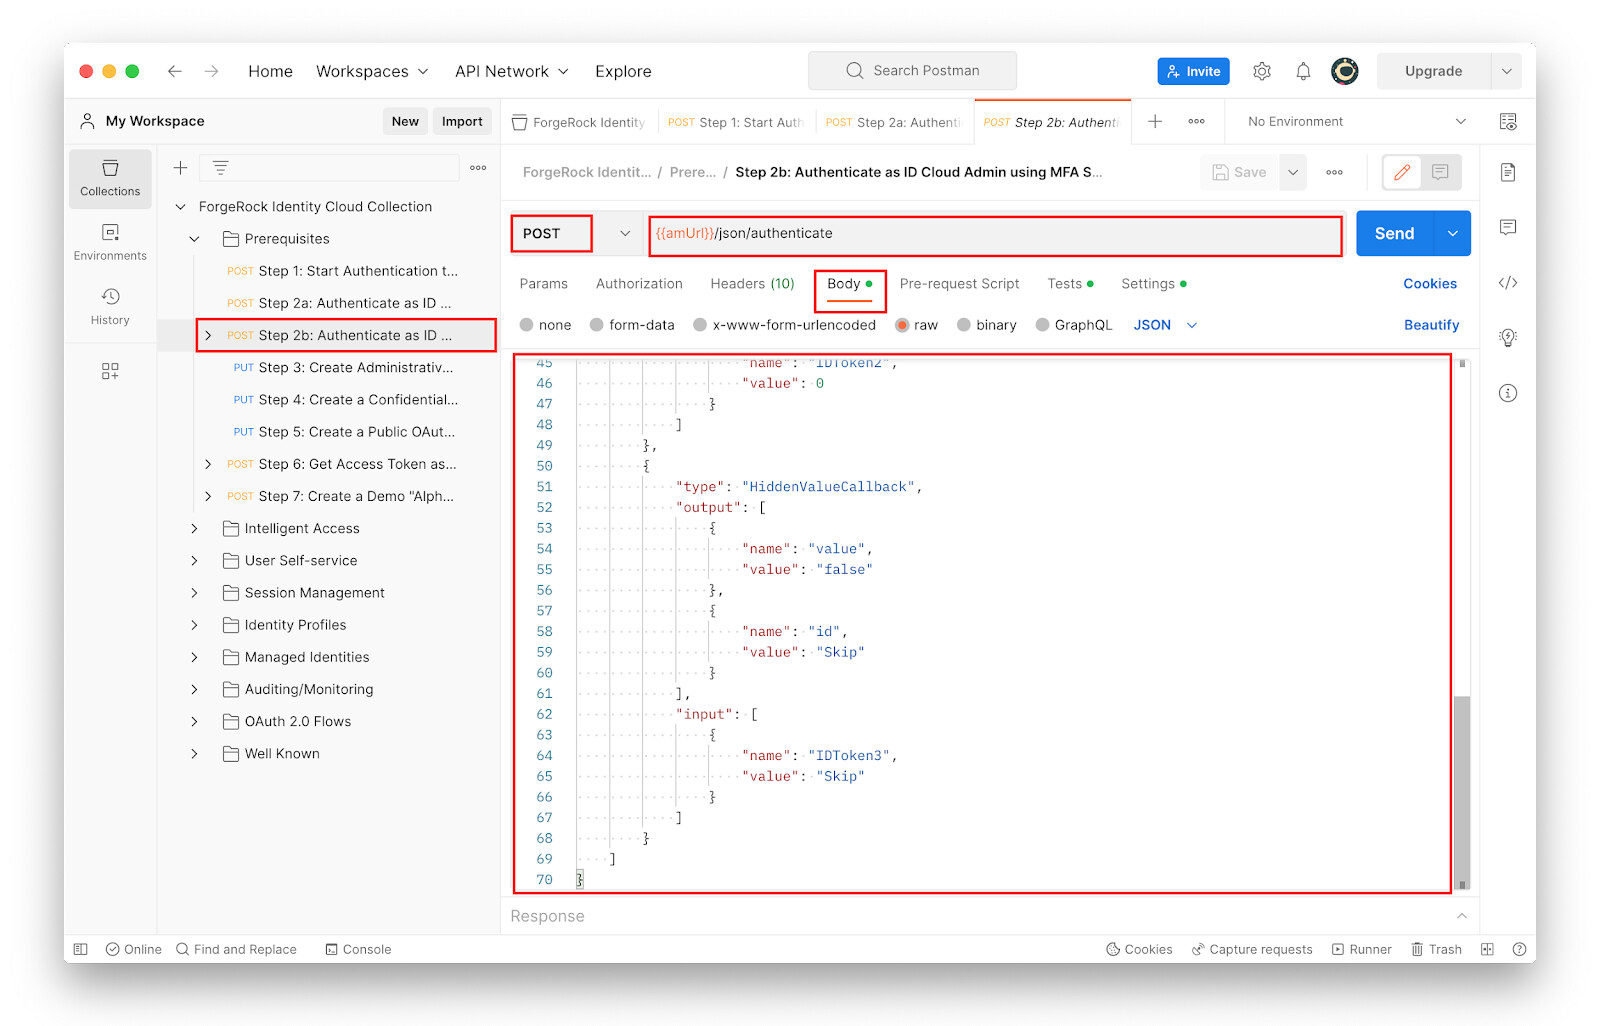
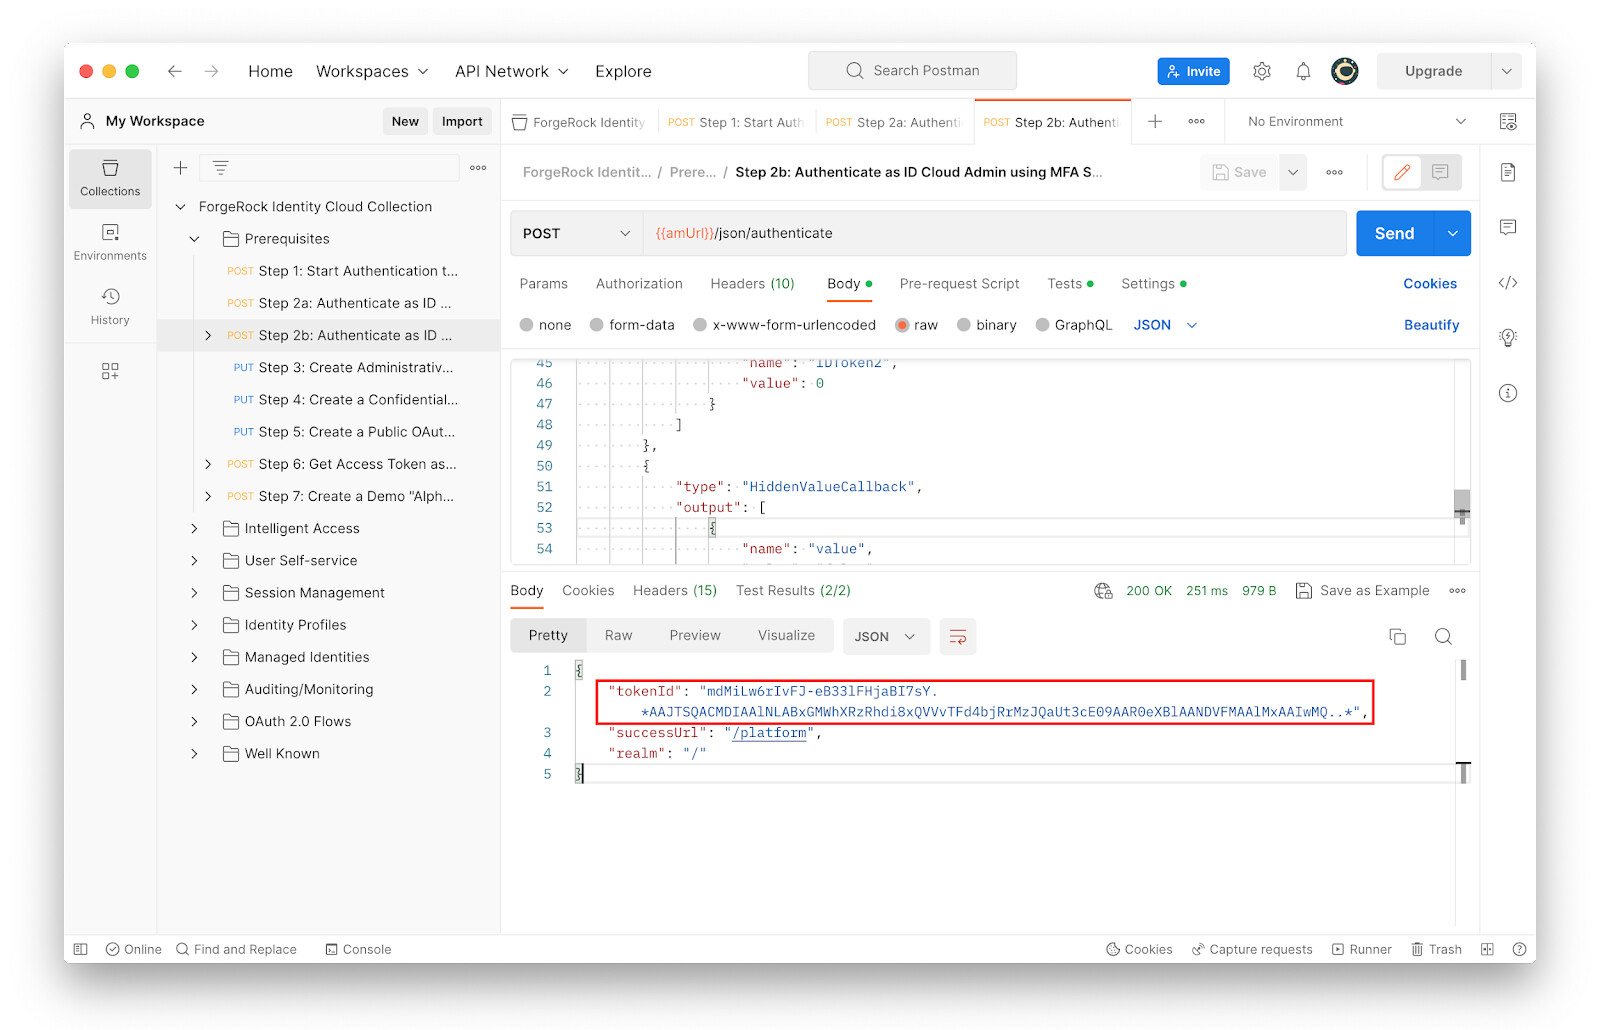
Under Prerequisites, click Step 2b to study the following:
-
The request type: POST
-
The request URL:
{{amUrl}}/json/authenticate -
The Body Section where the user decides to skip the Multi Factor Authentication option.
-
-
With Prerequisites > Step 2b selected, click Send.
The Identity Cloud authentication requirements are now completed. The Identity Cloud “authenticate” REST endpoint now returns a session token for the authenticated user.
Using the session token created for the postmanAdminUser, additional administrative activities can be performed on the Identity Cloud tenant. Recall that the postmanAdminUser has the
openidm-adminauthorization role assigned.Step 3 through to Step 5 of the Prerequisites section are used to create the following OAuth clients: * Step 3 creates postmanAdminClient * Step 4 creates postmanConfidentialClient * Step 5 creates postmanPublicClient
-
Under Prerequisites, click Step 3 and study the following:
-
The request type: PUT
-
The request URL:
{{amUrl}}/json{{realm}}/realm-config/agents/OAuth2Client/{{postmanConfidentialClientId}} -
The Headers section, hover the mouse over the
adminSSOTokenvariable and notice that it has the value set to the token returned in the earlier call.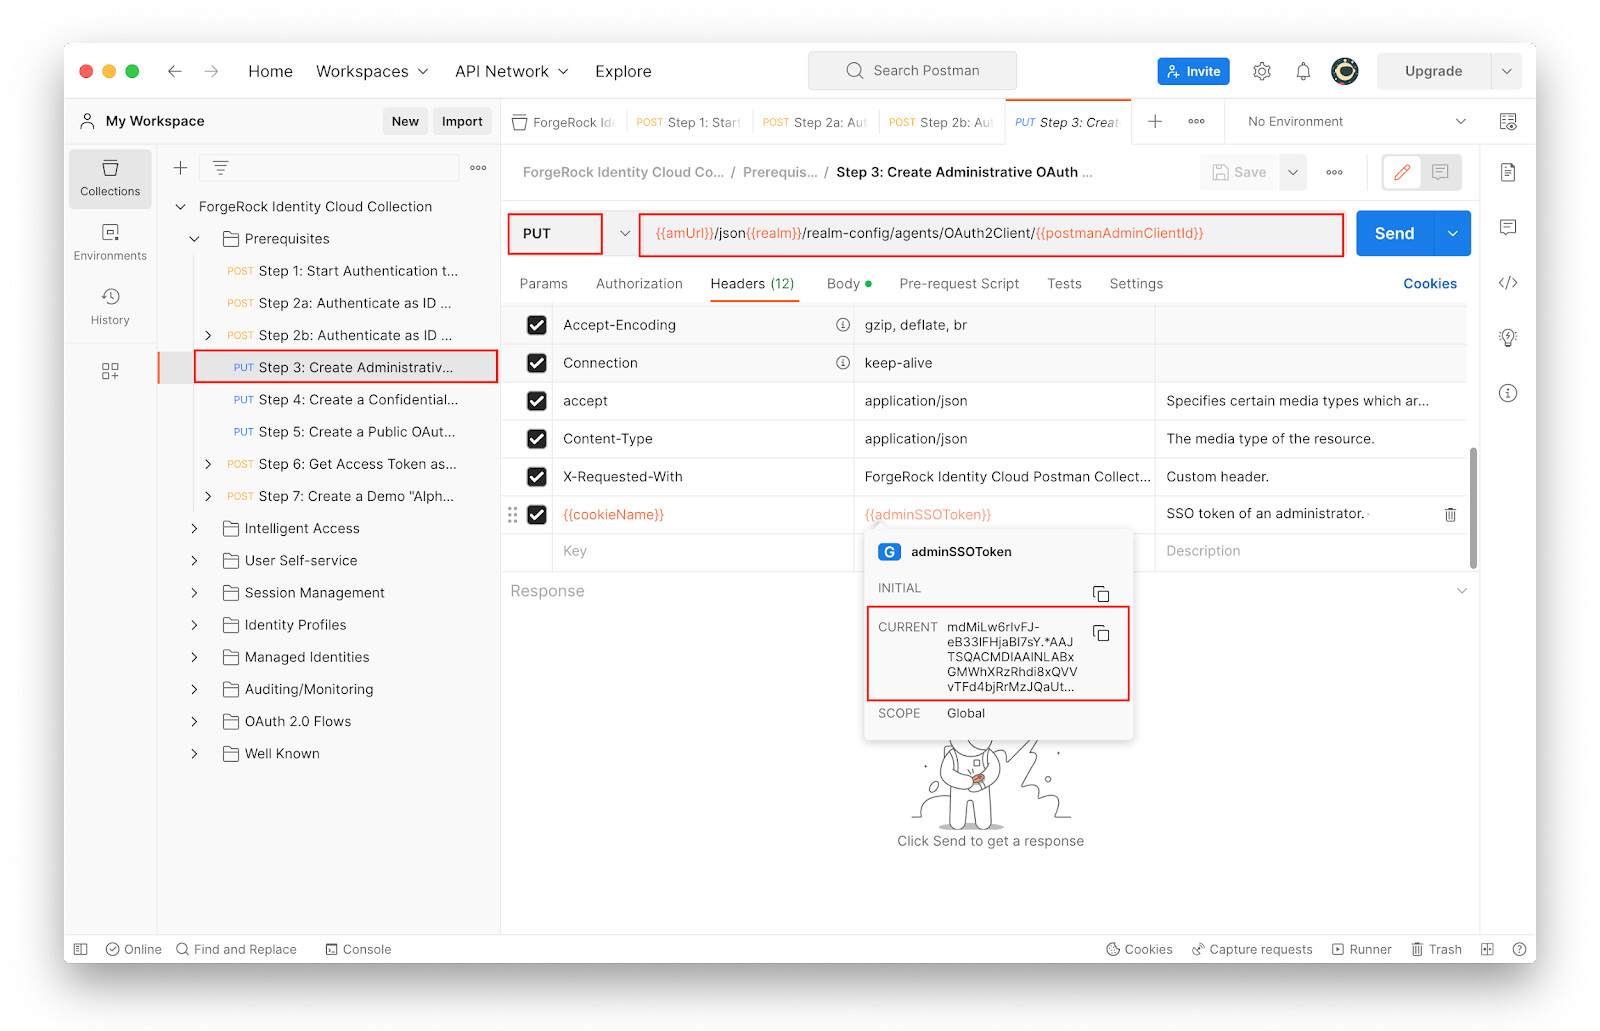
-
-
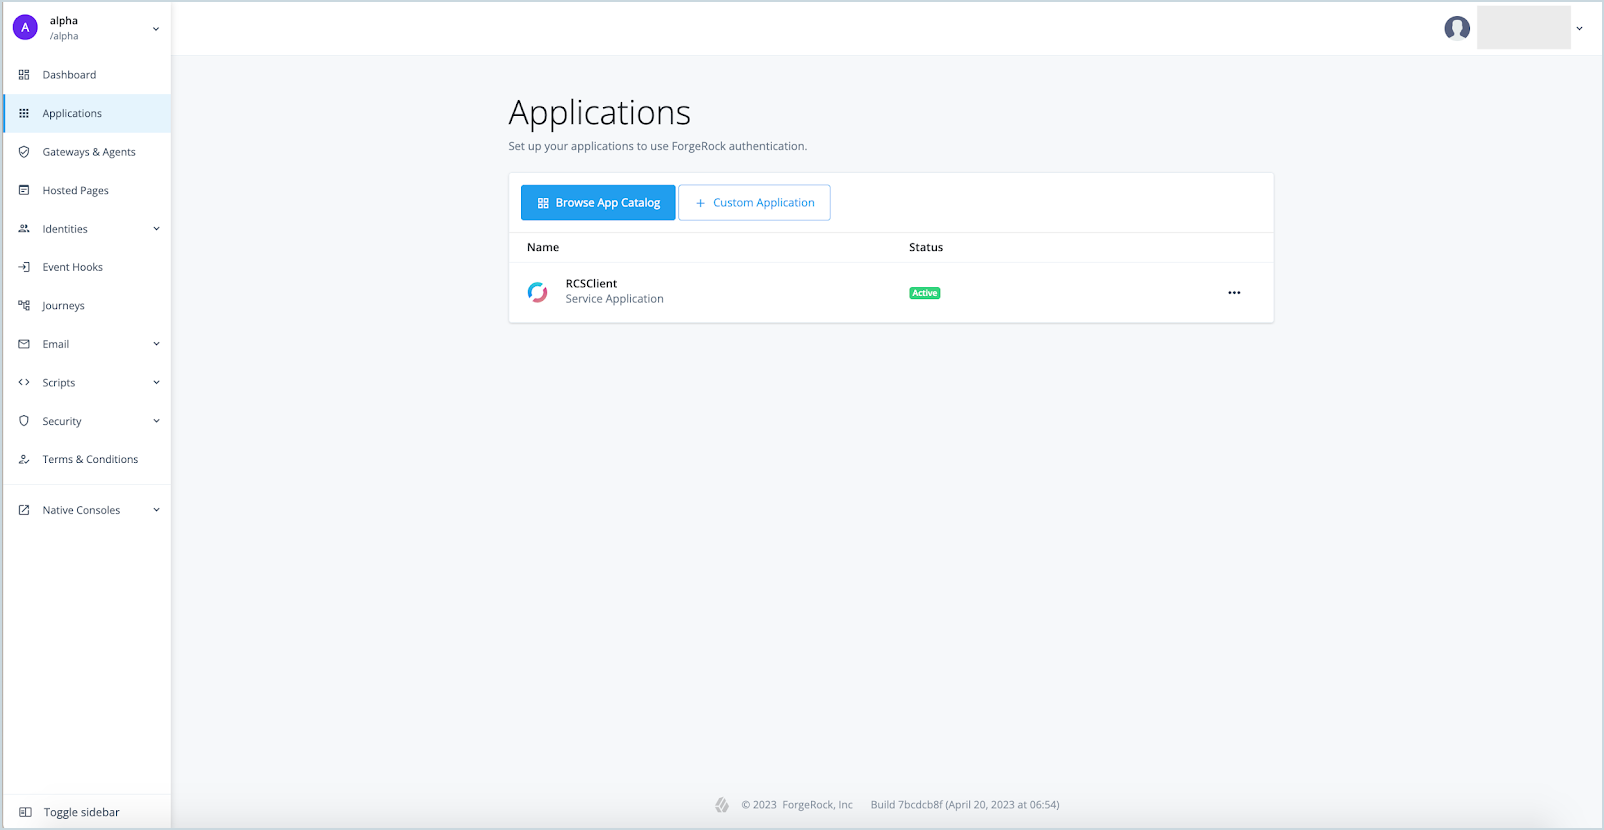
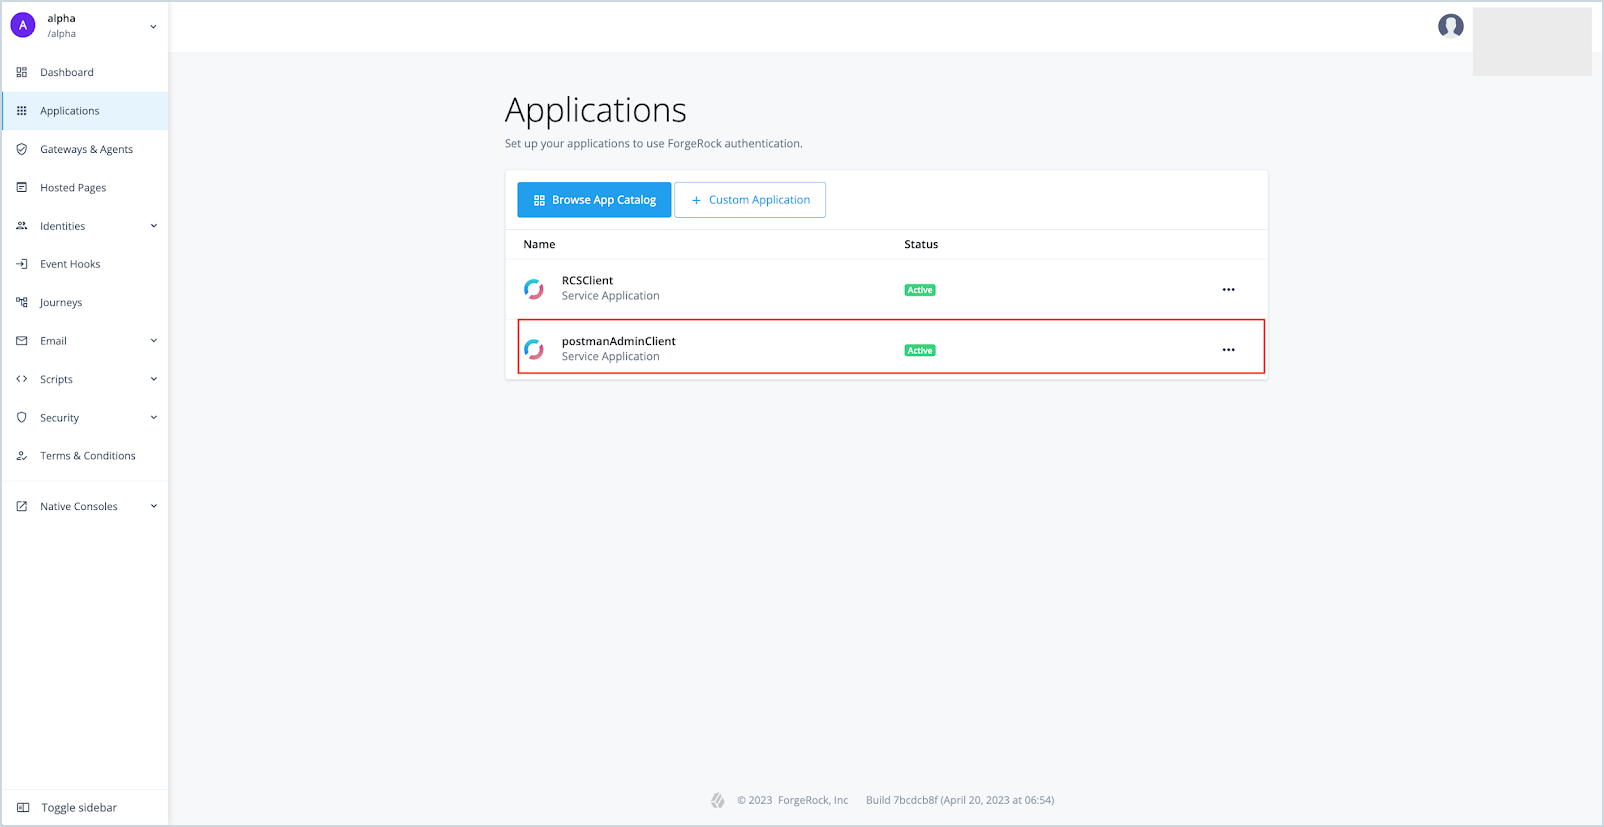
Before sending the REST request to create OAuth profiles in Identity Cloud, log into the Identity Cloud tenant Admin UI. In the alpha realm, go to Applications to take note of any existing client profiles. A new application will be created later when we send the request to create a new OAuth client.
-
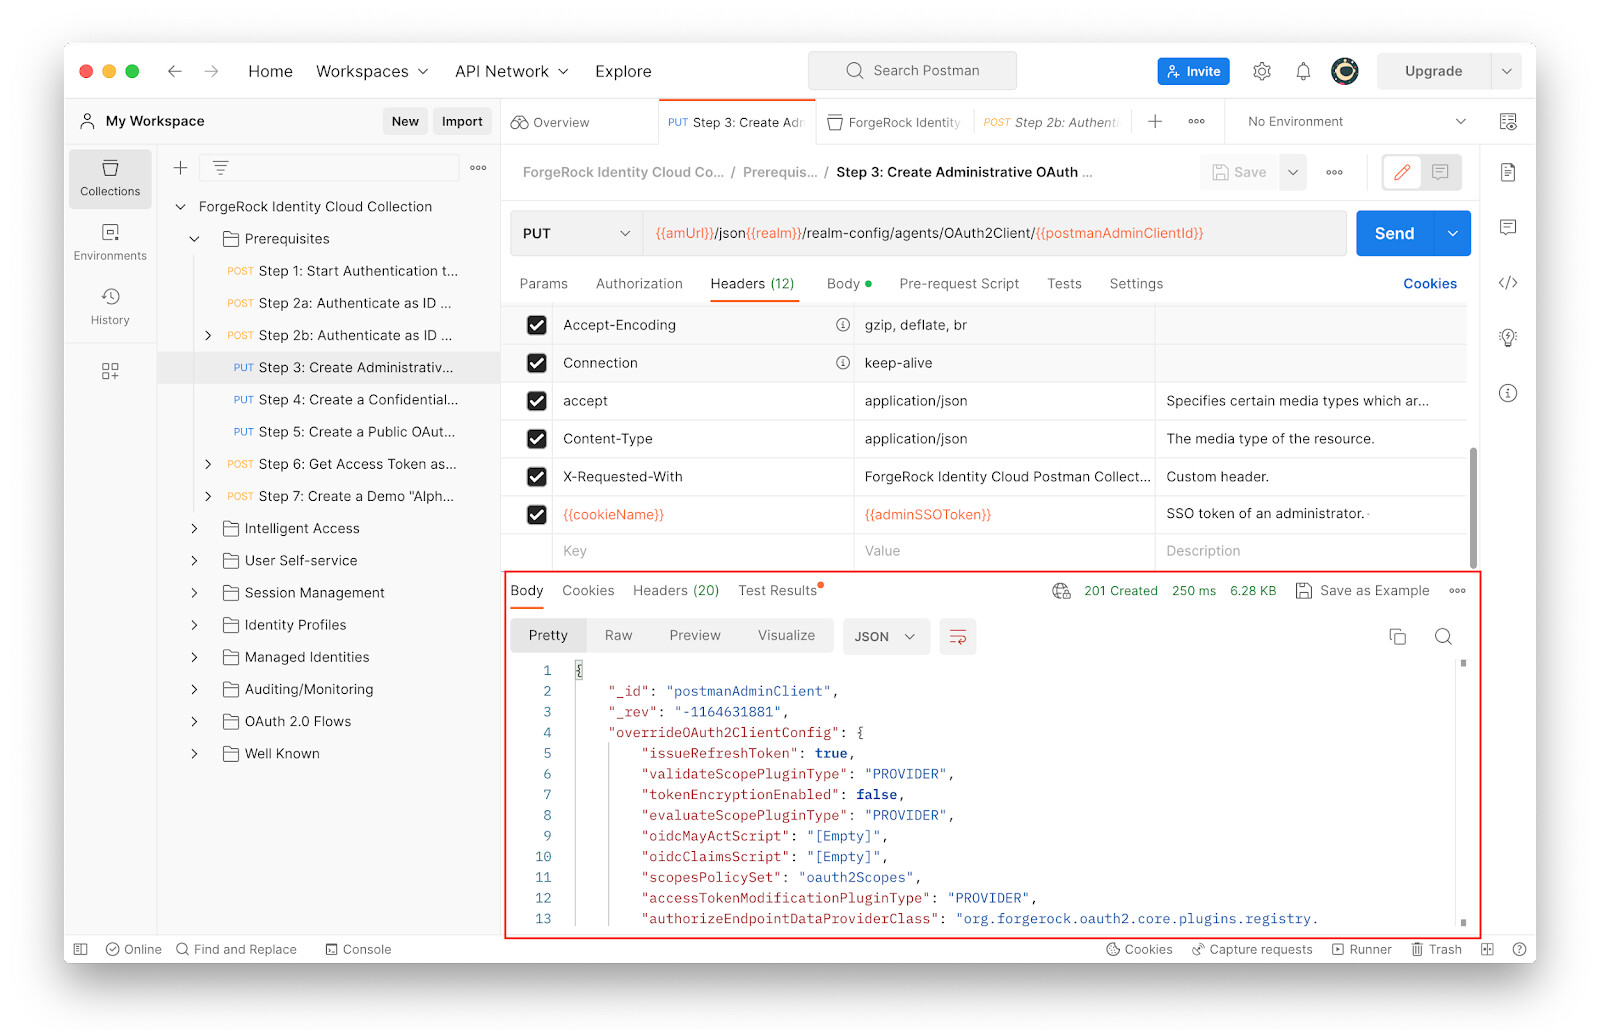
With Prerequisites > Step 3 selected, click Send.
-
Examine the JSON response indicating the successful creation of OAuth Client in Identity Cloud.
-
To confirm the creation of an OAuth client profile in Identity Cloud, log into the Identity Cloud Admin UI and go to Applications. The new OAuth client is listed.
-
In Postman, under Prerequisites, examine Step 4 and Step 5. Send the REST requests in each step to create two more OAuth clients, which will be used for various OAuth 2.0 grant types in the OAuth 2.0 Flows section of the Identity Cloud Postman Collection.
-
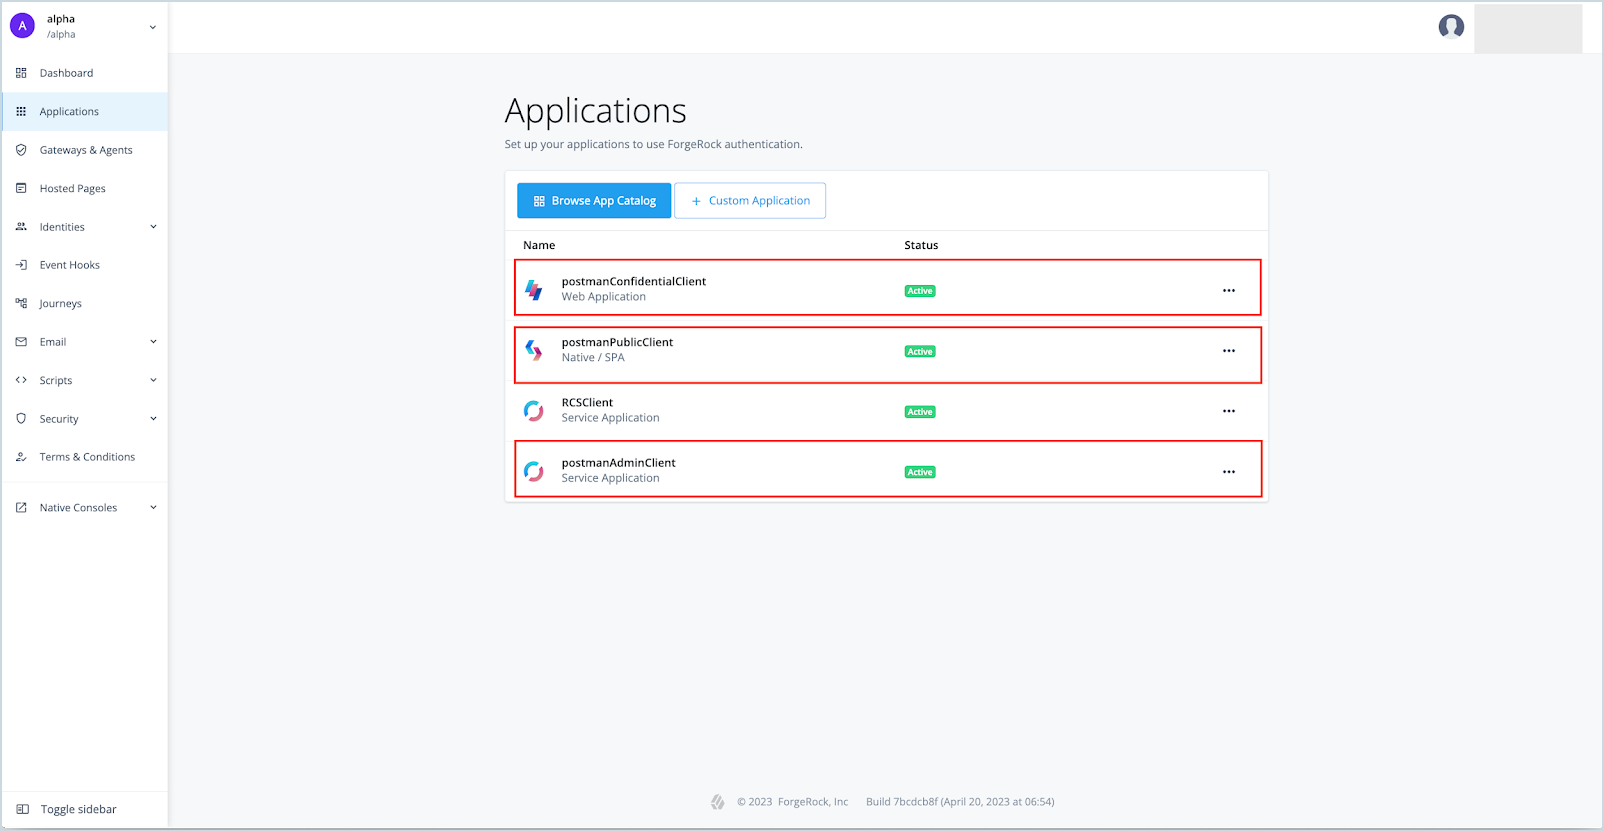
To confirm the creation of two more OAuth client profiles in Identity Cloud, log into the Identity Cloud Admin UI. In the alpha realm, go to Applications.
All three OAuth client profiles created using the REST calls are listed.
Step 6 of the Prerequisites section is summarized as follows:
Using the “postmanAdminClient” OAuth 2.0 application configured earlier, a POST request is sent to the Identity Cloud “access_token” REST endpoint for acquiring an access token with scope
fr:idm:*. The request uses Resource Owner Password Credential (ROPC) grant type of OAuth 2.0, so the credentials of postmanAdminuser is also included in the request. -
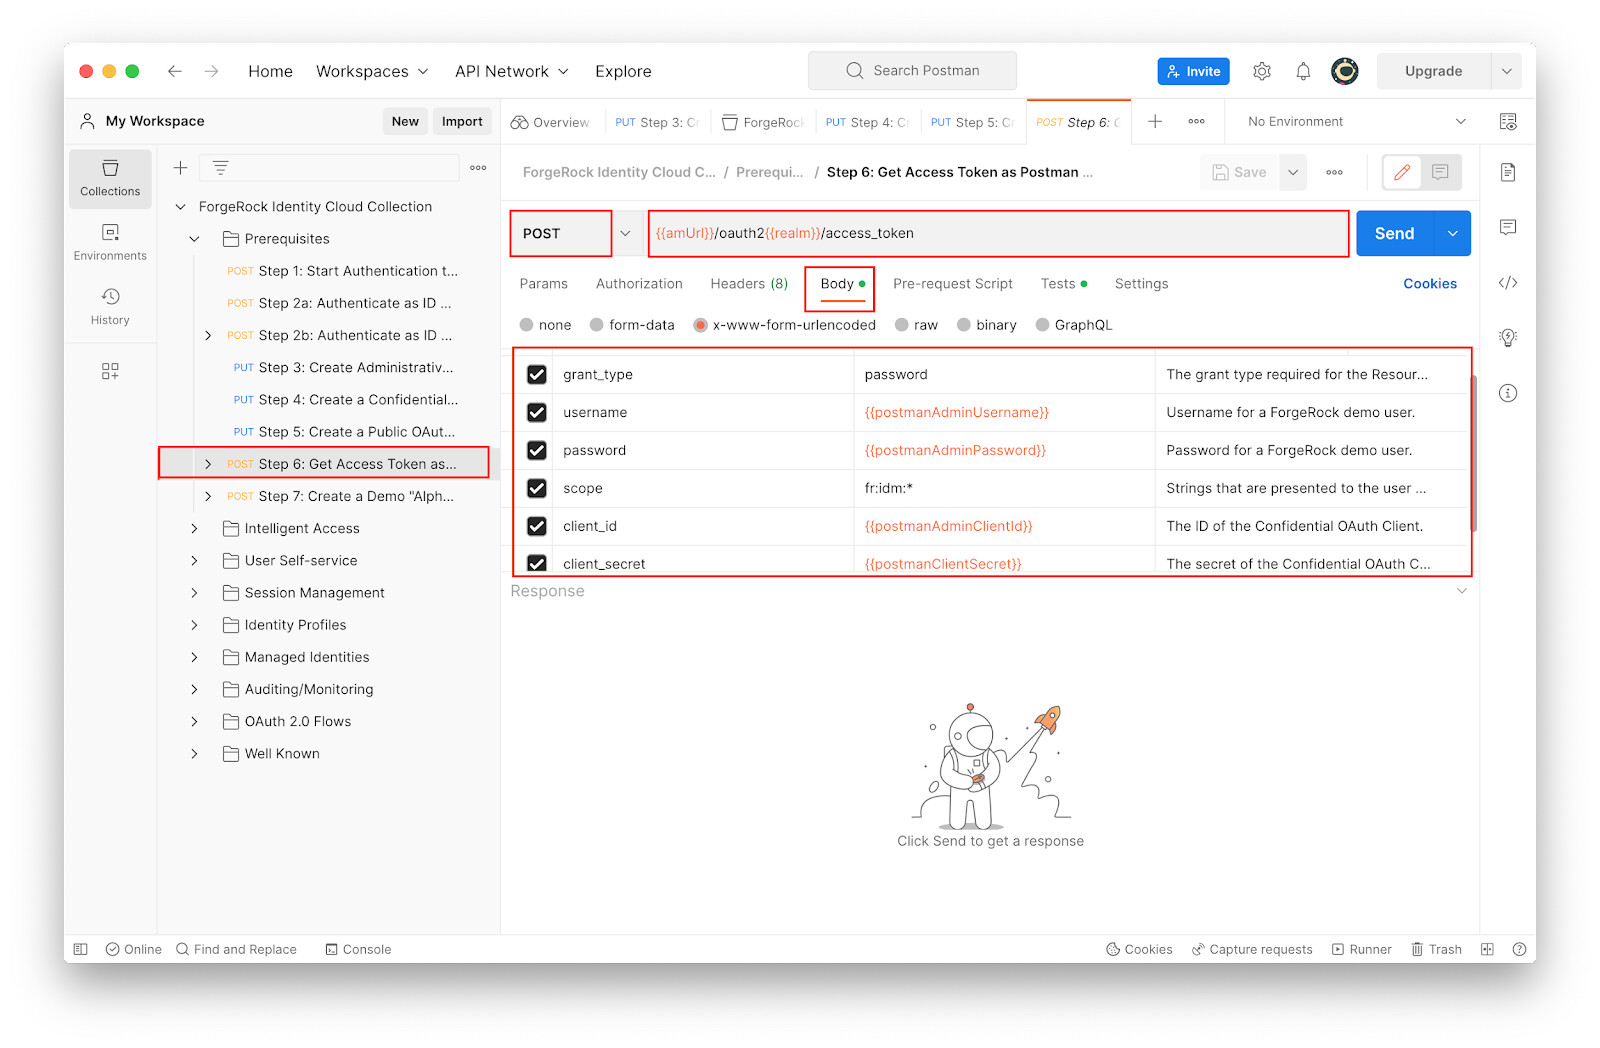
Under Prerequisites, click Step 6 and study the following:
-
The request type: POST
-
The request URL:
{{amUrl}}/oauth2{{realm}}/access_token -
The Body section
-
-
With Prerequisites > Step 6 selected, click Send.
The “access_token” endpoint of Identity Cloud, returns an access token with scope
fr:idm:*to the “postmanAdminClient” OAuth application.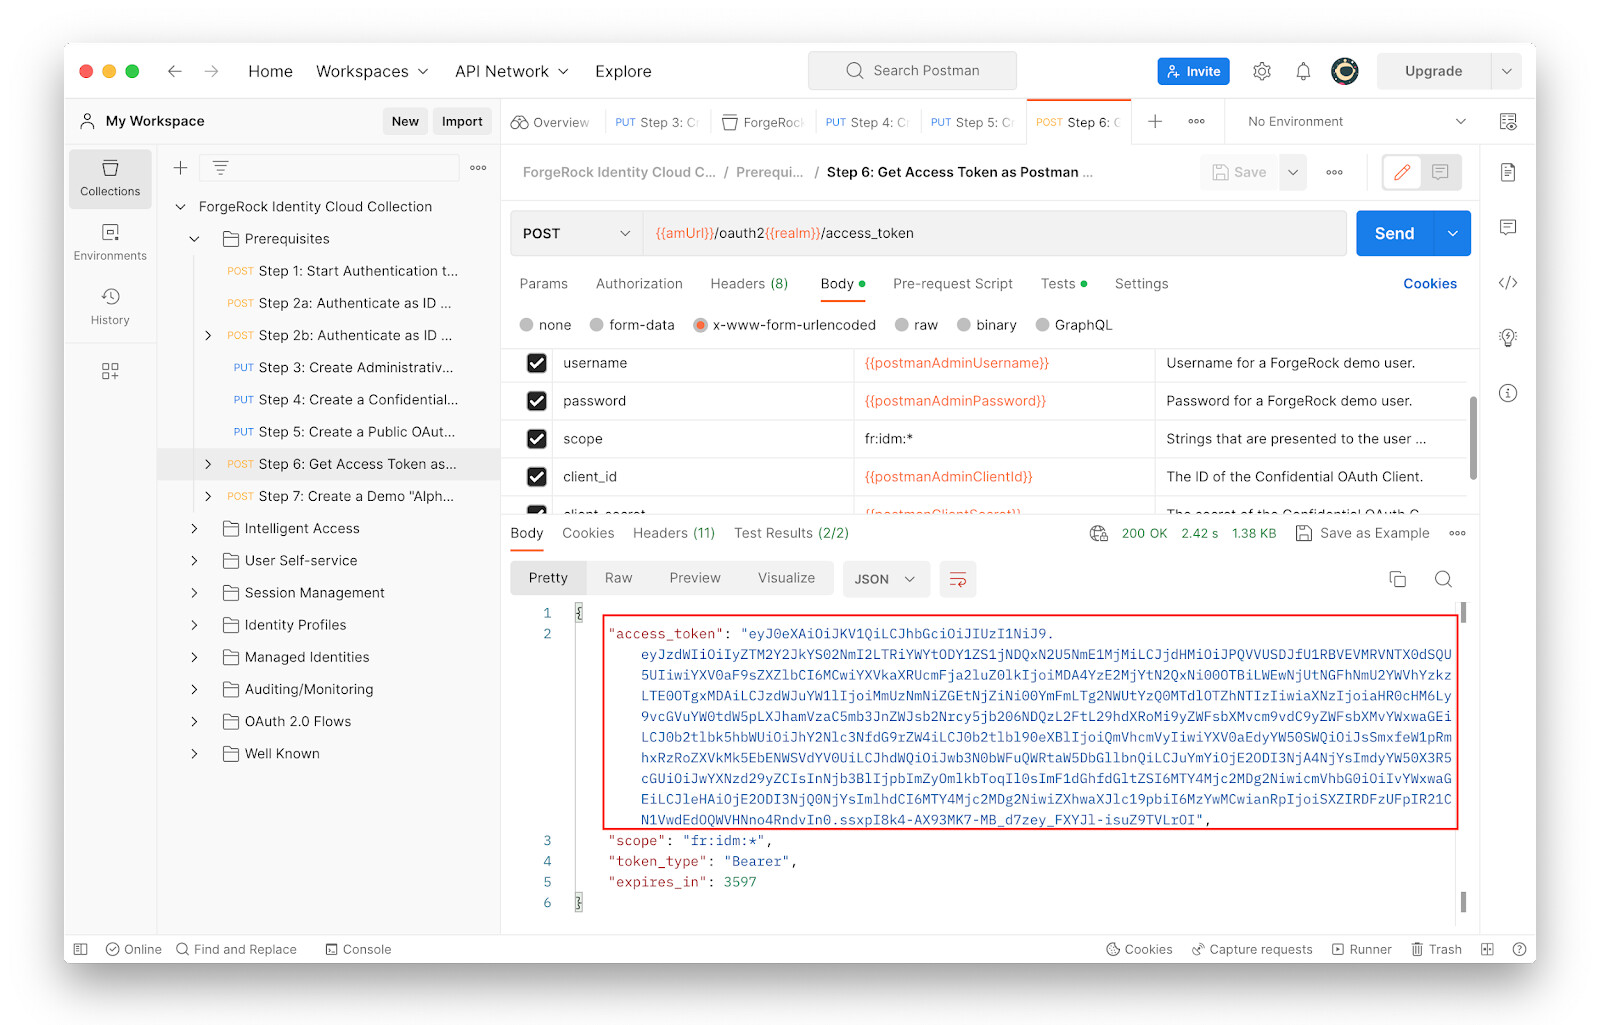
Step 7 of the Prerequisites section uses the access token obtained from Step 6 to perform the administrative task of creating a user in the alpha realm of the Identity Cloud Admin UI.
-
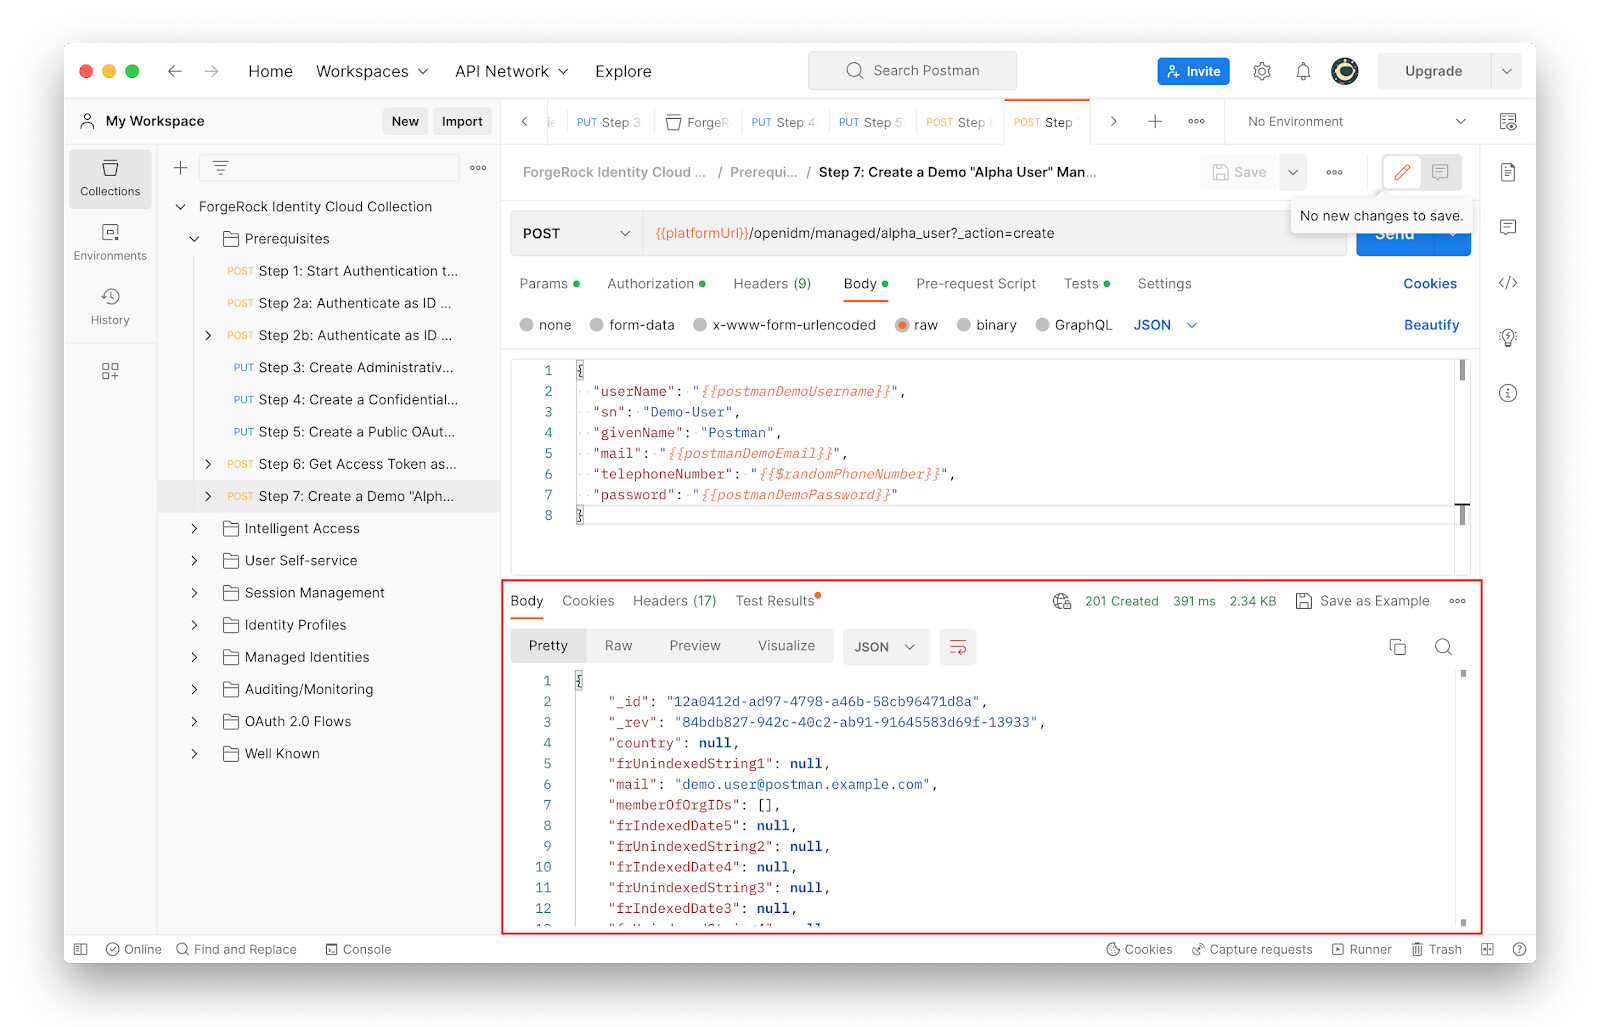
Under Prerequisites, click Step 7 and study the following:
-
The request type: POST
-
The request URL:` {{platformUrl}}/openidm/managed/alpha_user?_action=create`
-
The Body section (some attribute values of users are picked up from the variables configured earlier, some are randomly generated).
-
-
With Prerequisites > Step 7 selected, click Send.
-
Examine the JSON response indicating the successful creation of a user account.
-
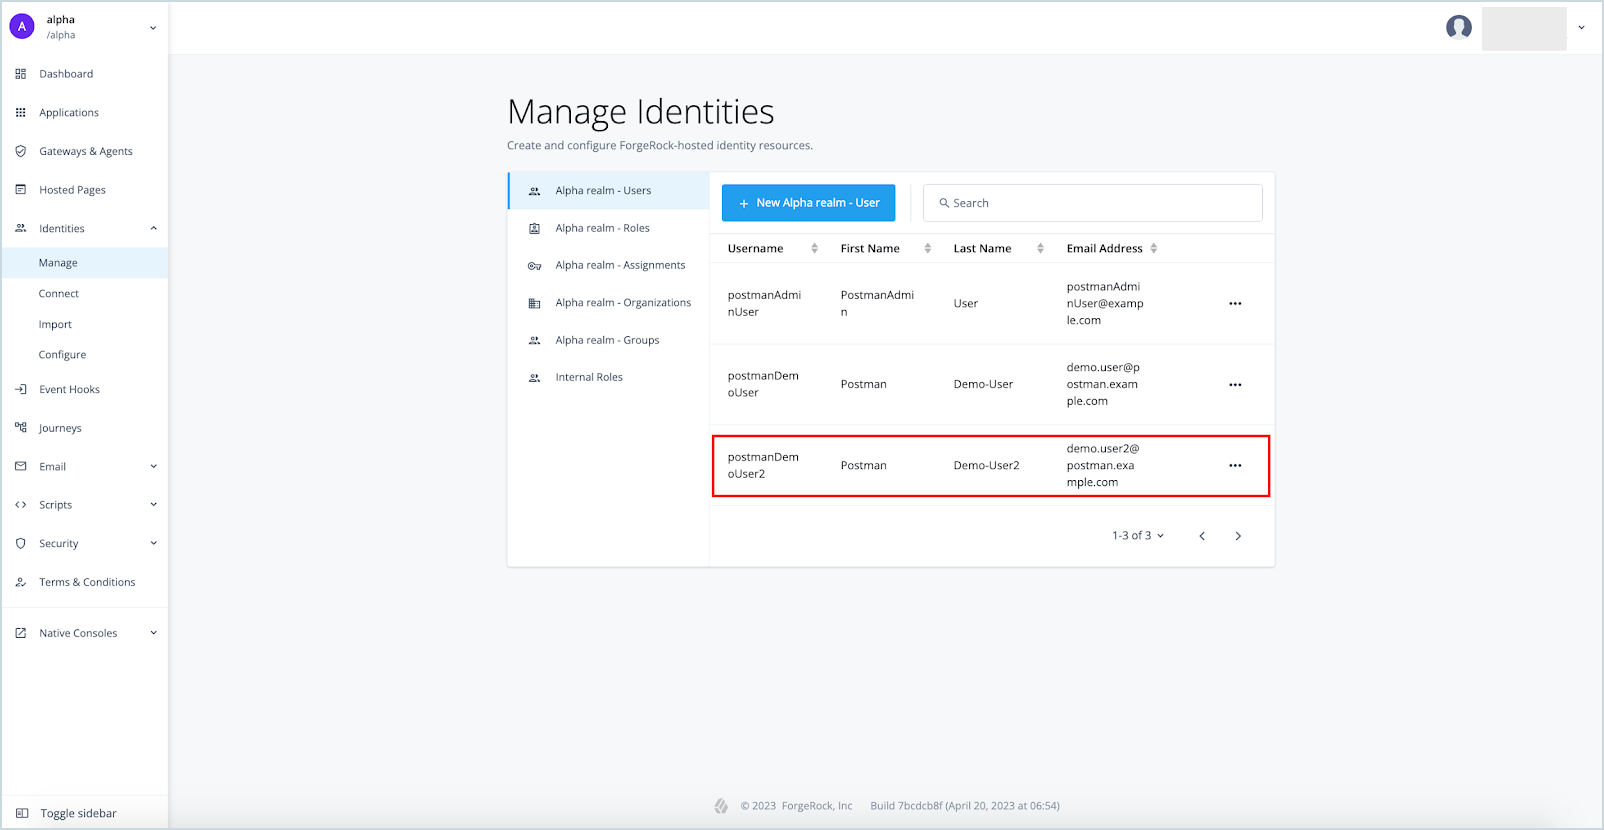
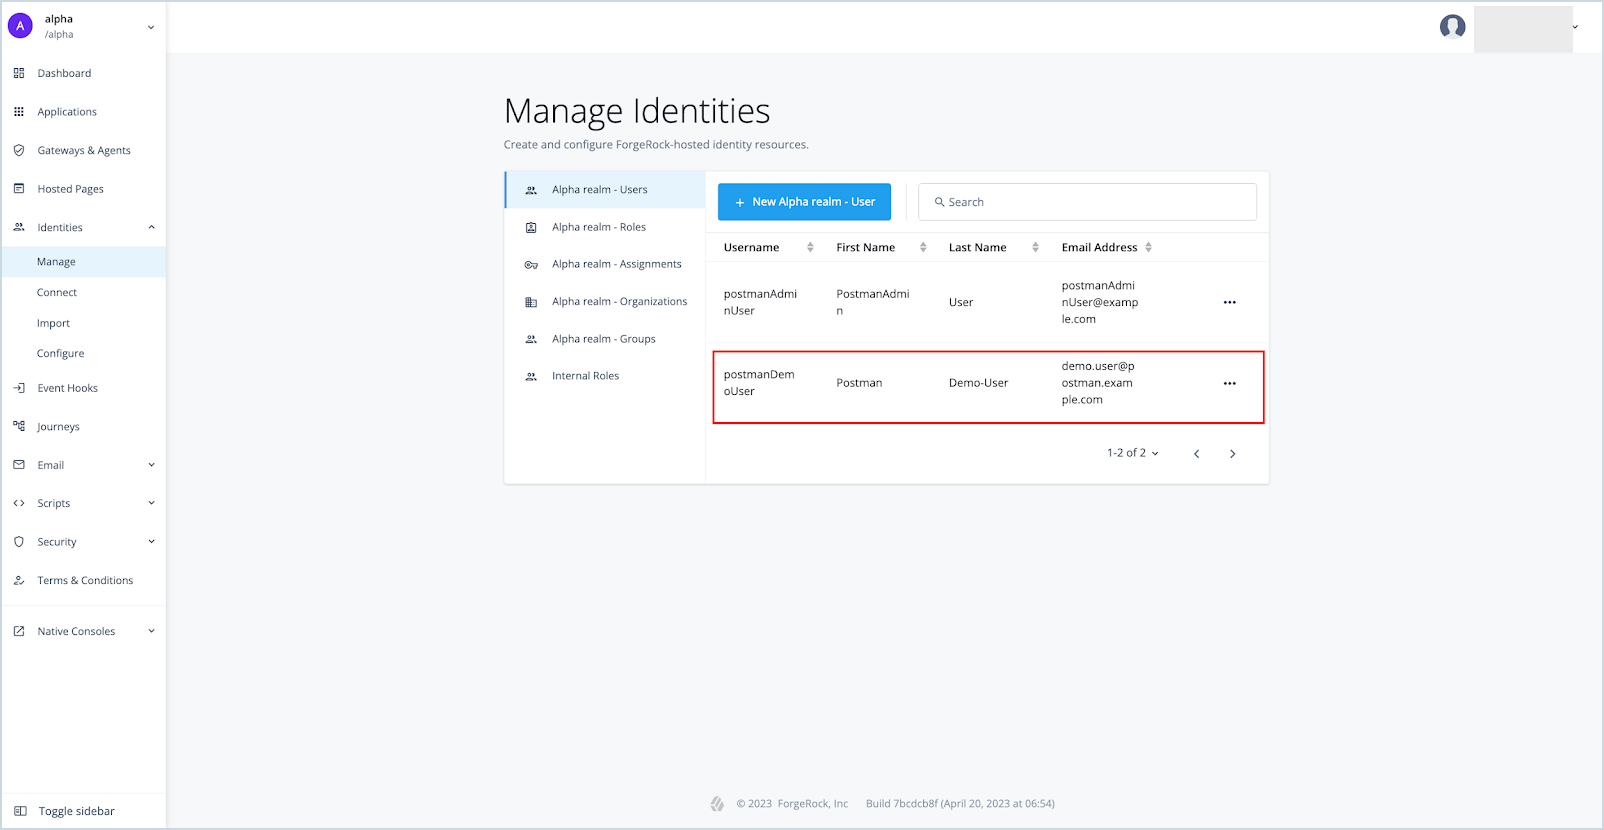
To confirm that the new user was created, log into the Identity Cloud Admin UI, and go to Identities > Manage.
The new Identity Cloud user who was created using the REST API is listed.
Examples using curl ~ 5 min
Besides Postman, the Identity Cloud REST APIs can also be invoked using curl.
This section of the guide revisits a couple of steps from the Prerequisites section of the ForgeRock Identity Postman Collection using the widely used curl command.
Use the OS command line terminal to run two examples of curl command below to:
-
Request an access token with scope
fr:idm:*from the Identity Cloud “access token” endpoint using the OAuth ROPC grant type (Step 6 of ForgeRock Identity Cloud Postman Collection). -
Use the access token obtained above to create a new ForgeRock Identity Cloud user (Step 7 of ForgeRock Identity Cloud Postman Collection).
To run the curl commands:
-
Make a request for an access token. The backward slash indicates that the command continues in the next line. Don’t forget to replace the
httpslink with your Identity Cloud tenant URL.$ curl \ --header 'Content-Type: application/x-www-form-urlencoded ' \ --data 'grant_type=password' \ --data 'username=postmanAdminUser' \ --data 'password=Rock5tar10$' \ --data 'scope=fr:idm:*' \ --data 'client_id=postmanAdminClient' \ --data 'client_secret=postmanClientSecret' \ 'https://<id_cloud_tenant>/am/oauth2/realms/root/realms/alpha/access_token'Example response:
{ "access_token": "eyJ0eXAiOiJKV1QiLCJhbGciOiJIUzI1NiJ9.eyJzdWIiOiIyZTM2Y2JkYS02NmI2LTRiYWYtODY1ZS1jNDQxN2U5NmE1MjMiLCJjdHMiOiJPQVVUSDJfU1RBVEVMRVNTX0dSQU5UIiwiYXV0aF9sZXZlbCI6MCwiYXVkaXRUcmFja2luZ0lkIjoiMDA4YzE2MjYtN2QxNi00OTBiLWEwNjUtNGFhNmU2YWVhYzkzLTE4NTAwNDMiLCJzdWJuYW1lIjoiMmUzNmNiZGEtNjZiNi00YmFmLTg2NWUtYzQ0MTdlOTZhNTIzIiwiaXNzIjoiaHR0cHM6Ly9vcGVuYW0tdW5pLXJhamVzaC5mb3JnZWJsb2Nrcy5jb206NDQzL2FtL29hdXRoMi9yZWFsbXMvcm9vdC9yZWFsbXMvYWxwaGEiLCJ0b2tlbk5hbWUiOiJhY2Nlc3NfdG9rZW4iLCJ0b2tlbl90eXBlIjoiQmVhcmVyIiwiYXV0aEdyYW50SWQiOiJzZlFZUnhBOGk1MkU2ZUlYWVF5WVJoci13NzAiLCJhdWQiOiJwb3N0bWFuQWRtaW5DbGllbnQiLCJuYmYiOjE2ODI3NzY5MzQsImdyYW50X3R5cGUiOiJwYXNzd29yZCIsInNjb3BlIjpbImZyOmlkbToqIl0sImF1dGhfdGltZSI6MTY4Mjc3NjkzNCwicmVhbG0iOiIvYWxwaGEiLCJleHAiOjE2ODI3ODA1MzQsImlhdCI6MTY4Mjc3NjkzNCwiZXhwaXJlc19pbiI6MzYwMCwianRpIjoiM29GQTgtRkg4eVZueVBialFBYi1UNXBOek9nIn0.TYAsmF93vVmCzTcC751SLQwNo-J9fBi30u2O-ImwSdI", "scope": "fr:idm:*", "token_type": "Bearer", "expires_in": 3599 } -
The following command creates an Identity Cloud user using the access token received above.
 $ curl  \
 --header 'Content-Type: application/json' \
 --header 'Authorization: Bearer <access_token obtained above>' \
 --data '{
   "userName": "postmanDemoUser2",
   "sn": "Demo-User2",
   "givenName": "Postman",
   "mail": "demo.user2@postman.example.com",
   "telephoneNumber": "777-777-7777",
   "password": "Rock5tar10$"
 }' 'https://<id_cloud_tenant>/openidm/managed/alpha_user?_action=create'
Example response:
{ "_id": "d2f094a2-ad6f-4166-bb04-141af54ac61e", "_rev": "84bdb827-942c-40c2-ab91-91645583d69f-17075", "country": null, "frUnindexedString1": null, "mail": "demo.user2@postman.example.com", "memberOfOrgIDs": [], < ------------output omitted for brevity ----------> "telephoneNumber": "777-777-7777", "city": null, < ------------output omitted for brevity ----------> "sn": "Demo-User2", "frUnindexedDate1": null, "frIndexedInteger5": null, "preferences": null, "userName": "postmanDemoUser2", "frIndexedDate2": null, "frIndexedDate1": null, "effectiveRoles": [] } -
To confirm that the new user was created in the Identity Cloud alpha realm, log into your Identity Cloud Admin UI, and go to Identities > Manage. The new Identity Cloud user created using the curl command is listed.