Part 2: Integrate Azure With ForgeRock Identity Cloud
Author: |
Volker Scheuber |
Created at: |
Jun 2021 |
Updated at: |
Jan 2024 |
Originally posted on Mr. Andesons Musings
A video demonstration is included at the end of this article to help guide you through testing the instructions and login journey.
Overview
I won’t repeat the introduction from Integrate Azure With ForgeRock Identity Cloud – Part I and instead, come straight to the point. This article builds on the previous and frequently refers to it.
Let’s take a look at a more straight-forward but less flexible integration option, the IDP-initiated flow in standalone mode.
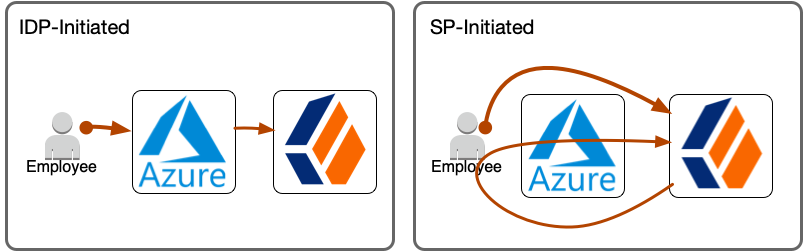
In the IDP-initiated flow, Azure controls the flow from start to finish.
Configure SAML Integration
Both flows, SP-initiated and IDP-initiated, require very similar configuration steps, yet with important differences. Even though SAML is an open standard, its configuration differs greatly between vendors and implementations and involves vendor-specific steps, terminology, and configuration.
Prerequisites
-
ForgeRock Identity Cloud tenant admin access
-
Azure Active Directory tenant admin access
Configure IDP-Initiated Flow (Standalone Mode)
If you have run through the steps of
Part
I already, watch out for ✓ indicators on which steps you don’t need to
do again and
![]() indicators on which steps are different from what you did in
Part
I.
indicators on which steps are different from what you did in
Part
I.
1. Create Circle Of Trust in ForgeRock Identity Cloud
Identity Cloud groups identity providers and service providers who agree to share authentication information into circles of trust. The first step is to create a circle of trust for this Azure integration.
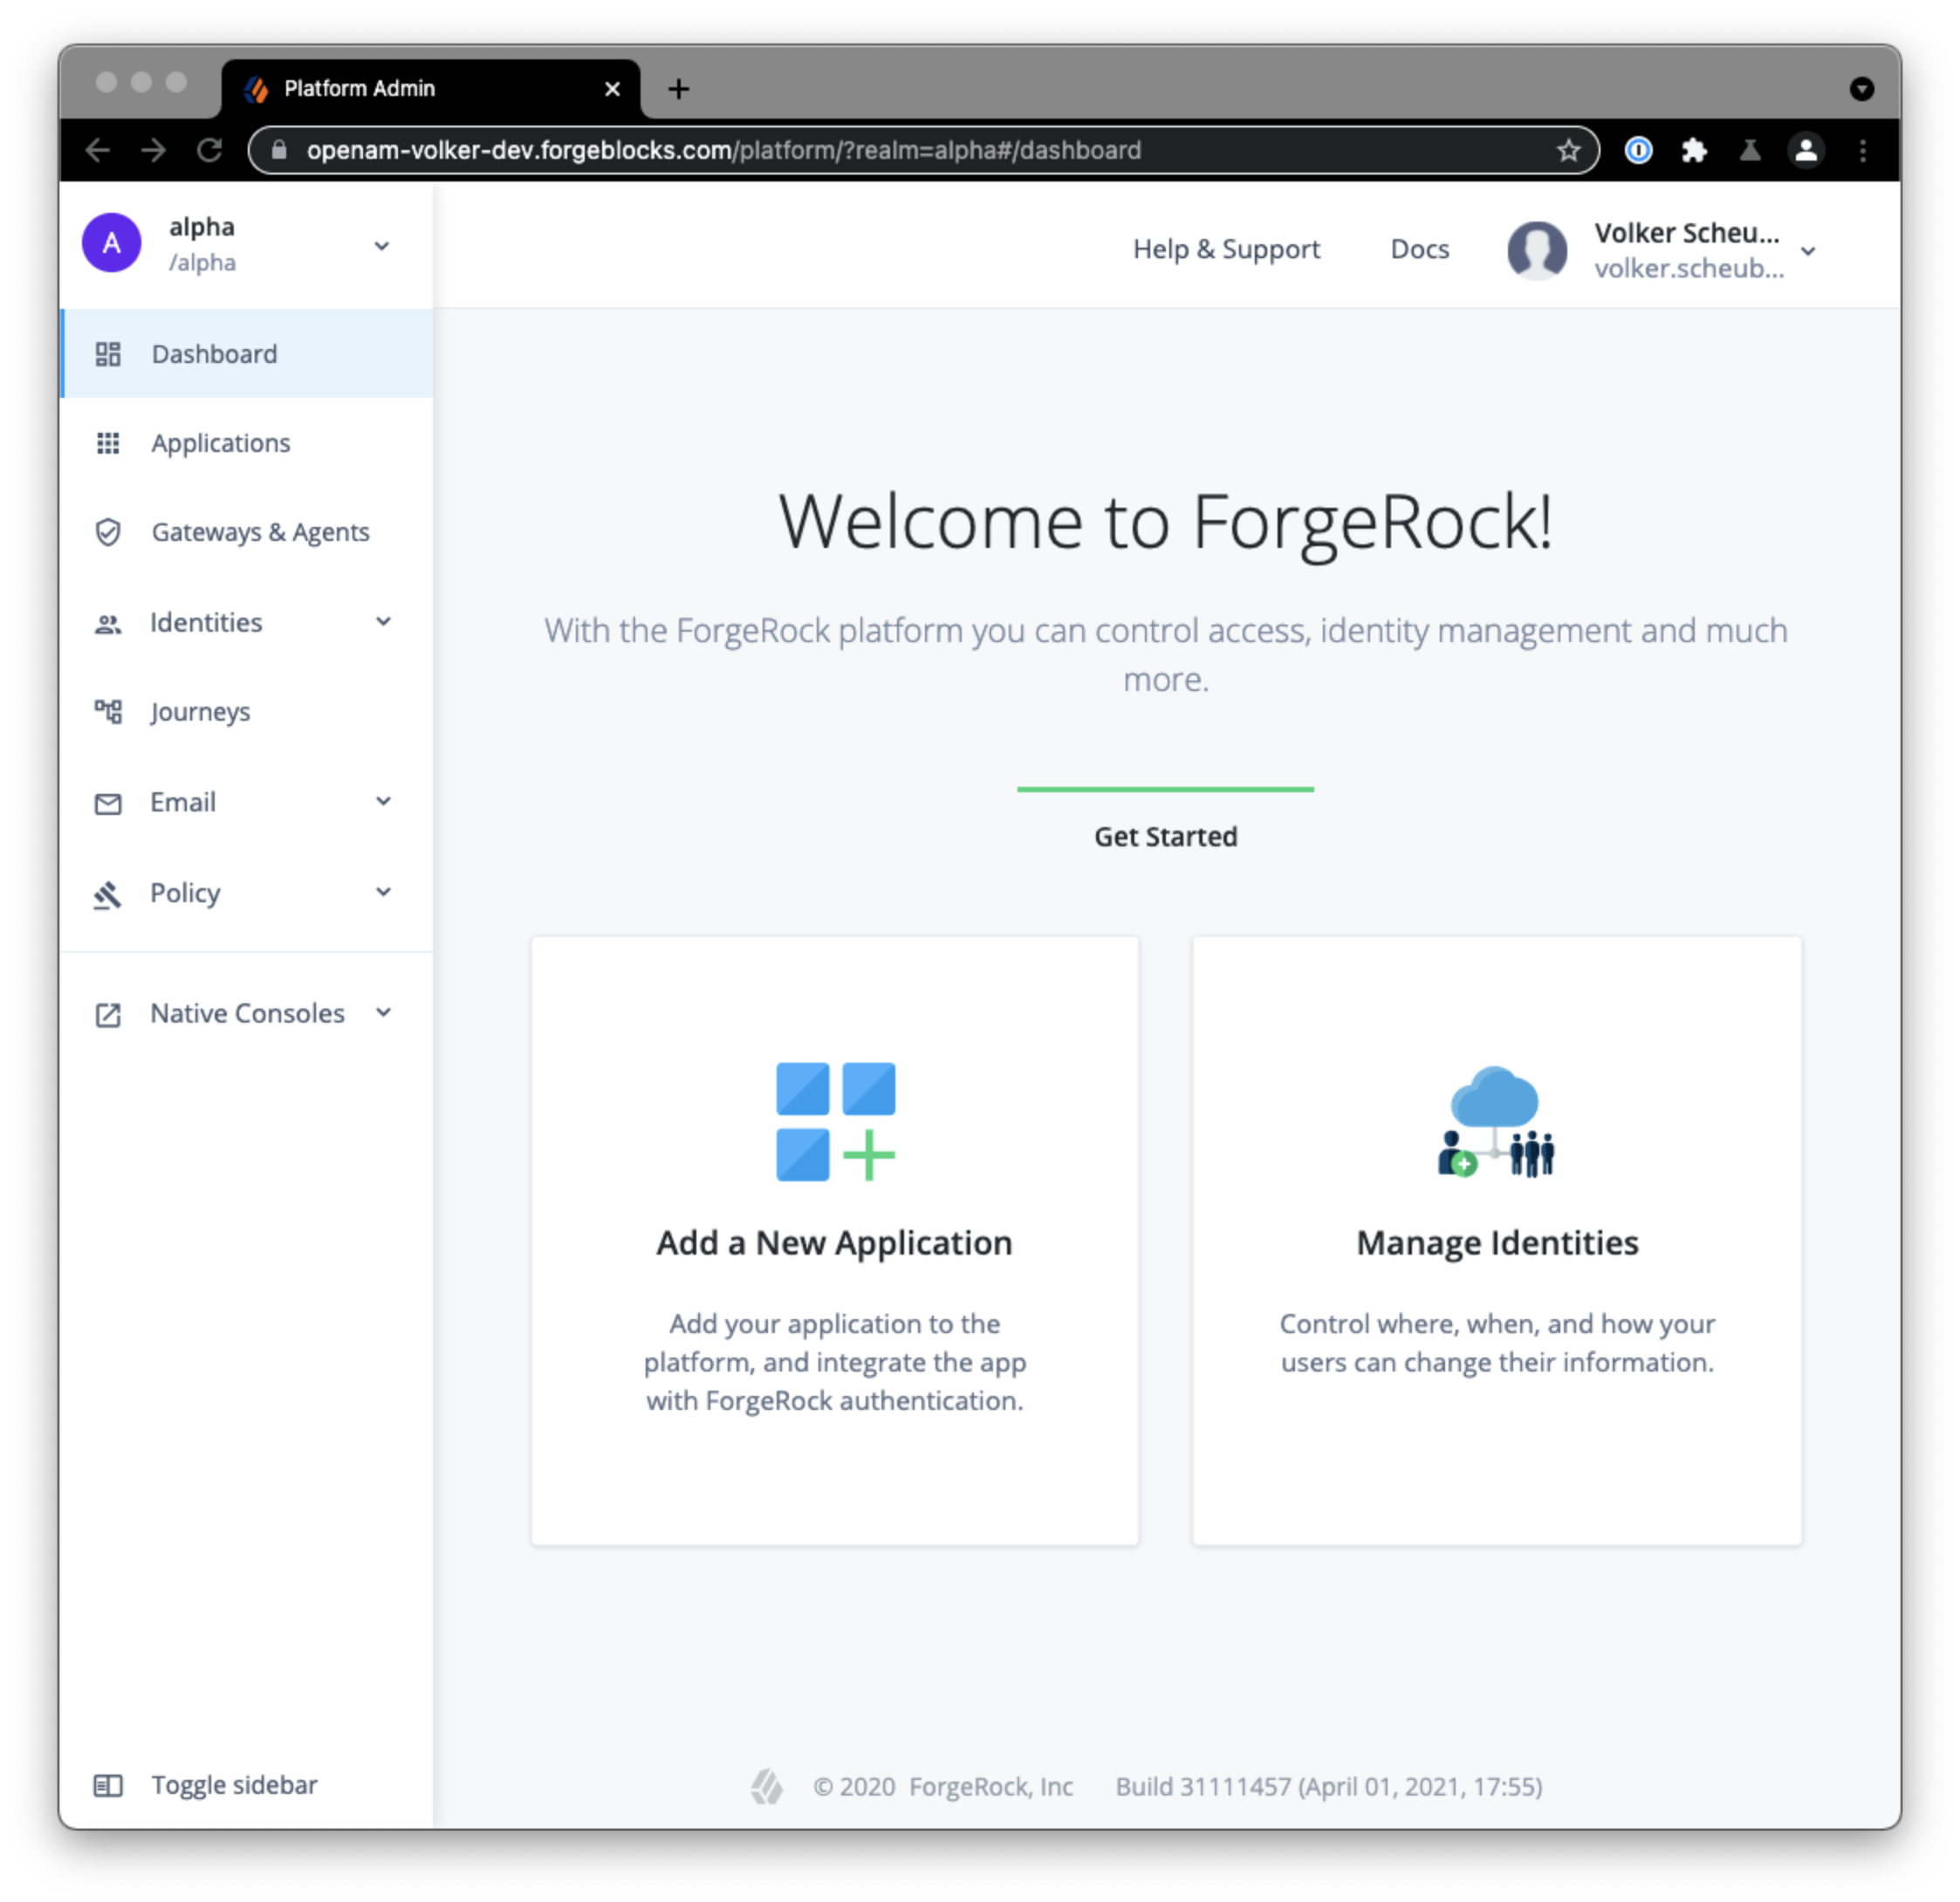 Login
to your ForgeRock Identity Cloud tenant admin UI
Login
to your ForgeRock Identity Cloud tenant admin UI
A demo tenant admin UI URL looks like this:
https://<tenant-name>.forgeblocks.com/platform
A production tenant admin UI URL looks like this:
https://<tenant-name>.id.forgerock.io/platform
I will be using my personal tenant throughout this article:
https://openam-volker-dev.forgeblocks.com/platform
 From
the left-hand navigation menu select Native Consoles > Access
Management > Applications > Federation > Circles of Trust > Add
Circle of Trust. Choose a name, e.g.
From
the left-hand navigation menu select Native Consoles > Access
Management > Applications > Federation > Circles of Trust > Add
Circle of Trust. Choose a name, e.g. AzureCOT, and description that
indicate what the COT is being used for. I recommend you use it
specifically for the Azure integration and create additional COTs for
other integrations as you see fit. Don’t worry about any of the other
fields for now.
2. Create Hosted Service Provider in ForgeRock Identity Cloud
![]() This step is very similar to step 2 of
Part
I, but watch out for the differences! This time you do not have to
enable integrated mode. This step is shorter than what you did in step 2
of
Part
I.
This step is very similar to step 2 of
Part
I, but watch out for the differences! This time you do not have to
enable integrated mode. This step is shorter than what you did in step 2
of
Part
I.
Identity Cloud stores information about both federation parties, the service provider (its own role) and the identity provider (Azure’s role). Its own configuration is stored as a Hosted SP, which this step creates, and information about the Azure identity provider is stored as a Remote identity provider (which you will create in step 7).
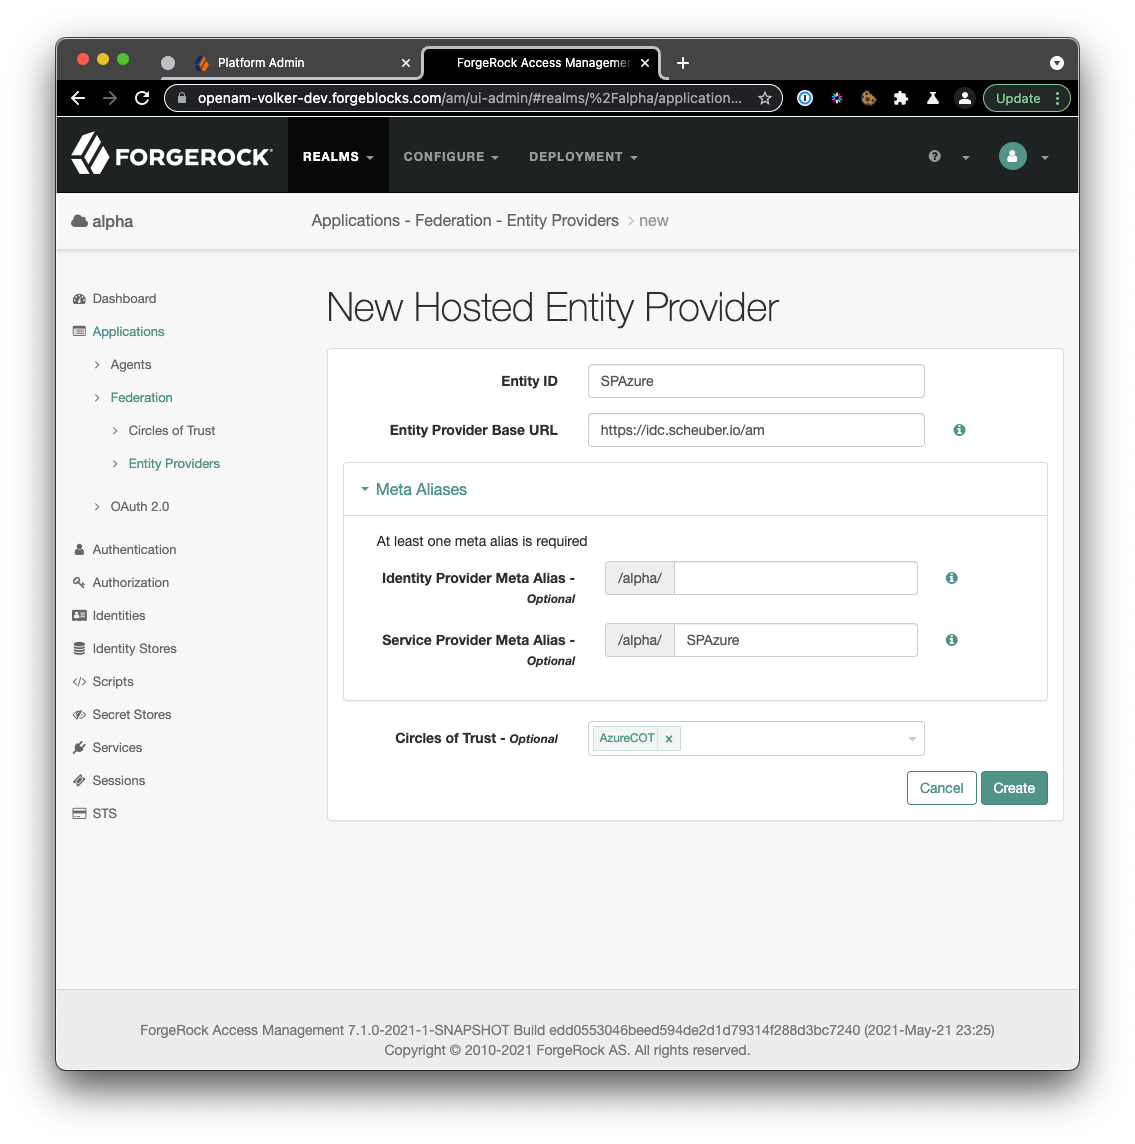 From
the native access management console’s left-hand navigation menu select
Applications > Federation > Entity Providers > Add Entity
Provider > Hosted. Choose a short and descriptive value for the Entity
ID, e.g.
From
the native access management console’s left-hand navigation menu select
Applications > Federation > Entity Providers > Add Entity
Provider > Hosted. Choose a short and descriptive value for the Entity
ID, e.g.
SPAzure(![]() note the different name: for integrated mode I suggested
note the different name: for integrated mode I suggested iSPAzure).
Be mindful of the Entity Provider Base URL field. It is pre-populated with a valid default value but you may want to consider changing it, if your ID Cloud realm is configured with a custom DNS name and you want users to access your tenant using that custom DNS name. I have a custom DNS name configured for the alpha realm in my tenant and thus I change the Entity Provider Base URL to reflect that custom DNS name. What you enter here affects the user experience, as the URL is visible to the end user during the SAML flow.
Leave the Identity Provider Meta Alias field empty to avoid creating a hosted IDP.
Choose a value for the Service Provider Meta Alias field. I recommend to use the entity id (unless you decided to use a URL-style value as your entity id, then you will want to chose some other unique string value).
Select the circle of trust you created in step 1 as the value (or one of the values) for the Circles of Trust field.
Once you created the entity provider, there are a number of additional configuration steps to take:
 On
the Assertion Processing tab, modify the Attribute Mapper to contain
the following mappings in the Attribute Map. These mappings will work
with the default settings in an Azure Enterprise Application. Add any
additional mappings as you see fit. The map determines how you will be
able to refer to attributes in the assertion to create or update user
profiles in ID Cloud.
On
the Assertion Processing tab, modify the Attribute Mapper to contain
the following mappings in the Attribute Map. These mappings will work
with the default settings in an Azure Enterprise Application. Add any
additional mappings as you see fit. The map determines how you will be
able to refer to attributes in the assertion to create or update user
profiles in ID Cloud.
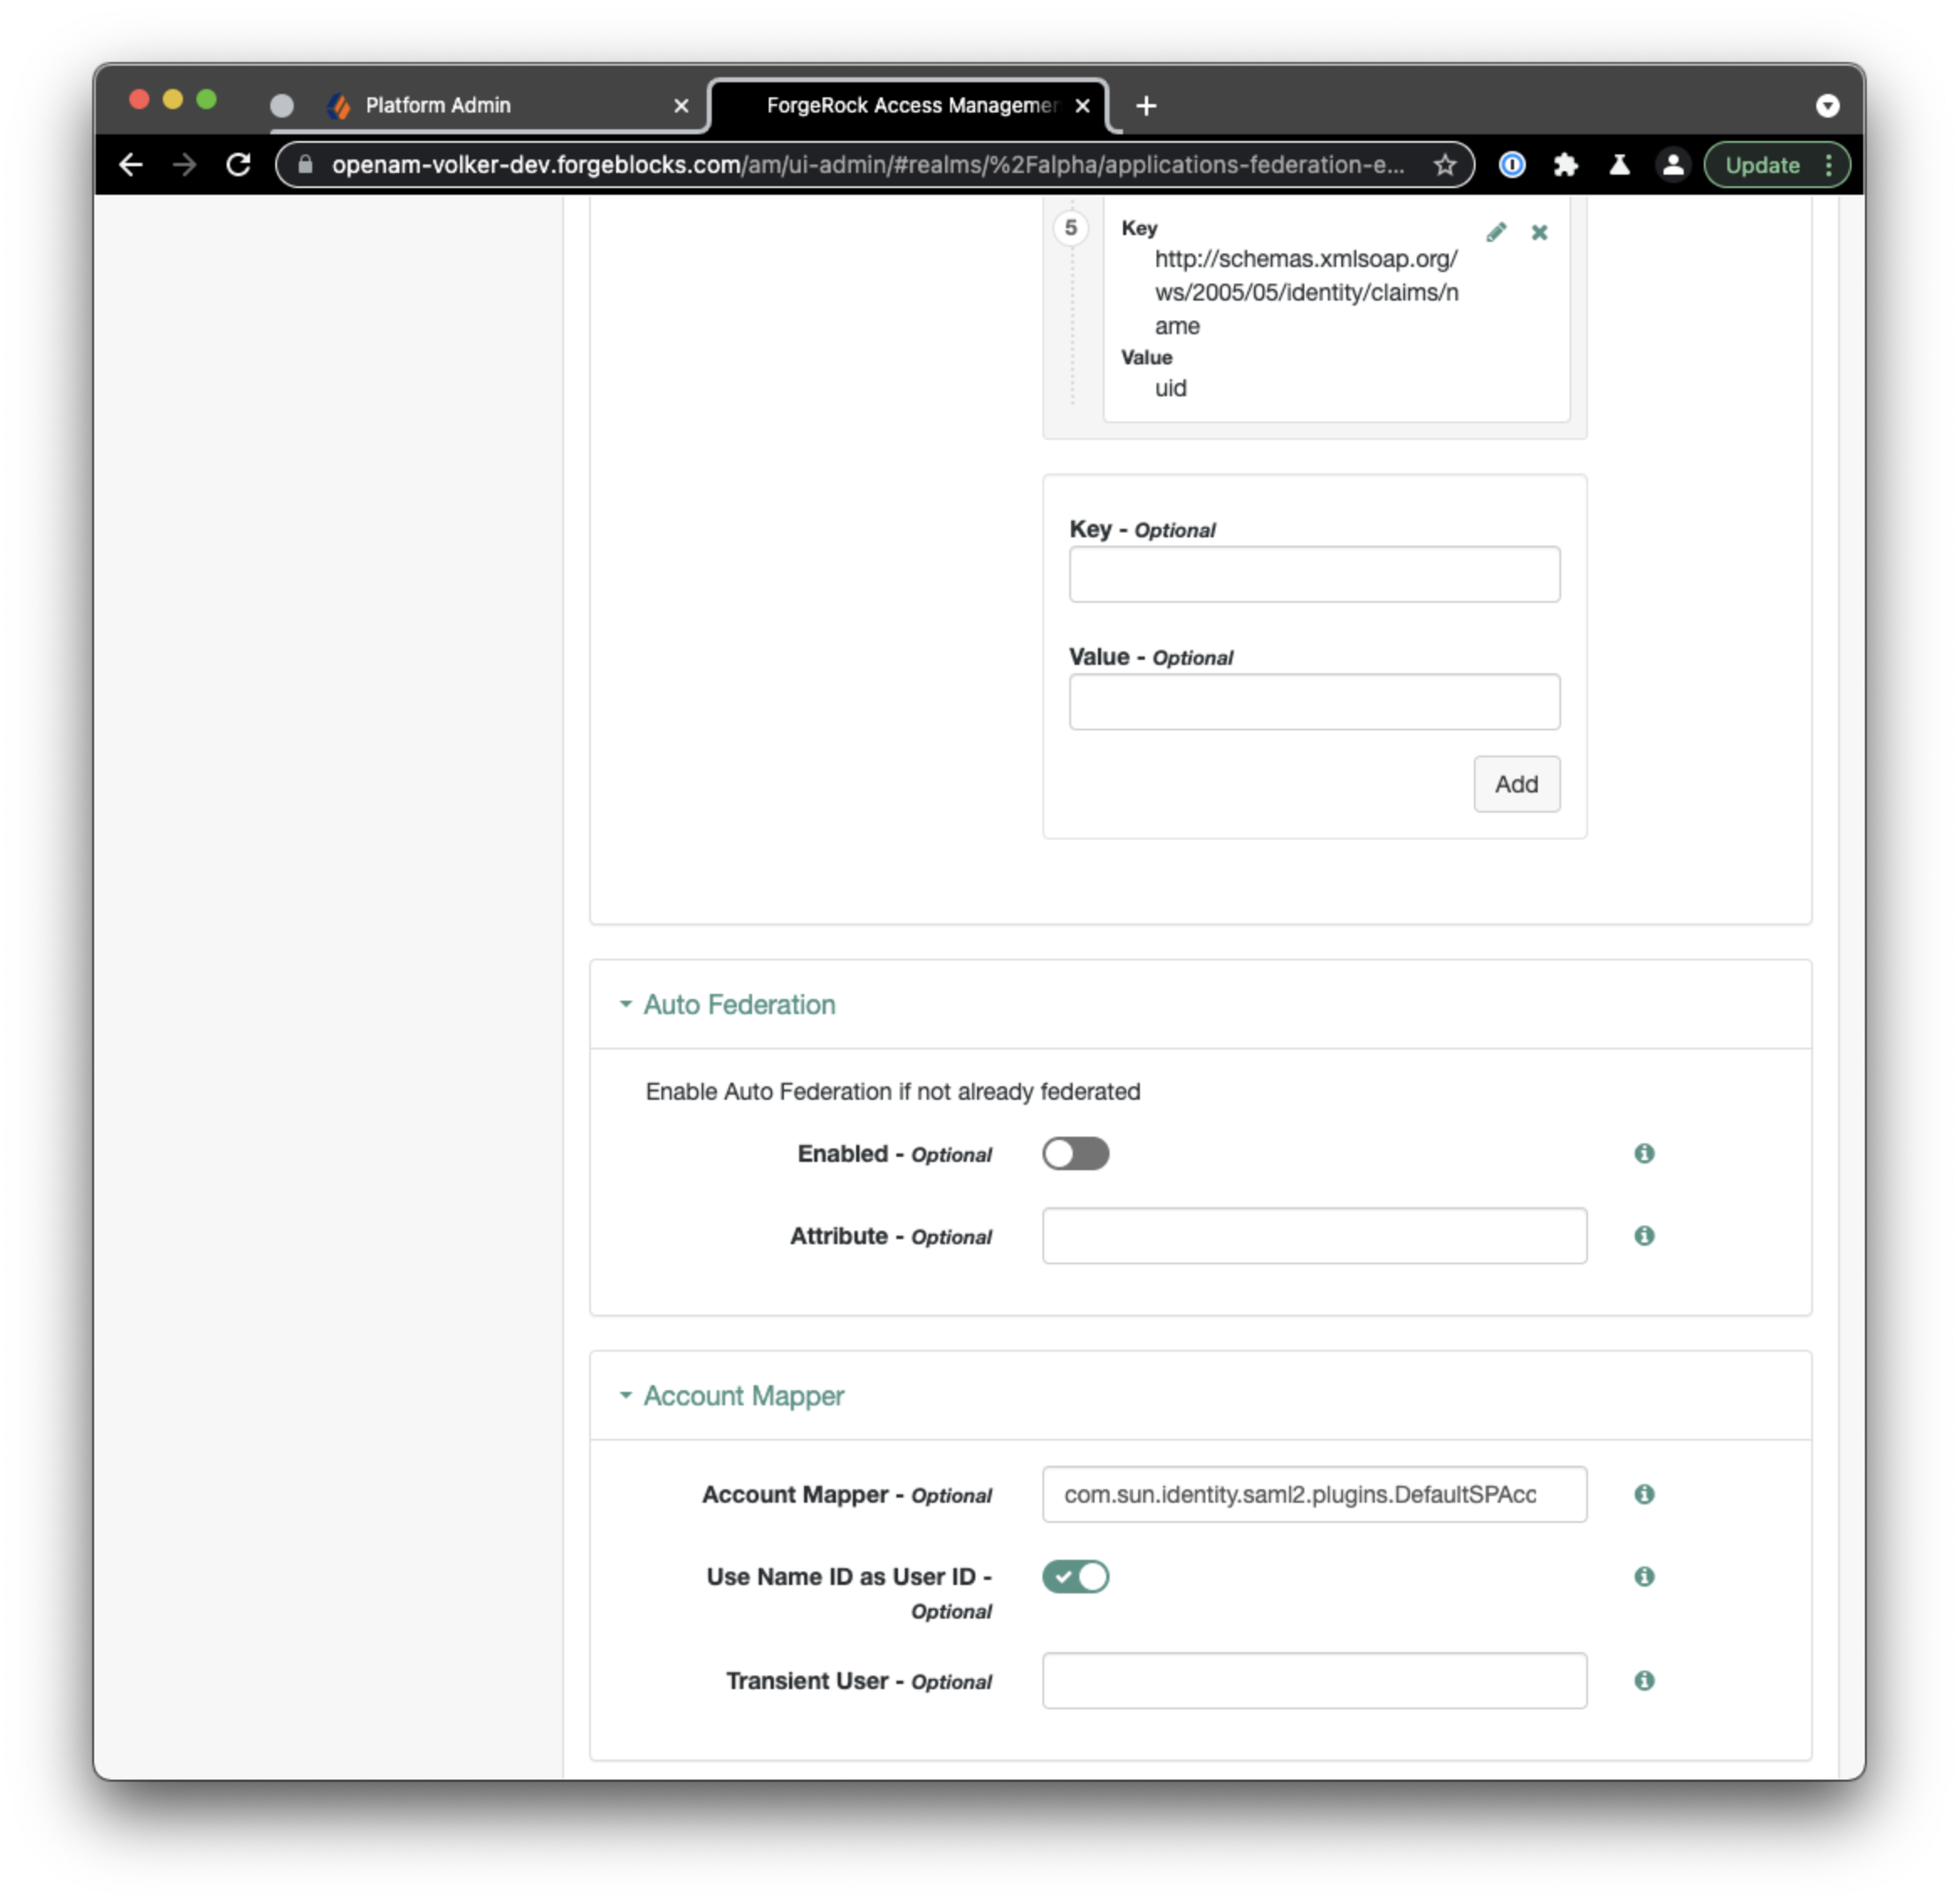 On
that same Assertion Processing tab, scroll down to the Account
Mapper section and enable the option Use Name ID as User ID. This
instructs ID Cloud to set the username to the value of the Name ID in
the assertion. You would want to disable this options if you want to use
another SAML attribute as the username in ID Cloud.
On
that same Assertion Processing tab, scroll down to the Account
Mapper section and enable the option Use Name ID as User ID. This
instructs ID Cloud to set the username to the value of the Name ID in
the assertion. You would want to disable this options if you want to use
another SAML attribute as the username in ID Cloud.
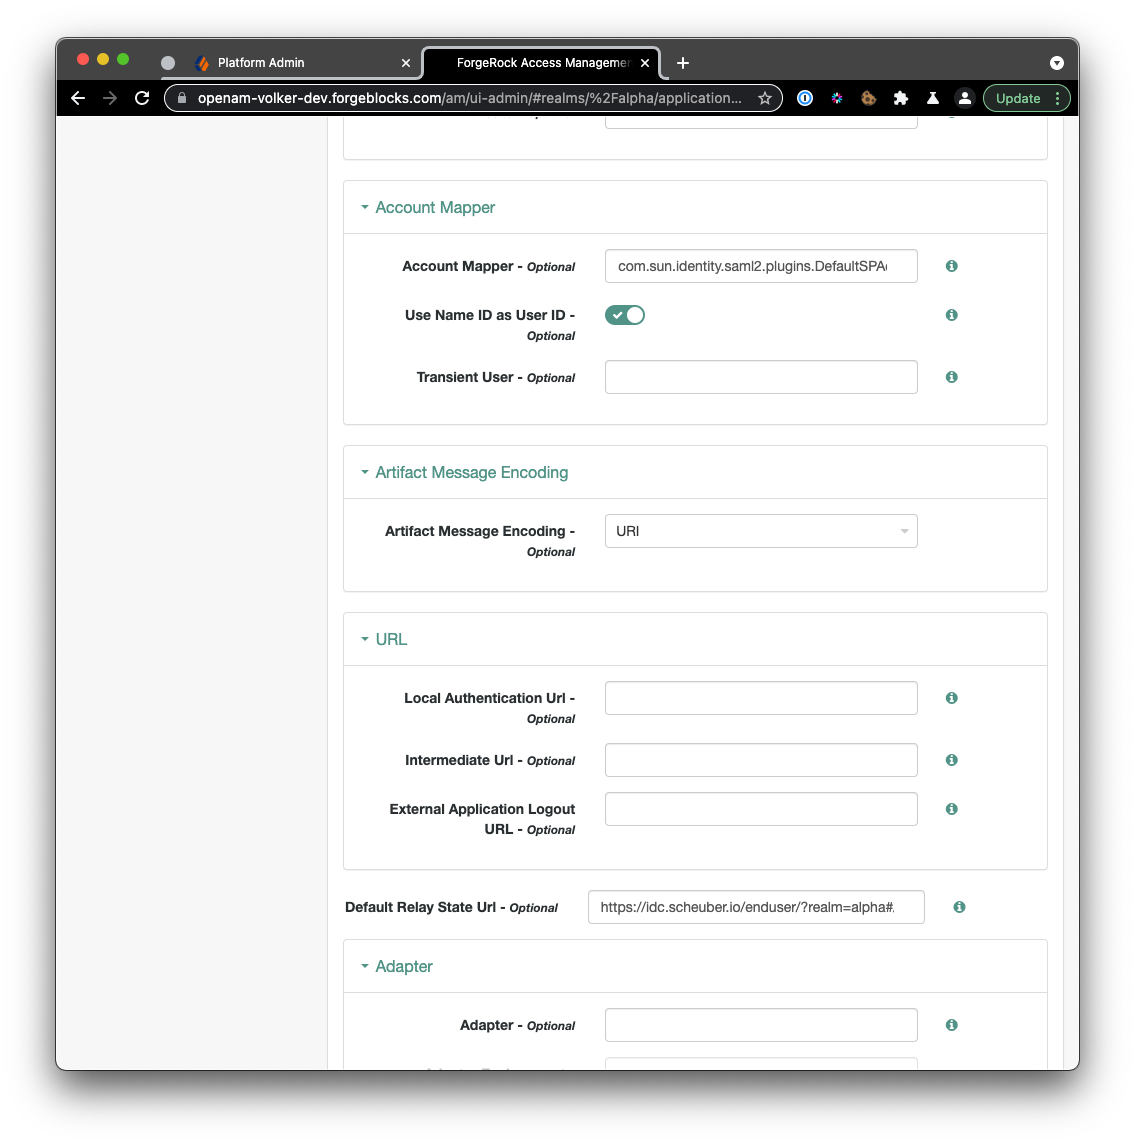
![]() Scroll down a bit further on that same page and set the Default Relay
State Url to a URL of your choice but preferably one that is only
accessible with an authenticated user session. The Default Relay State
Url setting specifies where the SP should send the user after
successful authentication by the IDP. A good value for testing is the
user self-service and profile management application in Identity Cloud,
in my case:
Identity
Management. Note that the IDP can override this setting.
Scroll down a bit further on that same page and set the Default Relay
State Url to a URL of your choice but preferably one that is only
accessible with an authenticated user session. The Default Relay State
Url setting specifies where the SP should send the user after
successful authentication by the IDP. A good value for testing is the
user self-service and profile management application in Identity Cloud,
in my case:
Identity
Management. Note that the IDP can override this setting.
3. Export metadata from ForgeRock Identity Cloud
![]() This step is very similar to step 3 of
Part
I, but watch out for the differences! All the URLs use the standalone
mode hosted SP
This step is very similar to step 3 of
Part
I, but watch out for the differences! All the URLs use the standalone
mode hosted SP SPAzure.
Identity Cloud exposes its SAML2 metadata through a URL you can access from your browser to “Save Page As…” or use a command line tool like wget or curl to obtain the metadata XML and store it as an XML file.
Metadata URL format:
[TenantURL]/am/saml2/jsp/exportmetadata.jsp?entityid=[EntityID]&realm=/[RealmName]
Where:
-
[TenantURL]is your default tenant URL or the custom DNS name, e.g.https://openam-volker-dev.forgeblocks.comorhttps://idc.scheuber.ioin my case. -
[EntityID]is the name your hosted service provider you chose in step 2, e.g.SPAzure. -
[RealmName]is the name of the realm hosting your service provider, e.g.alpha.
Metadata URL using my default tenant name:
Metadata URL using my custom DNS name:
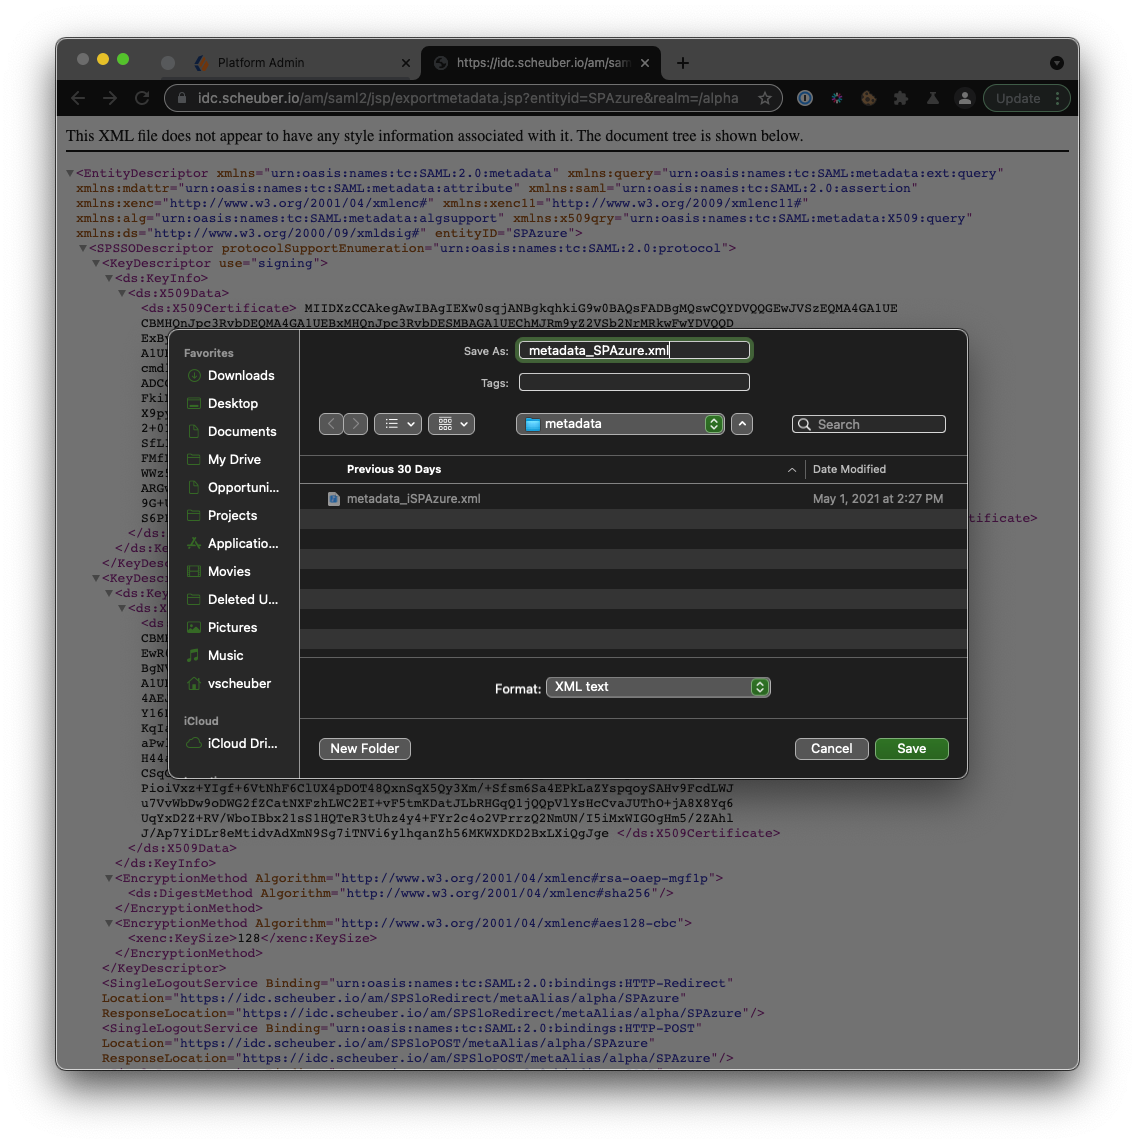 Point
your browser to the metadata URL you composed following the guidelines
above, then do a “Save Page As…” and save the metadata as
Point
your browser to the metadata URL you composed following the guidelines
above, then do a “Save Page As…” and save the metadata as
metadata_SPAzure.xml. Keep this file handy, as you will need it to
configure the Azure side of the integration. Alternatively to using your
browser, you could use a command like:
$ curl --output metadata_SPAzure.xml"https://idc.scheuber.io/am/saml2/jsp/exportmetadata.jsp?entityid=SPAzure&realm=/alpha"
4. Create enterprise application in Azure AD
![]() I recommend you create a separate enterprise application from the one
you created in
Part
I), so that you can observe the two flows side-by-side.
I recommend you create a separate enterprise application from the one
you created in
Part
I), so that you can observe the two flows side-by-side.
Azure lets you create enterprise applications for the purpose of storing single sign-on configuration for an application or service you want to integrate with Azure.
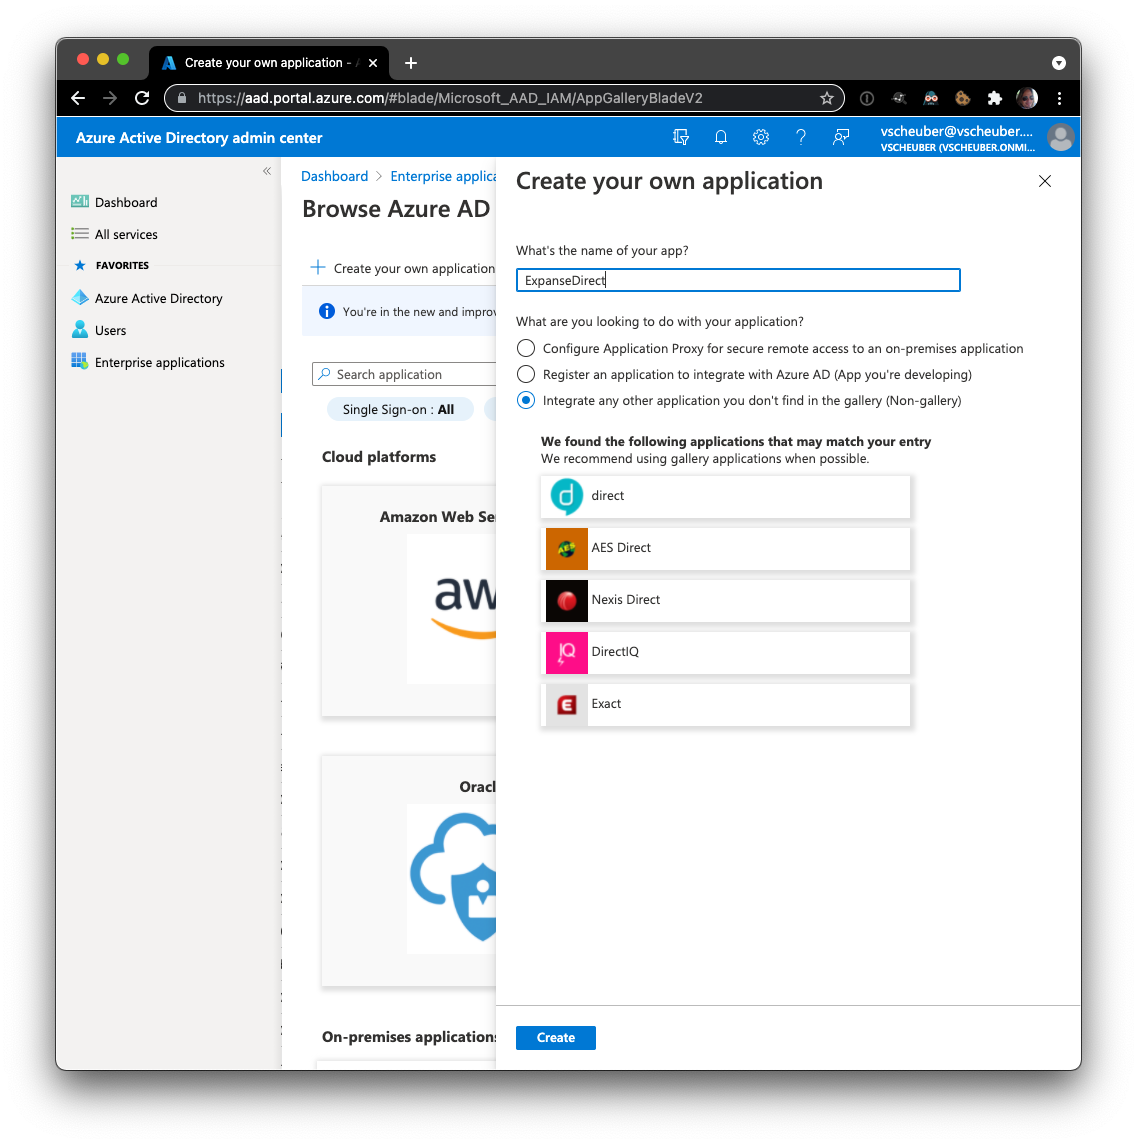 Login
to your Azure Active Directory administration portal at
https://aad.portal.azure.com, select
Enterprise applications from the left navigation menu. From the
enterprise applications page, select New Application, then Create
your own application, pick a name and select the bottom option
Integrate any other application you don’t find in the gallery
(Non-gallery), then select Create.
Login
to your Azure Active Directory administration portal at
https://aad.portal.azure.com, select
Enterprise applications from the left navigation menu. From the
enterprise applications page, select New Application, then Create
your own application, pick a name and select the bottom option
Integrate any other application you don’t find in the gallery
(Non-gallery), then select Create.
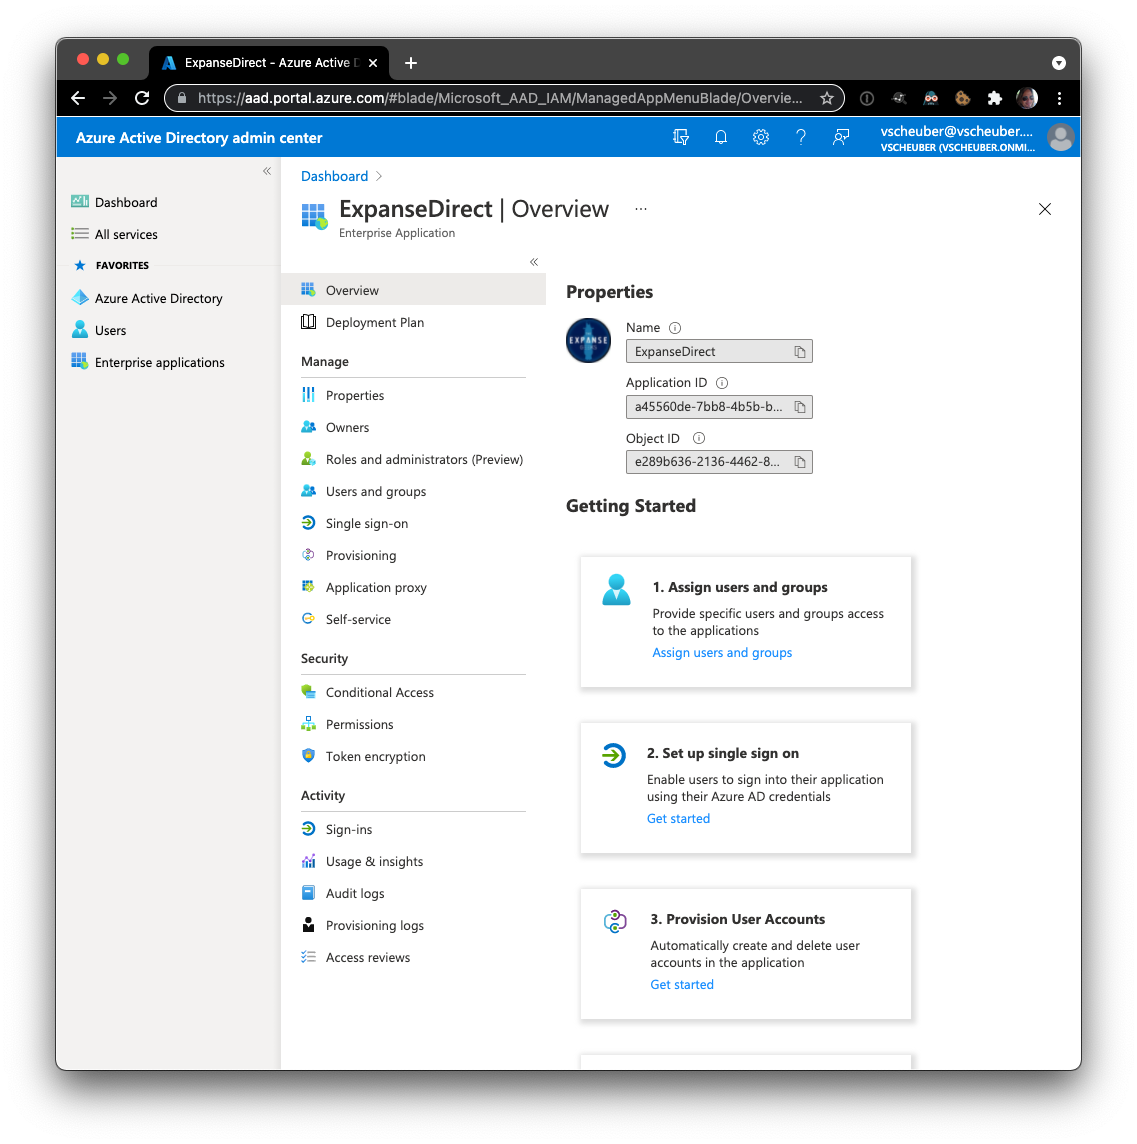 From
the Overview page of your new enterprise application, configure the
basics: Select a nice icon for your application, and more importantly,
assign users and groups. Enterprise applications will only show for
users who have been assigned either directly or indirectly through a
group. Once these basic necessities are taken care of, you can configure
single sign-on.
From
the Overview page of your new enterprise application, configure the
basics: Select a nice icon for your application, and more importantly,
assign users and groups. Enterprise applications will only show for
users who have been assigned either directly or indirectly through a
group. Once these basic necessities are taken care of, you can configure
single sign-on.
5. Upload ForgeRock metadata into enterprise application and configure IDP settings
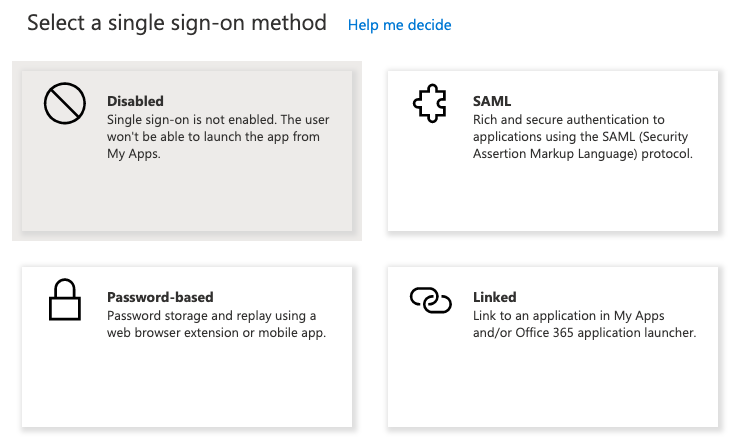 From
the Overview page of your new enterprise application or from the left
navigation menu select Single sign-on. Choose SAML, then Upload
metadata file and upload the file you exported from Identity Cloud,
From
the Overview page of your new enterprise application or from the left
navigation menu select Single sign-on. Choose SAML, then Upload
metadata file and upload the file you exported from Identity Cloud,
metadata_SPAzure.xml. This will configure most of the required
settings to make single sign-on (SSO) work and land you on the Basic
SAML Configuration page.

![]() You don’t need to change anything after import. Note the difference
between this step in
Part
I, where you had to provide a Sign on URL. The in-line help says:
“This URL contains the sign-in page for this application that will
perform the service provider-initiated single sign-on. Leave it blank if
you want to perform identity provider initiated single sign-on”. So
we’ll leave it empty.
You don’t need to change anything after import. Note the difference
between this step in
Part
I, where you had to provide a Sign on URL. The in-line help says:
“This URL contains the sign-in page for this application that will
perform the service provider-initiated single sign-on. Leave it blank if
you want to perform identity provider initiated single sign-on”. So
we’ll leave it empty.
If you wanted to, you could override the Default Relay State Url setting from step 2 with the Relay State setting on the IDP. For now I suggest you leave it empty.
For a basic configuration, the defaults in the User Attributes & Claims section suffice and align with the Attribute Mapper configuration performed in Identity Cloud in step 2.
6. Download and modify Azure metadata from enterprise application
This step takes place in the Azure Active Directory Portal and in a local file editor.
![]() Read the instructions for this step carefully, if you plan on running
the SP-initiated integrated mode flow from
Part
I and the IDP-initiated standalone flow described in this part in
parallel. The download and modification of the Azure metadata is exactly
the same as what you have done in
Part
I except that you should not overwrite the resulting files from
Part
I because you will need them to complete this step.
Read the instructions for this step carefully, if you plan on running
the SP-initiated integrated mode flow from
Part
I and the IDP-initiated standalone flow described in this part in
parallel. The download and modification of the Azure metadata is exactly
the same as what you have done in
Part
I except that you should not overwrite the resulting files from
Part
I because you will need them to complete this step.
 From
the same Basic SAML Configuration page, select Download next to
Federation Metadata XML in section 3 SAML Signing Certificate and
save the Azure metadata to a file, e.g.
From
the same Basic SAML Configuration page, select Download next to
Federation Metadata XML in section 3 SAML Signing Certificate and
save the Azure metadata to a file, e.g. metadata_AzureIDP2.xml, which
you will import into Identity Cloud to create a remote IDP in step 7,
after you make some modifications.
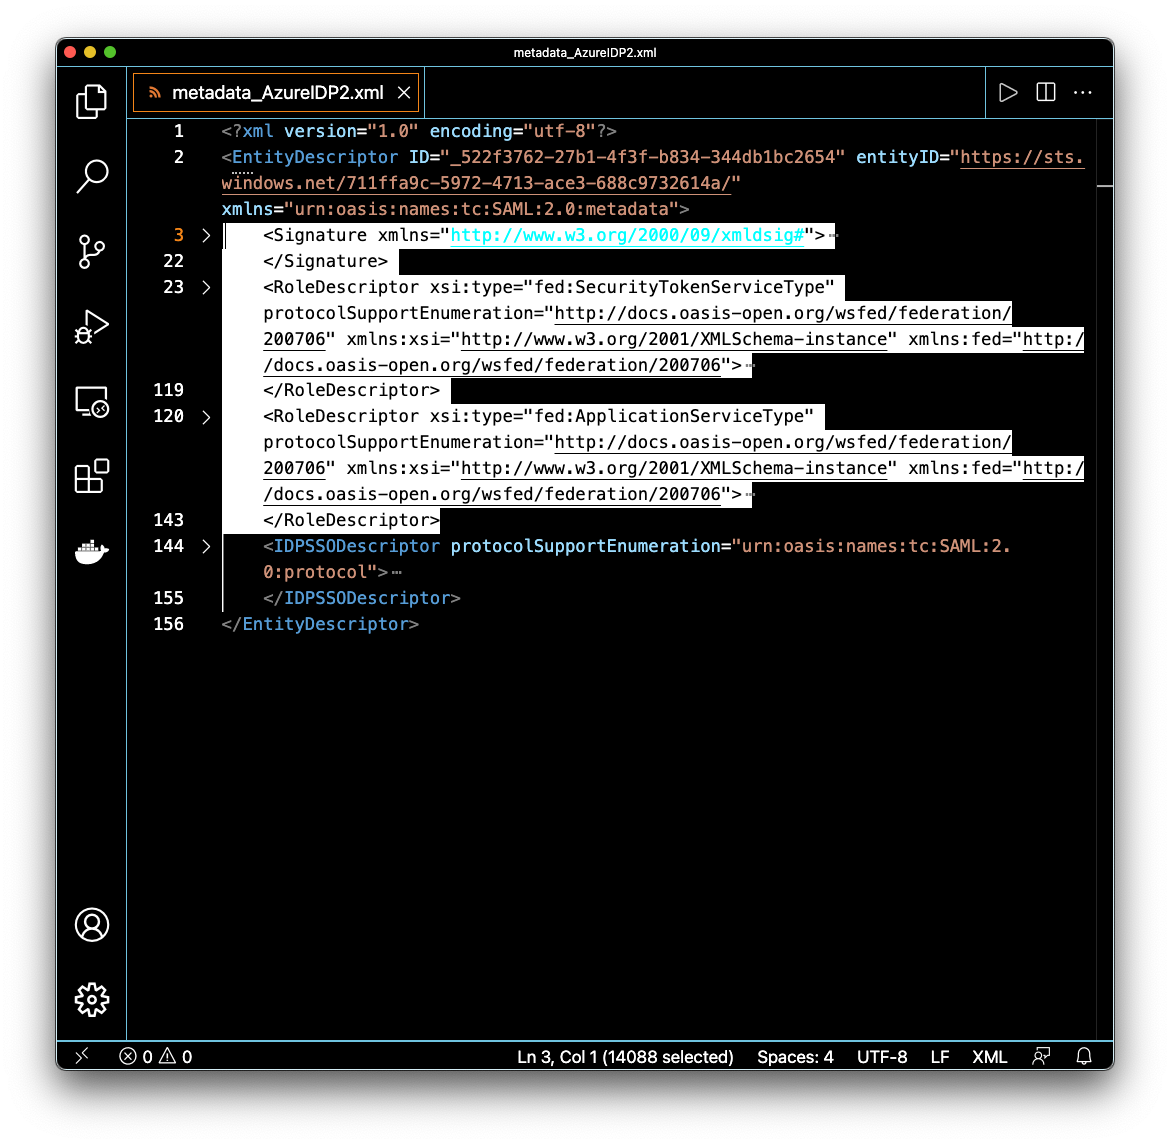 Open
the file in a text or XML editor. If your editor supports
XML-formatting, format the document so it is easier to navigate. The
file includes Azure-specific and proprietary elements not defined in the
SAML specification and not supported by Identity Cloud, which will
result in import failure. These elements are irrelevant to the
integration you are configuring and can therefore be safely removed.
Open
the file in a text or XML editor. If your editor supports
XML-formatting, format the document so it is easier to navigate. The
file includes Azure-specific and proprietary elements not defined in the
SAML specification and not supported by Identity Cloud, which will
result in import failure. These elements are irrelevant to the
integration you are configuring and can therefore be safely removed.
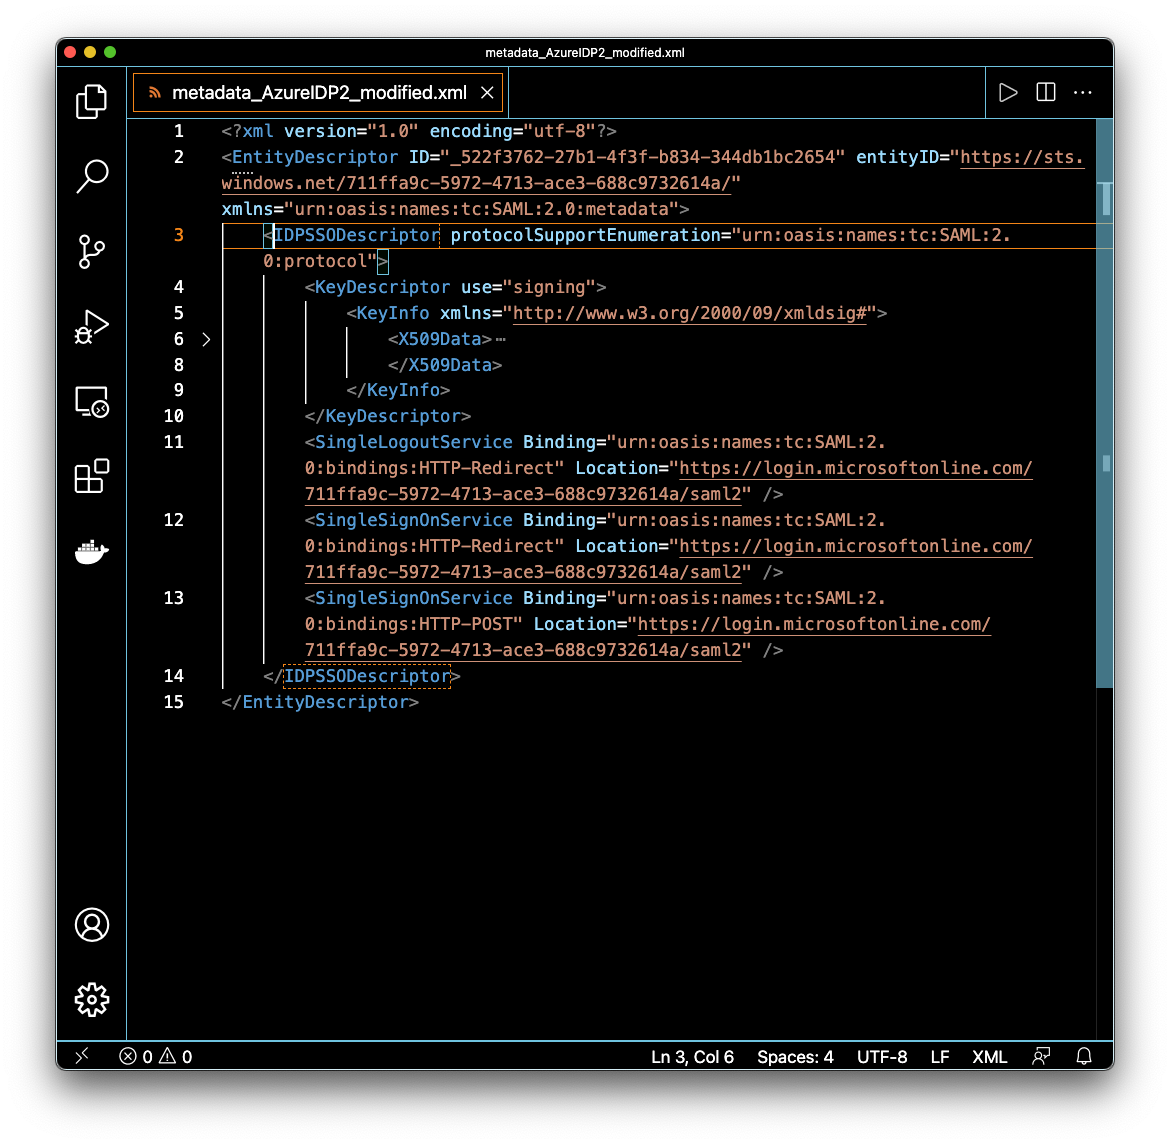 Remove
the following elements under the EntityDescriptor root element:
Signature, RoleDescriptor, fed:xxxx. In other words, remove everything
except for the IDPSSODescriptor element, and save the file with a new
name,
Remove
the following elements under the EntityDescriptor root element:
Signature, RoleDescriptor, fed:xxxx. In other words, remove everything
except for the IDPSSODescriptor element, and save the file with a new
name, metadata_AzureIDP2_modified.xml , so you can always come back to
the original metadata.
![]() If you only want to run the IDP-initiated flow, then this step is
complete. If, however, you want to run both flows in parallel, then
complete the following paragraphs.
If you only want to run the IDP-initiated flow, then this step is
complete. If, however, you want to run both flows in parallel, then
complete the following paragraphs.
 If
you compare the two modified metadata files
If
you compare the two modified metadata files
metadata_AzureIDP_modified.xml and metadata_AzureIDP2_modified.xml,
you will notice that they only differ in one relevant part, which is the
signing cert. Azure uses one global IDP instance per tenant, signified
by the equal entityID attribute of the EntityDescriptor root element,
but each enterprise application gets its own signing cert, by which they
can be kept apart.
Because the entityID in both files is the same, you would receive an error message in the next step. ForgeRock Identity Cloud uses the entityID as the unique identifier of an entity provider in a realm and thus only one entity provider with that same ID can exist per realm.
The solution to this conflict is simple: We will re-create the remote IDP using both signing certificates, allowing ForgeRock Identity Cloud to validate SAML assertions from both enterprise applications.
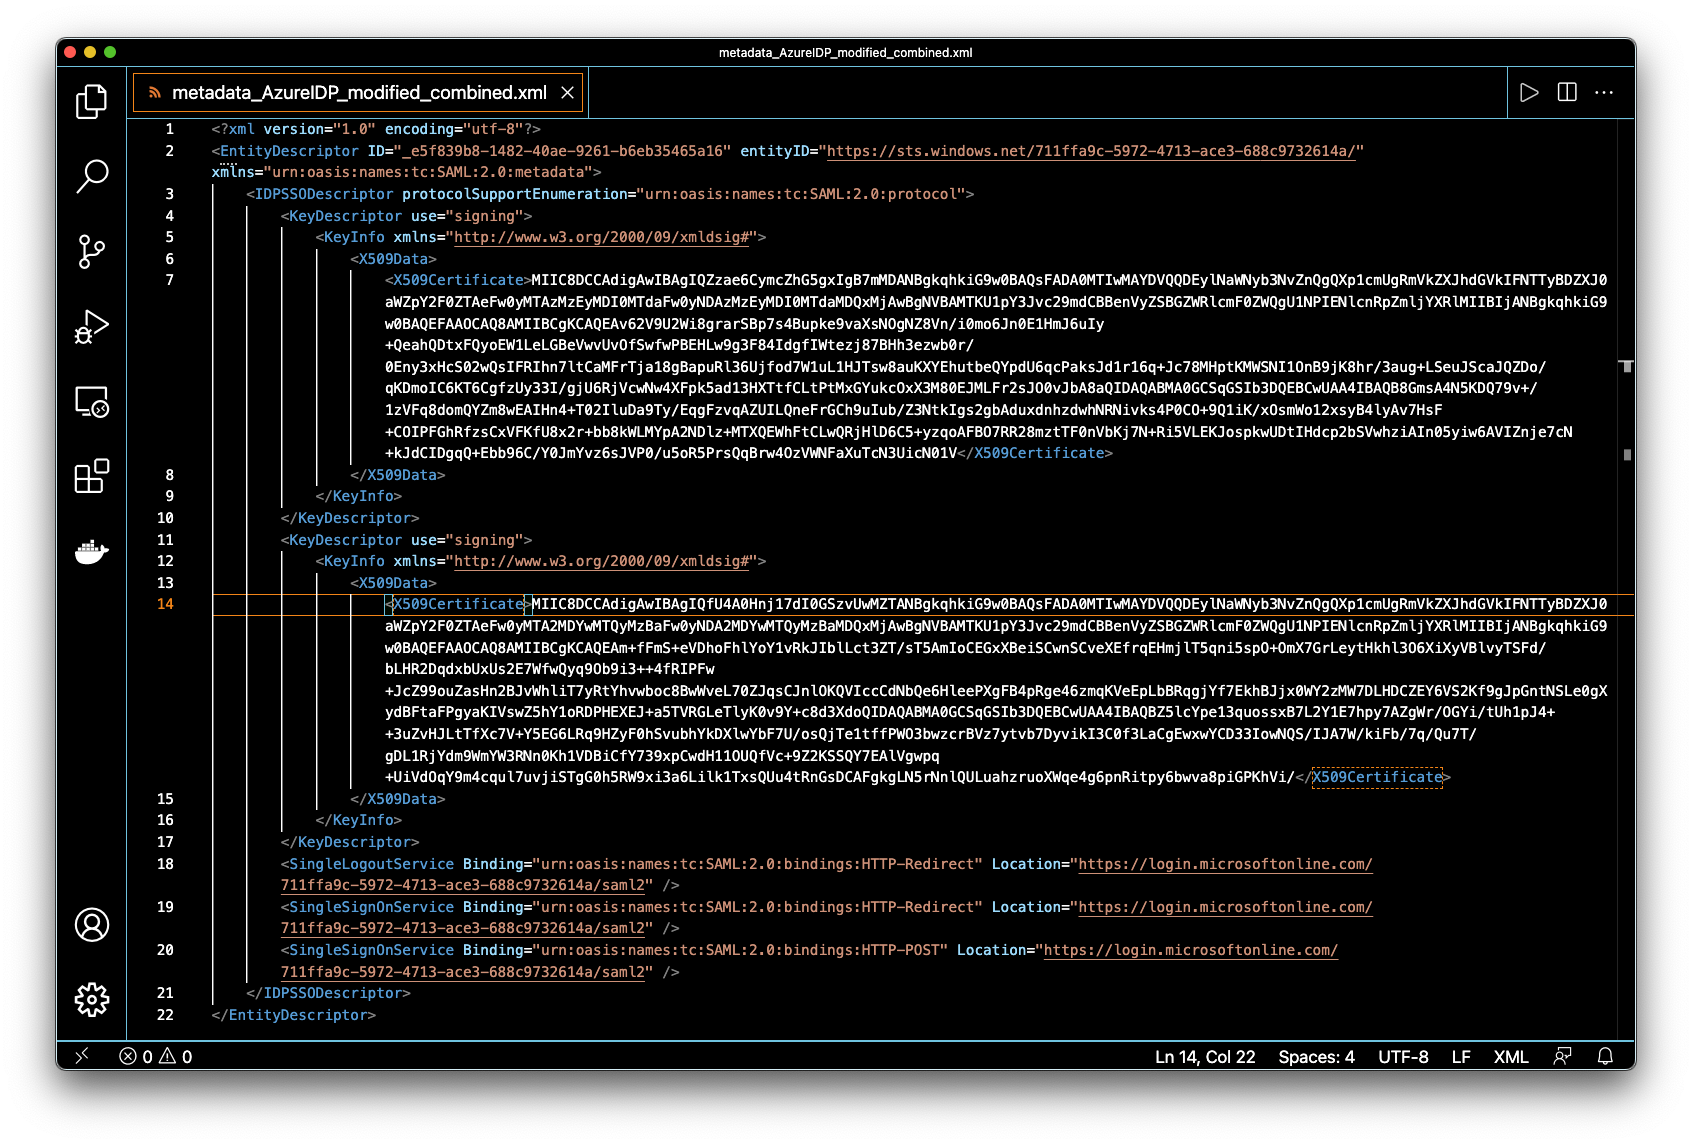 To
implement the solution, copy the KeyDescriptor element and all its
children from one of the files into the other right below the existing
KeyDescriptor element, then save the file under yet another name,
To
implement the solution, copy the KeyDescriptor element and all its
children from one of the files into the other right below the existing
KeyDescriptor element, then save the file under yet another name,
metadata_AzureIDP_modified_combined.xml, to preserve all the
individual steps.
7. Create remote IDP in ForgeRock Identity Cloud by importing Azure metadata
You are now switching context back to Identity Cloud. To begin, login to your tenant admin UI.
![]() Read the instructions for this step carefully, if you plan on running
the SP-initiated integrated mode flow from
Part
I and the IDP-initiated standalone flow described in this part in
parallel. Delete the remote IDP you created in
Part
I. You will then re-create it using the combined metadata file from
step 6.
Read the instructions for this step carefully, if you plan on running
the SP-initiated integrated mode flow from
Part
I and the IDP-initiated standalone flow described in this part in
parallel. Delete the remote IDP you created in
Part
I. You will then re-create it using the combined metadata file from
step 6.
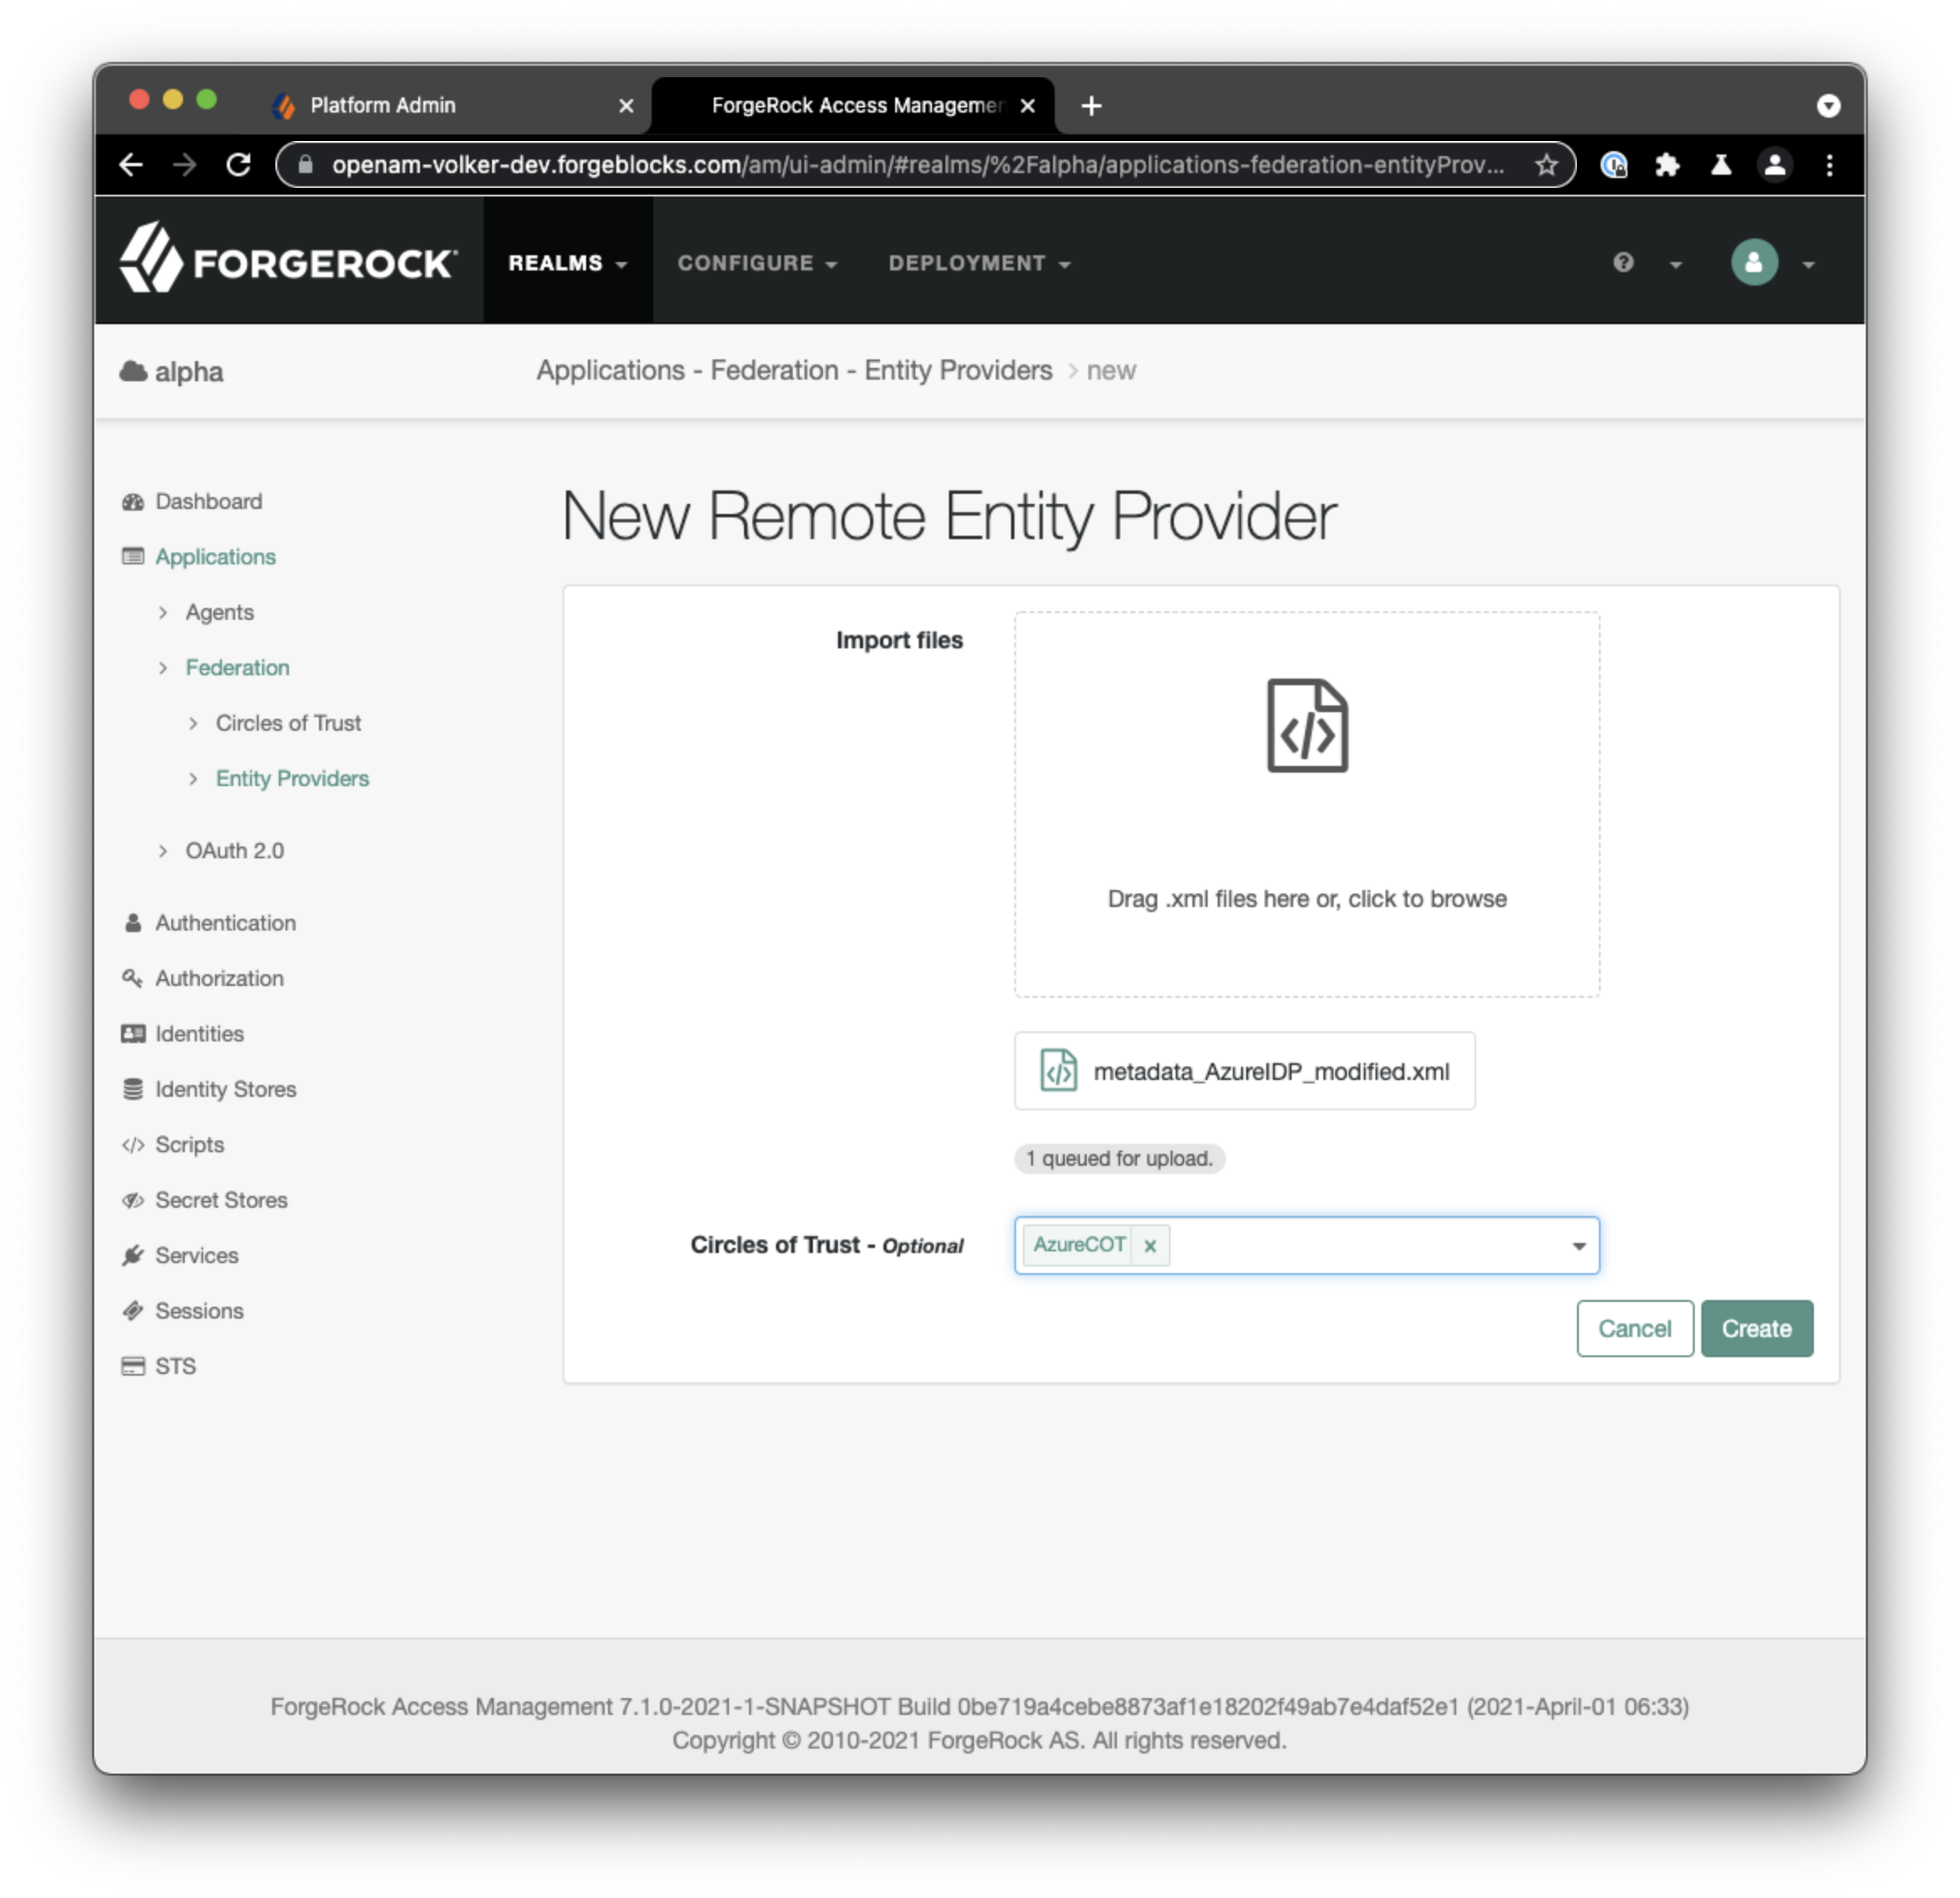 From
the native access management console’s left-hand navigation menu select
Applications > Federation > Entity Providers > Add Entity
Provider > Remote. Select to import the modified Azure metadata file
(
From
the native access management console’s left-hand navigation menu select
Applications > Federation > Entity Providers > Add Entity
Provider > Remote. Select to import the modified Azure metadata file
(metadata_AzureIDP2_modified.xml`if you did not complete
Part
I and `metadata_AzureIDP2_modified_combined.xml`if you did complete
Part
I and want to run both flows in parallel) and select the circle of
trust you created in step 1,
e.g. `AzureCOT. Then select Create.
Run Through IDP-Initiated Flow (Standalone Mode)
Now it’s time again to test the configuration. To do that, login to the Azure My Apps portal at https://myapplications.microsoft.com/ as a user you have granted access to the new enterprise application you created. Click the application icon and let the flow take you on the login journey.
Watch the full flow without any distractions in the video below and compare it to the SP-initiated (integrated mode) flow.
Epilogue
We have explored a straight-forward and classic integration using a pure SAML 2.0 IDP-initiated flow without any bells and whistles. If Azure is your IDP and you have no special requirements on the SP-side, this flow can be a fit.
For more control and enhanced user experiences through additional adaptive and contextual behavior, consider the SP-initiated flow (integrated mode) we explored in Part I.
Other Articles by This Author
![]() Part
1: Integrating Azure with ForgeRock Identity Cloud Using SAML2
[.badge-category__name#Integrations#]
Part
1: Integrating Azure with ForgeRock Identity Cloud Using SAML2
[.badge-category__name#Integrations#]
Originally posted on Mr. Anderson’s Musings Two video demonstrations are included at the end of this article to help guide you through testing the instructions and fine-tuning the login journey. Overview Security infrastructure teams seek to integrate various applications and vendor ecosystems to create a holistic experience for the user base they serve. [image] Figure 1: Most organizations leverage multiple ecosystems Microsoft Azure is one of the most commonly used of these ecosystems. M…
![]() Azure Pass-Through
Authentication
[.badge-category__name#Integrations#]
Azure Pass-Through
Authentication
[.badge-category__name#Integrations#]
Originally posted on Mr. Anderson’s Musings. A video demonstration is included at the end of this article to help guide you through testing the instructions for logging in to Identity Cloud using Azure AD credentials. Overview The term pass-through authentication refers to an identity provider (IDP) delegating authentication to another system, which holds and validates the credentials. Pass-through authentication is often a temporary measure with a specific purpose. However, sometimes it i…
Originally posted on Mr. Anderson’s Musings A New World A new world of possibilities was born with the introduction of authentication trees in ForgeRock’s Access Management (AM). Limiting login sequences of the past were replaced with flexible, adaptive, and contextual authentication journeys. ForgeRock chose the term Intelligent Authentication to capture this new set of capabilities. Besides offering a shiny new browser-based design tool to visually create and maintain authentication trees, …